樹莓派(Raspberry Pi)提供了40個Pin角,可以整合其他的硬體裝置作特別的應用
當然也可以接上步進馬達並驅動它,這篇文章會說明怎麼透過C#的程式,驅動步進馬達
要讓樹莓派可以執行C#,必須先在樹莓派上安裝Windows 10 IoT Core的版本
安裝的方式請先連上https://developer.microsoft.com/en-us/windows/iot/downloads,然後下載[Windows IoT Core Dashboard]
安裝完成後,將Windows IoT Core的作業系統寫入至mini sd card卡中並放入樹莓派執行即可,這點就不在這裡贅述
當樹莓派的作業系統安裝完成後,就可以將手邊的步進馬達以及馬達控制版作一個連接的動作
先將步進馬達的電壓分別接到Pin2(5v)以及Pin6(GND)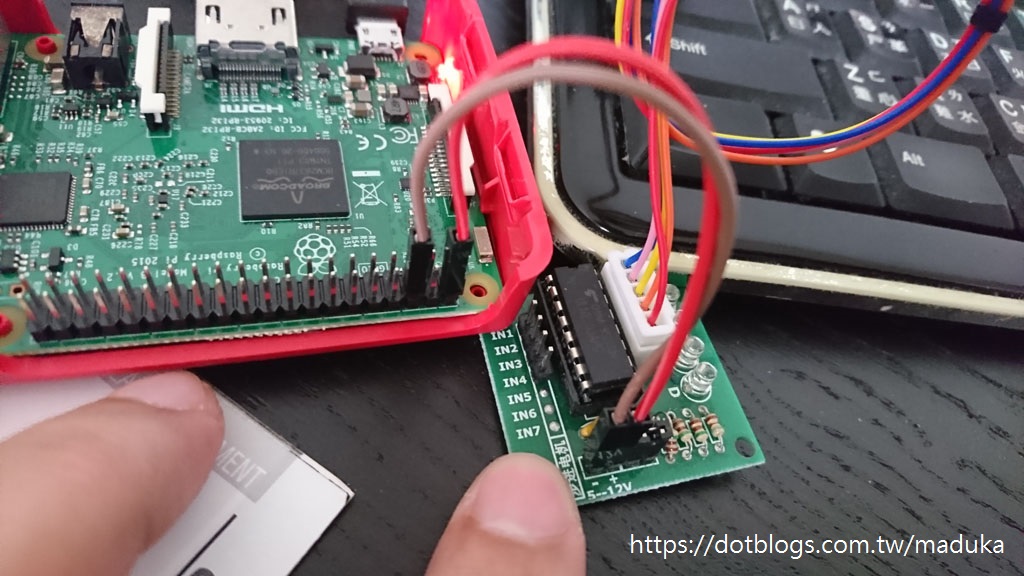
接著,將步進馬達的控制版上的Pin1~4,分別接到樹莓派的Pin29, Pin31, Pin33, Pin37,也就是GPIO的5,6,13,26這四個腳位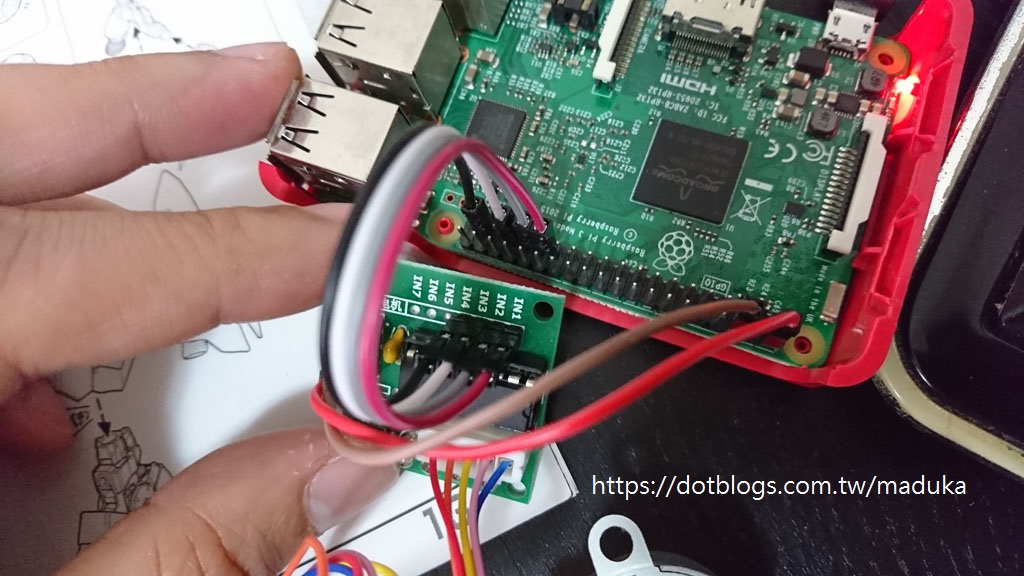
到這裡,硬體的處理已經完成,接下來就是撰寫程式碼進行馬達的驅動了
首先,打開Visual Studio,並建立一個新的專案,專案類型選擇[Windows 通用] ==> [空白應用程式]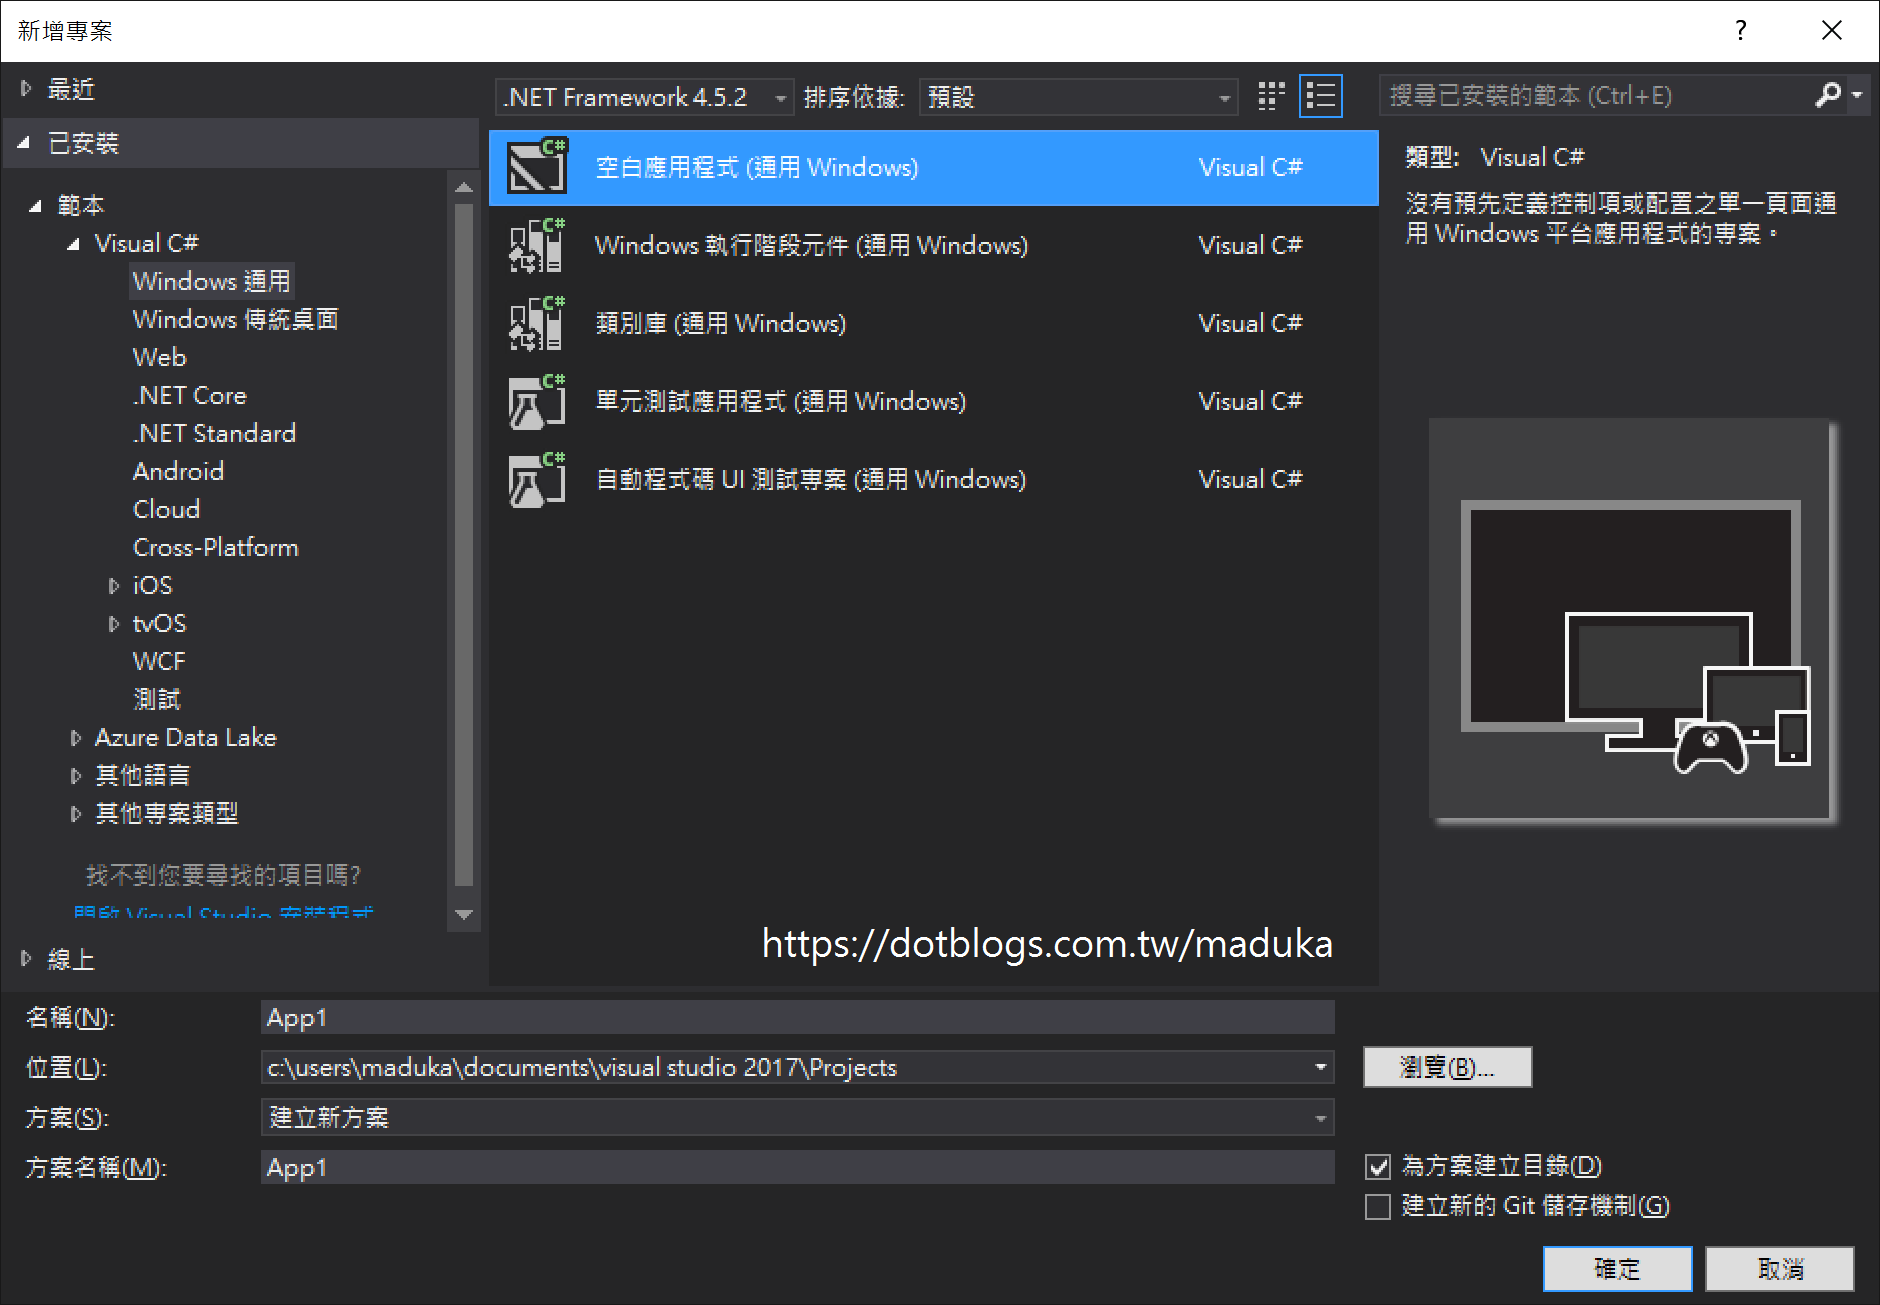
另外再建立一個新的類別庫,專案類型一樣是選擇[Windows 通用]==>[類別庫]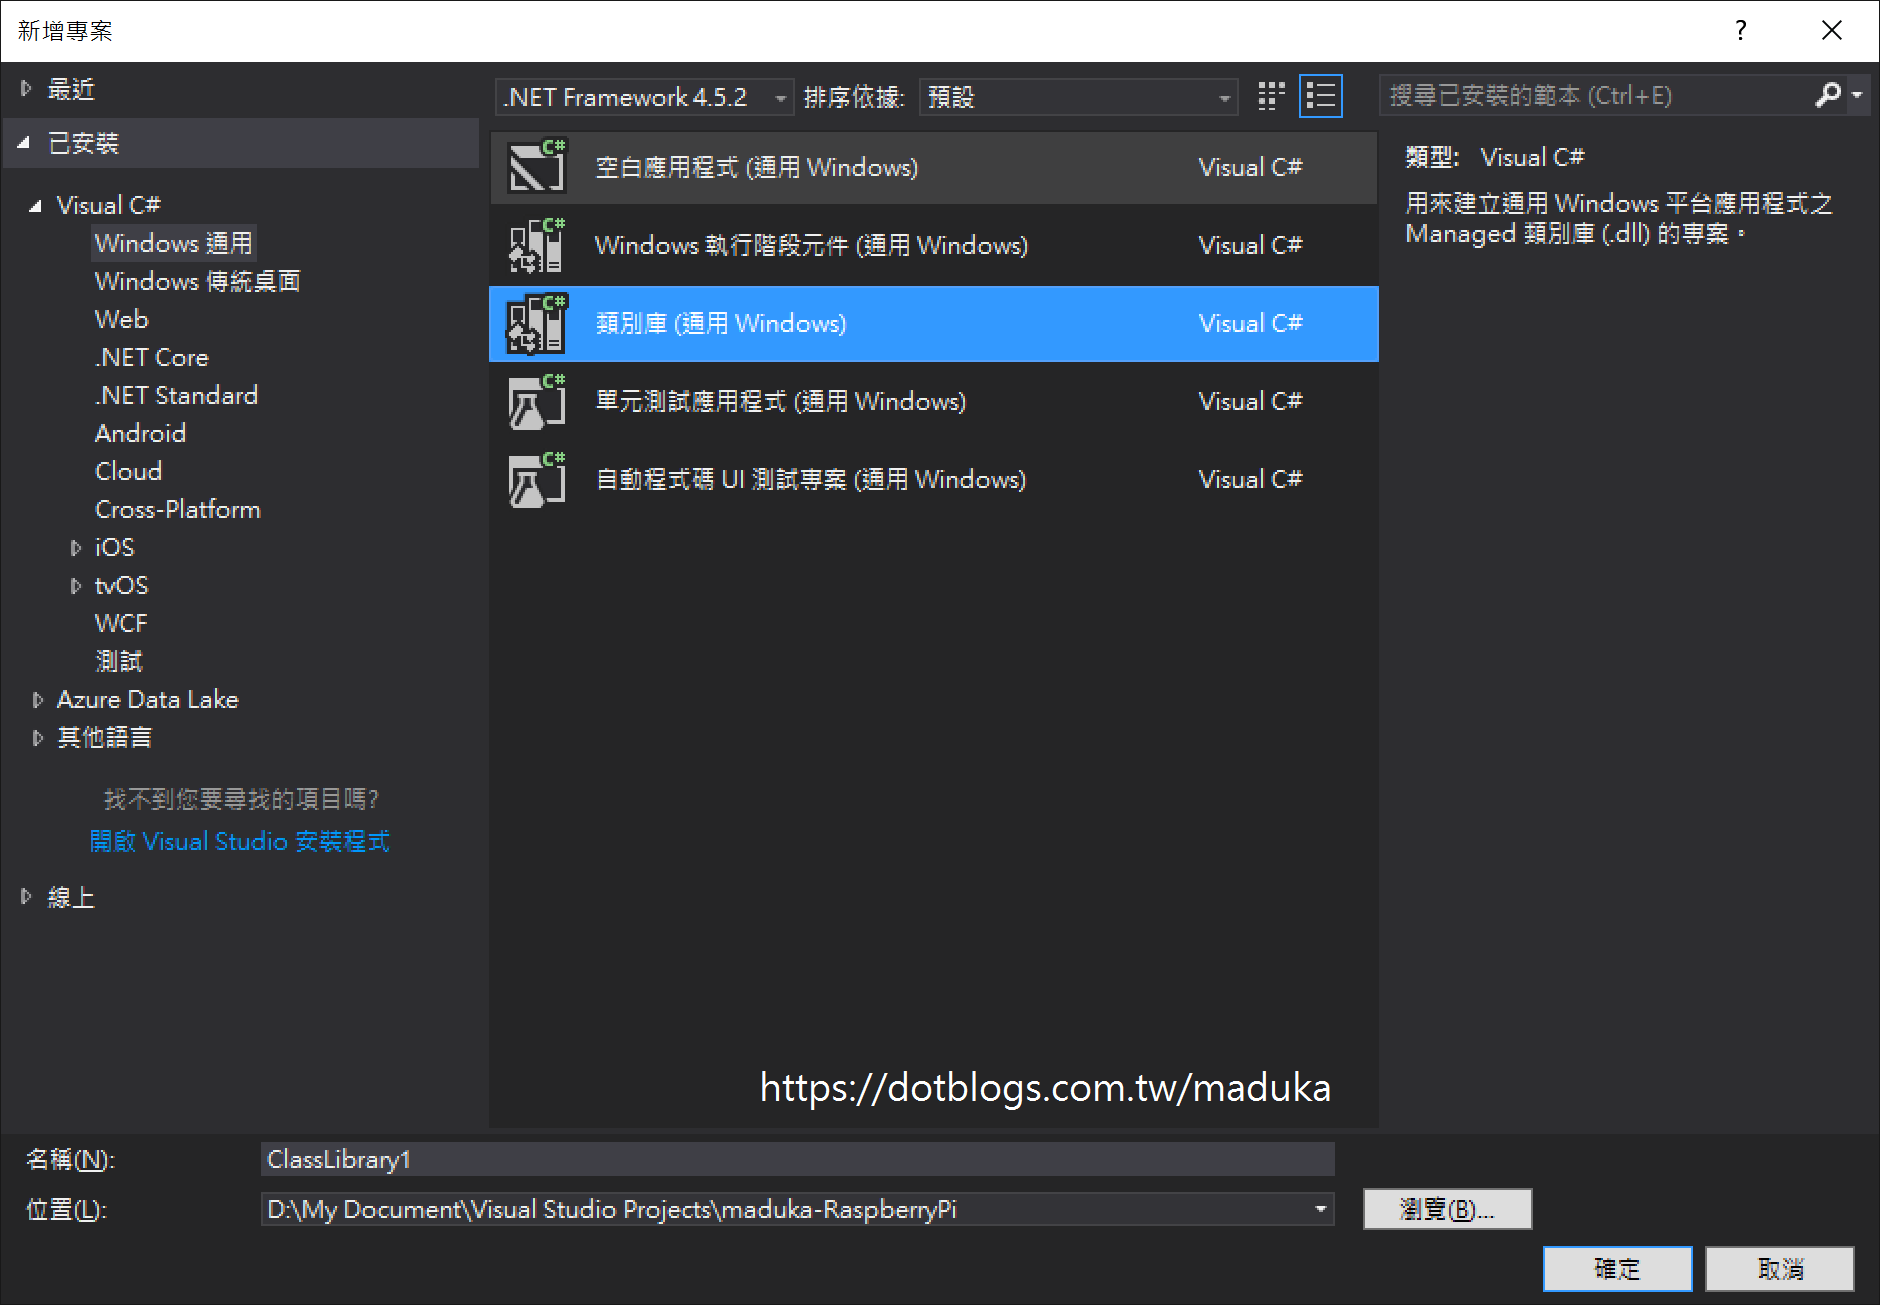
先在類別庫專案中,加入Enums.cs的類別庫,並將下面程式放入該類別庫中
public class Enums
{
    public enum DrivingMethod
    {
        WaveDrive,
        FullStep,
        HalfStep,
    }

    public enum TurnDirection
    {
        Left,
        Right
    }
}
這個列舉型別定義了兩個項目的內容,分別是轉動的步伐大小以及轉動的方向(順時鐘或是逆時鐘)
接著,建立一個Const.cs的類別庫,並將下面的內容放入該類別庫中
public static class Consts
{
    public static readonly GpioPinValue[][] ConstWaveDriveSequence =
    {
        new[] {GpioPinValue.High, GpioPinValue.Low, GpioPinValue.Low, GpioPinValue.Low},
        new[] {GpioPinValue.Low, GpioPinValue.High, GpioPinValue.Low, GpioPinValue.Low},
        new[] {GpioPinValue.Low, GpioPinValue.Low, GpioPinValue.High, GpioPinValue.Low},
        new[] {GpioPinValue.Low, GpioPinValue.Low, GpioPinValue.Low, GpioPinValue.High}
    };

    public static readonly GpioPinValue[][] ConstFullStepSequence =
    {
        new[] {GpioPinValue.High, GpioPinValue.Low, GpioPinValue.Low, GpioPinValue.High},
        new[] {GpioPinValue.High, GpioPinValue.High, GpioPinValue.Low, GpioPinValue.Low},
        new[] {GpioPinValue.Low, GpioPinValue.High, GpioPinValue.High, GpioPinValue.Low},
        new[] {GpioPinValue.Low, GpioPinValue.Low, GpioPinValue.High, GpioPinValue.High }

    };

    public static readonly GpioPinValue[][] ConstHaveStepSequence =
    {
        new[] {GpioPinValue.High, GpioPinValue.High, GpioPinValue.Low, GpioPinValue.Low, GpioPinValue.Low, GpioPinValue.Low, GpioPinValue.Low, GpioPinValue.High},
        new[] {GpioPinValue.Low, GpioPinValue.High, GpioPinValue.High, GpioPinValue.High, GpioPinValue.Low, GpioPinValue.Low, GpioPinValue.Low, GpioPinValue.Low},
        new[] {GpioPinValue.Low, GpioPinValue.Low, GpioPinValue.Low, GpioPinValue.High, GpioPinValue.High, GpioPinValue.High, GpioPinValue.Low, GpioPinValue.Low},
        new[] {GpioPinValue.Low, GpioPinValue.Low, GpioPinValue.Low, GpioPinValue.Low, GpioPinValue.Low, GpioPinValue.High, GpioPinValue.High, GpioPinValue.High }
    };
}
這一段內容主要是在定義轉動的步伐,以及對應的電磁鐵轉動的規則,透過電磁鐵變動的方式,讓步進馬達進行驅動的動作
接著在類別庫專案中,加入一個StepMotor.cs的類別庫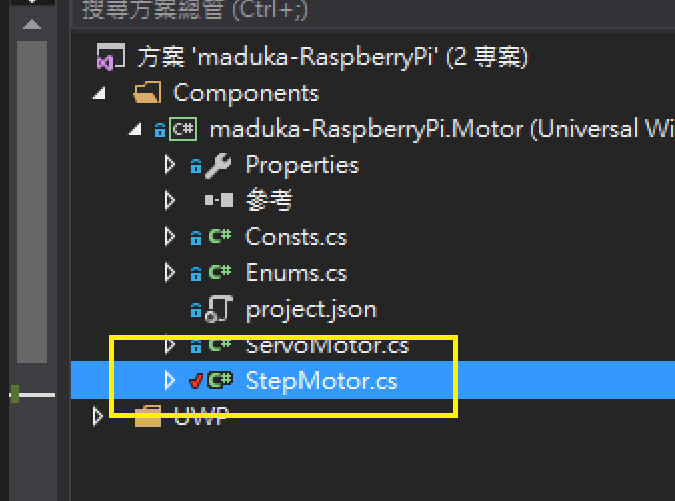
將下面的程式放入至該類別庫檔案之中
using Windows.Devices.Gpio;
using static maduka_RaspberryPi.Motor.Enums;
using static maduka_RaspberryPi.Motor.Consts;

public class StepMotor
{
    public int? Sleep { get; set; }

    private readonly GpioPin[] _gpioPins = new GpioPin[4];

    public StepMotor(int blueWireToGpio, int pinkWireToGpio, int yellowWireToGpio, int orangeWireToGpio)
    {
        var gpio = GpioController.GetDefault();

        _gpioPins[0] = gpio.OpenPin(blueWireToGpio);
        _gpioPins[1] = gpio.OpenPin(pinkWireToGpio);
        _gpioPins[2] = gpio.OpenPin(yellowWireToGpio);
        _gpioPins[3] = gpio.OpenPin(orangeWireToGpio);

        foreach (var gpioPin in _gpioPins)
        {
            gpioPin.Write(GpioPinValue.Low);
            gpioPin.SetDriveMode(GpioPinDriveMode.Output);
        }
    }

    public async Task TurnAsync(int degree, TurnDirection direction, DrivingMethod drivingMethod = DrivingMethod.FullStep)
    {
        if (this.Sleep == null)
            this.Sleep = 15;

        var steps = 0;
        GpioPinValue[][] methodSequence;
        switch (drivingMethod)
        {
            case DrivingMethod.WaveDrive:
                methodSequence = ConstWaveDriveSequence;
                steps = (int)Math.Ceiling(degree / 0.1767478397486253);
                break;
            case DrivingMethod.FullStep:
                methodSequence = ConstFullStepSequence;
                steps = (int)Math.Ceiling(degree / 0.1767478397486253);
                break;
            case DrivingMethod.HalfStep:
                methodSequence = ConstHaveStepSequence;
                steps = (int)Math.Ceiling(degree / 0.0883739198743126);
                break;
            default:
                throw new ArgumentOutOfRangeException(nameof(drivingMethod), drivingMethod, null);
        }

        var counter = 0;
        while (counter < steps)
        {
            for (var j = 0; j < methodSequence[0].Length; j++)
            {
                for (var i = 0; i < 4; i++)
                    _gpioPins[i].Write(methodSequence[direction == TurnDirection.Left ? i : 3 - i][j]);

                await Task.Delay((int)this.Sleep);
                counter++;
                if (counter == steps)
                    break;
            }
        }

        Stop();
    }

    public void Stop()
    {
        foreach (var gpioPin in _gpioPins)
        {
            gpioPin.Write(GpioPinValue.Low);
        }
    }

    public void Dispose()
    {
        foreach (var gpioPin in _gpioPins)
        {
            gpioPin.Write(GpioPinValue.Low);
            gpioPin.Dispose();
        }
    }
}
這段是讓步進馬達轉動的主程式,在初始化這個類別的時候,傳入用來作為驅動步進馬達用的四個Gpio Pin編號,接著當呼叫TurnAsync方法的時候,同時傳入要轉動的角度、方向以及步伐,讓馬達進行轉動的動作
接著在UWP的專案中,將下面的內容加入至MainPage.xaml中
<TextBlock x:Name="txtStepMotor" HorizontalAlignment="Left" Margin="3,96,0,0" TextWrapping="Wrap" Text="StepMotor" VerticalAlignment="Top"/>
<Button x:Name="btnReverseStep" Content="Reverse" HorizontalAlignment="Left" Margin="136,94,0,0" VerticalAlignment="Top" Click="btnReverseStep_Click"/>
<Button x:Name="btnFowardStep" Content="Foward" HorizontalAlignment="Left" Margin="281,94,0,0" VerticalAlignment="Top" Click="btnFowardStep_Click"/>
<Button x:Name="btnStopStep" Content="Stop" HorizontalAlignment="Left" Margin="210,131,0,0" VerticalAlignment="Top" Width="64" Click="btnStopStep_Click"/>
<TextBox x:Name="txtAngleStep" HorizontalAlignment="Left" Margin="210,94,0,0" TextWrapping="Wrap" Text="90" VerticalAlignment="Top" Width="66"/>
這段內容主要是為了定義畫面上的幾個按鈕,分別是順時鐘、逆時鐘旋轉以及停止的按鈕,還有一個旋轉角度的文字輸入方塊,得到的畫面結果會是這樣
接著,將下面的程式,放入至MainPage.xaml.cs之中
using maduka_RaspberryPi.Motor;

/// <summary>
/// 可以在本身使用或巡覽至框架內的空白頁面。
/// </summary>
public sealed partial class MainPage : Page
{
    GpioController objGpioController = GpioController.GetDefault();
    StepMotor objMotor = null;

    public MainPage()
    {
        this.InitializeComponent();
        objMotor = new StepMotor(5, 6, 13, 26) { Sleep = 15, };
    }

    private async void btnReverseStep_Click(object sender, RoutedEventArgs e)
    {
        await objMotor.TurnAsync(int.Parse(txtAngleStep.Text), Enums.TurnDirection.Right, Enums.DrivingMethod.WaveDrive);
    }

    private async void btnFowardStep_Click(object sender, RoutedEventArgs e)
    {
        await objMotor.TurnAsync(int.Parse(txtAngleStep.Text), Enums.TurnDirection.Left, Enums.DrivingMethod.FullStep);
    }

    private void btnStopStep_Click(object sender, RoutedEventArgs e)
    {
        objMotor.Stop();
    }
}
主程式的內容就是當頁面載入時,同時初始化步進馬達的類別,並傳入(5,6,13,26)這四個Pin腳,作為控制版的四個輸入腳位,然後設定每15毫秒電磁力的相位會變更一次,讓馬達作轉動
而當按下Button的動作,就是呼叫TurnAsync的方法,傳入轉動的角度,方向以及步伐,讓馬達轉動
接著把寫好的程式,透過遠端電腦的佈署方式放到樹莓派中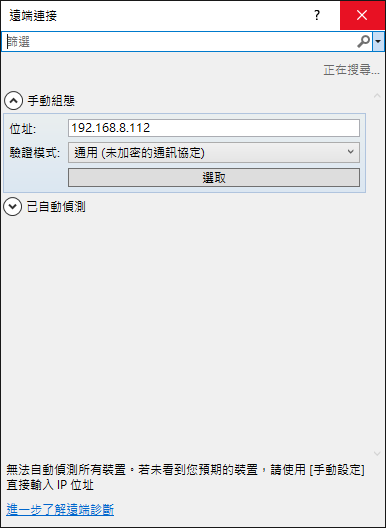
透過遠端網頁連線的方式,可以看到這個UWP已經被安裝到樹莓派上了,點選左方的箭頭,啟動這個應用程式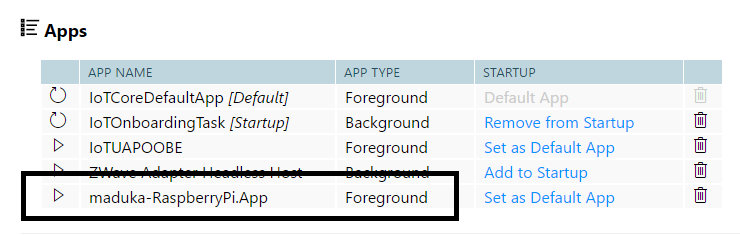
從遠端桌面的方式,可以看到樹莓派的畫面,這個UWP已經被啟動了,這時只要按下[Reverse]以及[Foward]兩個按鈕,就可以讓步進馬達旋轉了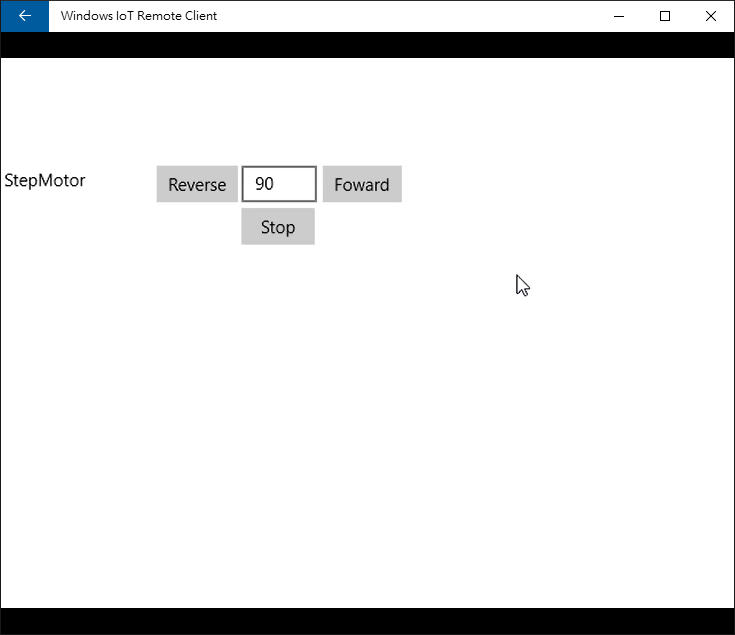
執行結果影片
參考資料
步進馬達的介紹
RASPBERRY PI 筆記(十二):控制步進馬達
樹莓派RASPBERRY PI控制步進馬達
Using stepper motor in Windows 10 IoT Core
Stepper motor from Windows 10 IoT core
https://github.com/erickbp/IoT/blob/master/Stepper%20Motor/Stepper%20Motor/Uln2003Driver.cs