[Windows Phone 8]基礎課程---Grid(網格版面配置)全攻略
前言
---------------------------------------------------------------------------------------------
昨天有幸到別的學校分享了Windows Phone 8的介面與開發技巧,
突然覺得基礎版面的介紹可以讓大家更清楚整個APP的架構,
其實我覺得Grid在Windows Phone 8裡面,
就像一座房子的骨架一樣,或者是說Grid就是一個表格
所以來跟大家分享一下,讓大家可以多認識Windows Phone 8的基礎開發喔!
背景知識
--------------------------------------------------------------------------------------------
Grid的Row(行)與Column(列)
Grid提供兩個屬性集合 : RowDefinitions(行集合)
ColumnDefinitions(列集合)
EG:
RowDefinitions中包含多個RowDefinition對象
每一個RowDefinition代表一行,如果有3個RowDefinition,則表示Grid中有3行。
Grid的行高、列寬與表示方法---3種
(1.) Auto (自動計算)
<RowDefinition Height="Auto"/>
大小是由內容物件的大小屬性決定。
(2.) Pixel (固定值)
<RowDefinition Height="100"/>
此值是以像素表示。
(3.) Star (按比例分配)
<RowDefinition Height="*"/>
此值是以可用空間的加權比例表示
Grid的單元格內定位方式---5種
(1.) Margin
在Xaml裡面的順序為 左、上、右、下
EG:
Margin = “10,20,30,40”//表示 左邊間距10,上面間距20,右邊間距30,下面間距40
Margin = “10,30” //表示左、右邊間距為10,上、下間距為30
Margin = “10” //表示上、下、左、右的間距為10
(2.) HorizontalAlignment (水平位置對齊)
Left : 與父容器的左側對齊
Center : 與父容器水平置中對齊
Right : 與父容器的右側對齊
Stretch : 水平方向延伸,填滿整個容器
(3.) VerticalAlignment (垂直位置對齊)
Top : 與頂端對齊
Center : 在容器垂直置中對齊
Bottom : 與底部對齊
Stretch : 水平方向延伸,填滿整個容器
(4.) Height (元素的高度)
Double類型 EG: 123.456 (也可以輸入123)
(5.) Width (元素的寬度)
Double類型 EG: 465.321 (也可以輸入456)
實作
-------------------------------------------------------------------------------------------
1.先開啟一個新的Windows Phone 8專案
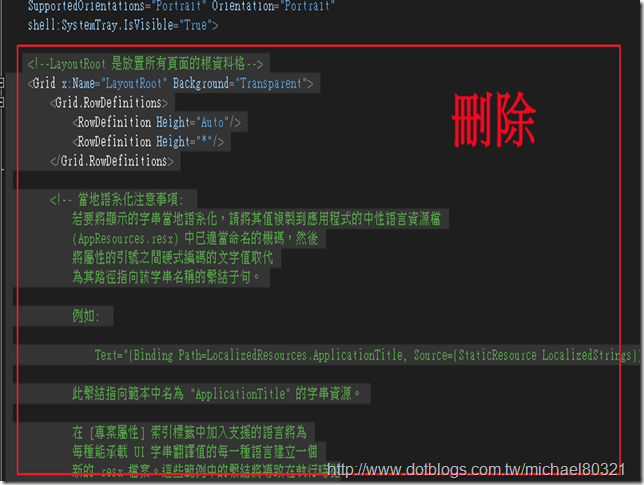
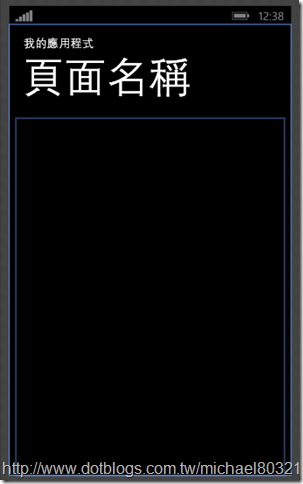
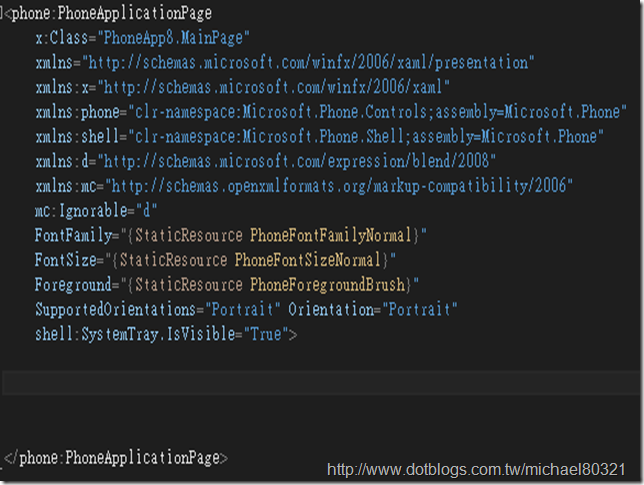
2.把預設的Grid全部刪除,剩下空頁面
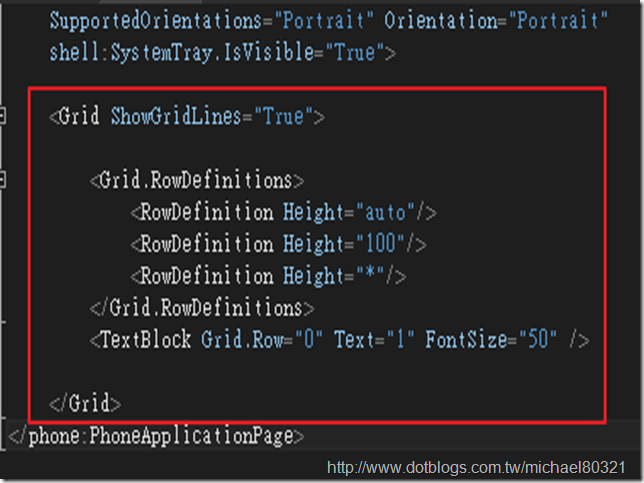
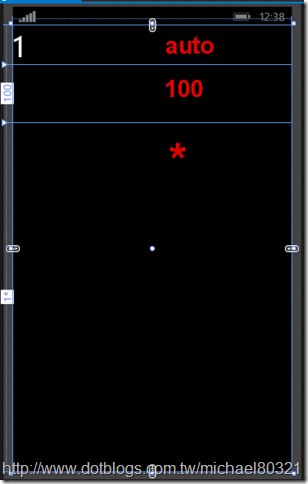
3.我們給這個空白頁面一個Grid,並且依序指定行高給它,為了讓使用者看到劃分線,
所以加上 ShowGridLines="True" ,由於auto裡面必須要有東西,不然會顯示不出來,所以
加上一個TextBlock並給它一個值為數字1, 列 的表示法與 行 類似
EG:
<Grid.ColumnDefinitions>
<ColumnDefinition Width="auto"/>
</Grid.ColumnDefinitions>
<Grid ShowGridLines="True">

        <Grid.RowDefinitions>
            <RowDefinition Height="auto"/>
            <RowDefinition Height="100"/>
            <RowDefinition Height="*"/>
        </Grid.RowDefinitions>
        <TextBlock Grid.Row="0" Text="1" FontSize="50" />

    </Grid>
4. Margin的不同
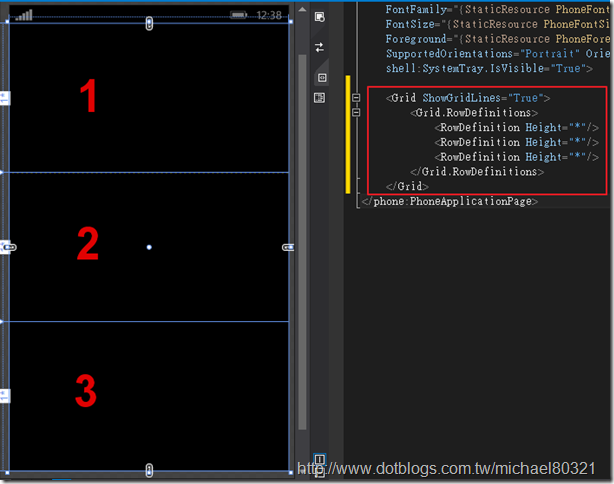
這時我們把剛剛的布局修改一下,分成3行
 <Grid ShowGridLines="True">
        <Grid.RowDefinitions>
            <RowDefinition Height="*"/>
            <RowDefinition Height="*"/>
            <RowDefinition Height="*"/>
        </Grid.RowDefinitions>
    </Grid>
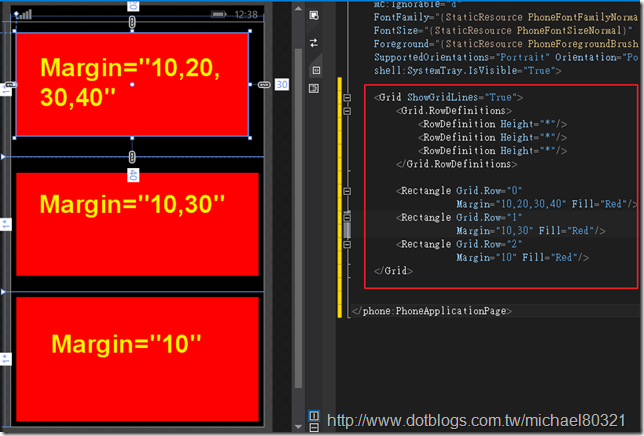
5. 再來我們各放入一個Retangle並且分別把範例依序放入1、2、3行內
指定元素在哪一行使用Grid.Row="0" 、Grid.Row="1" 、Grid.Row="2"表示
Margin = “10,20,30,40”//表示 左邊間距10,上面間距20,右邊間距30,下面間距40
Margin = “10,30” //表示左、右邊間距為10,上、下間距為30
Margin = “10” //表示上、下、左、右的間距為10
<Grid ShowGridLines="True">
        <Grid.RowDefinitions>
            <RowDefinition Height="*"/>
            <RowDefinition Height="*"/>
            <RowDefinition Height="*"/>
        </Grid.RowDefinitions>

        <Rectangle Grid.Row="0"
                   Margin="10,20,30,40" Fill="Red"/>
        <Rectangle Grid.Row="1"
                   Margin="10,30" Fill="Red"/>
        <Rectangle Grid.Row="2"
                   Margin="10" Fill="Red"/>
    </Grid>
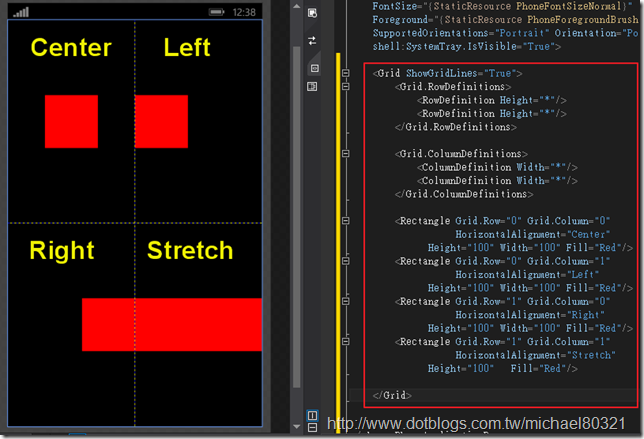
6.再來是 HorizontalAlignment (水平位置對齊)
一樣先把程式碼更改一下,就可以看出不一樣的地方了喔!
Left : 與父容器的左側對齊
Center : 與父容器水平置中對齊
Right : 與父容器的右側對齊
Stretch : 水平方向延伸,填滿整個容器
先設定Grid分成4等分,然後每個父容器裡面放一個Retangle並附加屬性給它
這邊也順便把 "Height" 和 "Width" 的值帶進去
這時大家會發現Stretch那邊只有設定一個Height的值,這是因為預設的值就是Stretch,
設定Height是讓大家能夠看出來
<Grid ShowGridLines="True">
        <Grid.RowDefinitions>
            <RowDefinition Height="*"/>
            <RowDefinition Height="*"/>
        </Grid.RowDefinitions>

        <Grid.ColumnDefinitions>
            <ColumnDefinition Width="*"/>
            <ColumnDefinition Width="*"/>
        </Grid.ColumnDefinitions>

        <Rectangle Grid.Row="0" Grid.Column="0"
                   HorizontalAlignment="Center"
              Height="100" Width="100" Fill="Red"/>
        <Rectangle Grid.Row="0" Grid.Column="1"
                   HorizontalAlignment="Left"
              Height="100" Width="100" Fill="Red"/>
        <Rectangle Grid.Row="1" Grid.Column="0"
                   HorizontalAlignment="Right"
              Height="100" Width="100" Fill="Red"/>
        <Rectangle Grid.Row="1" Grid.Column="1"
                   HorizontalAlignment="Stretch"
              Height="100"   Fill="Red"/>

    </Grid>
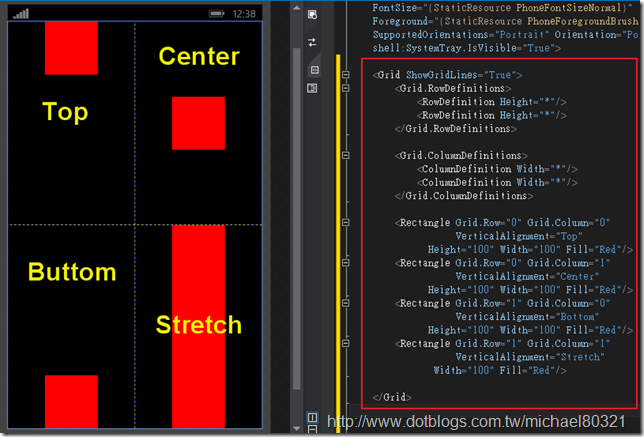
7. VerticalAlignment (垂直位置對齊)
一樣先把程式碼更改一下,就可以看出不一樣的地方了喔!
Top : 與頂端對齊
Center : 在容器垂直置中對齊
Bottom : 與底部對齊
Stretch : 水平方向延伸,填滿整個容器
這邊的VerticalAlignment的Stretch也是預設值
<Grid ShowGridLines="True">
        <Grid.RowDefinitions>
            <RowDefinition Height="*"/>
            <RowDefinition Height="*"/>
        </Grid.RowDefinitions>

        <Grid.ColumnDefinitions>
            <ColumnDefinition Width="*"/>
            <ColumnDefinition Width="*"/>
        </Grid.ColumnDefinitions>

        <Rectangle Grid.Row="0" Grid.Column="0"
                   VerticalAlignment="Top"
              Height="100" Width="100" Fill="Red"/>
        <Rectangle Grid.Row="0" Grid.Column="1"
                   VerticalAlignment="Center"
              Height="100" Width="100" Fill="Red"/>
        <Rectangle Grid.Row="1" Grid.Column="0"
                   VerticalAlignment="Bottom"
              Height="100" Width="100" Fill="Red"/>
        <Rectangle Grid.Row="1" Grid.Column="1"
                   VerticalAlignment="Stretch"
               Width="100" Fill="Red"/>

    </Grid>
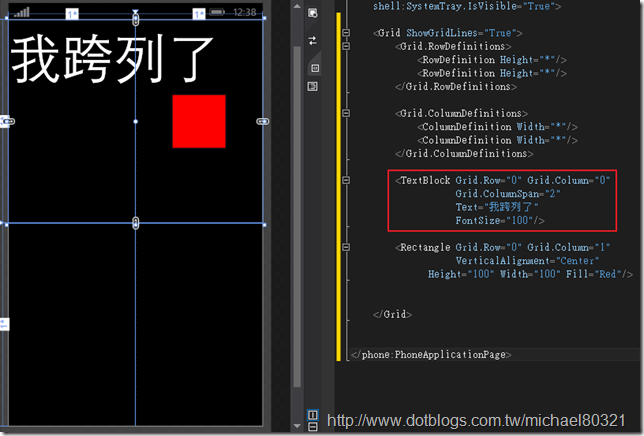
補充:
剛剛在輸入Grid.Row 和 Grid.Column時一定會看到兩個選項,
就是 RowSpan 和 ColumnSpan 那麼他們是甚麼呢?
這邊示範的是跨列,由圖中可以知道 RowSpan 和 ColumnSpan 預設值都是 1,
不是 0 ,所以要跨列或行的話就要從 2 開始!
<Grid ShowGridLines="True">

         <Grid.RowDefinitions>
        <RowDefinition Height="*"/>
        <RowDefinition Height="*"/>
        </Grid.RowDefinitions>

        <Grid.ColumnDefinitions>
            <ColumnDefinition Width="*"/>
            <ColumnDefinition Width="*"/>
        </Grid.ColumnDefinitions>

        <TextBlock Grid.Row="0" Grid.Column="0"
                  Grid.ColumnSpan="2"
                  Text="我跨列了"
                  FontSize="100"/>

        <Rectangle Grid.Row="0" Grid.Column="1"
                  VerticalAlignment="Center"
           Height="100" Width="100"  Fill="Red"/>
    </Grid>
結語
--------------------------------------------------------------------------------------------------------
Grid的布局還滿重要的,對於剛入門的初學者一定要熟悉它,這對APP設計很有幫助喔!
希望對大家有幫助^_^
如有錯誤請不吝指教,謝謝 :)
參考資料
--------------------------------------------------------------------------------------------------------
Layout for Windows Phone –MSDN
微軟最有價值專家 Bill叔 PPT

