MVC ModelBinding List 方式
通常從view傳過來的資料,常常會有需要傳一整個List的需求,
以下將介紹,怎麼從view傳List到controller的說明
這邊要講道模型繫結,那模型繫結共分成兩個,簡單模型繫結 與 複雜模型繫結
簡單模型繫結:主要針對單一屬性來使用,例如List<int>, List<string> 等等….
複雜模型繫結:主要針對POCO物件來使用,例如List<Student>, List<Member> 等等….
簡單模型繫結:
現在我們的Index,需要接收到List<int> ProductId 的值
1: [HttpPost]
2: public ActionResult Index(List<int> ProductId)
3: {
4: if (ProductId != null)
5: {
6: foreach (var item in ProductId)
7: {
8: Console.WriteLine(item);
9:
10: }
11: }
12:
13: return RedirectToAction("Index");
14: }
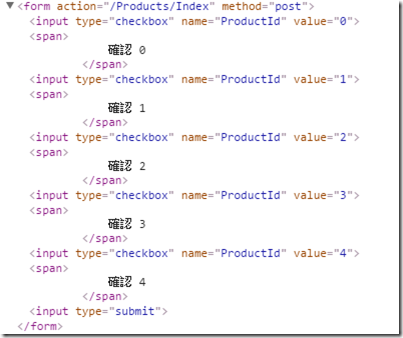
View就要建立某一組元件的name,是一樣的,這邊我們以checkbox為例
2: @using (Html.BeginForm()) {
3: for (int i = 0; i < 5; i++)
4: {
5: <input type="checkbox" name="ProductId" value="@i" />
6: <span>
7: 確認 @i
8: </span>
9: }
10: <input type="submit"/>
11: }
產生出來的結果
原始碼
以這種方式就能做到,簡單模型繫結的功能,是不是很簡單~
複雜模型繫結:
先看一下我們的ModelBinding Action要接收List<Student> students值
1: [HttpPost]
2: public ActionResult ModelBinding(List<Student> students)
3: {
4: foreach (var item in students)
5: {
6: Console.WriteLine(item.Name);
7: }
8:
9: return View();
10: }
11:
12: public class Student
13: {
14: public int Id { get; set; }
15: public string Name { get; set; }
16: }
要接收這樣的值,View就要經過一些設計,要讓欄位的name長這樣子
1: <input type="text" name="students[0].Id" />
所以我cshtml這樣設計
1: @model IEnumerable<Practice.Controllers.Student>
2:
3: @{
4: var students = Model.ToArray();
5: }
6:
7: @using (Html.BeginForm())
8: {
9: <table>
10: @for (int i = 0; i < students.Length; i++)
11: {
12: <tr>
13: <td>
14: <span>ID: @i</span>
15: @Html.EditorFor(modelItem => students[i].Id)
16: </td>
17: <td>
18: <span>Name: @i</span>
19: @Html.EditorFor(modelItem => students[i].Name)
20: </td>
21: </tr>
22: }
23: <tr>
24: <td><input type="submit" /></td>
25: </tr>
26:
27: </table>
28: }
原始碼
1: <form action="/Products/ModelBinding" method="post">
2: <table>
3: <tr>
4: <td>
5: <span>ID: 0</span>
6: <input class="text-box single-line" data-val="true" data-val-number="欄位 Id 必須是數字。"
7: data-val-required="Id 欄位是必要項。" id="students_0__Id"
8: name="students[0].Id" type="number" value="1" />
9: </td>
10: <td>
11: <span>Name: 0</span>
12: <input class="text-box single-line" id="students_0__Name"
13: name="students[0].Name" type="text" value="Kevin" />
14: </td>
15: </tr>
16: <tr>
17: <td>
18: <span>ID: 1</span>
19: <input class="text-box single-line" data-val="true" data-val-number="欄位 Id 必須是數字。"
20: data-val-required="Id 欄位是必要項。" id="students_1__Id" name="students[1].Id" type="number" value="2" />
21: </td>
22: <td>
23: <span>Name: 1</span>
24: <input class="text-box single-line" id="students_1__Name"
25: name="students[1].Name" type="text" value="Bob" />
26: </td>
27: </tr>
28: <tr>
29: <td><input type="submit" /></td>
30: </tr>
31:
32: </table>
33: </form>
知道這個用法,就可以很輕易完成批次更新的功能,使用起來真的很方便。
一天一分享,身體好健康。
該追究的不是過去的原因,而是現在的目的。

