本來是要在Google map 上,以公司的地點為圓心畫出半徑5公里的圓形,以方便計算運費。
想不到在Google map 上,只能畫直線。
因此只好透過API 來畫出同心圓
本篇會使用到 Google Cloud Platform 以及Maps JavaScript API
畫圓心的程式碼很簡單,但就是沒有辦法直接在一般的Google map上用
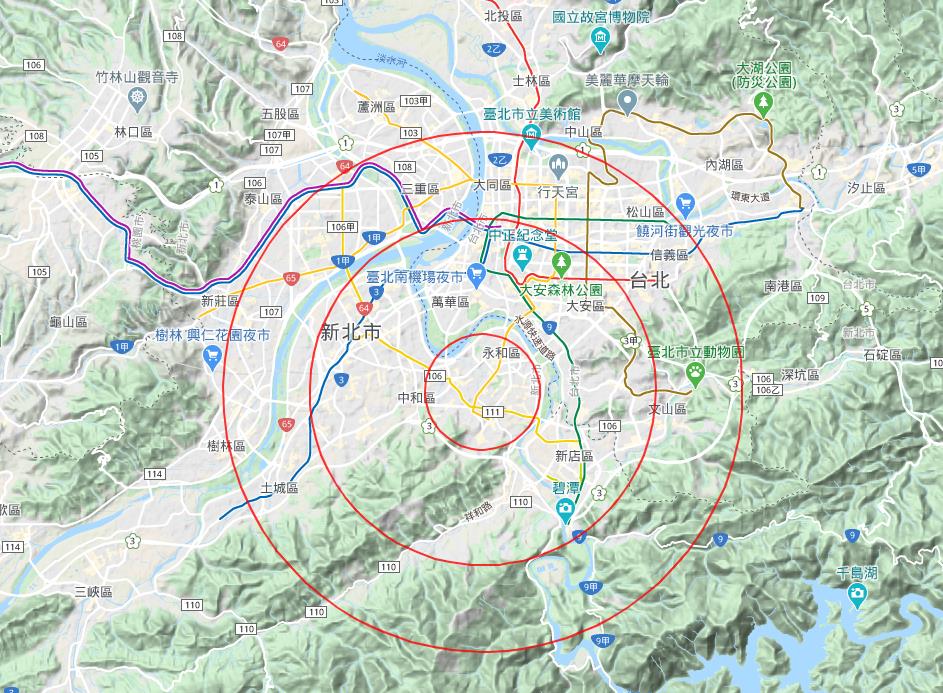
下面我會以我最終的完成圖來做說明
先看實際完成圖以及代碼部分。
<!DOCTYPE html>
<html>
<head>
    <meta name="viewport" content="initial-scale=1.0, user-scalable=no">
    <meta charset="utf-8">
    <title>Circles</title>
    <style>
        /* Always set the map height explicitly to define the size of the div
        * element that contains the map. */
        #map {
            height: 100%;
        }
        /* Optional: Makes the sample page fill the window. */
        html, body {
            height: 100%;
            margin: 0;
            padding: 0;
        }
    </style>
</head>
<body>
    <div id="map"></div>
    <script>
        // This example creates circles on the map, representing populations in North
        // America.

        // First, create an object containing LatLng and population for each city.
        var citymap = {
            km2: {
                center: { lat: 24.99817, lng: 121.508 },
                meter: 2000
            },
            km6: {
                center: { lat: 24.99817, lng: 121.508 },
                meter: 6000
            }, km9: {
                center: { lat: 24.99817, lng: 121.508 },
                meter: 9000
            },
        };

        function initMap() {
            // Create the map.
            var map = new google.maps.Map(document.getElementById('map'), {
                zoom: 12,
                center: { lat: 24.99817, lng: 121.508 },
                mapTypeId: 'terrain'
            });

            // Construct the circle for each value in citymap.
            // Note: We scale the area of the circle based on the population.
            for (var city in citymap) {
                // Add the circle for this city to the map.
                var cityCircle = new google.maps.Circle({
                    strokeColor: '#FF0000',
                    strokeOpacity: 0.8,
                    strokeWeight: 2,
                    fillColor: 'Transparent',
                    fillOpacity: 0.35,
                    map: map,
                    center: citymap[city].center,
                    radius: citymap[city].meter
                });
            }
        }
    </script>
    <script async defer
            src="https://maps.googleapis.com/maps/api/js?key=key&callback=initMap">
    </script>
</body>
</html>
首先,要先去註冊一個 Google Cloud Platform 的帳號,會有200元美金的額度的樣子。
啟用 Map Javascript API
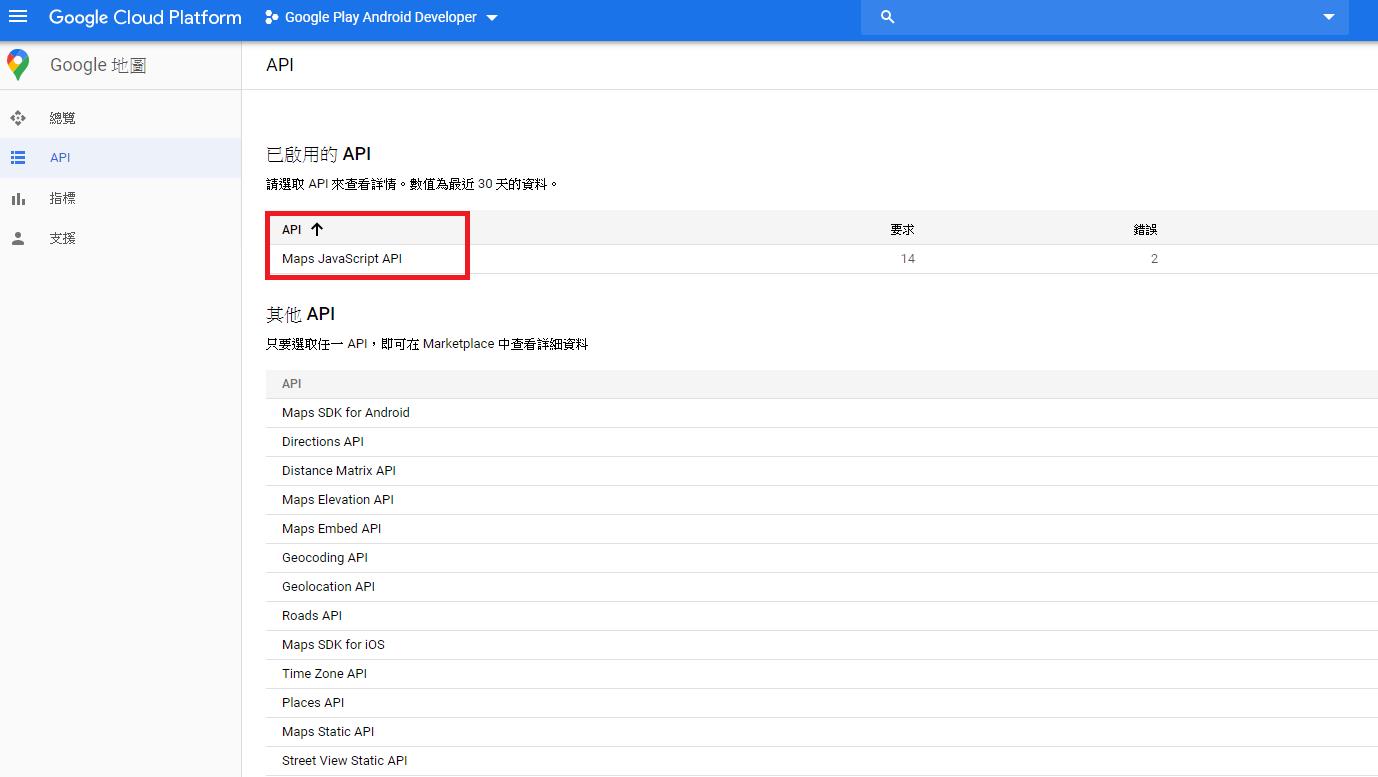 啟用完畢後,點進去切換到憑證的頁面,裡面會有一組KEY,等等會用到。
第二步,開個新的記事本,貼上上面的程式碼。在最下方這一段中有一個key=mykey,將mykey替換成上一步,憑證頁面中的Key。
<script async defer
            src="https://maps.googleapis.com/maps/api/js?key=key&callback=initMap">
    </script>
這邊設定正確,儲存文件成HTML檔案,開啟後,就會是上方的完成圖。
下面會說各個參數設定
var citymap = {
            km2: {
                center: { lat: 24.99817, lng: 121.508 },
                meter: 2000
            },
            km6: {
                center: { lat: 24.99817, lng: 121.508 },
                meter: 6000
            }, km9: {
                center: { lat: 24.99817, lng: 121.508 },
                meter: 9000
            },
        };
圖中有三個圓圈,分別是2公里,6公里,跟9公里。
center是圓圈的中心,輸入緯度跟經度
meter代表公尺
想畫幾個圓圈就放幾組
function initMap() {
            // Create the map.
            var map = new google.maps.Map(document.getElementById('map'), {
                zoom: 12,
                center: { lat: 24.99817, lng: 121.508 },
                mapTypeId: 'terrain'
            });

            // Construct the circle for each value in citymap.
            // Note: We scale the area of the circle based on the population.
            for (var city in citymap) {
                // Add the circle for this city to the map.
                var cityCircle = new google.maps.Circle({
                    strokeColor: '#FF0000',
                    strokeOpacity: 0.8,
                    strokeWeight: 2,
                    fillColor: 'Transparent',
                    fillOpacity: 0.35,
                    map: map,
                    center: citymap[city].center,
                    radius: citymap[city].meter
                });
            }
        }
在Init map 中,第一段是網頁一開始進去的顯示方式
zoom是設定畫面的縮放程度。
center是畫面的中心位置,輸入緯度跟經度。
由於我們是畫同心圓,所以設定一樣就好。
第二段的迴圈是開始畫圓
strokeColor是圓圈的邊線,設定成紅色
strokeOpacity是邊線的透明度
strokeWeight是邊線的寬度
fillColor是圓圈內部的填滿色,這邊是設定成透明的,才看得清中間的地圖。
fillOpacity是圓圈內部填滿色的透明度
其他更詳細的參數以及其他API可以從API使用手冊中了解。
使用完之後,記得要先關閉 Google Cloud Platform 的API,或是設定成有限制的,以防費用超出免費額度
參考資料:Google API使用手冊https://developers.google.com/maps/documentation/javascript/get-api-key
有任何改進的意見及問題歡迎傳送到電子郵件
電子郵件:momo16542@gmail.com