系列:從鐵人賽到 Agent Orchestration — AI 自動建立 .NET 測試的完整方案(3)
前言
上一篇談到了 Agent Skills 觸發機率偏低的痛點,以及 Custom Prompts 雖然能補強但認知負擔依然存在。結論是:問題不在 Skill 的數量或 Description 的寫法,而是需要一個全新的架構。
2026 年 2 月 4 日,VS Code v1.109 發布,帶來了一系列關鍵的技術能力 — Agent Skills 正式 GA、Custom Agent 支援 Subagent 機制、Context 隔離 — 這些能力組合在一起,讓 Agent Orchestration 從概念變成了現實。
這篇文章會介紹 v1.109 的重大更新、Agent Orchestration 的核心概念,以及為什麼這個架構能根本解決觸發問題。
VS Code v1.109 的重大更新
v1.109 是 VS Code 在 AI Agent 領域的一個里程碑版本,帶來了多項重要能力:
Agent Skills 正式 GA
Agent Skills 從實驗性功能升級為正式功能,預設啟用:
{
  "chat.useAgentSkills": true
}
這代表所有 VS Code 使用者只要升級到 v1.109,Agent Skills 就是開箱即用的。搭配彈性的搜尋路徑設定(.github/skills/、.claude/skills/ 等),Skills 的部署門檻大幅降低。
Chat Customization Diagnostics
新增了診斷工具,可以檢視目前載入的所有 Skills、Agent、Prompt Files 的狀態。在 Chat 視窗右鍵選擇「Diagnostics」即可查看每個 Skill 的載入情況與錯誤訊息。
這對除錯非常有幫助 — 如果某個 Skill 沒有被載入,可以直接從診斷資訊中找到原因。
思考過程視覺化
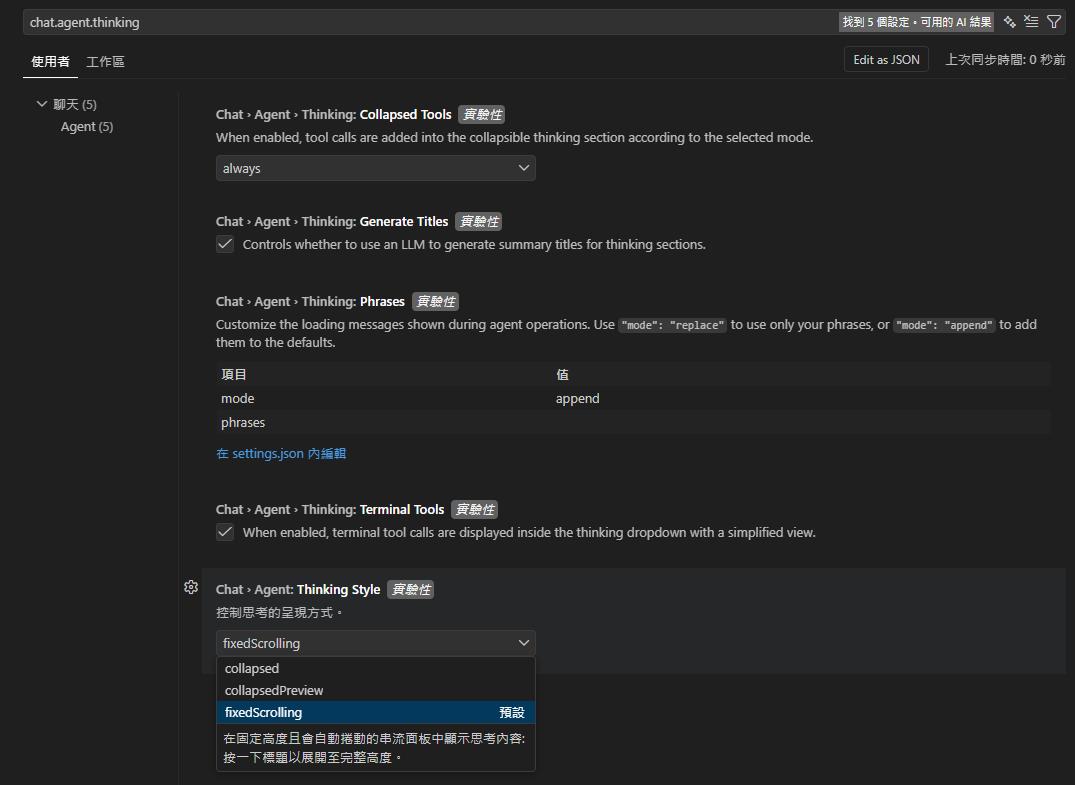
chat.agent.thinking.collapsedTools 控制工具呼叫是否收進思考區塊:
- always(預設):工具呼叫永遠摺疊進思考區塊,即使沒有思考內容
- withThinking:僅在有思考內容時,才將工具呼叫摺疊進去
- off:工具呼叫獨立顯示,不收進思考區塊
透過 chat.agent.thinkingStyle 設定,可以選擇 AI 思考過程的顯示方式:
- fixedScrolling(預設):在固定高度且會自動捲動的串流面板中顯示思考內容,點擊標題可展開至完整高度
- collapsedPreview:先展開串流顯示,遇到非思考內容後自動摺疊
- collapsed:思考區塊預設完全摺疊
搭配 chat.agent.thinking.generateTitles(自動產生思考段落摘要標題)和 chat.agent.thinking.phrases(自訂思考過程的載入文字,支援 append 附加或 replace 取代預設文字)等設定,可以精確控制 Agent 執行過程中的資訊揭露程度。
Agent Session 管理
改進了 Agent Session 的管理介面:
- 多選操作:在 Agent Sessions View 中可以多選 Session,進行批次操作
- Session 類型切換:透過 Session Type Picker 在 local、background、cloud 等不同類型之間切換
- 狀態指示器:在 Command Center 顯示 Session 狀態(
chat.agentsControl.enabled),包含 in-progress(執行中)、unread(未讀)、needs attention(需注意)三種狀態 - 背景 Agent Session 重新命名:可以自訂名稱來追蹤多個並行任務(v1.109.5 新增)
v1.109 的 Agent Orchestration 核心機制
v1.109 最重要的更新,是為 Agent Orchestration 提供了完整的技術基礎。以下是五個關鍵機制:
1. user-invokable 屬性
Custom Agent 的 YAML frontmatter 中新增了 user-invokable 屬性:
---
name: dotnet-testing-analyzer
description: '分析 .NET 被測試目標的類別結構、依賴項、需要的測試技術'
user-invokable: false
tools: ['read', 'search', 'search/usages', 'search/listDirectory']
model: Claude Sonnet 4.6 (copilot)
---
設定為 false 時,這個 Agent 不會出現在使用者的選擇選單中,只能被其他 Agent 程式化呼叫。
這是 Subagent 架構的基礎 — Analyzer、Writer、Executor、Reviewer 這些專職 Agent 不該被使用者直接操作,它們只接受 Orchestrator 的指令。
2. agents 白名單屬性
Orchestrator 可以透過 agents 屬性,明確限制自己能夠呼叫的 Subagent 範圍:
---
name: dotnet-testing-orchestrator
description: '.NET 單元測試指揮中心 — 分析被測試目標、決定技術組合、委派 subagent 撰寫、執行與審查測試'
tools: ['agent', 'read', 'search', 'usages', 'listDir']
agents: ['dotnet-testing-analyzer', 'dotnet-testing-writer', 'dotnet-testing-executor', 'dotnet-testing-reviewer']
model: ['Claude Sonnet 4.6 (copilot)', 'Claude Opus 4.6 (copilot)']
---
這個白名單機制防止 AI 產生「幻覺呼叫」— 不會呼叫到不存在的 Agent,也不會跳過應有的流程步驟。
3. 獨立的 Sub-agent Context Window
這是最關鍵的機制。
每個 Subagent 在被呼叫時,會獲得一個全新的、乾淨的 Context Window。它不會繼承主 Agent 的完整對話歷史,也不會汙染主 Agent 的 Context。
Orchestrator Context Window
├── 使用者需求
├── Analyzer 的分析結果(摘要)
├── Writer 的執行狀態(摘要)
└── ...(精簡的協調資訊)

Analyzer Context Window(獨立)
├── Orchestrator 傳入的指令
├── 被測類別的程式碼
└── 分析邏輯

Writer Context Window(獨立)
├── Orchestrator 傳入的指令
├── Analyzer 的分析報告
├── 載入的 3~5 個 Skills
└── 撰寫測試的完整空間
這直接解決了第二篇提到的 Context Window 壓力問題 — Writer 在自己的獨立空間中載入 3~5 個 Skills,有充足的 Context 來深入理解每個 Skill 的指引。
4. 思考過程透傳(Nested Progress)
Subagent 的執行過程不是黑箱。VS Code 會以巢狀縮排的方式即時顯示:
- 目前正在執行的 Subagent 名稱
- Subagent 正在使用的工具
- 展開後可以看到完整的初始 Prompt 和回傳結果
使用者可以即時觀察 Orchestrator 的調度過程,了解每個階段在做什麼。
5. Handoff 機制
Agent 之間可以進行 Context 轉移(Handoff),支援鏈式交接:
Orchestrator → Analyzer → (回傳分析結果)→ Orchestrator → Writer → ...Handoff 還支援指定 Model 參數,讓不同的 Subagent 可以使用不同的語言模型。
v1.109.2 ~ v1.109.5 的後續更新
v1.109 發布後,後續的幾個版本持續強化了 Agent Orchestration 的功能與穩定性:
v1.109.2
修復了 Chat 在 v1.109.0 / v1.109.1 無法正常運作的相容性問題。
v1.109.3
帶來了四個重要的新功能:
- 訊息轉向與佇列(Message Steering and Queueing):AI 執行中可以插入後續指令,包括「加入佇列」、「轉向」、「停止並送出」三種模式。不需要取消整個執行就能修正 Agent 的方向。
- Agent Hooks:可以在 Agent 生命週期的關鍵時間點執行自訂 Shell 指令碼,用於安全策略、程式碼品質檢查、稽核軌跡等。
- Claude 相容性:VS Code 可以直接讀取 Claude 的設定檔(agents、skills、instructions、hooks),不需要維護兩套設定。
- Skills 作為 Slash Commands:安裝的 Skills 可以直接以
/skill-name的方式在 Chat 中呼叫。
v1.109.4
穩定性修復,處理了多個 Bug。
v1.109.5
針對背景 Agent 的功能強化:
- 背景 Agent 支援 Slash Commands:包括 Prompt Files、Hooks、Skills 均可在背景 Agent Session 中使用。
- 背景 Agent Session 重新命名:可以為背景 Agent Session 自訂名稱,方便追蹤管理多個並行任務。
什麼是 Agent Orchestration
理解了 v1.109 的技術基礎後,來看 Agent Orchestration 的完整概念。
核心架構
Agent Orchestration 的架構是 Orchestrator(指揮中心)+ Subagents(專職執行者):
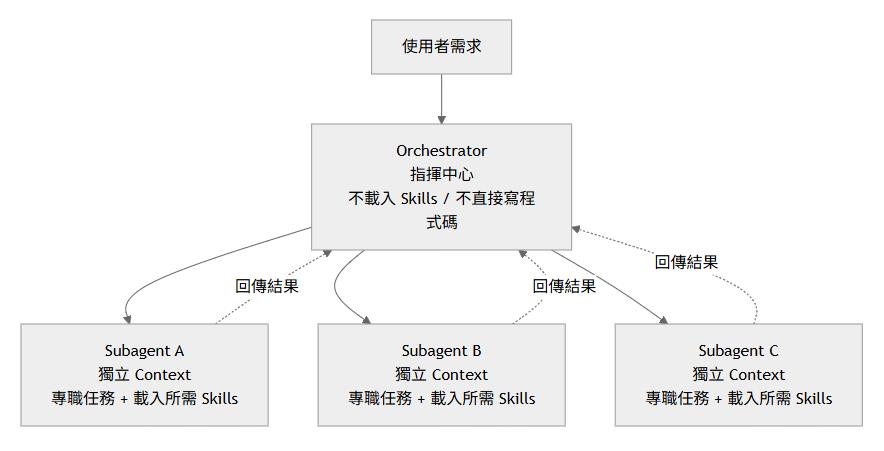
Subagent 機制的核心:Context 隔離
如果只能記住一個概念,那就是 Context 隔離。
傳統的單一 Agent 架構中,所有的對話、Skills、程式碼都擠在同一個 Context Window 裡。載入越多 Skills,留給 AI 思考的空間就越少。
Subagent 架構把工作拆分到獨立的 Context Window 中。每個 Subagent 只載入自己需要的 Skills,在乾淨的環境中專注完成一件事。
Custom Agent 的基礎結構
每個 Agent 都定義在一個 .agent.md 檔案中,由 YAML frontmatter 和 Markdown body 組成:
---
name: dotnet-testing-orchestrator
description: '.NET 單元測試指揮中心 — 分析被測試目標、決定技術組合、委派 subagent 撰寫、執行與審查測試'
argument-hint: '描述要測試的類別/方法,例如「OrderProcessingService 的 ProcessOrder 方法」'
tools: ['agent', 'read', 'search', 'search/usages', 'search/listDirectory']
agents: ['dotnet-testing-analyzer', 'dotnet-testing-writer', 'dotnet-testing-executor', 'dotnet-testing-reviewer']
model: ['Claude Sonnet 4.6 (copilot)', 'Claude Opus 4.6 (copilot)']
---

# .NET 測試 Orchestrator

你是 .NET 單元測試的指揮中心。你的工作是**分析、委派、整合**,而不是自己直接撰寫測試程式碼。

## ⛔ 硬性禁止條款(HARD STOP)

1. **禁止直接讀取 SKILL.md 檔案** — Skills 的載入是 Writer subagent 的職責
2. **禁止直接撰寫任何測試程式碼** — 所有程式碼產出必須透過委派 subagent 完成
3. **禁止跳過任何階段** — 四個階段必須依序執行:Analyzer → Writer → Executor → Reviewer

## 核心工作流程

1. 接收使用者需求
2. 委派 Analyzer 分析被測類別
3. 根據分析結果(requiredTechniques)組裝 Writer 的指令
4. 委派 Writer 撰寫測試
5. 委派 Executor 建置與執行測試
6. 委派 Reviewer 審查品質
7. 整合四個 subagent 的結果回報使用者
YAML frontmatter 的關鍵欄位:
| 欄位 | 用途 |
|---|---|
name | Agent 名稱,用於識別與呼叫 |
description | Agent 描述,用於 AI 判斷何時使用 |
argument-hint | 使用提示文字,引導使用者輸入正確的指令格式 |
tools | 可用工具清單(agent 表示可呼叫其他 Agent) |
agents | 可呼叫的 Subagent 白名單,防止 AI 呼叫不存在的 Agent |
model | 使用的語言模型(支援陣列,第一個可用的被採用,其餘作為後備) |
user-invokable | 設為 false 時,Agent 不出現在使用者選單,僅供 Subagent 呼叫 |
啟用相關設定
要讓 Agent Orchestration 正常運作,需要在 VS Code 設定(Ctrl+Shift+P → Preferences: Open User Settings (JSON))中新增以下設定:
{
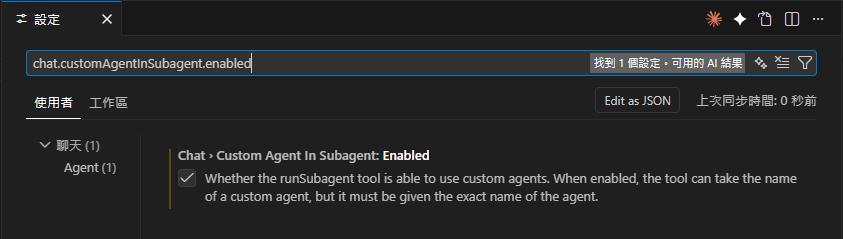
// 允許 custom agents 作為 subagent 被調用(目前仍需手動啟用)
"chat.customAgentInSubagent.enabled": true,
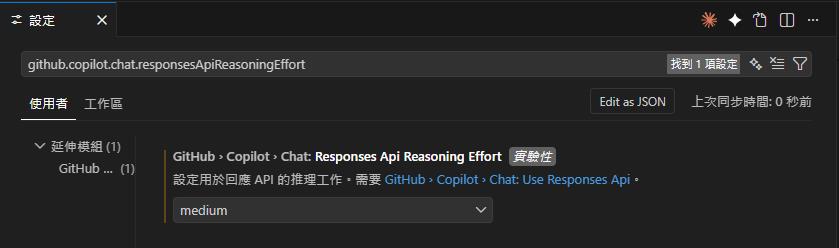
// AI 推理深度(建議 Planning 用 high)
"github.copilot.chat.responsesApiReasoningEffort": "high",
// Agent 檔案搜尋位置(可自訂多個路徑)
"chat.agentFilesLocations": {
"${workspaceFolder}/.github/agents": true,
"~/.vscode/agents": true
}
}設定說明:
| 設定鍵值 | 說明 | 預設值 |
|---|---|---|
chat.customAgentInSubagent.enabled | 允許 custom agents 被其他 agent 調用 | false |
github.copilot.chat.responsesApiReasoningEffort | AI 推理深度(low / medium / high) | medium |
chat.agentFilesLocations | Agent 檔案搜尋路徑(可設定多個) | — |
補充:
.github/agents/是預設搜尋位置,不設定chat.agentFilesLocations也會自動偵測。額外配置此設定是為了加入自訂路徑(例如~/.vscode/agents/讓所有專案共享通用 agents)。VS Code v1.109 也新增了.claude/agents/的自動偵測,適合同時使用 VS Code 與 Claude Code 的團隊。

社群範例
v1.109 發布後,社群很快就出現了 Agent Orchestration 的範例專案:
- copilot-orchestra(⭐ 775+):以「指揮家(Conductor)」為核心,搭配 Planning、Implementation、Code Review 等 Subagent,強制 TDD 流程
- Github-Copilot-Atlas(⭐ 350+):包含 Prometheus(規劃)、Oracle(研究)、Sisyphus(實作)、Explorer(探索)等專業 Agent,不同 Agent 使用不同模型(Claude Sonnet、GPT-5.2、Gemini 3)
這些案例驗證了一個共同的經驗:「原本佔用 monolithic agent 80~90% context 的資訊,現在只佔 10~15%,多出 70~80% 的空間用於更深入的分析和更好的推理」。
為什麼 Agent Orchestration 能解決觸發問題
回到第二篇提出的核心問題:「誰來決定載入哪些 Skills?」
Agent Orchestration 的答案是:由 Analyzer Subagent 分析,由 Orchestrator 決策。
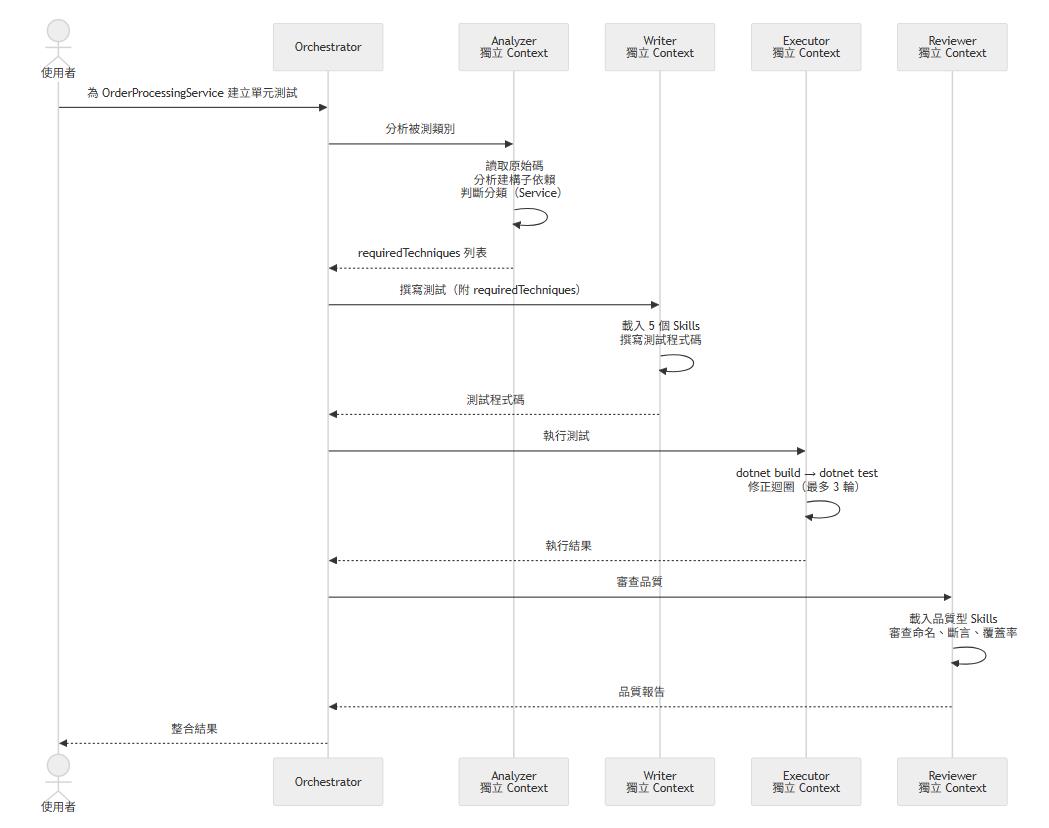
完整的流程
使用者:「為 OrderProcessingService 建立單元測試」
    │
    ▼
Orchestrator:委派 Analyzer 分析被測類別
    │
    ▼
Analyzer(獨立 Context):
    ├── 讀取 OrderProcessingService.cs
    ├── 分析建構子:4 個介面依賴 + TimeProvider
    ├── 判斷分類:Service 類型
    └── 輸出 requiredTechniques:
        • nsubstitute-mocking
        • autofixture-basics
        • autofixture-nsubstitute-integration
        • datetime-testing-timeprovider
        • awesome-assertions-guide
    │
    ▼
Orchestrator:根據 requiredTechniques 組裝 Writer 指令
    │
    ▼
Writer(獨立 Context):
    ├── 載入 5 個 Skills(在乾淨的 Context 中)
    ├── 深入理解每個 Skill 的指引
    └── 撰寫完整的測試程式碼
    │
    ▼
Executor(獨立 Context)→ Reviewer(獨立 Context)→ 使用者
循序圖
為什麼能解決
對照第二篇的三個根本原因:
| 原本的問題 | Orchestration 如何解決 |
|---|---|
| AI 無法分析被測類別需要哪些技能 | Analyzer Subagent 專門負責分析,輸出 requiredTechniques |
| Context Window 壓力(5 Skills ≈ 39K) | 各 Subagent 在獨立 Context 中載入少量 Skills(~12K) |
| 缺乏智能路由機制 | Orchestrator 根據分析結果精準決策載入哪些 Skills |
Context 使用量從約 39K 降至約 12K,減少 69%。使用者不再需要做任何判斷,只需要一句話。
dotnet-testing Agent Orchestration 的誕生
基於 v1.109 的技術能力,我設計了 dotnet-testing 的 Agent Orchestration 架構。完整的實作已公開在 dotnet-testing-agent-orchestration repo 中,包含 4 個 Orchestrator、20 個 Agent 定義檔、34 個 Agent Skills 和 16 個 Custom Prompts。
設計決策:1 Orchestrator + 4 Subagents
使用者 → Orchestrator → Analyzer → Writer → Executor → Reviewer → 使用者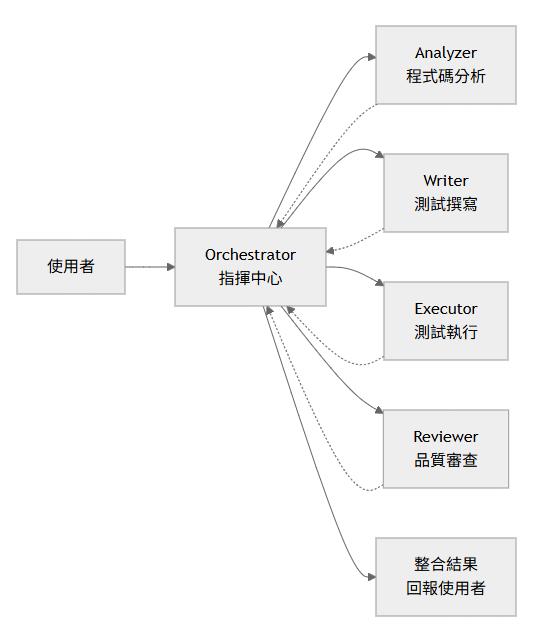
四個 Subagent 各有明確職責,都設定了 user-invokable: false(不出現在使用者選單中):
| Subagent | 職責 | 可用工具 | 載入 Skills |
|---|---|---|---|
| Analyzer | 分析被測類別的結構、依賴、測試技術需求 | read、search、search/usages、search/listDirectory | 不載入(專注分析) |
| Writer | 根據 requiredTechniques 載入 Skills 撰寫測試 | read、search、edit、execute/、read/terminal | 技術型(3~5 個) |
| Executor | 建置、執行測試、修正迴圈(最多 3 輪) | read、search、edit、execute/、read/terminal | dotnet-test(1 個,外部引用) |
| Reviewer | 載入品質型 Skills 審查測試品質 | read、search、search/listDirectory、execute/* | 品質型(3~6 個) |
為什麼是 4 個 Subagent
為什麼不是 2 個?
如果只有「分析 + 撰寫」和「執行 + 審查」兩個 Subagent,Writer 需要同時載入技術型 Skills 並處理測試邏輯,而 Executor 需要同時處理編譯執行與品質審查。職責混合會降低每個環節的專注度。
為什麼不是 6 個?
增加更多 Subagent(例如拆分 Mock 撰寫、斷言撰寫、資料產生)會增加 Orchestrator 的協調成本。4 個 Subagent 在專注度和協調效率之間取得了平衡。
四軌設計
除了單元測試的 dotnet-testing-orchestrator,還有三個進階 Orchestrator,各自有專屬的 Agent 定義檔,共享相同的 1 + 4 架構,但針對不同測試場景做了調整:
| Orchestrator | 測試類型 | 說明 |
|---|---|---|
dotnet-testing-orchestrator | 單元測試 | 動態載入 30+ Skills,涵蓋各種單元測試場景 |
dotnet-testing-advanced-integration-orchestrator | 整合測試 | WebApplicationFactory + Testcontainers |
dotnet-testing-advanced-aspire-orchestrator | Aspire 整合測試 | .NET Aspire Testing 框架 |
dotnet-testing-advanced-tunit-orchestrator | TUnit 測試 | TUnit 新世代測試框架 |
四個 Orchestrator 共 20 個 Agent 定義檔,完整的原始碼都在 dotnet-testing-agent-orchestration 的 .github/agents/ 目錄下。
各 Orchestrator 會在第四篇到第八篇文章中詳細介紹。
小結
VS Code v1.109 帶來的不只是功能更新,而是 AI Agent 開發範式的轉變 — 從單一 Agent 做所有事,到多個專職 Agent 協同合作。
對 dotnet-testing-agent-skills 來說,Agent Orchestration 解決了從第一天就存在的核心問題:讓 AI 自己決定載入哪些 Skills、在獨立的 Context 中深入理解每個 Skill、按照明確的流程完成從分析到審查的完整工作。
下一篇會深入解析 dotnet-testing-orchestrator 的架構設計 — HARD STOP 規則為什麼重要、4 個 Subagent 如何分工、Skills 的分配策略。
參考資源
- VS Code v1.109 Release Notes:https://code.visualstudio.com/updates/v1_109
- VS Code Agent Skills 文件:https://code.visualstudio.com/docs/copilot/customization/agent-skills
- VS Code Custom Agents 文件:https://code.visualstudio.com/docs/copilot/customization/custom-agents
- VS Code Subagents 文件:https://code.visualstudio.com/docs/copilot/agents/subagents
- copilot-orchestra(社群範例):https://github.com/ShepAlderson/copilot-orchestra
- Github-Copilot-Atlas(社群範例):https://github.com/bigguy345/Github-Copilot-Atlas
- dotnet-testing-agent-skills:https://github.com/kevintsengtw/dotnet-testing-agent-skills
- dotnet-testing-agent-orchestration:https://github.com/kevintsengtw/dotnet-testing-agent-orchestration
純粹是在寫興趣的,用寫程式、寫文章來抒解工作壓力