MVC Note (4) In NHibernate Part 3. 建立 PersonController 及相關的 ViewPage
在 Part 2 的時候,我們建立好我們要用一些功能,接下來就要運用在 Controller 上頭,趕快來看下面的步驟
Step 1. 建立 PersonController
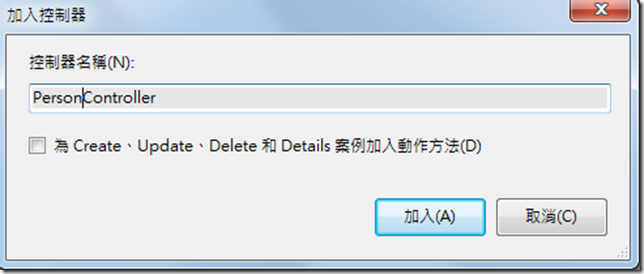
在 Controllers 資料夾點擊滑鼠右鍵:加入 => 控制器,會彈出下圖
控制器的名稱就取名為 PersonController,在這裡我偷懶一下,勾選了"為 Create、Update、Delete 和 Details 案例加入動作方法",來簡省一些時間。產生出來的模樣請參考下方的程式碼,不過是不包含裡面已經撰寫好的處理喔!
using System;
using System.Collections.Generic;
using System.Linq;
using System.Web;
using System.Web.Mvc;
using MvcApplication1.Models;

namespace MvcApplication1.Controllers
{
    public class PersonController : Controller
    {
        //
        // GET: /Person/

        public ActionResult Index()
        {
            IRepository<Person> pr = new PersonRepository();
            return View(pr.GetAll());
        }

        //
        // GET: /Person/Details/5

        public ActionResult Details(Guid id)
        {
            IRepository<Person> pr = new PersonRepository();
            return View(pr.GetDataByID(id));
        }

        //
        // GET: /Person/Create

        public ActionResult Create()
        {
            return View();
        }

        //
        // POST: /Person/Create

        [AcceptVerbs(HttpVerbs.Post)]
        public ActionResult Create(FormCollection collection)
        {
            String name = collection.Get("UserName");
            Int32 sex = int.Parse(collection.Get("rbSex"));
            String address = collection.Get("UserAddress");

            IRepository<Person> pr = new PersonRepository();

            Person p = new Person();

            p.Name = name;
            p.Sex = sex;
            p.Address = address;

            pr.Save(p);
            return RedirectToAction("Index");

        }

        //
        // GET: /Person/Edit/5

        public ActionResult Edit(Guid id)
        {
            IRepository<Person> pr = new PersonRepository();

            Person p = pr.GetDataByID(id);
            return View(p);
        }

        //
        // POST: /Person/Edit/5

        [AcceptVerbs(HttpVerbs.Post)]
        public ActionResult Edit(Guid id, FormCollection collection)
        {
            String address = collection.Get("UserAddress");

            IRepository<Person> pr = new PersonRepository();

            Person p = pr.GetDataByID(id);

            p.Address = address;

            pr.Update(p);

            return RedirectToAction("Index");
        }

        //
        // GET: /Person/Delete/5

        public ActionResult Delete(Guid id)
        {
            IRepository<Person> pr = new PersonRepository();
            pr.Delete(pr.GetDataByID(id));

            return RedirectToAction("Index");
        }

    }
}
* 要加入”專案名稱.Models”的命名空間。
Step 2. 建立 Index ViewPage
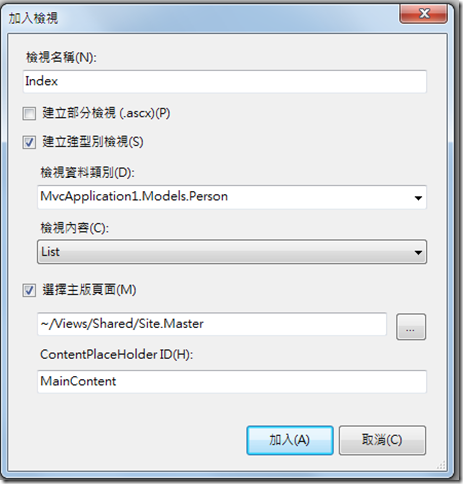
在 public ActionResult Index() {}的區塊用滑鼠點右鍵來加入檢視頁,即會跳出下圖
檢視資料類別的部分當然就是選取 Person 類別,而這個 ViewPage 要用來作列表的呈現,因此在檢視內容上選取了 List 。按加入後,產生出下方的程式碼
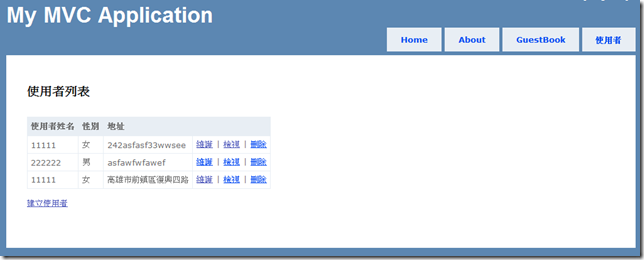
<%@ Page Title="" Language="C#" MasterPageFile="~/Views/Shared/Site.Master" Inherits="System.Web.Mvc.ViewPage<IEnumerable<MvcApplication1.Models.Person>>" %> <asp:Content ID="Content1" ContentPlaceHolderID="TitleContent" runat="server"> Index </asp:Content> <asp:Content ID="Content2" ContentPlaceHolderID="MainContent" runat="server"> <h2> 使用者列表</h2> <%if (Model.Count() > 0) { %> <table> <tr> <th> 使用者姓名 </th> <th> 性別 </th> <th> 地址 </th> <th> </th> </tr> <% foreach (var item in Model) { %> <tr> <td> <%= Html.Encode(item.Name)%> </td> <td> <%= item.Sex == 1 ? "男" : "女"%> </td> <td> <%= Html.Encode(item.Address)%> </td> <td> <%= Html.ActionLink("維護", "Edit", new { id = item.ID })%> | <%= Html.ActionLink("檢視", "Details", new { id = item.ID })%> | <%= Html.ActionLink("刪除", "Delete", new { id = item.ID })%> </td> </tr> <%} %> </table> <% } else { %> <p> 目前無任何使用者資料 </p> <% } %> <p> <%= Html.ActionLink("建立使用者", "Create") %> </p> </asp:Content>*在第 9 行的加入了一個判斷回傳的資料個數是否大於零,若為零則顯示"目前無任何使用者資料"的提示字, 免得出來空空的一片,誰曉得到底有沒有資料。畫面如下:
Step 3. 建立 Create ViewPage
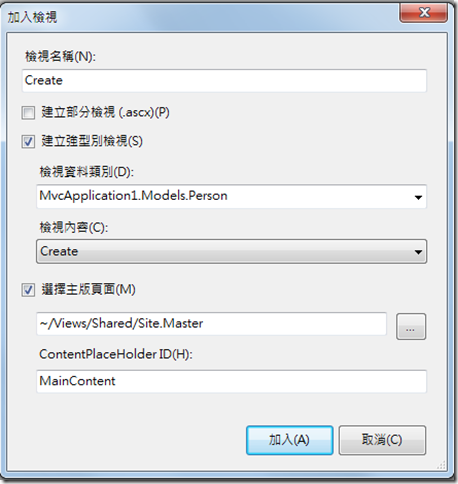
在 public ActionResult Create() {} 的區塊用滑鼠點右鍵來加入檢視頁,即會跳出下圖
檢視內容的部分可以選擇 Create,這樣可以輕輕鬆鬆產生出新增的頁面。程式碼如下:
<%@ Page Title="" Language="C#" MasterPageFile="~/Views/Shared/Site.Master" Inherits="System.Web.Mvc.ViewPage<MvcApplication1.Models.Person>" %>

<asp:Content ID="Content1" ContentPlaceHolderID="TitleContent" runat="server">
    Create
</asp:Content>
<asp:Content ID="Content2" ContentPlaceHolderID="MainContent" runat="server">
    <h2>
        建立使用者</h2>
    <% using (Html.BeginForm())
       {%>
    <fieldset>
        <legend>Fields</legend>
        <p>
            名字:
            <%= Html.TextBox("UserName") %>
        </p>
        <p>
            性別:
            <%=Html.RadioButton("rbSex",1,true) %>男
            <%=Html.RadioButton("rbSex",2) %>女
        </p>
        <p>
            地址 :
            <%=Html.TextArea("UserAddress", new { Style = "width:300px;height:50px" })%>
        </p>
        <p>
            <input type="submit" value="儲存" />
        </p>
    </fieldset>
    <% } %>
    <div>
        <%= Html.ActionLink("回到列表", "Index") %>
    </div>
</asp:Content>
頁面產生完,工作就不是這麼結束了,總不能按了[儲存]就什麼事情也沒發生,所以在 public ActionResult Create() {} 下方有個 public ActionResult Create(FormCollection collection) {} 區塊是要來處理頁面上的資料。
在資料的部分使用 FormCollection 來接收,利用 FormCollection.Get ( String name ) 取得相關的值,再按照 Person.cs 的屬性型別做適當的轉換。
Step 4. 建立 Edit ViewPage
建立的方式可參考前二個步驟(謎:開始在發懶了),檢視內容的部分選擇 Edit 來快速產出 ViewPage,不過所產生出來的 ViewPage 內容是按照檢視資料類別的屬性直接反映,所以要稍微修整一下成我想要的,
<%@ Page Title="" Language="C#" MasterPageFile="~/Views/Shared/Site.Master" Inherits="System.Web.Mvc.ViewPage<MvcApplication1.Models.Person>" %>

<asp:Content ID="Content1" ContentPlaceHolderID="TitleContent" runat="server">
    Edit
</asp:Content>
<asp:Content ID="Content2" ContentPlaceHolderID="MainContent" runat="server">
    <h2>
        使用者維護</h2>
    <% using (Html.BeginForm())
       {%>
    <fieldset>
        <legend>Fields</legend>
        <p>
            名字:
            <%=Html.Label(Model.Name) %>
        </p>
        <p>
            性別:
            <%= Model.Sex == 1 ? "男" : "女" %>
        </p>
        <p>
            地址:
            <%= Html.TextArea("UserAddress",Model.Address,new{Style="width:300px;height:50px"}) %>
        </p>
        <p>
            <input type="submit" value="儲存" />
        </p>
    </fieldset>
    <% } %>
    <div>
        <%= Html.ActionLink("回到列表", "Index") %>
    </div>
</asp:Content>
我僅留地址的部分供使用者進行編輯,其餘的部分只做顯示。資料回存的部分依然使用 FormCollection.Get ( String name ) 方法,不過 Edit 比 Create 多利用一個 Guid 型別的 id 作為索引值。
Step 5. 其他
如 Detail 就單純建立一個不太需要作任何動作的 ViewPage,而 Delete 的部分因為我們是直接在列表動作,因此在
public ActionResult Delete(Guid id) {} 區塊內撰寫處理的方法,而不再另外產相對應的 ViewPage ,不過要另外再產
生 Delete ViewPage 也是可以的。
結論
在實作的過程中,不難發現用 Entity Framewrok 直接做資料存取的控制,確實比使用 NHibernate 來的快速及方便,用 NHibernate
來做資料存取顯得”刻苦耐勞”,目前可以透過一些小工具來彌補一些些的不方便,在資料映射的部分可以直接修改 hbm.xml 來
快速調整實際對應資料表各項設定,再重新編輯即可(謎:不知道 .dbml 可不可以這樣惡搞),以上的實作希望能幫助有需要的
人。
===================
大家好 , 我叫芋宅宅
我很菜 , 請各位前輩指教


