WPF和Silverlight從2.0版之後就一直針對Data Binding的部份不停的在做改善,現在甚至可以透過Visual Studio 2010或Blend 4.0在設計模式裡透過幾下滑鼠的點擊就可以完成Binding的設定。
所謂的Binding呢,中文的翻譯是「繫結」,有玩線上遊戲的朋友應該也都會聽過一個名詞叫「綁定」,其實指的都是同一個英文單字—Binding,意思就是把兩件東西連結在一起。
WPF和Silverlight從2.0版之後就一直針對Data Binding的部份不停的在做改善,現在甚至可以透過Visual Studio 2010或Blend 4.0在設計模式裡透過幾下滑鼠的點擊就可以完成Binding的設定。
所謂的Binding呢,中文的翻譯是「繫結」,有玩線上遊戲的朋友應該也都會聽過一個名詞叫「綁定」,其實指的都是同一個英文單字—Binding,意思就是把兩件東西連結在一起。
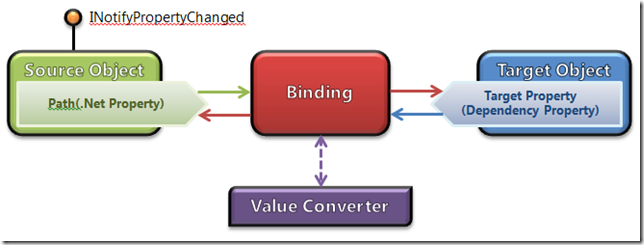
而Binding的組成包含了以下幾樣東西:
- Source:要繫結的對象(也可以看作是資料的來源),可以是一個控制項,也可以是一個Class的Instance,更可以是一個Class的集合(Collection)
- Path:要繫結到的對象的屬性(Property)
- Target Property:被繫結的目標的屬性(必需為Dependency Property才行)
- Binding本身:Binding本身也是一個物件,在裡面可以決定繫結的方向(如單向、雙向、一次性繫結等等)
- ValueConverter:轉換器,用來處理不同型別Property之間的值轉換
如果有仔細看上圖的話,應該會發現:咦?INotifyPropertyChanged這玩意兒是哪來的??其實它是.Net裡面一個看來簡單但是功能強大的介面,透過它來實作雙向的繫結就會易如反掌,之後會跟各位分享這個介面在資料繫結中的使用。 Ok,先讓我們來重溫一下沒有Binding的世界是怎麼寫程式的吧。
我們先建立一個Silverlight專案,在畫面上放一個Calendar和一個TextBlock,然後當Calendar的SelectedDate改變的時候,就把日期顯示到TextBlock裡,要做到這樣的功能,Xaml和cs檔如下:
<UserControlx:Class="SilverlightDataBinding.MainPage"
xmlns="http://schemas.microsoft.com/winfx/2006/xaml/presentation"
xmlns:x="http://schemas.microsoft.com/winfx/2006/xaml"
xmlns:d="http://schemas.microsoft.com/expression/blend/2008"
xmlns:mc="http://schemas.openxmlformats.org/markup-compatibility/2006"
xmlns:sdk="http://schemas.microsoft.com/winfx/2006/xaml/presentation/sdk"
mc:Ignorable="d"
d:DesignWidth="800"d:DesignHeight="600"
Width="Auto"Height="Auto">
    <Gridx:Name="LayoutRoot"Background="Transparent">
        <StackPanelHorizontalAlignment="Center"VerticalAlignment="Center">
            <sdk:CalendarHorizontalAlignment="Center"Name="calCalendar"Width="Auto" SelectedDatesChanged="calCalendar_SelectedDatesChanged"/>
            <TextBoxHeight="23"HorizontalAlignment="Stretch"Name="txtDate"Width="Auto"/>
        </StackPanel>
    </Grid>
</UserControl>
using System.Windows.Controls;

namespace SilverlightDataBinding
{
    public partial class MainPage : UserControl
    {
        public MainPage()
        {
            InitializeComponent();
        }

        private void calCalendar_SelectedDatesChanged( object sender , SelectionChangedEventArgs e )
        {
            this.txtDate.Text = calCalendar.SelectedDate.ToString();
        }
    }
}
很簡單對吧!!但是用了Binding之後,更簡單!!而且之後要介紹的方式會越來越簡單,請耐心看下去。
前面有說到Binding的幾個組成要素,在上面的例子中,Source就是calCalendar,Path就是SelectedDate,Target當然就是txtDate的TextProperty屬性囉,再來我們就直接在cs檔裡面寫Binding吧!!首先我們把calCalendar的SelectedDatesChanged EvnetListener拿掉。
<UserControl x:Class="SilverlightDataBinding.MainPage"
    xmlns="http://schemas.microsoft.com/winfx/2006/xaml/presentation"
    xmlns:x="http://schemas.microsoft.com/winfx/2006/xaml"
    xmlns:d="http://schemas.microsoft.com/expression/blend/2008"
    xmlns:mc="http://schemas.openxmlformats.org/markup-compatibility/2006"
    xmlns:sdk="http://schemas.microsoft.com/winfx/2006/xaml/presentation/sdk"
    mc:Ignorable="d"
    d:DesignWidth="800" d:DesignHeight="600"
    Width="Auto" Height="Auto">

    <Grid x:Name="LayoutRoot" Background="Transparent">
        <StackPanel HorizontalAlignment="Center" VerticalAlignment="Center">
            <sdk:Calendar HorizontalAlignment="Center" Name="calCalendar" Width="Auto" />
            <TextBox Height="23" HorizontalAlignment="Stretch" Name="txtDate" Width="Auto" />
        </StackPanel>
    </Grid>
</UserControl>
MainPage.cs改為如下:
using System.Windows.Controls;
using System.Windows.Data;
using System.Windows;

namespace SilverlightDataBinding
{
    public partial class MainPage : UserControl
    {
        public MainPage()
        {
            InitializeComponent();

            //宣告Binding物件
            Binding binding = new Binding();

            //設定Source Object
            binding.Source = this.calCalendar;

            //指定Path為Source的哪個Property
            binding.Path = new PropertyPath( "SelectedDate" );

            //建資料繫結
            txtDate.SetBinding( TextBox.TextProperty , binding );
        }
    }
}
再執行看看,是不是結果完全一樣呢?但是,看到這邊,你可能會說,我原來只要一行就搞定了,為什麼改用Binding,卻變成要四行!?難不成這是騙小孩嗎!?其實也可以寫成一行啦:
BindingOperations.SetBinding( txtDate , TextBox.TextProperty , new Binding { Source = this.calCalendar , Path = new PropertyPath( "SelectedDate" ) } );
或是寫成
txtDate.SetBinding( TextBox.TextProperty , new Binding { Source = this.calCalendar , Path = new PropertyPath( "SelectedDate" ) } );
都是可以的。
那問題就又來啦,之前用EventHandler的作法,還可以藉由把EventHandler拿掉來停止值的更新,用Binding的話也行嗎?就算是「拾取後綁定」也總應該可以刪除吧!?當然可以把Binding做清除的動作!!
清除Binding的方式很多,在Silverlight裡的話,可以使用以下方式:
//1.使用ClearValue方法
txtDate.ClearValue( TextBox.TextProperty );
//2.直接賦與一個新的值
txtDate.Text = string.Empty;
如果是WPF呢?那方法更多了:
//1.使用BindingOperations.ClearBinding方法
BindingOperations.ClearBinding( txtDate , TextBox.TextProperty );
//2.使用BindingOperations.ClearAllBinding方法
BindingOperations.ClearAllBindings( txtDate );
//3. 直接賦與一個新的值
txtDate.Text = string.Empty;
這次就先到此為止啦,下篇再來講講直接使用XAML來做到Binding。
