已經用過WPF/Silverlight的朋友們應該對於ResourceDictionary不陌生。不過,ResourceDictionary除了用來存放Style、Storyboard等等資源之外,也可以拿來實作多國語系喔!!而且透過ResourceDictionary的方式來實作多國語系,一樣可以達到執行時期動態的語系切換功能!!
廢話不多說,以下來來跟各位分享這個簡單的方式,也歡迎有興趣的朋友跟著一步一步做看看喔!!
已經用過WPF/Silverlight的朋友們應該對於ResourceDictionary不陌生。不過,ResourceDictionary除了用來存放Style、Storyboard等等資源之外,也可以拿來實作多國語系喔!!而且透過ResourceDictionary的方式來實作多國語系,一樣可以達到執行時期動態的語系切換功能!!
廢話不多說,以下就來跟各位分享這個簡單的方式,也歡迎有興趣的朋友跟著一步一步做看看喔!!
Step 1:建立WPF應用程式
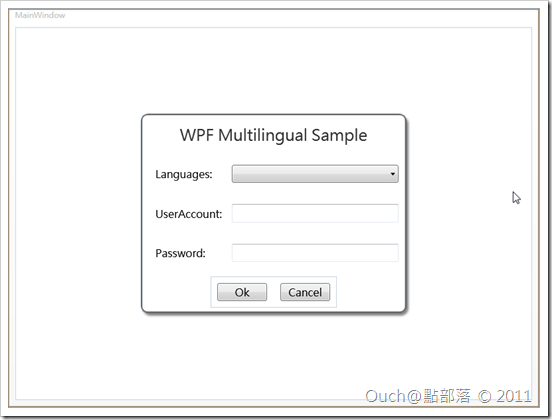
首先,跟上一篇一樣,請自行建立一個WPF專案,有看前兩篇的朋友們應該就對下面的使用者介面很熟悉了~
而該介面原始Xaml如下:
<Window x:Class="Wpf_PureApp.MainWindow" xmlns="http://schemas.microsoft.com/winfx/2006/xaml/presentation"
		xmlns:x="http://schemas.microsoft.com/winfx/2006/xaml"
		xmlns:mc="http://schemas.openxmlformats.org/markup-compatibility/2006"
		xmlns:d="http://schemas.microsoft.com/expression/blend/2008" mc:Ignorable="d" d:DesignWidth="800"
		d:DesignHeight="600" Title="MainWindow" Height="Auto" Width="Auto">
	<Grid>
		<Border BorderBrush="#FF646464" BorderThickness="2" HorizontalAlignment="Center" Height="300"
				VerticalAlignment="Center" Width="400" CornerRadius="10" Background="White">
			<Border.Effect>
				<DropShadowEffect Opacity="0.5" />
			</Border.Effect>
			<Grid>
				<Grid.ColumnDefinitions>
					<ColumnDefinition Width="125" />
					<ColumnDefinition Width="0.646*" />
				</Grid.ColumnDefinitions>
				<Grid.RowDefinitions>
					<RowDefinition Height="0.2*" />
					<RowDefinition Height="0.2*" />
					<RowDefinition Height="0.2*" />
					<RowDefinition Height="0.2*" />
					<RowDefinition Height="0.2*" />
				</Grid.RowDefinitions>
				<TextBlock x:Name="textBlock" HorizontalAlignment="Center" TextWrapping="Wrap"
						VerticalAlignment="Center" Grid.ColumnSpan="2" Text="WPF Multilingual Sample" FontSize="24"
						Foreground="#FF323232" />
				<TextBlock x:Name="textBlock3" TextWrapping="Wrap" Text="Languages:" HorizontalAlignment="Left"
						VerticalAlignment="Center" Grid.Row="1" Margin="20,0,0,0" FontSize="16" />
				<ComboBox x:Name="comboBox" d:LayoutOverrides="Height" Grid.Row="1" Grid.Column="1"
						VerticalAlignment="Center" Margin="10" FontSize="16" DisplayMemberPath="DisplayName" />
				<TextBlock x:Name="textBlock2" TextWrapping="Wrap" HorizontalAlignment="Left" VerticalAlignment="Center"
						Grid.Row="2" Margin="20,0,0,0" FontSize="16" Text="UserAccount:" />
				<TextBox x:Name="textBox" TextWrapping="Wrap" Grid.Column="1" Grid.Row="2" Margin="10" FontSize="16"
						VerticalAlignment="Center" />
				<TextBlock x:Name="textBlock1" TextWrapping="Wrap" HorizontalAlignment="Left" VerticalAlignment="Center"
						Grid.Row="3" Margin="20,0,0,0" FontSize="16" Text="Password:" />
				<TextBox x:Name="textBox1" TextWrapping="Wrap" Grid.Row="3" Grid.Column="1" Margin="10" FontSize="16"
						VerticalAlignment="Center" />
				<StackPanel Grid.Row="4" Grid.ColumnSpan="2" VerticalAlignment="Center" HorizontalAlignment="Center"
						Orientation="Horizontal">
					<Button x:Name="button" Content="Ok" Width="75" Margin="10" FontSize="16" />
					<Button x:Name="button1" Content="Cancel" Width="75" Margin="10" FontSize="16" />
				</StackPanel>
			</Grid>
		</Border>
	</Grid>
</Window>
基本上到這邊應該都不會有什麼問題,大家可以執行看看自己寫的小範例,看看是不是能正常的運作,正常的話就可以繼續下一個步驟囉!!
Step 2:建立存放語系ResourceDictionary檔的資料夾
請透過Visual Studio中的Solution Explorer,在專案裡自行建立一個用來存檔ResourceDictionary的資料夾,以我自己的例子,我把這個資料夾取名為Cultures。 
Step 3:在建立好的資料夾中新增各語系的ResourceDictionary檔
在剛剛建立好的資料夾上按下滑鼠右鍵,點選Add -> ResourceDictionary...,我們要先建立一個預設的語系資源檔。
為語系ResourceDictionary檔命名,這邊我使用StringResource.xaml當預設語系檔的名稱。
這系列的範例中語系資源會影響到的都只有文字的部份,所以我們得要在ResourceDictionary中透過建立字串的方式,提供給控制項做DataBinding,而為了要在ResourceDictionary中建立字串,我們得在StringResource.xaml的NameSpace中加入對System這個NameSpace的引用,可以這樣寫:
xmlns:sys="clr-namespace:System;assembly=mscorlib"
再來就可以依照我們的需要,在StringResource.xaml建立字串啦~這邊要注意,之後控制項得透過x:Key來存取我們定義好的字串,所以千萬要小心,別打錯字了喔!
<ResourceDictionary xmlns="http://schemas.microsoft.com/winfx/2006/xaml/presentation"
		xmlns:x="http://schemas.microsoft.com/winfx/2006/xaml" xmlns:sys="clr-namespace:System;assembly=mscorlib">
	<sys:String x:Key="UserAccount">User Account</sys:String>
	<sys:String x:Key="Password">Password</sys:String>
	<sys:String x:Key="Languages">Languages</sys:String>
	<sys:String x:Key="Ok">Ok</sys:String>
	<sys:String x:Key="Cancel">Cancel</sys:String>
</ResourceDictionary>
建立完預設語系的ResourceDictionary之後,我們一樣透過複製檔案的方式,複製出供其他語系使用的ResourceDictionary檔,這邊要注意的是,記得要在檔名的後面加入語系對應的名稱簡碼喔!!例如我的預設語系檔名是StringResource.xaml,正體中文的語系資源檔名就得是StringResources.zh-TW.xaml,英文則是StringResources.en-US.xaml。我建立出來的正體中文資源檔和英文資源檔的內容則分別如下:
<ResourceDictionary xmlns="http://schemas.microsoft.com/winfx/2006/xaml/presentation"
		xmlns:x="http://schemas.microsoft.com/winfx/2006/xaml" xmlns:sys="clr-namespace:System;assembly=mscorlib">
	<sys:String x:Key="UserAccount">帳號</sys:String>
	<sys:String x:Key="Password">密碼</sys:String>
	<sys:String x:Key="Languages">語言</sys:String>
	<sys:String x:Key="Ok">確定</sys:String>
	<sys:String x:Key="Cancel">取消</sys:String>
</ResourceDictionary>
<ResourceDictionary xmlns="http://schemas.microsoft.com/winfx/2006/xaml/presentation"
		xmlns:x="http://schemas.microsoft.com/winfx/2006/xaml" xmlns:sys="clr-namespace:System;assembly=mscorlib">
	<sys:String x:Key="UserAccount">User Account</sys:String>
	<sys:String x:Key="Password">Password</sys:String>
	<sys:String x:Key="Languages">Languages</sys:String>
	<sys:String x:Key="Ok">Ok</sys:String>
	<sys:String x:Key="Cancel">Cancel</sys:String>
</ResourceDictionary>
Step 4:修改語系ResourceDictionary檔的BuildAction、Copy to Output Dictionary和CustomTool屬性值
透過Solution Explorer全選所有我們建立好的語系ResourceDictionary檔。
接著在Properties視窗中將所有語系ResourceDictionary檔的BuildAction的值改為Content、Copy to Output Dictionary的值改為Copy always,最後將CustomTool的值清空。
Step 5:加入System.Windows.Form參考
會要做這一步,是為了我們要在執行期的時候動態的透過程式去取得可用的語系ResourceDictionary。
Step 6:在Settings.settings檔中加入預設語系的設定值
透過Solution Explorer,開啟位於專案中Properties資料夾裡面的Settings.settings檔。
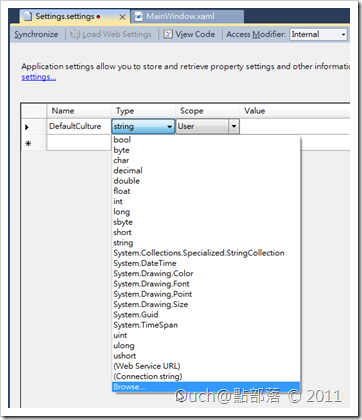
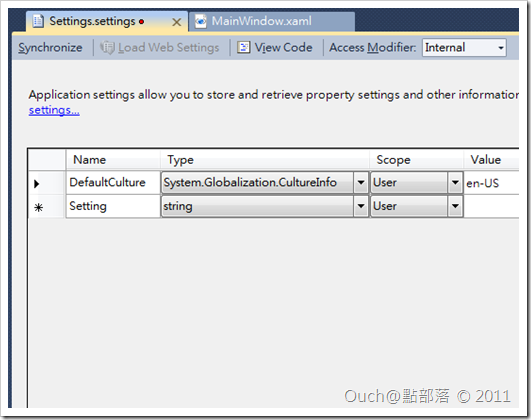
接著在裡面加入一組名稱為DefaultCulture,型別為CultureInfo,值為en-US的設定,方法如下:
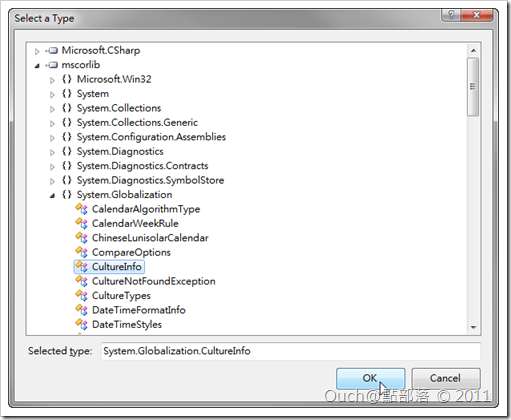
在第一個空白列的Name欄位中輸入DefaultCulture,然後在Type下拉選單中點選最下方的Browse...,並在跳出來的Select a Type視窗中如下圖點選到System.Globalization.CultureInfo。
最後在Value欄位中輸入en-US,完成後請記得存檔喔!!
Step 7:在專案中加入多語系小幫手Class檔
接下來的動作要寫一大堆的程式,不過我已經幫大家寫好了~當作是我送給大家的禮物,還請大家笑納(不過這篇的CulturesHelper和其他方式所要使用的CulturesHelper內容可不一樣喔,千萬別搞錯了!!)~
加入之後,請記得依照自己的需求在該Class中加入NameSpace喔!!另外,也請依照自己的ResourceDictionary檔的命名和存放的資料夾名稱,自行修改_resourcePrefix和_culturesFolder的值。
using System;
using System.Collections.Generic;
using System.Globalization;
using System.IO;
using System.Linq;
using System.Windows;
using System.Windows.Markup;


public class CulturesHelper
{
    private static bool _isFoundInstalledCultures = false;

    private static string _resourcePrefix = "StringResources";

    private static string _culturesFolder = "Cultures";

    private static List<CultureInfo> _supportedCultures = new List<CultureInfo>();

    public static List<CultureInfo> SupportedCultures
    {
        get
        {
            return _supportedCultures;
        }
    }

    public CulturesHelper()
    {
        if( !_isFoundInstalledCultures )
        {

            CultureInfo cultureInfo = new CultureInfo( "" );


            List<string> files = Directory.GetFiles( string.Format( "{0}\\{1}" , System.Windows.Forms.Application.StartupPath , _culturesFolder ) )
                .Where( s => s.Contains( _resourcePrefix ) && s.ToLower().EndsWith( "xaml" ) ).ToList();

            foreach( string file in files )
            {
                try
                {
                    string cultureName = file.Substring( file.IndexOf( "." ) + 1 ).Replace( ".xaml" , "" );

                    cultureInfo = CultureInfo.GetCultureInfo( cultureName );


                    if( cultureInfo != null )
                    {
                        _supportedCultures.Add( cultureInfo );

                    }
                }
                catch( ArgumentException )
                {
                }

            }

            if( _supportedCultures.Count > 0 && Properties.Settings.Default.DefaultCulture != null )
            {
                ChangeCulture( Properties.Settings.Default.DefaultCulture );
            }

            _isFoundInstalledCultures = true;
        }
    }

    public static void ChangeCulture( CultureInfo culture )
    {
        if( _supportedCultures.Contains( culture ) )
        {

            string LoadedFileName = string.Format( "{0}\\{1}\\{2}.{3}.xaml" , System.Windows.Forms.Application.StartupPath , _culturesFolder
                , _resourcePrefix , culture.Name );

            FileStream fileStream = new FileStream( @LoadedFileName , FileMode.Open );

            ResourceDictionary resourceDictionary = XamlReader.Load( fileStream ) as ResourceDictionary;

            Application.Current.MainWindow.Resources.MergedDictionaries.Add( resourceDictionary );

            Properties.Settings.Default.DefaultCulture = culture;
            Properties.Settings.Default.Save();
        }
    }

}
Step 8:修改App.xaml檔
接著我們要在App.xaml中預先載入一個語系的資源檔,以便後續DataBinding進行,這邊通常直接使用預設語系的資源檔就行了!如果要修改設計階段使用的語系,也是直接在這邊修改就可以囉!
Step 9:透過DataBinding將相對應的資源繫結到控制項
接著我們只需要透過簡單的DataBinding(例如Text="{DynamicResources KeyName}"),就可以輕鬆的存取語系ResourceDictionary中的字串啦~
如果覺得這樣有點麻煩,也可以透過Expression Blend來進行DataBinding的設定喔(這對Designer來說是一大方便啊!!)~~
例如我想針對Languages:這個TextBlock的Text屬性設定DataBinding,我只需要從Blend中點選Text右邊的Advanced options小白點,並且在跳出來的選單中展開Local Resource,就會出現所有我們定義好的字串Key值讓我們挑選啦!!
來看看繫結完的MainWindow.xaml會變怎樣吧~
<Window xmlns="http://schemas.microsoft.com/winfx/2006/xaml/presentation"
		xmlns:x="http://schemas.microsoft.com/winfx/2006/xaml"
		xmlns:mc="http://schemas.openxmlformats.org/markup-compatibility/2006"
		xmlns:d="http://schemas.microsoft.com/expression/blend/2008" xmlns:local="clr-namespace:Wpf_ResourceDictionary"
		x:Class="Wpf_ResourceDictionary.MainWindow" mc:Ignorable="d" d:DesignWidth="800" d:DesignHeight="600"
		Title="MainWindow" Height="Auto" Width="Auto">
	<Window.Resources>
		<local:CulturesHelper x:Key="CulturesHelperDataSource" d:IsDataSource="True" />
	</Window.Resources>
	<Grid>
		<Border BorderBrush="#FF646464" BorderThickness="2" HorizontalAlignment="Center" Height="300"
				VerticalAlignment="Center" Width="400" CornerRadius="10" Background="White">
			<Border.Effect>
				<DropShadowEffect Opacity="0.5" />
			</Border.Effect>
			<Grid>
				<Grid.ColumnDefinitions>
					<ColumnDefinition Width="125" />
					<ColumnDefinition Width="0.646*" />
				</Grid.ColumnDefinitions>
				<Grid.RowDefinitions>
					<RowDefinition Height="0.2*" />
					<RowDefinition Height="0.2*" />
					<RowDefinition Height="0.2*" />
					<RowDefinition Height="0.2*" />
					<RowDefinition Height="0.2*" />
				</Grid.RowDefinitions>
				<TextBlock x:Name="textBlock" HorizontalAlignment="Center" TextWrapping="Wrap"
						VerticalAlignment="Center" Grid.ColumnSpan="2" Text="WPF Multilingual Sample" FontSize="24"
						Foreground="#FF323232" />
				<TextBlock x:Name="textBlock3" TextWrapping="Wrap" Text="{DynamicResource Languages}"
						HorizontalAlignment="Left" VerticalAlignment="Center" Grid.Row="1" Margin="20,0,0,0"
						FontSize="16" />
				<ComboBox x:Name="comboBox" d:LayoutOverrides="Height" Grid.Row="1" Grid.Column="1"
						VerticalAlignment="Center" Margin="10" FontSize="16" DisplayMemberPath="DisplayName"
						ItemsSource="{Binding SupportedCultures, Source={StaticResource CulturesHelperDataSource}}" />
				<TextBlock x:Name="textBlock2" TextWrapping="Wrap" HorizontalAlignment="Left" VerticalAlignment="Center"
						Grid.Row="2" Margin="20,0,0,0" FontSize="16" Text="{DynamicResource UserAccount}" />
				<TextBox x:Name="textBox" TextWrapping="Wrap" Grid.Column="1" Grid.Row="2" Margin="10" FontSize="16"
						VerticalAlignment="Center" />
				<TextBlock x:Name="textBlock1" TextWrapping="Wrap" HorizontalAlignment="Left" VerticalAlignment="Center"
						Grid.Row="3" Margin="20,0,0,0" FontSize="16" Text="{DynamicResource Password}" />
				<TextBox x:Name="textBox1" TextWrapping="Wrap" Grid.Row="3" Grid.Column="1" Margin="10" FontSize="16"
						VerticalAlignment="Center" />
				<StackPanel Grid.Row="4" Grid.ColumnSpan="2" VerticalAlignment="Center" HorizontalAlignment="Center"
						Orientation="Horizontal">
					<Button x:Name="button" Content="{DynamicResource Ok}" Width="75" Margin="10" FontSize="16"
							/>
					<Button x:Name="button1" Content="{DynamicResource Cancel}" Width="75" Margin="10" FontSize="16" />
				</StackPanel>
			</Grid>
		</Border>
	</Grid>
</Window>
要取得有哪些語系可用的話,只需要像上面的例子一樣,將CulturesHelper設為DataSource,再透過它的SupportedCultures屬性,就可以取出偵測到可用的語系有哪些。
Step 10:加入動態切換語系的部份
最後,說好的執行時期動態切換呢!?跟上一篇的方式一樣,只需要在語言下拉選單的選項被改變了之後,呼叫CulturesHelper中的ChangeCulture方法就行啦!!
來看看執行的畫面~
切換!!~~
最後的最後,一樣奉上成品的原始碼,請自行服用:


