簡單創立共用事件,讓物件可以自由變換大小位置。
PS:如果沒記錯的話,因為程式不是全部都我寫,部分程式碼是參考網路,如果有參考到你/妳的著作權,請留言給我讓我特別註記。
1.開啟專案加入你要的物件,並宣告作用物件、滑鼠物件偏差值,並加入一個Panel,這個Panel請記得設定BorderStyle不可以為None,不然移動或是改變大小時會無法看到所引線喔。
	object Target;
int XOffset, YOffset;
2.寫下共用事件:滑鼠點下去、滑鼠彈起來、滑鼠移動
滑鼠點下去
	private void ControlsMouseDown(object sender, MouseEventArgs e)
{
    if (Target == null && autoToolStripMenuItem.Checked)
    {
        Control bt = sender as Control;
        if (bt != null)
        {
            panel1.Location = new Point(bt.Location.X, bt.Location.Y);
            if (e.X > bt.Size.Width -10 && e.Y > bt.Height -10)
            {
                sizeToolStripMenuItem.Checked = true;
                moveToolStripMenuItem.Checked = false;
            }
            else
            {
                moveToolStripMenuItem.Checked = true;
                sizeToolStripMenuItem.Checked = false;
            }
        }
    }

    if (moveToolStripMenuItem.Checked || sizeToolStripMenuItem.Checked)
    {
        Target = sender;
        Control bt = Target as Control;
        if (bt != null)
        {
            XOffset = bt.Location.X - e.X;
            YOffset = bt.Location.Y - e.Y;

            if (e.X > bt.Size.Width -10 && e.Y > bt.Height -10)
            {
                panel1.Size = bt.Size;
                panel1.Location = new Point(bt.Location.X, bt.Location.Y);
            }
        }
    }
}
PS:利用ToolStripMenuItem設定動作行為是Move、Resize還是Auto。
滑鼠彈起來
	private void ControlsMouseUp(object sender, MouseEventArgs e)
{
    if (Target != null)
    {
        Control bt = Target as Control;
        if (bt != null)
        {
            if (moveToolStripMenuItem.Checked)
            {
                bt.Location = new Point(panel1.Location.X, panel1.Location.Y);
            }
            if (sizeToolStripMenuItem.Checked)
            {
                bt.Size = panel1.Size;
            }
        }
        Target = null;
        panel1.Visible = false;
    }
}
滑鼠移動
	private void ControlsMouseMove(object sender, MouseEventArgs e)
{
    if (Target != null)
    {
        panel1.Location = new Point(button1.Location.X,button1.Location.Y);
        if (moveToolStripMenuItem.Checked)
        {
            panel1.Location = new Point(XOffset + e.X, YOffset + e.Y);
            panel1.Visible = true;
        }
        if (sizeToolStripMenuItem.Checked)
        {
            panel1.Size = new Size(e.X, e.Y);
            panel1.Visible = true;
        }
    }
}
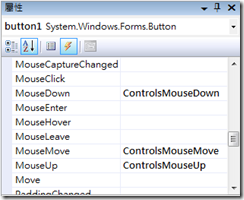
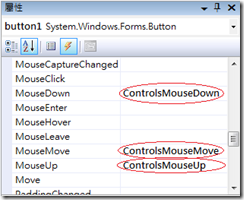
3.有了這三個動作,你可以 套用在你想要套用的物件上,點選物件後,在該物件的屬性視窗的事件中分別在MouseDown、MouseUp、MouseMove中分別選相對應的共用事件。
基本上這樣就大功告成啦,如果需要更複雜的功能可以基於這個功能來發展唷,對於一般的使用者來說這樣的寫法簡單又容易。
範例檔案中有更詳細的註解。

