本篇主要是說明如何在Eclipse上建立 Azure通知中樞之Client端的專案, 此篇不會在說明如何設定GCM和Azure通知中樞以及如何在Android Studio上建立 Azure通知中樞之Client端的專案,若想要瞭解可以參考此篇。
本篇主要是說明如何在Eclipse上建立 Azure通知中樞之Client端的專案, 此篇不會在說明如何設定GCM和Azure通知中樞以及如何在Android Studio上建立 Azure通知中樞之Client端的專案,若想要瞭解可以參考此篇。
1.建立Android專案
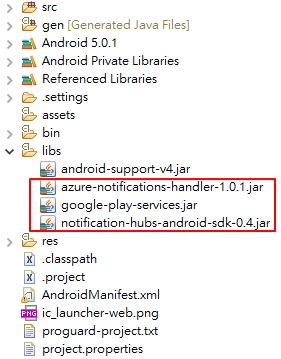
2.將Azure通知中樞程式庫和 Google Android GMS程式庫 加入到 /libs目錄
azure-notifications-handler 下載
notification-hubs-android-sdk 下載
google-play-services 下載
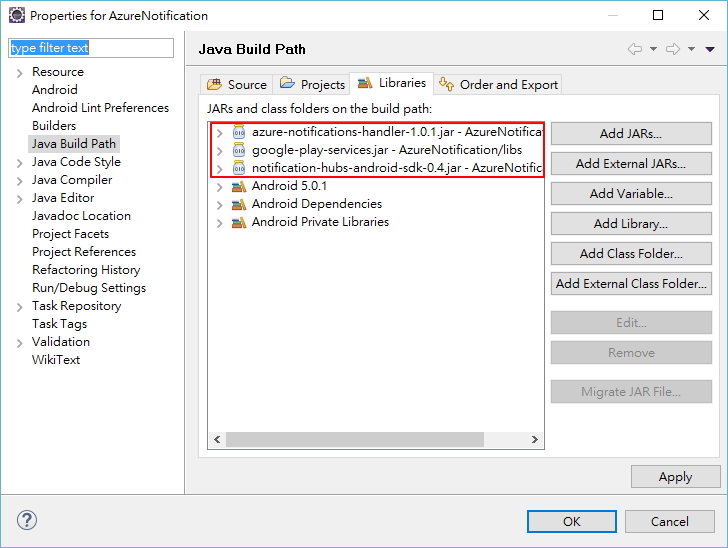
3.Project→Propertise→Java Build Path,將 Azure通知中樞和Google Android GMS程式庫加入
4.在 AndroidManifest.xml中加入App所需要的權限
- 將{App Package}修改成App的Package
<!-- Permission -->
<uses-permission android:name="android.permission.INTERNET" />
<uses-permission android:name="android.permission.GET_ACCOUNTS" />
<uses-permission android:name="android.permission.WAKE_LOCK" />
<uses-permission android:name="com.google.android.c2dm.permission.RECEIVE" />
<uses-permission android:name="android.permission.VIBRATE" />

<!-- permission.C2D_MESSAGE -->
<permission
	android:name="{App Package}.permission.C2D_MESSAGE"
	android:protectionLevel="signature" />
<uses-permission android:name="{App Package}.permission.C2D_MESSAGE" />
5. 在 AndroidManifest.xml中加入Broadcast Receiver
- 將{App Package}修改成App的Package
<receiver
	android:name="com.microsoft.windowsazure.notifications.NotificationsBroadcastReceiver"
	android:permission="com.google.android.c2dm.permission.SEND" >
	<intent-filter>
		<action android:name="com.google.android.c2dm.intent.RECEIVE" />

		<category android:name="{App Package}" />
	</intent-filter>
</receiver>
6.加入NotificationSettings.java
- 這個檔案主要是定義GCM和Azure通知中樞的設定
- SenderId:GCM的Project ID
- HubName: Azure通知中樞的名稱
- HubListenConnectionString: Azure通知中樞的連線字串
public class NotificationSettings {
    public static String SenderId = "SendrId";
    public static String HubName = "HubName";
    public static String HubListenConnectionString = "HubListenConnectionString";
}
7-1.加入GcmInstanceIDListenerService.java
public class GcmInstanceIDListenerService extends InstanceIDListenerService {
    private static final String TAG = "GcmInstanceIDListenerService";

    @Override
    public void onTokenRefresh() {
        Log.i(TAG, "Refreshing GCM Registration Token");

        Intent intent = new Intent(this, RegistrationIntentService.class);
        startService(intent);
    }
}
7-2.在AndroidManifest.xml中加入此Service
- 將{App Package}修改成App的Package
<service
	android:name="{App Package}.GcmInstanceIDListenerService"
	android:exported="false" >
	<intent-filter>
		<action android:name="com.google.android.gms.iid.InstanceID" />
	</intent-filter>
</service>
8-1.加入RegistrationIntentService.java
- 此段的程式碼主要是用來處理GCM和Azure通知中樞的註冊
public class RegistrationIntentService extends IntentService {

	private static final String TAG = "RegIntentService";

	public RegistrationIntentService() {
		super(TAG);
	}

	@Override
	protected void onHandleIntent(Intent intent) {
		SharedPreferences sharedPreferences = PreferenceManager.getDefaultSharedPreferences(this);
		String resultString = null;
		String regID = null;

        	try {
        		// Get Google Cloud Messaging Token
       	 		String senderId = NotificationSettings.SenderId;
        		String scopeGCM = GoogleCloudMessaging.INSTANCE_ID_SCOPE;
            		InstanceID instanceID = InstanceID.getInstance(this);
            		String token = instanceID.getToken(senderId, scopeGCM);

            		// Get And Store Register ID
            		if ((regID=sharedPreferences.getString("registrationID", null)) == null) {
            			// Register Azure Notification Push Hub
            			String hubName = NotificationSettings.HubName;
            			String hubConnectionString = NotificationSettings.HubListenConnectionString;
            			String deviceTag = NotificationSettings.DeviceTag;
                		NotificationHub hub = new NotificationHub(hubName, hubConnectionString, this);
                		regID = hub.register(token).getRegistrationId();

                		// Print Registered Successfully Message
                		resultString = "Registered Successfully - RegId : " + regID;

                		// Store Register ID
                		sharedPreferences.edit().putString("registrationID", regID).apply();
            		} else {
                		resultString = "Previously Registered Successfully - RegId : " + regID;
            		}
        	} catch (Exception e) {
            		Log.e(TAG, resultString="Failed to complete token refresh", e);
        	}

        	// Notify UI that registration has completed.
        	if (MainActivity.isVisible) {
            		MainActivity.mainActivity.ToastNotify(resultString);
        	}
	}
}
8-2. 在AndroidManifest.xml中加入此Service
- 將{App Package}修改成App的Package
<service
	android:name="{App Package}.RegistrationIntentService"
	android:exported="false" >
</service>
9.加入 GcmHandler.java
- 這段程式碼主要負責處理從GCM推播下來時所要做的事情
- sendNotification(...):發出通知訊息
public class GcmHandler extends NotificationsHandler  {
    public static final int NOTIFICATION_ID = 1;
    private NotificationManager mNotificationManager;
    NotificationCompat.Builder builder;
    Context ctx;

    @Override
    public void onReceive(Context context, Bundle bundle) {
        ctx = context;
        String nhMessage = bundle.getString("message");
        sendNotification(nhMessage);
        if (MainActivity.isVisible) {
            MainActivity.mainActivity.ToastNotify(nhMessage);
        }
    }

    private void sendNotification(String msg) {

        Intent intent = new Intent(ctx, MainActivity.class);
        intent.addFlags(Intent.FLAG_ACTIVITY_CLEAR_TOP);

        mNotificationManager = (NotificationManager)
                ctx.getSystemService(Context.NOTIFICATION_SERVICE);

        PendingIntent contentIntent = PendingIntent.getActivity(ctx, 0,
                intent, PendingIntent.FLAG_ONE_SHOT);

        Uri defaultSoundUri = RingtoneManager.getDefaultUri(RingtoneManager.TYPE_NOTIFICATION);
        NotificationCompat.Builder mBuilder =
                new NotificationCompat.Builder(ctx)
                        .setSmallIcon(R.drawable.ic_launcher)
                        .setContentTitle("Notification Hub Demo")
                        .setStyle(new NotificationCompat.BigTextStyle()
                        .bigText(msg))
                        .setSound(defaultSoundUri)
                        .setContentText(msg);

        mBuilder.setContentIntent(contentIntent);
        mNotificationManager.notify(NOTIFICATION_ID, mBuilder.build());
    }
}
10-1.修改activity_main.xml (Layout)
<RelativeLayout xmlns:android="http://schemas.android.com/apk/res/android"
    xmlns:tools="http://schemas.android.com/tools"
    android:layout_width="match_parent"
    android:layout_height="match_parent"
    tools:context="${relativePackage}.${activityClass}" >

    <TextView
        android:id="@+id/text_hello"
        android:layout_width="wrap_content"
        android:layout_height="wrap_content"
        android:text="@string/hello_world" />

</RelativeLayout>
10-2.修改MainActivity.java
(1) 加入Private成員
public static MainActivity mainActivity;
public static Boolean isVisible = false;
private static final int PLAY_SERVICES_RESOLUTION_REQUEST = 9000;
private static final String TAG = "MainActivity";
(2) 在onCreate中加入,啟動GCM和Azure通知中樞的註冊
@Override
protected void onCreate(Bundle savedInstanceState) {
	super.onCreate(savedInstanceState);
	setContentView(R.layout.activity_main);

	mainActivity = this;
	NotificationsManager.handleNotifications(this, NotificationSettings.SenderId, GcmHandler.class);
	registerWithNotificationHubs();
}
(3) 加入下面幾的Method,用來驗證應用程式是否正確執行
@Override
protected void onStart() {
	super.onStart();
	isVisible = true;
}

@Override
protected void onPause() {
	super.onPause();
	isVisible = false;
}

@Override
protected void onResume() {
	super.onResume();
	isVisible = true;
}

@Override
protected void onStop() {
	super.onStop();
	isVisible = false;
}


public void registerWithNotificationHubs()
{
	Log.i(TAG, " Registering with Notification Hubs");

	try {
		 if (checkPlayServices()) {
			// Start IntentService to register this application with GCM.
			Intent intent = new Intent(this, RegistrationIntentService.class);
			startService(intent);
		}
	}catch(Exception e) {

	}

}

private boolean checkPlayServices() {
	// Check Google Service
	GoogleApiAvailability apiAvailability = GoogleApiAvailability.getInstance();
	int resultCode = apiAvailability.isGooglePlayServicesAvailable(this);
	if (resultCode != ConnectionResult.SUCCESS) {
		if (apiAvailability.isUserResolvableError(resultCode)) {
			apiAvailability.getErrorDialog(this, resultCode, PLAY_SERVICES_RESOLUTION_REQUEST)
					.show();
		} else {
			Log.i(TAG, "This device is not supported by Google Play Services.");
			ToastNotify("This device is not supported by Google Play Services.");
			finish();
		}
		return false;
	}
	return true;
}

public void ToastNotify(final String notificationMessage) {
	runOnUiThread(new Runnable() {
		@Override
		public void run() {
			Toast.makeText(MainActivity.this, notificationMessage, Toast.LENGTH_LONG).show();
			TextView helloText = (TextView) findViewById(R.id.text_hello);
			helloText.setText(notificationMessage);
		}
	});
}
11-1.在/res/values中加入version.xml檔案
- 設定相對應的Google Play Services 的版本號碼
<?xml version="1.0" encoding="utf-8"?>
<resources>
    <integer name="google_play_services_version">8487000</integer>
</resources>
11-2. 在AndroidManifest.xml的application標籤內加入Google Android GMS Version的Meta Data
<!-- Meta Data Google Android GMS Version (res/valuse/version.xml) -->
<meta-data
	android:name="com.google.android.gms.version"
	android:value="@integer/google_play_services_version" />
參考資料:
使用 Azure 通知中樞將推播通知傳送至 Android (引用部分程式碼)
