摘要:[Xamarin.Android] 整合Google+ 登入
如何在Xamarin中整合Google+登入?在國外網站上有為外國作者James Montemagno分享了如何在Xamarin.Android上整合Google Plus的登入方法,這邊就介紹這篇文章。
這個專案的範例程式可以在原作者的GitHub網站上下載:
https://github.com/jamesmontemagno/GooglePlusSignIn
1. 首先調整Xamarin Android專案的設定
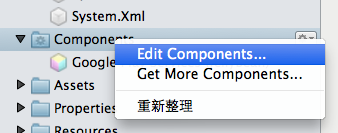
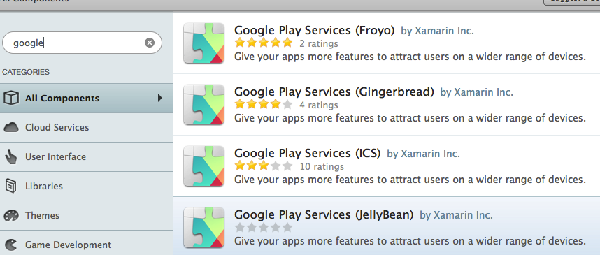
1.1 開啓Android SDK Manager下載Google Play Service。
1.2 在使用Xamarin開發中,所有會使用到Google 的雲服務功能,無論是Google+,地圖,GCM推播,都需要去下載Google Play Service 元件。
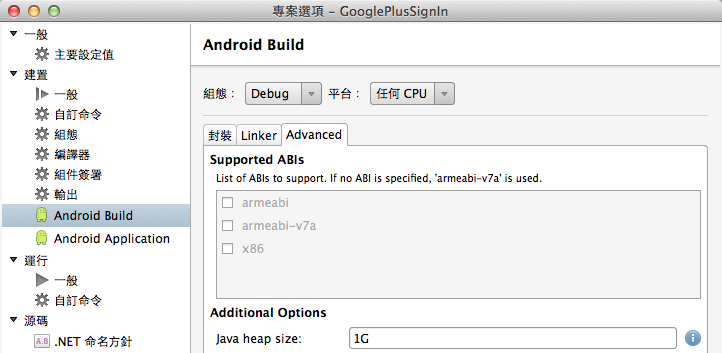
1.3 調整專案中的Heap Size.
在專案中,選擇project properties -> Android Build -> Advanced -> Java Heap Size.在這邊調整為1G
2. 設定Google Console
在進行這一段設定之前,當然你需要有一個Google帳號。這邊就不贅述,請自行上Google網站上申請。
2.1 前往Google App Console網站建立一個Project
https://console.developers.google.com
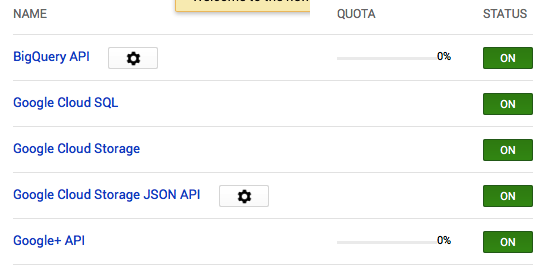
2.2 在Google Service console網站上開啓Google plus service
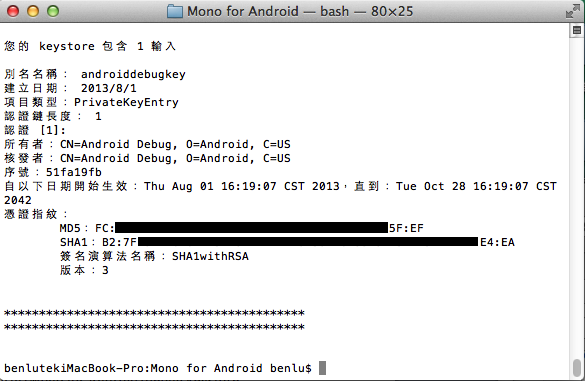
2.3 取得你電腦上的SHA1指紋憑證
(在這個範例中是使用預設的Debug.keystore,如果你要發佈這個App,你必須自己建立另一個Keystore)
使用預設的debug.keystore,他的存放路徑如下:
在Mac環境中,Debug.keystore的路徑為
/Users/<UserName>/.local/share/Xamarin/Mono for Android/debug.keystore
在Windows環境中的路徑是
C:\Users\[USERNAME]\AppData\Local\Xamarin\Mono for Android\debug.keystore
可使用下列的指令列印出SHA1指紋憑證
keytool -list -v -keystore /Users/benlu/.local/share/Xamarin/Mono\ for\ Android/debug.keystore
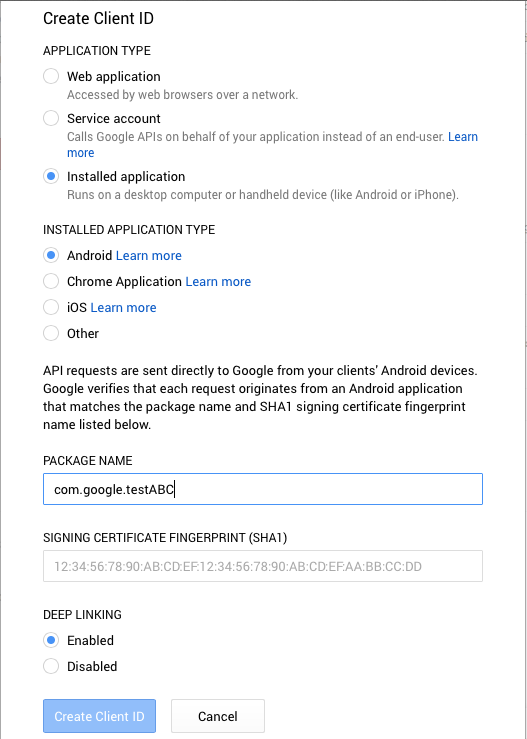
2.4 在Google Console上面建立一個Client ID
在這個步驟特別要注意,註冊這個ID所需要的Package name與你專案中的package名稱一樣.
3. 建立Xamarin Android 專案
3.1 開啓Android專案中的Main.axml檔案,輸入底下的Xaml檔案.
<?xml version="1.0" encoding="utf-8"?>
<LinearLayout xmlns:android="http://schemas.android.com/apk/res/android"
    xmlns:plus="http://schemas.android.com/apk/lib/com.google.android.gms.plus"
    android:orientation="vertical"
    android:layout_width="fill_parent"
    android:layout_height="fill_parent"
    android:padding="12dp">
    <LinearLayout
        android:orientation="horizontal"
        android:layout_width="wrap_content"
        android:layout_height="wrap_content"
        android:layout_gravity="center"
        android:gravity="center">
        <com.google.android.gms.common.SignInButton
            android:id="@+id/sign_in_button"
            android:layout_width="wrap_content"
            android:layout_height="wrap_content"
            android:layout_gravity="center" />
        <Button
            android:id="@+id/logout_button"
            android:layout_width="wrap_content"
            android:layout_height="wrap_content"
            android:layout_gravity="center"
            android:text="Logout" />
    </LinearLayout>
    <com.google.android.gms.plus.PlusOneButton
        android:id="@+id/plus_one_button"
        android:layout_width="wrap_content"
        android:layout_height="wrap_content"
        android:layout_gravity="center"
        plus:size="standard"
        plus:annotation="inline"
        android:layout_marginTop="12dp" />
    <ImageView
        android:src="@android:drawable/ic_menu_gallery"
        android:layout_width="100dp"
        android:layout_height="100dp"
        android:id="@+id/profile_image"
        android:layout_marginTop="12dp" />
    <TextView
        android:textAppearance="?android:attr/textAppearanceLarge"
        android:layout_width="match_parent"
        android:layout_height="wrap_content"
        android:id="@+id/profile_name"
        android:singleLine="true" />
    <TextView
        android:textAppearance="?android:attr/textAppearanceLarge"
        android:layout_width="match_parent"
        android:layout_height="wrap_content"
        android:id="@+id/profile_nickname"
        android:singleLine="true" />
    <TextView
        android:textAppearance="?android:attr/textAppearanceLarge"
        android:layout_width="match_parent"
        android:layout_height="wrap_content"
        android:id="@+id/profile_about"
        android:maxLines="3" />
</LinearLayout>
3.2 接著需要設定App整合Google+所需要的權限,這邊需要設定Internet,Get Accounts還有User Crefentials.開啓In AndroidManifest.xml,加入所需要的權限
3.3 開啓畫面MainActivity.cs檔案,建立GooglePlusClient物件,並且載入LoginButton 與 PlusOneButton:
控制項。
plusClient = new PlusClient.Builder(this, this, this).Build();

googleLoginButton = FindViewById(Resource.Id.sign_in_button);

plusOneButton = FindViewById (Resource.Id.plus_one_button);
3.4 接著來實作登入按鈕被按下的事件處理常式,這邊建立ResolveLogin這個方法與實作常式。而當建立連線後,會觸發OnActivityResult事件。
        private void ResolveLogin(ConnectionResult result)
        {
            if (result.HasResolution) {
                try {
                    result.StartResolutionForResult (this, REQUEST_CODE_RESOLVE_ERR);
                } catch (Android.Content.IntentSender.SendIntentException e) {
                    plusClient.Connect ();
                }
            } else if(progressDialog != null && progressDialog.IsShowing) {
                progressDialog.Dismiss ();
            }
        }
     protected override void OnActivityResult (int requestCode, Result resultCode, Intent data)
        {
            base.OnActivityResult (requestCode, resultCode, data);

            if (requestCode != REQUEST_CODE_RESOLVE_ERR)
                return;

            if (resultCode == Result.Ok) {
                plusClient.Connect ();
            } else {
                progressDialog.Dismiss ();
            }
        }
3.5 接著要實作兩個interface,
IGooglePlayServicesClientConnectionCallbacks, IGooglePlayServicesClientOnConnectionFailedListener.
這個範例中,在Activity Start事件與stop事件中都會嘗試連結Google plus。
public void OnConnected (Bundle p0){
            progressDialog.Dismiss ();
            RefreshPlusOneButton ();
            UpdateProfile ();
            Toast.MakeText (this, "Connected!", ToastLength.Long).Show ();
    }
    public void OnDisconnected (){
            Toast.MakeText (this, "Disconnected!", ToastLength.Long).Show ();
    }
   public void OnConnectionFailed (ConnectionResult result)
   {
            if (progressDialog.IsShowing) {
                ResolveLogin (result);
            }

            connectionResult = result;
            Toast.MakeText (this, "Connection Failed!", ToastLength.Long).Show ();
        }
3.6 在OnCreate事件中,我們也希望去對Google plus註冊與取得Callbacks
plusClient.RegisterConnectionCallbacks (this);
plusClient.IsConnectionFailedListenerRegistered (this);
3.7 在登入按鈕中,加入條件判斷式來確認當已經登入過Google Plus後,不要再重複登入.
            googleLoginButton.Click += (sender, e) => {
                if(plusClient.IsConnected || plusClient.IsConnecting)
                    return;
                progressDialog.Show();

                if (connectionResult == null) {
                    plusClient.Connect();
                }
                else{
                    ResolveLogin(connectionResult);
                }
            };
3.8 一旦登入後,可以取得這個使用者的登入資訊, 呈現在畫面上。
 private void UpdateProfile(){
var imageView = FindViewById (Resource.Id.profile_image);
FindViewById (Resource.Id.profile_name).Text = plusClient.CurrentPerson.DisplayName;FindViewById (Resource.Id.profile_nickname).Text = plusClient.CurrentPerson.Nickname;

FindViewById (Resource.Id.profile_about).Text = plusClient.CurrentPerson.AboutMe;
imageLoader.DisplayImage (plusClient.CurrentPerson.Image.Url, imageView, Resource.Drawable.default_icon);
        }
3.9 如果使用者需要登出Google Plus,我們只需要撤銷PlusClient的權限即可。
 logoutButton.Click += (sender, e) => {
     if(!plusClient.IsConnected || plusClient.IsConnecting)
     return;
     plusClient.RevokeAccessAndDisconnect(this);
 };
3.10 在這個範例中,最後新增一個按鈕,當你完成登入Google Plus的時候,按下這個按鈕,
可以在Google+上帶入URL網址與分享資訊。
private void RefreshPlusOneButton ()
{
plusOneButton.Initialize ("http://blog.xamarin.com/microsoft-and-xamarin-partner-globally/", PLUS_ONE_REQUEST_CODE);
		}
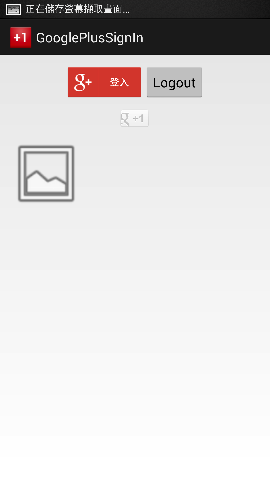
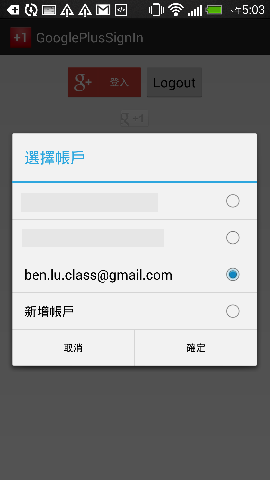
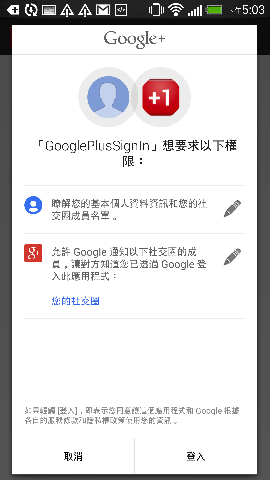
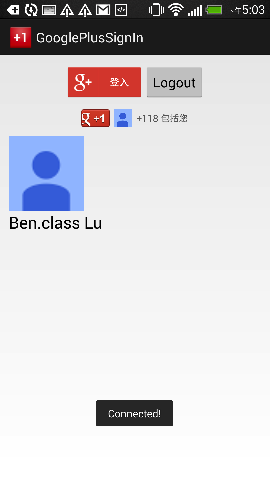
登入這個App,可以看見如以下的畫面,在這個App上按下紅色的Google+按鈕,會開啟帳戶選擇視窗。
這邊選擇一個你的Google+帳戶後,按下確定,登入完成後,可以看到在App中截取到我這個Google+的帳號資訊了。
參考文件:
Google+ Sign in In android application
http://forums.xamarin.com/discussion/15898/google-sign-in-in-android-application
Google Plus Services, Login and +1 in Xamarin.Android
http://motzcod.es/post/67077106339/google-plus-services-login-and-1-in-xamarin-android
