[ASP.Net Identity 2] 空白MVC專案使用Asp.net Identity 上
繼上一篇後,接著要開始在MVC專案中使用Asp.Net Identity。但是在這一篇中,還沒有與MS SQL資料庫做結合。
這一篇研究是參考國外的ASP.NET Identity Stripped Bare - MVC Part 1 這篇文章,有興趣的話可以點選下方連結參考原文。
http://benfoster.io/blog/aspnet-identity-stripped-bare-mvc-part-1
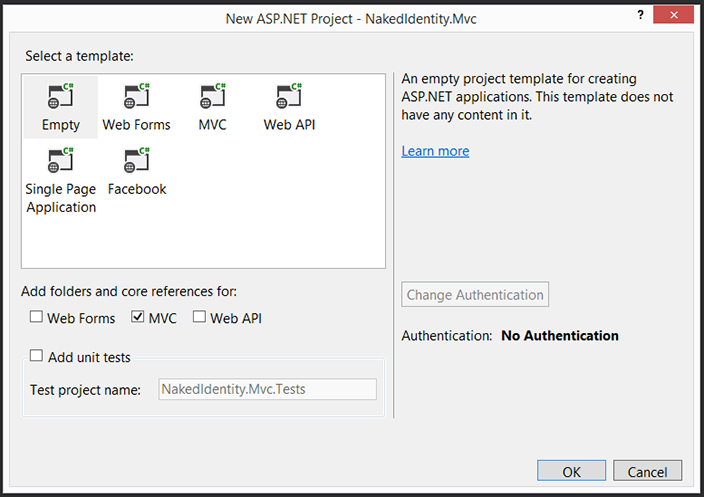
建立一個空的Asp.Net MVC專案
從NuGet Package 安裝Owin套件
從Nuget上下載安裝兩個package
1. Microsoft.Owin.Host.SystemWeb– 實際上Asp.Net Identity是建立在Owin之上,這樣的設計讓同樣的identity功能可以被使用在Owin支援的Framework上,例如WebApi與SignalR。這個套件會enables OWIN middleware去hook into the IIS request pipeline。
2. Microsoft.Owin.Security.Cookies–這個套件會enables cookie based authentication
Bootstrapping OWIN
要initialize Owin Identity component,需要新增一個Startup Class到專案中。Startup class類別中還需要包含方法 Configuration。然後傳入一個IAppBuilder物件。這樣這個Startup Class會自動的被Owin找到並初始化。
namespace AspNetIdentity1
{
Public class Startup
    {
		Public void Configuration(IAppBuilder app)
		{
			app.UseCookieAuthentication(new CookieAuthenticationOptions
            	{
				AuthenticationType = "ApplicationCookie",
			//這邊設定User在沒有登入的情況下會導到哪個Controller的Action裡面
				LoginPath = new PathString("/auth/login")
            	});
        	}
    	}
}
UseCookieAuthentication是用來擴充Asp.Net Identity framework使用cookie base驗證,這個擴充有2個屬性要設定
1.AuthenticationType:這是一個用來識別Cookie的字串屬性。這個屬性之所以要設定是因為使用者可能會有很多個Instance在Cookie middlware。舉例來說,當使用外部的Auth Server(OAuth/OpenID),同樣的Cookie middlware會被用來給外部的provider傳遞要求(claims)。如果有在NuGet中加入Microsoft.AspNet.Identity package的話,可以使用DefaultAuthenticationTypes.ApplicationCookie。其值與"ApplicationCookie"相同。
2. LoginPath:這個路徑是當user agent(瀏覽器)收到了未通過驗證的401封包時unauthorized (401) response,需要被重新導向。這個Path會對應到你的login controller。在這個範例中,會指向AuthController的Login Action。
預設的安全設定
一般我們可以藉由在Controller層級或者是Action層級去設定[Authorize]屬性來決定這個Controller或者是Action是否需要驗證才可以使用。但是一但專案很大的時候,Controller或是Action會變得越來越多。所以這邊可以利用反向的方式來設定,
先讓所有的Controller預設都需要通過驗證才可以使用。然後再以白名單的方式來開放。預設讓所有的Controller都需要經過驗證才可以存取,然後要匿名存取的部分在逐一開放。要做到這樣的設定,要去建立一個global filter - AuthorizeAttribute
建立下方的類別
usingSystem.Web.Mvc;
namespace AspNetIdentity1
{
Class FilterConfig
    {
		Public static void RegisterGlobalFilters(GlobalFilterCollection filters)
		{
			filters.Add(new HandleErrorAttribute());
			filters.Add(new AuthorizeAttribute());
        	}
    }
}

然後把這個物件註冊到global.asax.csApplication_Start的事件當中
namespace AspNetIdentity1
{
	Public class MvcApplication : System.Web.HttpApplication
	{
		protectedvoidApplication_Start()
		{
			AreaRegistration.RegisterAllAreas();
			RouteConfig.RegisterRoutes(RouteTable.Routes);
			FilterConfig.RegisterGlobalFilters(GlobalFilters.Filters);
        }
    }
}
建立受保護的Controller
其實在這裏就只是建立一個一般的HomeController,因為在上一個步驟我們設定了全域的Conterller保護,所以預設我們建立的Controller都會需要通過驗證才可以存取。
Public class HomeController : Controller
{
	Public ActionResult Index()
	{
		return View();
	}
}
建立HomeController,Index對應的View Layout。
@{
	ViewBag.Title = "Home";
}

<h2>Home</h2>
建立負責驗證登入的Controller
接著建立一個AuthController與一個Login Action。這個Login Action是當使用者沒有被登入的時候,會被導向的Action。[AllowAnonymous] 屬性是允許匿名登入使用者使用這個Controller。
[AllowAnonymous]
Public class AuthController : Controller
{
	Public ActionResult LogIn()
	{
		return View();
	}
}
同樣的也為這個Action建立相對應的View Layout。
@{
ViewBag.Title = "Log In";
}
<h2>Log In</h2>
執行這個MVC網站
到這個階段來執行測試一下網站,可以看到依據預設,這個網站會被App_Start的規則導向到HomeController/Index Action去,但是因為這個Controller需要驗證才可以存取,所以瀏覽器把我們轉導向authController/login Action去。
Logging in 登入
建立一個資料Model,用來建立使用者登入時所需的資料。這邊用簡單的方法設定幾個data annotation attributes,來讓mvc HTMLhelper可以幫我們產生Login Form。
Public class LogInModel
{
    [Required]
    [DataType(DataType.EmailAddress)]
	Public string Email { get; set; }

    [Required]
    [DataType(DataType.Password)]
	Public string Password { get; set; }

    [HiddenInput]
	Public stringReturnUrl { get; set; }
}
修改AuthController, 新增一個 GET action (GET /auth/login) ,當使用被導向到Login頁面的時候,HTMLhelper會自動幫忙建立Form表單。
[HttpGet]
Public ActionResult LogIn(string returnUrl)
{
	var model = new LogInModel
    {
		ReturnUrl = returnUrl
    };
	return View(model);
}
這個設計跟Forms Authentication module一樣。原先使用者要登入的網址,因為這個網址對應到的Controller是屬於被保護的資源。所以在重新導向的時候,原本要存取的網址就會被用querystring的參數來傳送。所以在設計上,雖然使用者被導向到Login登入頁面,當使用者經由Form表單送出帳號密碼的時候,原先使用者連結的網址也要一併送過來,這樣才可以在使用者登入後,直接幫使用者導向他原本要去的網頁。
在AuthController裡面新增一個 POST action (POST /auth/login) ,用來驗證使用者的帳號與密碼。
[HttpPost]
Public ActionResult LogIn(LogInModel model)
{
	if (!ModelState.IsValid)
    {
		return View();
    }

	// Don't do this in production!
	if (model.Email == "Ben@test.com"&&model.Password == "123456")
	{
		var identity = new ClaimsIdentity(new[]
		{
			new Claim(ClaimTypes.Name, "Ben"),
			new Claim(ClaimTypes.Email, "Ben@test.com "),
			new Claim(ClaimTypes.Country, "Taiwan")
		}, "ApplicationCookie");

		var	ctx = Request.GetOwinContext();
		var	authManager = ctx.Authentication;
		authManager.SignIn(identity);
		return Redirect(GetRedirectUrl(model.ReturnUrl));
    }

	// user authN failed
	ModelState.AddModelError("", "Invalid email or password");
	return View();
}

Private string GetRedirectUrl(string returnUrl)
{
	if (string.IsNullOrEmpty(returnUrl) || !Url.IsLocalUrl(returnUrl))
	{
		Return Url.Action("index", "home");
	}
	Return returnUrl;
}

這個範例中,先簡單化這個登入流程。先在Login Action裡面Hardcode登入驗證。在下一個範例再來將它延伸到ASP.Net Identity UserManager以及把相關的使用者資料儲存到Database。先來看看這個Login Action到底做了哪些事情?
1. 首先建立了一個ClaimsIdentity object,這個物件包含目前使用者資訊。Claim架構提供Client一個持續驗證用的Cookie。
2. 這邊也提供了authentication type,這必須要對應到在Startup中宣告的authentication type,兩者要相同。
3. 接著從Owin Context 中取得IAuthenticationManager instance。會在startup過程中自動註冊。
4. 接著呼叫IAuthenticationManager.SignIn傳送claims identity。這會設定Client端的authentication cookie。
5. 最後把使用者的瀏覽器導回他們原先的連結
然後更新LogIn.cshtml view,使其可以幫助我們自動產生相關的登入介面:
@model NakedIdentity.Mvc.ViewModels.LogInModel
@{
      ViewBag.Title = "Log In";
}

<h2>Log In</h2>

@Html.ValidationSummary(true)

@using (Html.BeginForm())
{
@Html.EditorForModel()
 <p>
  <button type="submit">Log In</button>
</p>
}
再次執行這個mvc網站
測試登入看看. 在我的範例中使用的帳號密碼為 (Ben@test.com/132456),登入成功後會被重新導向回HomeController的Index網頁。
Add the following to Home view:
<p>
  Hello @User.Identity.Name
</p>
建立Logging Out
完成Login後,接著就來看如何處理LogOut。
在AuthController新增一個LogAction:
Public ActionResult LogOut()
{
	var	ctx = Request.GetOwinContext();
	var	authManager = ctx.Authentication;

	authManager.SignOut("ApplicationCookie");
	return RedirectToAction("index", "home");
}
在一次取得從OWIN contex取得IAuthenticationManager instance, 這次是呼叫SignOut傳遞authentication type ,如此manager知道他要移除掉哪一個cookie。
在home page裡面新增一個link來連接Logout Action:
<p>
<a href="@Url.Action("logout", "auth")">Log Out</a>
</p>
Accessing custom claim data
在Controller裡面如果要存取使用者的屬性資料,可以透過轉型User.Identity的屬性來取得name。但是如果你想要取得更多的ClaimType的話,可以透過轉型為ClaimsIdentity。取得更多得資訊。
Public ActionResult Index()
{
	Var claimsIdentity = User.Identity as ClaimsIdentity;
	ViewBag.Country = claimsIdentity.FindFirst(ClaimTypes.Country).Value;
	return View();
}而這個User物件,可以看到他其實就是一個 Principal物件。在上一篇的時候有看到在手動建立ClaimIdentity與ClaimPrincipal物件時,我們把ClaimIdentity指給ClaimPrincipal。

簡化claim data的資料存取
如果經常要去存取user claims的屬性,使用強型別來存取也是一種選擇。
建立一個AppUser類別,繼承ClaimsPrincipal 類別。
Public class AppUser : ClaimsPrincipal
{
	Public AppUser(ClaimsPrincipal principal): base(principal)
    {
    }

	Public string Name
    {
		get
		{
			Return this.FindFirst(ClaimTypes.Name).Value;
		}
    }

	Public string Country
    {
		get
		{
			Return this.FindFirst(ClaimTypes.Country).Value;
		}
	}
}
然後新增 base controller,這個類別提供把this.User類別轉型為AppUser,然後回傳:
public abstract class AppController : Controller
{
Public AppUser  CurrentUser
    {
   get
        {
        return new AppUser(this.User as ClaimsPrincipal);
        }
    }
}
接著修改HomeController,使用物件屬性的方式就可以回傳User物件的屬性了。
public class HomeController : AppController
{
    publicActionResult Index()
    {
        ViewBag.Country = CurrentUser .Country;
         return View();
    }
}
不過到這邊還有其他的做法。為什麼要多ViewBag語法來傳遞資料? 在範例中看到在Index view已經可以使用@User.Identity.Name語法來取得資料了。這邊再換個方式,先建立一個客製化的base view page給有使用到AppUser principal的Razor views。
public abstract class AppViewPage : WebViewPage
{
Protected AppUser CurrentUser
    {
   get
        {
            return new AppUser(this.User as ClaimsPrincipal);
        }
    }
}

public abstract class AppViewPage : AppViewPage
{
}
開啟 /views/web.config 然後設定 pageBaseType:
<system.web.webPages.razor>
<pages pageBaseType="AspNetIdentity1.Mvc.AppViewPage">
修改 Index.cshtml view:
<p>
  Hello @CurrentUser.Name. How's the weather in @CurrentUser.Country?
</p>
這時HomeController 只要簡單的回傳view即可:
public ActionResult Index()
{
    return View();
}
參考文獻:
ASP.NET Identity Stripped Bare - MVC Part 1
http://benfoster.io/blog/aspnet-identity-stripped-bare-mvc-part-1
ASP.NET Identity Stripped Bare - MVC Part 2
http://benfoster.io/blog/aspnet-identity-stripped-bare-mvc-part-2