摘要:[MVC] ASP.Net Identity(三) 空白專案使用 Asp.Net Identity 下
上一個範例Demo如何在ASP.Net Identity用最少的Code來設定使用cookie based的驗證。這一部分要把上一個範例Hard-code做username與password的部分修改成Asp.Net Identity所提供的架構,將使用者的資訊儲存到SQL Server資料庫去。
Storing user information in a database
延伸上一個範例,除了上一篇研究提到所需要的兩個套件(Microsoft.Owin.Host.SystemWeb, Microsoft.Owin.Security.Cookies)外,另外還需要安裝底下的新套件。
Install-Package Microsoft.AspNet.Identity.EntityFramework
在這個範例中,是使用SQL LocalDB。
Create a class to represent your user
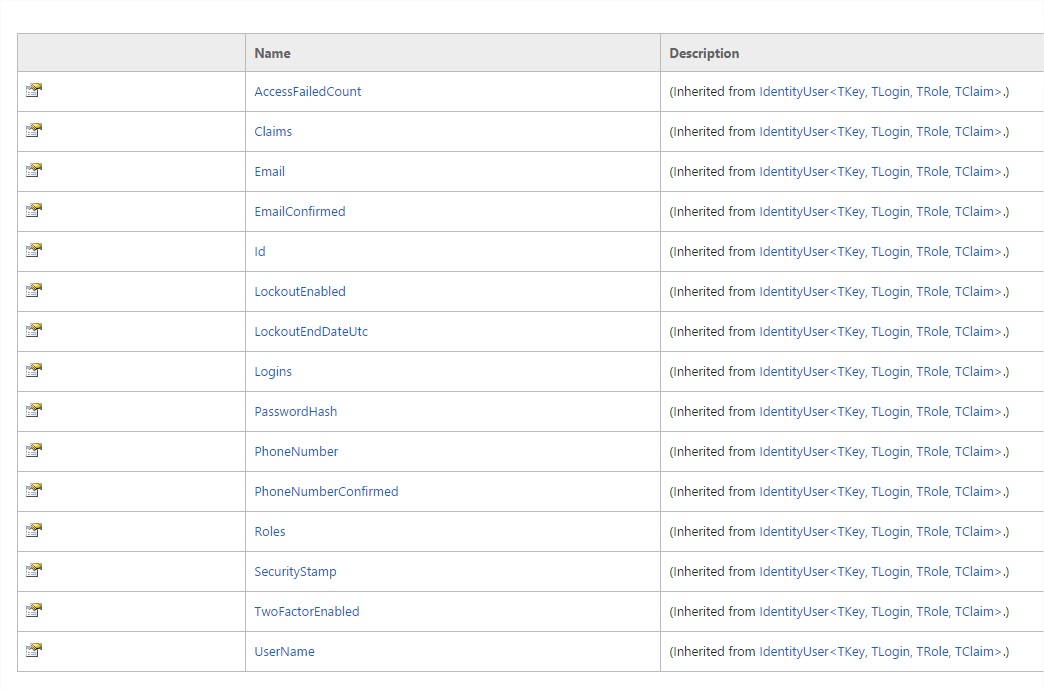
Asp.Net Identity提供了IdentityUser類別。參考MSDN網站可以發現預設的IdentityUser類別有下列的屬性。
在預設屬性上有欄位想要擴充,就是在繼承IdentityUser的類別中去新增擴充屬性。以原作者範例,他在IdentityUser上擴充兩個屬性。
這邊宣告了一個繼承IdentityUser的AppUser類別,在這個類別之中加入兩個擴充的屬性。分別是Country與Age。
Public class AppUser : IdentityUser
{
		Public string Country { get; set; }
		Public int Age { get; set; }
 }
Create your own DbContext
建立這個entity framework 的DbContext。預設情況下,EF幫你建立一個DefaultConnection來連接你的資料庫。如果在這部分你要調整去連接你自己的資料庫,可以到Web.Config下去修改這個DefaultConnection連線字串的設定。
namespace AspNetIdentity2
{
	Public class AppDbContext : IdentityDbContext{
		publicAppDbContext(): base("DefaultConnection")
        {}
    }
}
在WebConfig檔案中加入以下的連線字串
<connectionStrings>
<addname="DefaultConnection"
connectionString="Data Source=(LocalDb)\v11.0;AttachDbFilename=|DataDirectory|\AspNetIdentity2.mdf;Initial Catalog=AspNetIdentity2;Integrated Security=True"
providerName="System.Data.SqlClient" />
</connectionStrings>
Configuring UserManager
UserManager class是在Asp.Net Identity被用來管理使用者。例如:註冊新使用者,驗證帳號密碼與讀取使用者資料。程式開發者不需要去知道後端資料庫是如何儲存使用者資訊,或是存到哪裡去,他可能是SQL Server,也有可能是Microsoft Azure Table Storage,RavenDB或者是MongoDB…等。我們只需要對UserManager做操作就可以。
原作者在Startup.cs裡面使用Factory Pattern,來回傳UserManager。這部分你可以修改為你自己擅長的DI工具來實踐。
在cookie based authentication設定跟上一個章節都一樣。這邊也設定User名稱允許是英文,數字與字符的組合。原作者認為在2014網站類型都會習慣讓使用者用email來取代。
public class Startup
{
public static Func> UserManagerFactory { get; private set; }
public void Configuration(IAppBuilder app)
{
// this is the same as before
app.UseCookieAuthentication(new CookieAuthenticationOptions
{
AuthenticationType = DefaultAuthenticationTypes.ApplicationCookie,
LoginPath = new PathString("/auth/login")
});
// configure the user manager
UserManagerFactory = () =>
{
var usermanager = new UserManager(new UserStore(new AppDbContext()));
// allow alphanumeric characters in username
usermanager.UserValidator = new UserValidator(usermanager)
{
AllowOnlyAlphanumericUserNames = false
};
//usermanager.ClaimsIdentityFactory = new AppUserClaimsIdentityFactory();
return usermanager;
};
}
}
Authentication
在AuthController設定中,我們需要先宣告一個類別層級的userManager變數。
[AllowAnonymous]
public class AuthController : Controller
{
	Private readonly UserManager userManager;

	Public AuthController(): this(Startup.UserManagerFactory.Invoke()){}
	Public AuthController(UserManageruserManager)
	{
		this.userManager = userManager;
	}
//…
再來要確認在request結束之前,要dispose UserManager。
Protected override void Dispose(bool disposing)
{
	if (disposing &&userManager != null)
	{
		userManager.Dispose();
	}
	base.Dispose(disposing);
}
然後修改在上一個範例中Login Action中Hardcode寫死註冊驗證的部分:
[HttpPost]
Public async Task LogIn(LogInModel model)
{
	if (!ModelState.IsValid)
	{
		return View();
	}

	var user = await userManager.FindAsync(model.Email, model.Password);
	if (user != null)
	{
		Await SignIn(user);
		return Redirect(GetRedirectUrl(model.ReturnUrl));
	}

	// user authN failed
		ModelState.AddModelError("", "Invalid email or password");
		return View();
}
因為在Login與register action中都會要有登入的動作,所以把登入的相關程式獨立成一個method,命名為 SignIn。
這樣就可以在註冊與登入的時候去呼叫這個Method。
private async Task SignIn(AppUser user)
{
var identity = await userManager.CreateIdentityAsync(user, DefaultAuthenticationTypes.ApplicationCookie);
GetAuthenticationManager().SignIn(identity);
}
1. 我們嘗試用userManager.FindAsync 來對使用者提供的帳號密碼進行登入
2. 如果登入成功,我們為使用者建立一個claims identity。這個claims identity可以用來傳送給AuthenticationManager。
3. 最後我們使用cookie authentication middleware SignIn(identity).來登入使用者。
Registration
當然在能登入之前,要先能註冊一個使用者。首先來為註冊建立一個註冊用的Model。
Public class RegisterModel
    {
        [Required]
        [DataType(DataType.EmailAddress)]
Public string Email { get; set; }

        [Required]
        [DataType(DataType.Password)]
Public string Password { get; set; }

        [Required]
Public string Country { get; set; }

        [Required]
Public int Age { get; set; }
    }
在AuthController建立註冊用的register actions
[HttpGet]
Public ActionResult Register()
        {
return View();
        }

        [HttpPost]
Public async Task Register(RegisterModel model)
        {
if (!ModelState.IsValid)
            {
return View();
            }

var user = newAppUser{
        UserName = model.Email,
        Country = model.Country,
        Age = model.Age
};

var result = await userManager.CreateAsync(user, model.Password);

if (result.Succeeded)
            {
Await SignIn(user);
Return RedirectToAction("index", "home");
            }

foreach (var error inresult.Errors)
            {
ModelState.AddModelError("", error);
            }

return View();
        }
在註冊Action裡面我們呼叫userManager.CreateAsync來傳送AppUser instance與使用者密碼來建立使用者。(ASP.NET Identity library 會協助我們在密碼上的儲存去處理Hash安全機制).
最後來建立一個註冊要用的register view:
@model AspNetIdentity2.RegisterModel
@{
ViewBag.Title = "Register";
}

<h2>Register</h2>

@Html.ValidationSummary(false)

@using (Html.BeginForm())
{
@Html.EditorForModel()
<p>
<buttontype="submit">Register</button>
</p>
}
Run the application
在這邊執行會產生錯誤,如果你是直接改上一篇的範例的話,在上一篇Home page中有去存取Country屬性。原作者提到這部份是Asp.Net Identity設計上的一點小confusing. 因為我們可以加入一些自訂的屬性(custom properties),例如這個範例中的 AppUser.Country。但這並不是就是設定這些自訂屬性為Claims。關於這部分,有更多的解釋,可以參考另一個作者的blog,http://brockallen.com/2013/10/20/the-good-the-bad-and-the-ugly-of-asp-net-identity/#claims
在這個章節就先不多做解釋。
最直白的作法,我們可以再登入後取得Identity時,在去手動新增identity的ClaimTypes來對應到AppUser。
這樣的作法可以修改Signin這一個Method裡面的程式碼。
Private async Task SignIn(AppUser user)
{
var identity = await userManager.CreateIdentityAsync(user, DefaultAuthenticationTypes.ApplicationCookie);
identity.AddClaim(new Claim(ClaimTypes.Country, user.Country));
GetAuthenticationManager().SignIn(identity);
}
原作者給了一個更好的做法建議,去Create一個ClaimsIdentityFactory。
Public class AppUserClaimsIdentityFactory : ClaimsIdentityFactory{

Public override async TaskCreateAsync(UserManagermanager,AppUser user,string authenticationType){
     var identity = awaitbase.CreateAsync(manager, user, authenticationType);
     identity.AddClaim(new Claim(ClaimTypes.Country, user.Country));
     return identity;
  }
}
接著只要在Startup.cs去Update UserManagerFactory 就可以。
UserManagerFactory = () =>
{
    //...
    // use out custom claims provider
usermanager.ClaimsIdentityFactory = new AppUserClaimsIdentityFactory();
returnusermanager;
};
Storing additional user information
不過這邊有個衍生問題。我們新增了一個自訂的Age屬性,這個屬性在.Net提供的ClaimType裡面並沒有相對應的存取子。導致在user principal包覆的Identity裡面可以看到Age屬性。反而轉型為ClaimIdentity的時候,卻不能對自訂屬性去做存取。這時可以自行修改個DTO型別參照來處理這個問題。
參考文獻:
ASP.NET Identity Stripped Bare - MVC Part 2
http://benfoster.io/blog/aspnet-identity-stripped-bare-mvc-part-2
IdentityUser Class
IdentityUser Class

