跨出 Code First 開發第一步 (搭配MVC5為例)
A. 開發環境建立
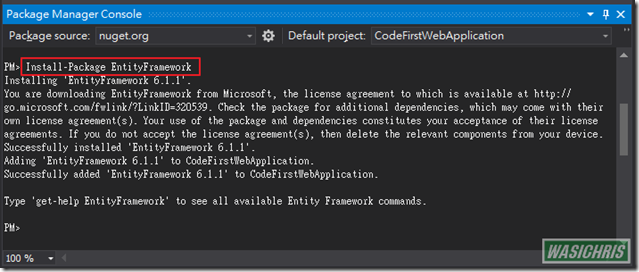
首先需要安裝Entity Framework,可以透過Package Manager Console或Manager NuGet Packages兩種方式進行安裝。使用Package Manager Console方式的朋友,請輸入 Install-Package EntityFramework 即可完成安裝;若使用Manager NuGet Packages的朋友,請搜尋EntityFramework並點選安裝即可,結果如下圖所示。
B. Model的建立資料
首先Code First的開發方式,顧名思義就是透過類別(Class)的定義來產生相對應的資料庫Table Schema。所以一開始的工作就是要建立類別及其關聯。相信大家對於Database First的開發方式都較為熟悉,所以筆者試著先將最終我們透過Code First 產生出的 ER-Model 繪出,讓大家先有個整體概念並思考要如何透過類別的設計來映射到Table Schema的每個環節,好讓Entity Framework輔助我們達到Code First的目標。
1. 建立類別(設定主鍵 Primary Key)
EF針對各類別 Primary Key 的自動剖析規則如下:
* 屬性名稱為 Id 或 類別名稱Id 將被視為主鍵(Key)
* 主鍵屬性型態為 數字 或 GUID 時,將被自動設定為 Identity 欄位
* 若要避免主鍵被自動設定成Identity欄位
可透過 [DatabaseGenerated(DatabaseGeneratedOption.None)]標籤調整
Customer Data Model
屬性名稱為 Id 將被視為主鍵(Key),且主鍵屬性型態為 數字 時,將被自動設定為 Identity 欄位。
using System;
using System.Collections.Generic;

namespace CodeFirstWebApplication.Models
{
    public class Customer
    {
        // Primary Key
        public int Id { get; set; }

        public string Email { get; set; }

        public string Password { get; set; }

        public string Name { get; set; }

        public DateTime RegisterOn { get; set; }
    }
}
Order Data Model
屬性名稱為 類別名稱Id 將被視為主鍵(Key),且主鍵屬性型態為 數字 時,將被自動設定為 Identity 欄位。
namespace CodeFirstWebApplication.Models
{
    public class Order
    {
        // Primary Key
        public int OrderId { get; set; }

        public string Memo { get; set; }
    }
}
Product Data Model
屬性名稱為 類別名稱Id 將被視為主鍵(Key),且主鍵屬性型態為 數字 時,將被自動設定為 Identity 欄位。由於我們的需求是希望商品Id由用戶自行輸入一組數字,所以我們將透過 [DatabaseGenerated(DatabaseGeneratedOption.None)]標籤來避免主鍵被自動設定成Identity欄位。
using System.ComponentModel.DataAnnotations.Schema;

namespace CodeFirstWebApplication.Models
{
    public class Product
    {
        // Primary Key
        [DatabaseGenerated(DatabaseGeneratedOption.None)]
        public int ProductId { get; set; }

        public string Name { get; set; }

        public string Description { get; set; }

        public int Price { get; set; }
    }
}
2. 針對各類別之相對應關係進行設定(外來鍵 Foreign Key)
EF針對各類別 Foreign Key 的自動剖析規則如下:
* 屬性名稱 = 導覽屬性名稱+參考主鍵屬性名稱,將被視為 Foreign Key
* 屬性名稱 = 參考主鍵屬性名稱,將被視為 Foreign Key
實務上只會依循同一種規則來設計所有Model,請避免混用以免造成不必要的誤解
Customer Data Model
其中Orders屬性為導覽屬性(Navigation Property),表示存放與本類別相關聯的類別。以本實例來說,顧客(Customer)與訂單(Order)是一對多的關係,表示單一顧客會擁有多筆訂單,所以該顧客所有訂單物件都將存放於 ICollection<Order> Orders 中。而 virtual 前置詞表示 Lazy Loading,表示只有在使用到Customer.Orders的時候才會從DB取得相關訂單資訊。
using System;
using System.Collections.Generic;

namespace CodeFirstWebApplication.Models
{
    public class Customer
    {
        // Primary Key
        public int Id { get; set; }

        public string Email { get; set; }

        public string Password { get; set; }

        public string Name { get; set; }

        public DateTime RegisterOn { get; set; }


        // Navigation Properties
        public virtual ICollection<Order> Orders { get; set; }
    }
}
Order Data Model
屬性名稱 = 導覽屬性名稱+參考主鍵屬性名稱 ex. Customer+Id = CustomerId,將被視為 Foreign Key
屬性名稱 = 參考主鍵屬性名稱 ex. ProductId,將被視為 Foreign Key
namespace CodeFirstWebApplication.Models
{
    public class Order
    {
        // Primary Key
        public int OrderId { get; set; }

        public string Memo { get; set; }


        // Foreign Key
        public int CustomerId { get; set; }

        // Foreign Key
        public int ProductId { get; set; }


        // Navigation Property
        public virtual Customer Customer { get; set; }

        // Navigation Property
        public virtual Product Product { get; set; }
    }
}
Product Data Model
商品(Product)與訂單(Order)是一對多的關係,表示單一商品會擁有多筆訂單,所以該商品所有訂單物件都將存放於 ICollection<Order> Orders 中。而 virtual 前置詞表示 Lazy Loading,表示只有在使用到Product.Orders的時候才會從DB取得相關訂單資訊。
using System.Collections.Generic;
using System.ComponentModel.DataAnnotations.Schema;

namespace CodeFirstWebApplication.Models
{
    public class Product
    {
        // Primary Key
        [DatabaseGenerated(DatabaseGeneratedOption.None)]
        public int ProductId { get; set; }

        public string Name { get; set; }

        public string Description { get; set; }

        public int Price { get; set; }


        // Navigation Properties
        public virtual ICollection<Order> Orders { get; set; }
    }
}
3. 針對類別屬性(Table Cloumn)進行裝飾
目前僅將各Data Model的主鍵及外來鍵設定完畢。回想一下當我們在設計Table Schema還有哪些資訊要設定呢? 沒錯就是基本的欄位型別、欄位大小及是否可允許Null值存在。筆者將就這些基本的設定逐一透過以下方式讓Entity Framework知道,並且產出我們所期望的Table Schema。
* 欄位型別
欄位型別絕大部分都可以透過類別屬性的型態來自動映射。其中又可透過 DataType 標籤進一步的指定資料型別,舉例來說,當我們加註 DataType.EmailAddress 於屬性中,該屬性在資料的呈現時會自動加上 mailto: 的link。
    [DataType(DataType.EmailAddress)]
    public string Email { get; set; }
* 欄位大小
當類別屬性型別為字串時,我們可透過 StringLength 標籤來設定欄位大小,而資料驗證時也將會依照該設定來檢核字串字數是否超過上限。
[StringLength(50, ErrorMessage = "名字不可超過50字元")]
public string Name { get; set; }
* 是否允許Null值
依照類別屬性型別是否可接受Null值作為判斷依據。假設型別為字串時,由於字串是可允許Null值,所以在映射到Table後該欄位亦可接受Null值;若是要將該欄位設定為不允許Null值時,我們可透過 Required 標籤來實現。請注意Price屬性在映射到Table欄位時將不允許Null值情況,因為int本身就是不允許Null值,所以不需要再加註Required 標籤來實現;若想將Price屬性改成允許Null值情況,只要將 int 調整為 int? 即可。
        [Required]
        public string Name { get; set; }

        public string Description { get; set; }

        public int Price { get; set; }
其實有許多標籤可以讓我們針對複雜的Data Model屬性進行細部設定,有興趣的朋友可以參考以下資訊。
Creating a More Complex Data Model
C. 建立 Database Context
整個操作Entity Framewor的核心物件就是 Database Context 類別,扮演著資料提供者的角色。我們將建立一個繼承至 System.Data.Entity.DbContext 的類別 StoreContext,針對各Data Model加入 DbSet 屬性;在Entity Framework中DbSet就如同Table,而Data Model就如同Table中的每一筆資料。
using CodeFirstWebApplication.Models;
using System.Data.Entity;
using System.Data.Entity.ModelConfiguration.Conventions;

namespace CodeFirstWebApplication.DAL
{
    public class StoreContext : DbContext
    {
        // Coustructors
        public StoreContext() : base("StoreContext")
        {
        }


        // Properties
        public DbSet<Customer> Customers { get; set; }

        public DbSet<Order> Orders { get; set; }

        public DbSet<Product> Products { get; set; }


        // Methods
        protected override void OnModelCreating(DbModelBuilder modelBuilder)
        {
            modelBuilder.Conventions.Remove<PluralizingTableNameConvention>();
        }
    }
}
注意: 由於筆者不希望EF在產生Table名稱時自動變為複數(ex. Customers, Orders, Products),所以覆寫了OnModelCreating方法並在其中加註 modelBuilder.Conventions.Remove<PluralizingTableNameConvention>() 來達成我們的目標。
D. 建立測試資料或預設資料
由於開發階段會時常會調整Data Model並透過EF來建立(刪除與重建)DB,若是每次都要手動寫入測試(預設)資料必定對於開發人員造成不少困擾,所以我們將透過以下方式讓EF在建立(刪除與重建)DB後自動執行自訂之行為。新增一個名稱為StoreInitializer類別並繼承System.Data.Entity.DropCreateDatabaseIfModelChanges<StoreContext>,接著覆寫Seed方法並在內容加上測試資料或預設資料即可。
using CodeFirstWebApplication.Models;
using System;
using System.Collections.Generic;

namespace CodeFirstWebApplication.DAL
{
    public class StoreInitializer : System.Data.Entity.DropCreateDatabaseIfModelChanges<StoreContext>
    {
        protected override void Seed(StoreContext context)
        {
            var customers = new List<Customer>
            {
            new Customer{Name="Carson1",Email="Carson1@gmail.com",RegisterOn=DateTime.Parse("2005-09-01")},
            new Customer{Name="Carson2",Email="Carson2@gmail.com",RegisterOn=DateTime.Parse("2005-09-02")},
            new Customer{Name="Carson3",Email="Carson3@gmail.com",RegisterOn=DateTime.Parse("2005-09-03")},
            new Customer{Name="Carson4",Email="Carson4@gmail.com",RegisterOn=DateTime.Parse("2005-09-04")},
            };

            customers.ForEach(s => context.Customers.Add(s));
            context.SaveChanges();
            var products = new List<Product>
            {
            new Product{ProductId=1050,Name="Chemistry",Price=3,},
            new Product{ProductId=4022,Name="Microeconomics",Price=3,},
            new Product{ProductId=4041,Name="Macroeconomics",Price=3,},
            new Product{ProductId=1045,Name="Calculus",Price=4,},
            new Product{ProductId=3141,Name="Trigonometry",Price=4,},
            new Product{ProductId=2021,Name="Composition",Price=3,},
            new Product{ProductId=2042,Name="Literature",Price=4,}
            };
            products.ForEach(s => context.Products.Add(s));
            context.SaveChanges();
            var orders = new List<Order>
            {
            new Order{CustomerId=1,ProductId=1050,Memo="memo11"},
            new Order{CustomerId=1,ProductId=4022,Memo="memo12"},
            new Order{CustomerId=1,ProductId=4041,Memo="memo13"},
            new Order{CustomerId=2,ProductId=1045,Memo="memo14"},
            new Order{CustomerId=2,ProductId=3141,Memo="memo15"},
            new Order{CustomerId=2,ProductId=2021,Memo="memo16"},
            new Order{CustomerId=3,ProductId=1050},
            new Order{CustomerId=4,ProductId=1050},
            new Order{CustomerId=4,ProductId=4022,Memo="memo17"},

            };
            orders.ForEach(s => context.Orders.Add(s));
            context.SaveChanges();
        }
    }
}
接著需要告訴EF使用這個初始的類別去建立預設資料。
 <entityFramework>
    <contexts>
      <context type="CodeFirstWebApplication.DAL.StoreContext, CodeFirstWebApplication">
        <databaseInitializer type="CodeFirstWebApplication.DAL.StoreInitializer, CodeFirstWebApplication" />
      </context>
    </contexts>
    <defaultConnectionFactory type="System.Data.Entity.Infrastructure.LocalDbConnectionFactory, EntityFramework">
      <parameters>
        <parameter value="v11.0" />
      </parameters>
    </defaultConnectionFactory>
    <providers>
      <provider invariantName="System.Data.SqlClient" type="System.Data.Entity.SqlServer.SqlProviderServices, EntityFramework.SqlServer" />
    </providers>
  </entityFramework>
E. 建立連線字串
在此使用的是LocalDB資料庫,其中 AttachDbFilename=|DataDirectory|\CodeFirstDb.mdf 表示資料庫將被建置於App_Data資料夾中。其實我們也可以不主動設定ConnectionString,EF將會依照Context來為我們建立出一個預設的ConnectionString來,請參考Code First to a New Database。
<connectionStrings>
    <add name="StoreContext" connectionString="Data Source=(LocalDb)\v11.0;AttachDbFilename=|DataDirectory|\CodeFirstDb.mdf;Initial Catalog=CodeFirstDb;Integrated Security=True" providerName="System.Data.SqlClient" />
  </connectionStrings>
  <appSettings>
    <add key="webpages:Version" value="3.0.0.0" />
    <add key="webpages:Enabled" value="false" />
    <add key="ClientValidationEnabled" value="true" />
    <add key="UnobtrusiveJavaScriptEnabled" value="true" />
  </appSettings>
F. 透過Db Context實踐資料的CRUD
1. 建立Customer Controller
PS 若新增失敗,請先編譯程式後再新增一次
由於筆者選擇的Scaffold就是針對EF來產生Controller及View
所以Controller中就是使用StoreContext來對DB進行存取作業
2. 修改_Layout.cshtml,加入顯示Customer資料的連結(指到Customer Controller的Index Action)
3. 在程式執行前筆者希望驗證以下的事項:
A. 何時EF會建立DB
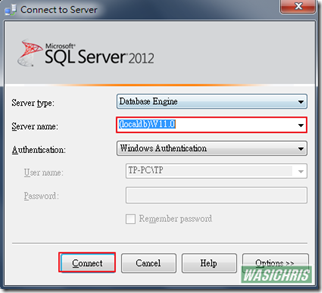
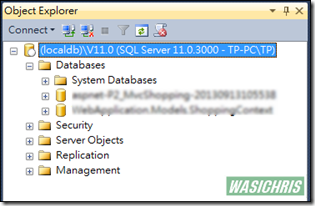
為了確定DB的狀況,首先登入SQL Server
目前只掛載2個LocalDB資料庫
B. 是否真的會進入StoreInitializer類別,建立初始資料
可以建立中斷點來檢查是否真的有執行到這段
4. 執行程式
此時DB尚未被EF建立,所以也不會進入StoreInitializer類別,建立初始資料
當點選Customer連結後,因使用到StoreContext所以觸發EF產生DB。
我們可以看到EF已經幫忙建立出CodeFirstDb的LocalDB,其中的Table皆依照Data Model的定義而開設的
由於連線字串中設定AttachDbFilename=|DataDirectory|\CodeFirstDb.mdf
表示資料庫將被建置於App_Data資料夾中
所以在專案的App_Data資料夾中產生了EF建立的mdf檔(預設不加入專案,請點選上方Show All Files選項)。
接著確實進入StoreInitializer類別,建立初始資料
畫面上呈現的資料,就是透過StoreInitializer類別建立的初始資料
(此處只著重功能測試,故不另調整View頁面來去除Password欄位的顯示)
再來簡單測試CRUD,此範例就先測試新增就好
的確可以透過StoreContext將資料寫進資料庫,並可從DB撈出顯示與頁面上
G. 資料欄位異動處理
當然在開發專案的過程中絕對不會如此的精準,所以時常有機會需要異動Data Model,此時我們就要利用以下的方式來同步更新DB,筆者將透過一個簡單異動來串起所有的步驟。
1. 異動Customer Data Model
目前Customer類別如下所示,筆者預計加入一個新的屬性來記錄顧客住址
 public class Customer
    {
        // Primary Key
        public int Id { get; set; }

        [DataType(DataType.EmailAddress)]
        public string Email { get; set; }

        [Required]
        public string Password { get; set; }

        [Required]
        [StringLength(50, ErrorMessage = "名字不可超過50字元")]
        public string Name { get; set; }

        [DataType(DataType.Date)]
        public DateTime RegisterOn { get; set; }


        // Navigation Properties
        public virtual ICollection<Order> Orders { get; set; }
    }
調整過後的Customer Data Model (加入Address屬性)
public class Customer
    {
        // Primary Key
        public int Id { get; set; }

        [DataType(DataType.EmailAddress)]
        public string Email { get; set; }

        [Required]
        public string Password { get; set; }

        [Required]
        [StringLength(50, ErrorMessage = "名字不可超過50字元")]
        public string Name { get; set; }

        [DataType(DataType.Date)]
        public DateTime RegisterOn { get; set; }

        // 新加入的屬性以記錄顧客住址
        public String Address { get; set; }

        // Navigation Properties
        public virtual ICollection<Order> Orders { get; set; }
    }
2. 啟動 Code First Migrations
點選 TOOLS – Library Package Manager – Package Manager Console
輸入 Enable-Migrations 執行
(若專案中不只一個 DbContex,需在指令後加上–ContextTypeName DbContext類別名稱)
此時會在專案中新增Migrations資料夾,並產生2個檔案
A. <時間>_InitialCreate.cs
在初次使用Migration時會建立此檔,其表示從空白DB轉移至目前使用中DB的異動過程。
public partial class InitialCreate : DbMigration
    {
        public override void Up()
        {
            CreateTable(
                "dbo.Customer",
                c => new
                    {
                        Id = c.Int(nullable: false, identity: true),
                        Email = c.String(),
                        Password = c.String(nullable: false),
                        Name = c.String(nullable: false, maxLength: 50),
                        RegisterOn = c.DateTime(nullable: false),
                    })
                .PrimaryKey(t => t.Id);

            CreateTable(
                "dbo.Order",
                c => new
                    {
                        OrderId = c.Int(nullable: false, identity: true),
                        Memo = c.String(),
                        CustomerId = c.Int(nullable: false),
                        ProductId = c.Int(nullable: false),
                    })
                .PrimaryKey(t => t.OrderId)
                .ForeignKey("dbo.Customer", t => t.CustomerId, cascadeDelete: true)
                .ForeignKey("dbo.Product", t => t.ProductId, cascadeDelete: true)
                .Index(t => t.CustomerId)
                .Index(t => t.ProductId);

            CreateTable(
                "dbo.Product",
                c => new
                    {
                        ProductId = c.Int(nullable: false),
                        Name = c.String(nullable: false),
                        Description = c.String(),
                        Price = c.Int(nullable: false),
                    })
                .PrimaryKey(t => t.ProductId);

        }

        public override void Down()
        {
            DropForeignKey("dbo.Order", "ProductId", "dbo.Product");
            DropForeignKey("dbo.Order", "CustomerId", "dbo.Customer");
            DropIndex("dbo.Order", new[] { "ProductId" });
            DropIndex("dbo.Order", new[] { "CustomerId" });
            DropTable("dbo.Product");
            DropTable("dbo.Order");
            DropTable("dbo.Customer");
        }
    }
B. Configuration.cs
其中若 AutomaticMigrationsEnabled 修改為 true 時,可不用建立Migration紀錄
直接輸入 Update-Database 執行,將DB依照目前Data Model狀態進行自動更新
internal sealed class Configuration : DbMigrationsConfiguration<CodeFirstWebApplication.DAL.StoreContext>
    {
        public Configuration()
        {
            AutomaticMigrationsEnabled = false;
            ContextKey = "CodeFirstWebApplication.DAL.StoreContext";
        }

        protected override void Seed(CodeFirstWebApplication.DAL.StoreContext context)
        {
            //  This method will be called after migrating to the latest version.

            //  You can use the DbSet<T>.AddOrUpdate() helper extension method
            //  to avoid creating duplicate seed data. E.g.
            //
            //    context.People.AddOrUpdate(
            //      p => p.FullName,
            //      new Person { FullName = "Andrew Peters" },
            //      new Person { FullName = "Brice Lambson" },
            //      new Person { FullName = "Rowan Miller" }
            //    );
            //
        }
    }
3. 新增Migration紀錄
輸入 Add-Migration AddAddress 執行,其中AddAddress為任意名稱,供識別這次異動資訊而命名
此時新增一筆Migration的紀錄AddAddress(取用Add-Migration的識別名稱),記錄著上下版本的差異
public partial class AddAddress : DbMigration
    {
        public override void Up()
        {
            AddColumn("dbo.Customer", "Address", c => c.String());
        }

        public override void Down()
        {
            DropColumn("dbo.Customer", "Address");
        }
    }
4. 更新資料庫
最後輸入 Update-Database 執行更新,亦可加上 -Verbose 讓畫面顯示異動的SQL語法
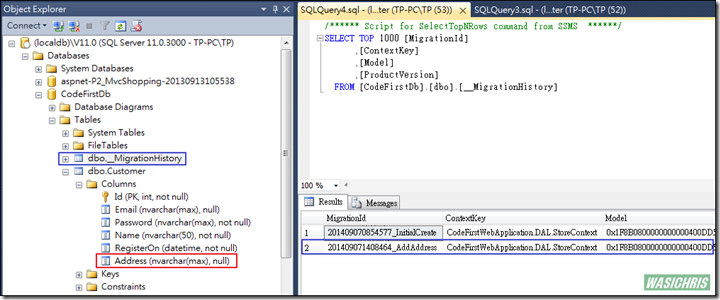
其中發現除了新增Customer表單Address欄位外,亦紀錄了Migration資訊於 __MigratioinHistory中
5. 驗證DB是否如預期調整
可以看到Custormer表單已經加上Address欄位,且在__MigrationHistory也記載了此次Migration紀錄
H. 後記
雖然花了不少的時間在實作,但對於剛接觸這門技術的我,總算有了一點的感覺。希望未來能夠有適合的專案讓筆者實際操練一下,也期許自己在面對各項新的領域都可以花時間邊做邊紀錄,一方面能讓像我懵懂的人有個粗淺的參考資訊,也好讓未來的我有喚醒記憶的機會。
參考資料
http://msdn.microsoft.com/en-us/data/jj193542
希望此篇文章可以幫助到需要的人
若內容有誤或有其他建議請不吝留言給筆者喔 !


