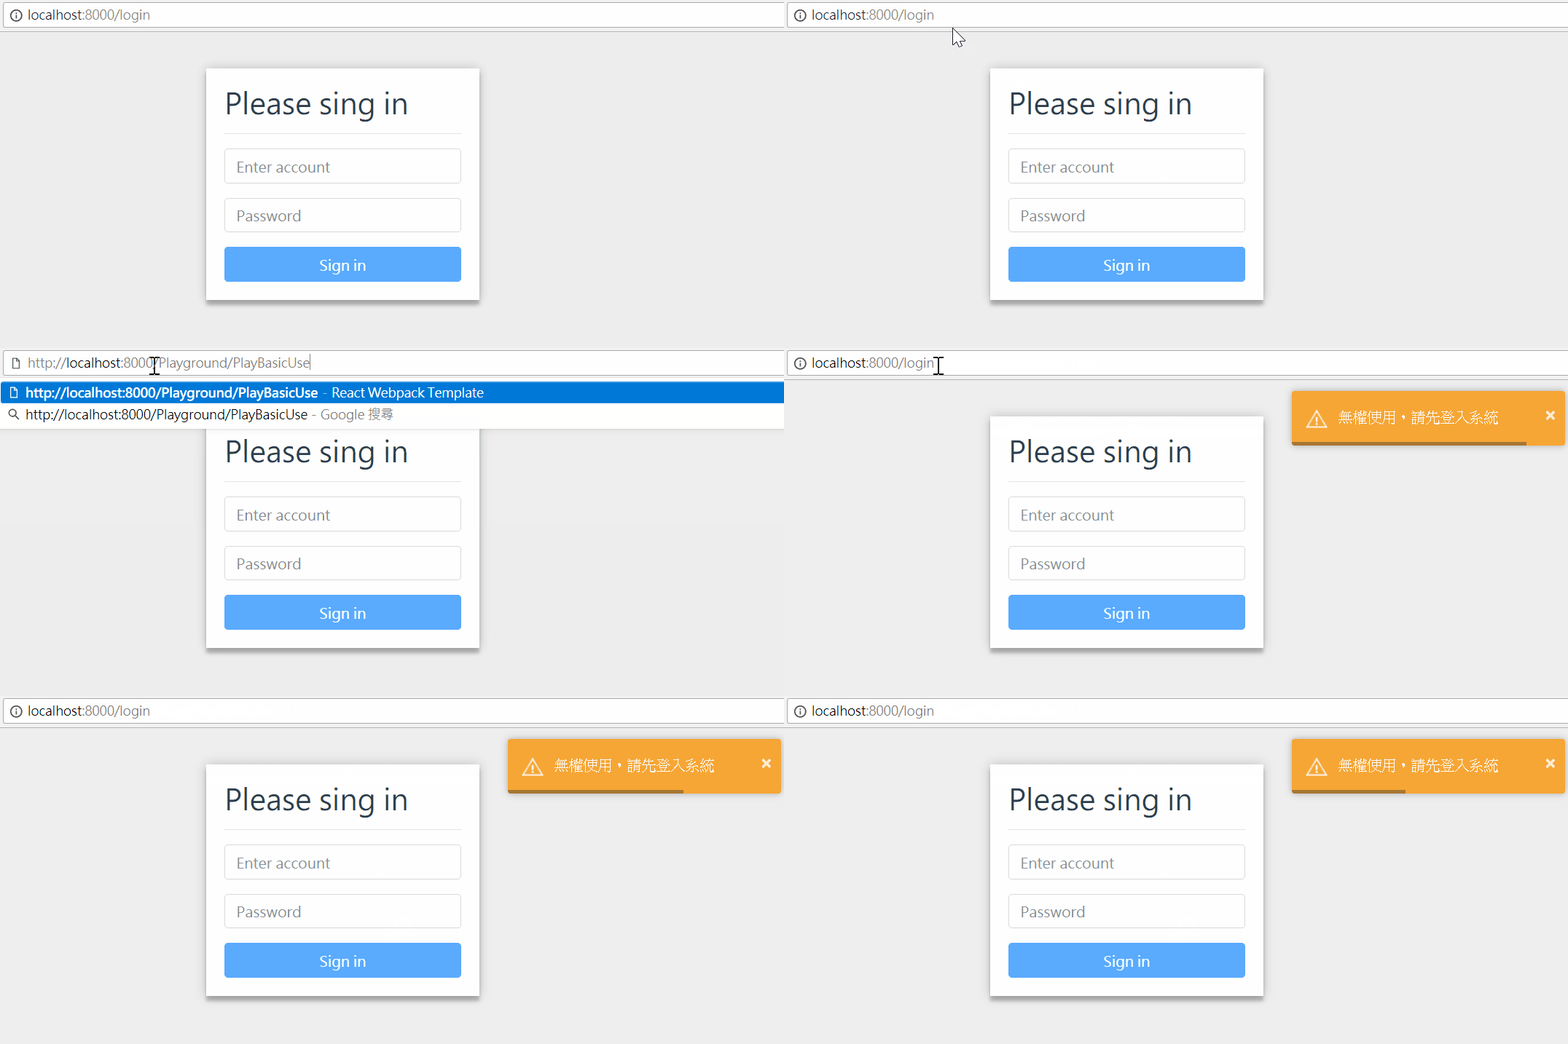
在開發具有登入功能的網站時,各功能頁面將所屬不同權限用戶使用,因此進入頁面前都需進行權限檢核;這篇文章將在 React Router 4 版本中實作一個符合基本需求的 PrivateRoute 組件,讓用戶在切換路由時進行權限的檢核,達到頁面功能權限控管的需求。
前言
如果有在關注 React 相關技術的朋友一定知道 react-router 從 v3 到 v4 有比較大的轉變,主要就是遵循 React 萬物皆組件的概念,所有路由都是組件 (具有完整的生命週期),當然就連 Redirect 功能也擁有一個自己的組件了,因此如果想讓路由具有權限檢核的功能,我們可以自行實作 private route 組件來滿足這個需求。
實作 PrivateRoute 組件
對於這個 Private Route 的需求如下:
- 具有檢核中 loading 屏蔽效果 ( checking auth...)
- 檢核權限 (token, function code ...)
- 權限檢核失敗直接 redirect 登入頁面
建立組件
首先建立 PrivateRoute 組件並定義兩個狀態 (state) 分別為 isLoading 及 isAuthed 旗標,分別表示「是否權限正在確認中」及「是否通過授權」的內部組件狀態,後續依靠這兩個狀態來操作路由的動態效果。
import { Component } from 'react'
import { connect } from 'react-redux'
import { get } from 'lodash'

export class PrivateRoute extends Component {
  constructor (props) {
    super(props)

    this.state = {
      isLoading: true, // 是否於權限檢核中
      isAuthed: false  // 是否通過權限檢核
    }
  }
}

const mapStateToProps = state => ({
  // 登入系統後會於 redux 中註記登入狀態
  isLogin: get(state, 'auth.isLogin')
})

const mapDispatchToProps = dispatch => ({
})

export default connect(mapStateToProps, mapDispatchToProps)(PrivateRoute)
定義傳入參數
接著定義需要從外部傳入的必要資訊為何。首先當然就是該頁面需要顯示的組件 (component) ,這樣路由才會知道要顯示什麼東西在頁面上;另外由於 PrivateRoute 需要進行功能頁面的權控,因此需要傳入此功能頁面的編號 (funcCode),以此向後端作為功能識別,查看該用戶是否具有使用該功能的權限。
// ... 略 ...
import PropTypes from 'prop-types'

export class PrivateRoute extends Component {

  // ... 略 ...

  static propTypes = {
    component: PropTypes.any.isRequired,
    funcCode: PropTypes.string.isRequired
  }

}
實作驗證方法
接著建立 checkAuth 非同步方法,用來向遠端 API 驗證用戶權限,效果如下:
- 切換權限檢核狀態 (作用是讓畫面被屏蔽,等待驗證結果)
- 向遠端服務確認用戶權限是否能夠操作這個功能頁面
- 更新權限檢核狀態 (移除屏蔽)
- 更新權限檢核結果 (畫面互動)
// ... 略 ...
import toastr from 'toastr'

export class PrivateRoute extends Component {

  // ... 略 ...

  checkAuth = async () => {

    let isAuthed = false
    const { isLogin, funcCode } = this.props

    if (isLogin) {

      // 設定狀態為權限檢核中 ...
      this.setState(state => ({ ...state, isLoading: true }))

      // 與遠端 API 確認權限 ...
      // token 可以從 axios interceptor 透過 head 送到後端
      // funcCode 需要從外部取得送至後端驗證使用者是否有此功能的權限
      isAuthed = await api.checkAuthWithServer(funcCode)
    }

    if (!isAuthed) {
      // 無權限顯示提示訊息
      toastr.warning('無權使用,請先登入系統')
    }

    // 更新狀態 1.檢核結束 2.檢核結果
    this.setState(state => ({ ...state, isAuthed: isAuthed, isLoading: false }))
  }

}
觸發驗證機制
再來決定哪個時候該進行檢核。依照組件的生命週期可以在「組件將被建立時 (componentWillMount)」及「組件接收的屬性變化時 (componentWillReceiveProps)」觸發檢核。
export class PrivateRoute extends Component {

  // ... 略 ...

  componentWillMount = async () => {
    await this.checkAuth()
  }

  componentWillReceiveProps = async (nextProps) => {
    if (nextProps.path !== this.props.path) {
      await this.checkAuth()
    }
  }

}
依狀態產生畫面
最後就是要依照狀態來決定畫面呈現的樣貌,說明如下:
- 當狀態為權限檢核中,顯示 LoadingIndicator 組件來屏蔽畫面。
(其中 LoadingIndicator 組件為筆者自建來顯示 spinner 動畫)
- 當權限檢核完畢時,透過 Route 組件 render 畫面。
- 有權限:渲染出外部傳入的 component 組件
- 無權限:渲染出 Redirect 組件來將頁面導向登入頁
// ... 略 ...
import { Route } from 'react-router-dom'
import { Redirect } from 'react-router'
import { LoadingIndicator } from 'components'

export class PrivateRoute extends Component {

  // ... 略 ...

  render () {
    const { component: Component, ...rest } = this.props
    const { isLoading, isAuthed } = this.state

    return (
      isLoading === true
        ? <LoadingIndicator />
        : <Route {...rest} render={props => (
            isAuthed
              ? <Component {...props} />
              : <Redirect to={{ pathname: '/login', state: { from: props.location } }} />
          )} />
    )
  }
}
使用 PrivateRoute 組件
以下是一個功能頁面的根組件,可以在這組件中切換各子功能顯示區塊;當路由位置符合 PrivateRoute 設定的 path 位置時,會渲染出該 PrivateRoute 組件,此時就可以透過傳入的 funcCode 來檢核用戶是否具有使用權限,若有權限則顯示傳入 PrivateRoute 的 component 組件。
import React from 'react'
import { Redirect, Switch } from 'react-router-dom'
import { Container } from 'components'
import { PlayStyledComponents, PlayIntlUniversal, PlayReduxForm, PlayBasicUse } from 'pages'
import { PrivateRoute } from 'containers'

export default (props) => {
  const { match } = props

  return <Container>
    {/* ... 切換路由的連結(略) ... */}
    <Switch>
      <PrivateRoute funcCode='F01' path={`${match.url}/PlayBasicUse`} component={PlayBasicUse} />
      <PrivateRoute funcCode='F02' path={`${match.url}/PlayStyledComponents`} component={PlayStyledComponents} />
      <PrivateRoute funcCode='F03' path={`${match.url}/PlayIntlUniversal`} component={PlayIntlUniversal} />
      <PrivateRoute funcCode='F04' path={`${match.url}/PlayReduxForm`} component={PlayReduxForm} />
      <Redirect to={`${match.url}/PlayBasicUse`} /> {/* 預設頁面 */}
    </Switch>
  </Container>
}
功能測試
用戶尚未登入系統,直接切換 URL 至特定 PrivateRoute 頁面時,權限檢核失敗並重新導向登入頁。

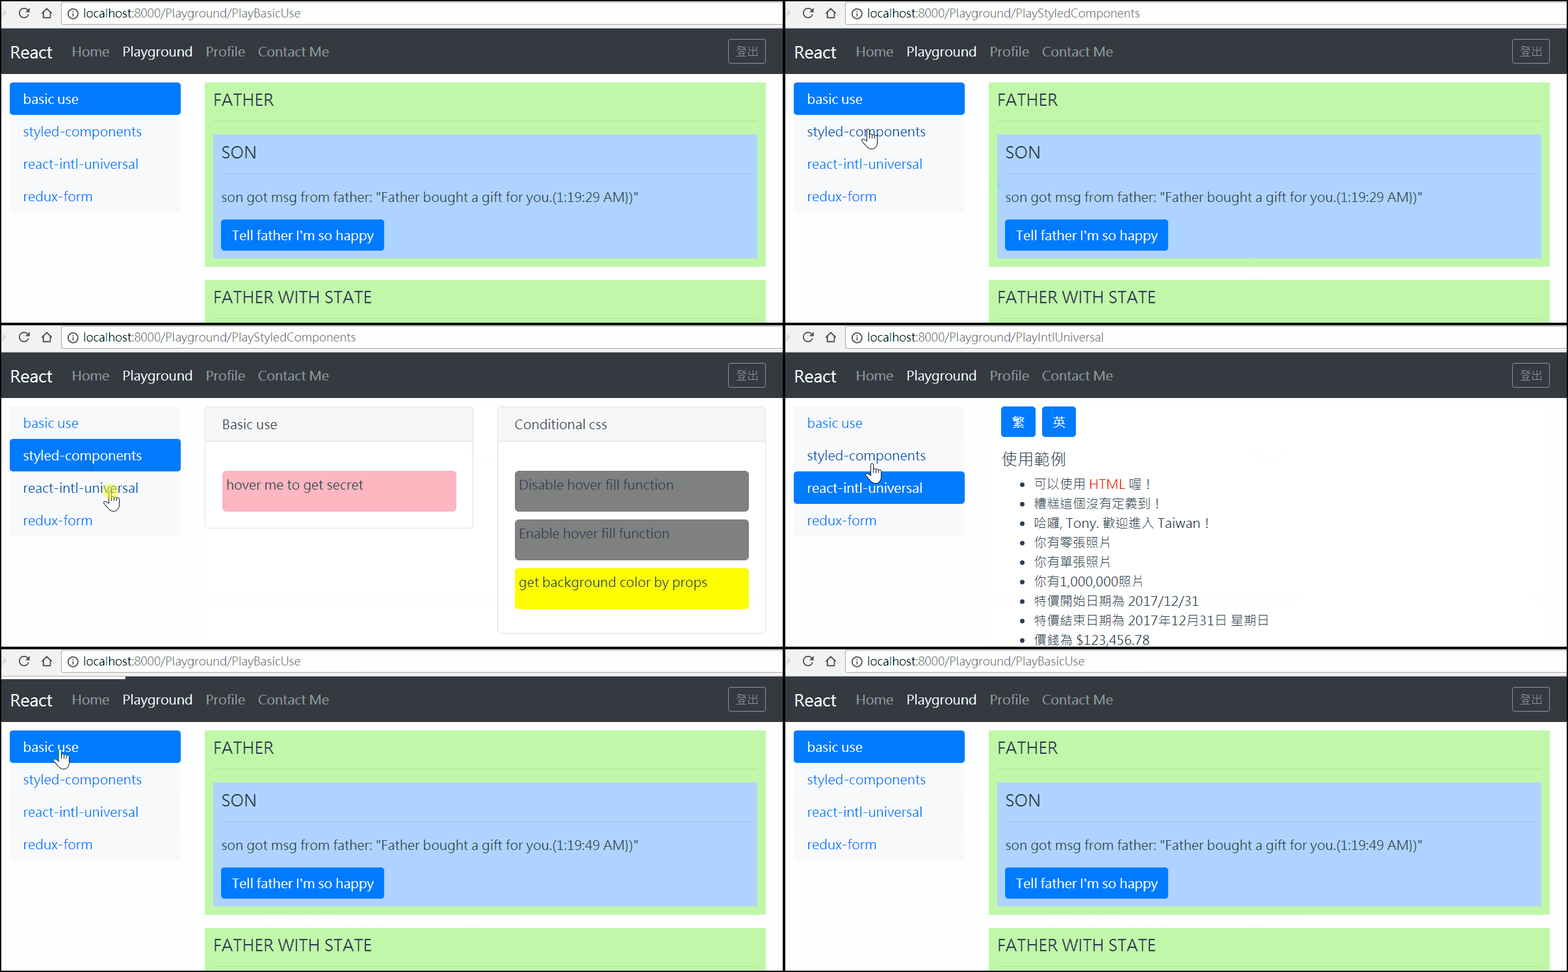
用戶登入系統後,每當切換路由時都會先屏蔽畫面,並發出 request 向後端驗證用戶是否具有權限;等待結果回傳後會直接解除屏蔽效果,依照驗證通過與否來決定畫面如何呈現。以下都是通過驗證的功能項,因此會直接顯示傳入各 PrivateRoute 的 component 組件於畫面上。

完整代碼
完整測試代碼如下,可以於此看出 PrivateRoute 全貌。
import { Component } from 'react'
import { connect } from 'react-redux'
import { get } from 'lodash'
import PropTypes from 'prop-types'
import toastr from 'toastr'
import { Route } from 'react-router-dom'
import { Redirect } from 'react-router'
import { LoadingIndicator } from 'components'


export class PrivateRoute extends Component {
  constructor (props) {
    super(props)

    this.state = {
      isLoading: true, // 是否於權限檢核中
      isAuthed: false  // 是否通過權限檢核
    }
  }

  static propTypes = {
    component: PropTypes.any.isRequired,
    funcCode: PropTypes.string.isRequired
  }

  checkAuth = async () => {
    let isAuthed = false
    const { isLogin, funcCode } = this.props

    if (isLogin) {
      // 設定狀態為權限檢核中 ...
      this.setState(state => ({ ...state, isLoading: true }))

      // 與遠端 API 確認權限 ...
      // token 可以從 axios interceptor 透過 head 送到後端
      // funcCode 需要從外部取得送至後端驗證使用者是否有此功能的權限
      isAuthed = await api.checkAuthWithServer(funcCode)
    }

    if (!isAuthed) {
      // 無權限顯示提示訊息
      toastr.warning('無權使用,請先登入系統')
    }

    // 更新狀態 1.檢核結束 2.檢核結果
    this.setState(state => ({ ...state, isAuthed: isAuthed, isLoading: false }))
  }

  componentWillMount = async () => {
    await this.checkAuth()
  }

  componentWillReceiveProps = async (nextProps) => {
    if (nextProps.location.pathname !== this.props.location.pathname) {
      await this.checkAuth()
    }
  }

  render () {
    const { component: Component, ...rest } = this.props
    const { isLoading, isAuthed } = this.state

    return (
      isLoading === true
        ? <LoadingIndicator />
        : <Route {...rest} render={props => (
            isAuthed
              ? <Component {...props} />
              : <Redirect to={{ pathname: '/login', state: { from: props.location } }} />
          )} />
    )
  }

}

const mapStateToProps = state => ({
  // 登入系統後會於 redux 中註記登入狀態
  isLogin: get(state, 'auth.isLogin')
})

const mapDispatchToProps = dispatch => ({
})

export default connect(mapStateToProps, mapDispatchToProps)(PrivateRoute)
若有更好的建議或做法再請不吝指導一下囉! 感謝!
希望此篇文章可以幫助到需要的人
若內容有誤或有其他建議請不吝留言給筆者喔 !
