今天我們要介紹Angular2的Service,透過Service我們可以將資料和商業邏輯統一放到一個(或數個)類別中進行管理,並在多個Components之間共享,讓程式架構更加明確!
在之前的文章我們已經大致介紹過Component與View的使用方式,也實際做了個ToDo List的程式,到目前為止我們已經可以完成大部分想要的功能了,但還不夠好,目前我們的資料跟對資料處理的方式散亂在各個Component之間,當程式越來越複雜時,就會開始變得管理不易,還好,別忘了Angular2是一個MVC框架,之前學到的Component可以對應到MVC的C(Controller),而View可以對應到MVC的V(View),當然Angular2也有提供MVC中的M(Model)的部分,也就是今天要介紹的Service。
以我們之前的TodoListApp為例子,目前Components之間的相依關係為
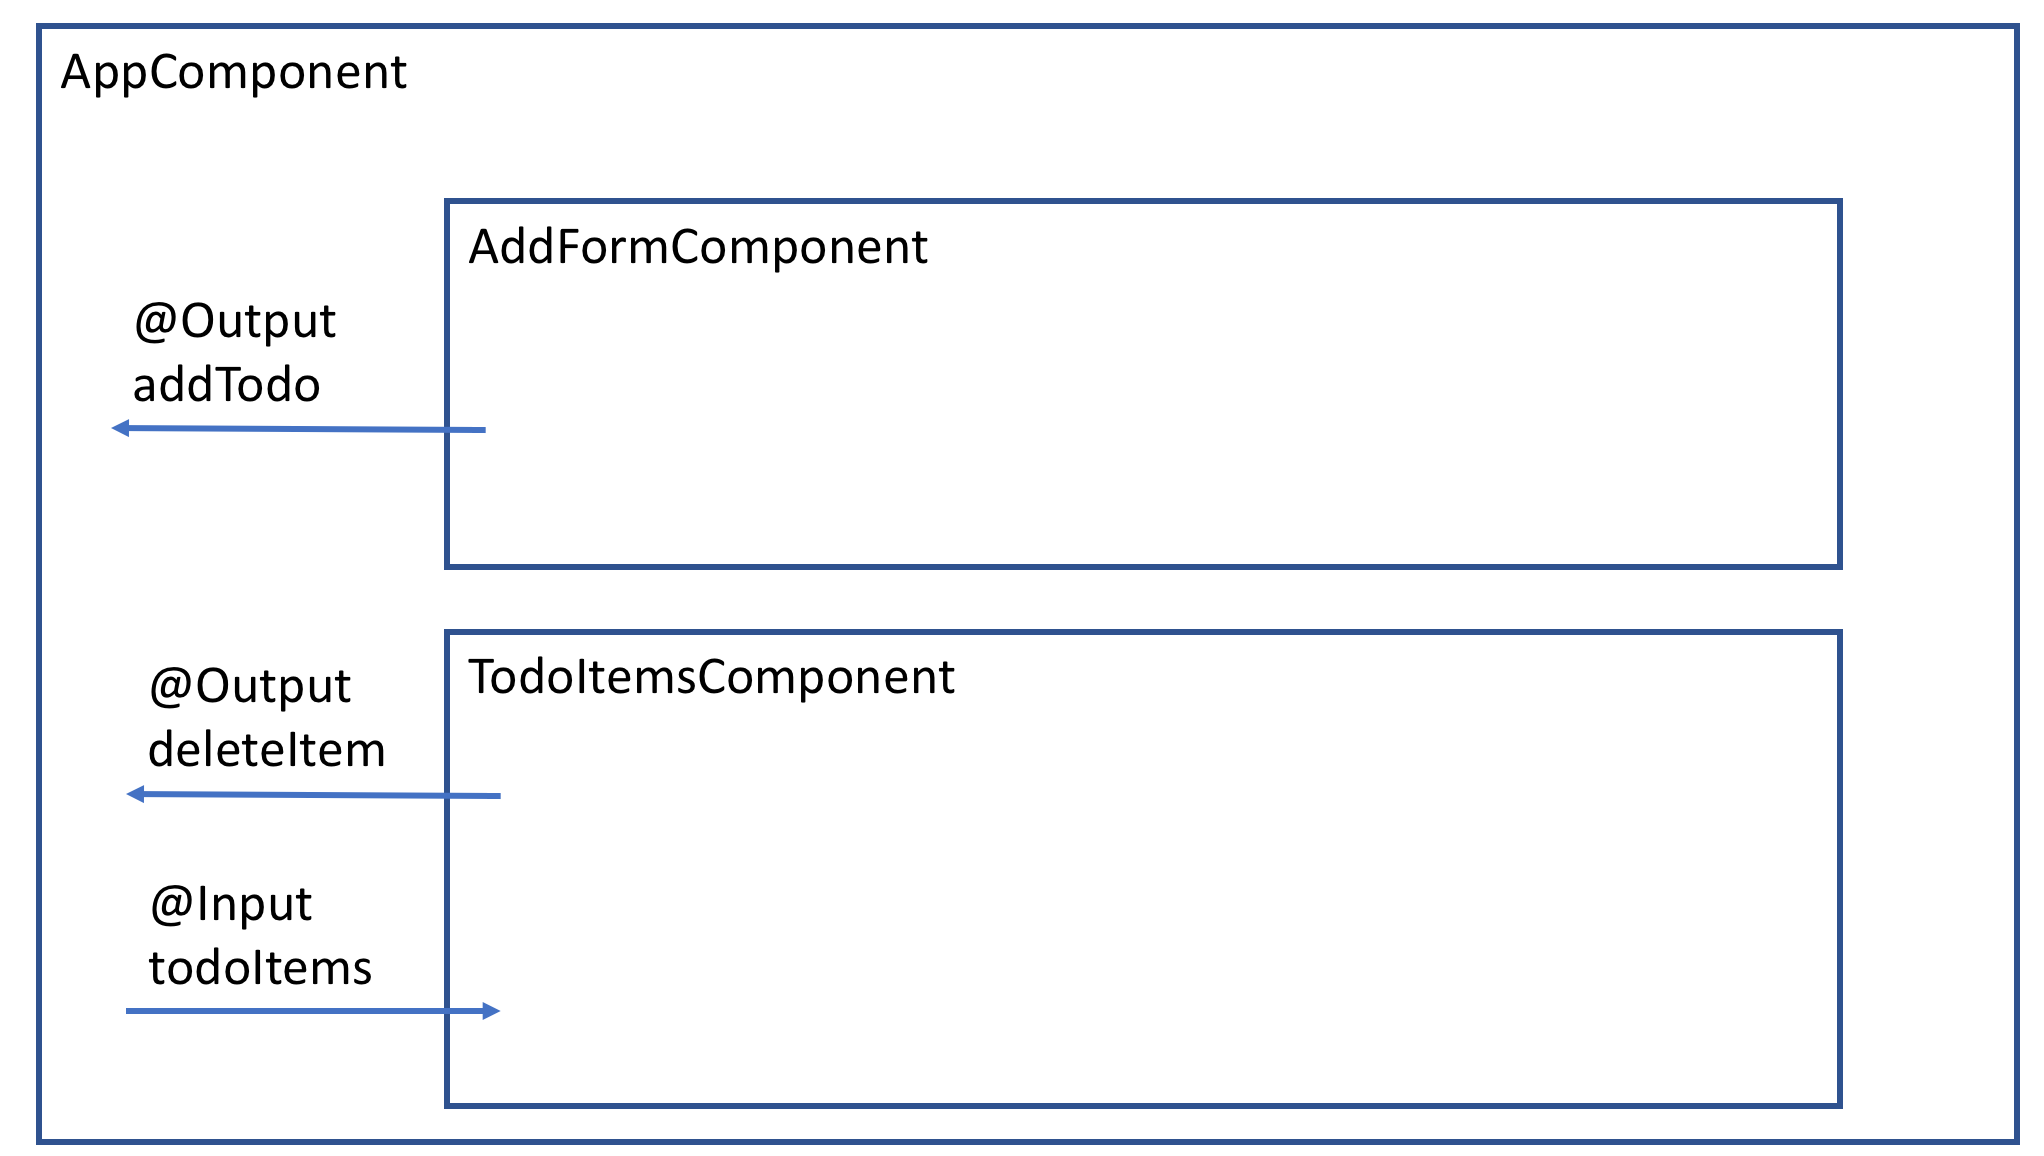
可以看到AppComponent除了包含幾個子Component之外,也與這些Component被@Input, @Output綁在一起了,假如情況再複雜一點,切了越多Component,Component之間的耦合性就越高,維護起來就越不容易;而透過Service,我們希望變成如下:
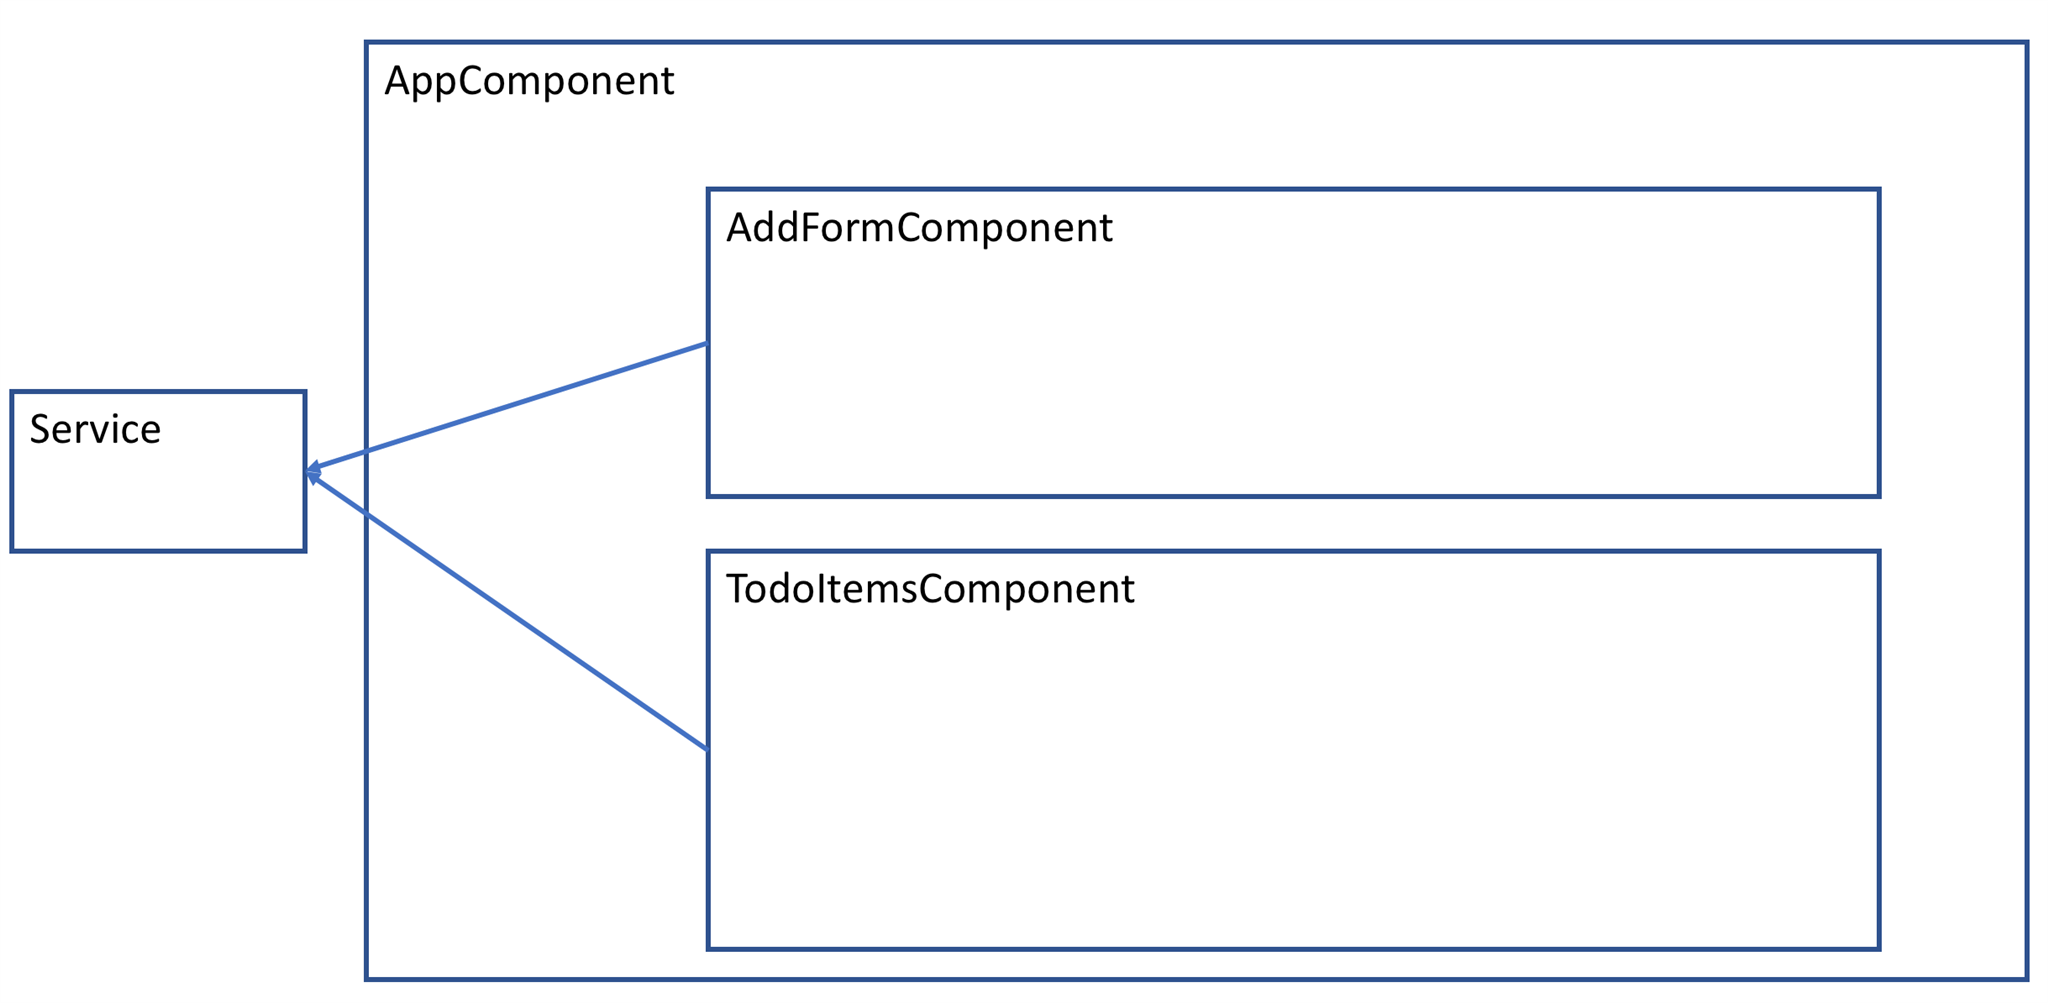
看到有什麼不同了嗎?我們把Component之間的相依關係都解開了,而是直接跟Service產生關係,如此一來Component的修改就比較不容易影響到別的Component,而Service就關注在如何處理資料就好,讓職責更加明確!
今天我們就把散亂在各Component之間處理資料的程式,通通移到Service中,達到關注點分離、程式更加容易維護的目標!
使用Angular CLI加入Service
一樣的,我們可以透過Angular CLI來替我們的Angular2專案加入Service,只需要一行指令:
ng g s TodoList
就能建立一個名為TodoListService的Service,我們可以打開src/app/todo-list.service.ts看到以下內容
import { Injectable } from '@angular/core';

@Injectable()
export class TodoListService {

  constructor() { }

}
在這裡我們又看到了一個名為@Injectable的decorator,由於Angular2中大量採用了相依注入的方式,來鬆綁程式之間的耦合性,也讓isolated unit test的進行更加容易,不過目前我們並不用太在意這些細節,只需要知道所有Service都必須加入一個@Injectable並採用注入的方式讓Component使用即可!
接著我們先把所有跟TodoList資料操作相關的細節加入TodoListService中,包含了基本的TodoList資料,新增、刪除、完成Todo這些程式
import { TodoItem } from './shared/todo-item';
import { Injectable } from '@angular/core';

@Injectable()
export class TodoListService {

  todoItems: TodoItem[] = [{
    id: 1,
    value: 'Todo Item No.1',
    done: false
  }, {
    id: 2,
    value: 'Todo Item No.2',
    done: true
  }, {
    id: 3,
    value: 'Todo Item No.3',
    done: false
  }];

  constructor() { }

  getTodoList() {
    return this.todoItems;
  }

  addTodo(text) {
    this.todoItems.push({
      id: (new Date()).getTime(),
      value: text,
      done: false
    });
  }

  deleteItem(item: TodoItem) {
    this.todoItems = this.todoItems.filter(todoItem => todoItem.id !== item.id);
  }

  toogleItemStatus(item: TodoItem) {
    item.done = !item.done;
  }
}
接著我們要將這個Service注入到需要用到的Compnent之中,至於該如何注入呢?首先先回顧我們使用Angular CLI建立Service時,應該會看到以下訊息

意思是,Service已經產生了,但還沒準備好可以提供給任何其他程式進行注入,要讓Service能夠被注入,我們還需要在src/app/app.module.ts中的@NgModule這個decorator中的providers: []中加入這個service
因此app.module.ts的程式碼看起來大致如下
// 先import我們的TodoListService
import { TodoListService } from './todo-list.service';

@NgModule({
  declarations: [
    AppComponent,
    HeaderComponent,
    AddFormComponent,
    TodoItemsComponent
  ],
  imports: [
    BrowserModule,
    FormsModule,
    HttpModule
  ],
  providers: [TodoListService], // 在providers中加入TodoListService
  bootstrap: [AppComponent]
})
export class AppModule { }
如此一來我們的Service就可以準備進行注入啦!
在Component中注入Service
接著我們先來把TodoItemsComponent的內容改為使用Service來操作資料,首先我們要把Service注入到Component中,在Angular2/TypeScript中使用的注入方式為建構式注入,src/app/todo-items/todo-items.component.ts程式碼看起來如下:
import { TodoListService } from './../todo-list.service';

export class TodoItemsComponent implements OnInit {
  constructor(private todoListService: TodoListService) { }
}
從上面程式碼中可以看到我們在建構式中加入private todoListService: TodoListService的參數,如此一來Angular2在執行時就能根據我們指定的TodoListService行別進行注入的動作,之後在Component的程式碼都能夠透過this.todoListService來取用這個service的資料。
在Component中使用Service
完成Service的注入之後,接著我們把不必要的@Input、@Output都拿掉,改由透過Service存取資料,此時TodoItemsComponent的程式看起來大致如下:
import { TodoListService } from './../todo-list.service';
import { TodoItem } from './../shared/todo-item';
import { Component, OnInit } from '@angular/core';

@Component({
  selector: 'app-todo-items',
  templateUrl: './todo-items.component.html',
  styleUrls: ['./todo-items.component.css']
})
export class TodoItemsComponent implements OnInit {
  constructor(private todoListService: TodoListService) { }

  ngOnInit() {
  }

  getTodoList() {
    return this.todoListService.getTodoList();
  }

  itemClick(item: TodoItem) {
    this.todoListService.toogleItemStatus(item);
  }

  delete(item: TodoItem) {
    this.todoListService.deleteItem(item);
  }
}
我們把原來的itemClick()和delete()裡面的程式都改由呼叫service來完成資料的處理,同時加入了getTodoList()來取得我們的清單資料,不過此使View的部分還是取用被我們刪掉的原本Component的items,因此把src/app/todo-items/todo-items.component.html裡面的*ngFor部分改為*ngFor="let item of getTodoList();最後,由於我們把原本的@Input, @Output都拿掉了,因此原來src/app/app.component.html宣告<app-todo-items>的參數也要拿掉(只剩下<app-todo-items></app-todo-items>,不用帶入任何參數了),否則在執行時會判斷Component有不必要的參數而導致錯誤。
接著執行看看程式,就可以看到程式我們可以一樣抓到TodoItems的資料,也能夠勾選/取消勾選和刪除資料啦!
至於AddFormComponent的部分,就當作作業練習看看吧!或參考已經改好放上GitHub的程式碼!
單元回顧
今天我們把Angular2中MVC架構的最後一塊拼圖—Model,也就是Service給介紹完了!透過Service,可以讓Component的程式盡可能輕量化,避免無謂的負擔太多,讓Component只需要關注在資料與View之間的傳遞即可,彼此都需要注意自己該注意的地方,職責明確,開發維護就更加容易啦!
小小補充
在今天的實做中,可以看到我們把@Input, @Output都拿掉了,是否代表有了Service就不需要@Input與@Output了呢?答案當然是:NO!
透過Service我們可以把Component之間的行為進行集中的管理,但有些時候我們設計的Component還是需要透過@Input與@Output來與外部Component連接的,例如團隊開發時有共享的Component,但在一些參數的設定上有所不同時,就是@Input與@Output發威了時候啦!共享的Component不開放給外部的部分可透過內部的Service管理,剩下要由外部Component接手的部分則加入@Input及@Output,由別人去擔心,再次達到關注點分離!這樣的架構是不是明確又美麗阿!!
今天實做的程式碼:
https://github.com/wellwind/Angular2DotblogsDemo/tree/ServiceDemo
下期預告:Angular2開發Ajax程式不可或缺的重要關鍵—Http Module