文、意如
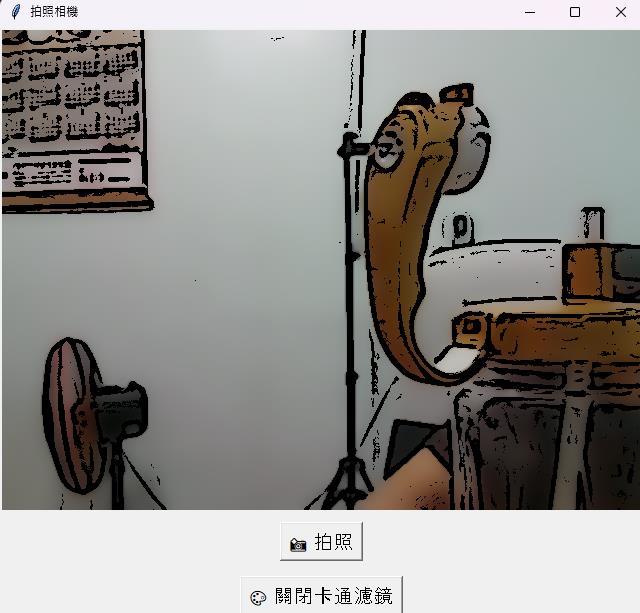
特效濾鏡卡通
py14.py
import cv2  # OpenCV:用於攝影機存取與影像處理
import tkinter as tk  # tkinter:建立 GUI 視窗
from tkinter import messagebox, simpledialog  # 匯入對話視窗(訊息框與簡單輸入框)
from PIL import Image, ImageTk  # 影像轉換,讓 OpenCV 圖像能顯示在 tkinter 上
import datetime  # 處理時間與時間戳記
import os  # 處理檔案與資料夾相關操作

# 建立主視窗
root = tk.Tk()
root.title("拍照相機")  # 設定視窗標題

# 建立影像顯示區域(用 Label 元件來顯示畫面)
label = tk.Label(root)
label.pack()  # 將 Label 放入視窗中

# 開啟預設攝影機(0 表示第一個攝影裝置)
cap = cv2.VideoCapture(0)

# 是否啟用卡通濾鏡的布林變數(預設關閉)
cartoon_filter_on = False

def apply_cartoon_filter(img):
    """將影像轉換為卡通效果"""
    # 先縮小圖片,加快濾鏡處理速度
    img_small = cv2.pyrDown(img)
    # 使用雙邊濾波(保留邊緣,模糊內部區域)
    img_small = cv2.bilateralFilter(img_small, 9, 75, 75)

    # 再進行兩次雙邊濾波,加強卡通化效果
    for _ in range(2):
        img_small = cv2.bilateralFilter(img_small, 9, 75, 75)

    # 再次放大圖片回原始大小
    img_up = cv2.pyrUp(img_small)

    # 將原始影像轉為灰階
    gray = cv2.cvtColor(img, cv2.COLOR_BGR2GRAY)
    # 使用自適應閾值偵測邊緣(先模糊再處理)
    edges = cv2.adaptiveThreshold(
        cv2.medianBlur(gray, 7), 255,
        cv2.ADAPTIVE_THRESH_MEAN_C,
        cv2.THRESH_BINARY, 9, 2
    )
    # 將邊緣圖由灰階轉為彩色(以便與圖像做 bitwise 合併)
    edges_colored = cv2.cvtColor(edges, cv2.COLOR_GRAY2BGR)

    # 將模糊後的圖片與邊緣合併,產生卡通效果
    cartoon = cv2.bitwise_and(img_up, edges_colored)
    return cartoon  # 回傳處理後的影像

def update_frame():
    """每幀更新畫面顯示"""
    ret, frame = cap.read()  # 從攝影機讀取一幀影像
    if ret:
        # 若啟用卡通濾鏡,則處理影像
        display_frame = apply_cartoon_filter(frame) if cartoon_filter_on else frame
        # 將 BGR 轉為 RGB(因為 PIL 需要 RGB 格式)
        frame_rgb = cv2.cvtColor(display_frame, cv2.COLOR_BGR2RGB)
        # 轉換為 PIL 影像格式
        img_pil = Image.fromarray(frame_rgb)
        # 轉換為 tkinter 可用的影像格式
        imgtk = ImageTk.PhotoImage(image=img_pil)
        label.imgtk = imgtk  # 避免影像被垃圾回收
        label.configure(image=imgtk)  # 更新影像顯示

    # 設定每 30 毫秒呼叫一次自身(達成即時畫面效果)
    root.after(30, update_frame)

def take_photo():
    """拍照並儲存圖片"""
    ret, frame = cap.read()  # 讀取一幀影像
    if not ret:
        # 若讀取失敗,顯示錯誤訊息
        messagebox.showerror("錯誤", "拍照失敗")
        return

    # 取得目前時間與時間字串
    now = datetime.datetime.now()
    timestamp_str = now.strftime("%Y-%m-%d %H:%M:%S")
    filename_time = now.strftime("%Y%m%d_%H%M%S")

    # 若開啟卡通濾鏡,先處理影像再儲存
    if cartoon_filter_on:
        frame = apply_cartoon_filter(frame)

    # 在圖片右下角加上時間戳記
    font = cv2.FONT_HERSHEY_SIMPLEX
    font_scale = 0.6
    thickness = 2
    color = (0, 255, 255)  # 黃色字體
    (text_width, text_height), baseline = cv2.getTextSize(timestamp_str, font, font_scale, thickness)
    x = frame.shape[1] - text_width - 10  # 右下角 X 座標
    y = frame.shape[0] - 10  # 右下角 Y 座標
    cv2.putText(frame, timestamp_str, (x, y), font, font_scale, color, thickness, cv2.LINE_AA)

    # 要求使用者輸入檔名(不含副檔名)
    user_filename = simpledialog.askstring("輸入檔名", "請輸入檔名(不含副檔名):")
    if not user_filename:
        # 若未輸入檔名,顯示警告並取消儲存
        messagebox.showwarning("警告", "未輸入檔名,取消儲存")
        return

    # 確保有 media 資料夾,若無則建立
    save_folder = "media"
    os.makedirs(save_folder, exist_ok=True)

    # 組合完整檔名與路徑
    full_filename = f"{user_filename}_{filename_time}.jpg"
    save_path = os.path.join(save_folder, full_filename)

    # 儲存影像
    cv2.imwrite(save_path, frame)

    # 顯示成功訊息
    messagebox.showinfo("成功", f"圖片已儲存:\n{save_path}")

def toggle_cartoon():
    """切換卡通濾鏡開關"""
    global cartoon_filter_on
    cartoon_filter_on = not cartoon_filter_on  # 切換開關狀態
    # 根據目前狀態更新按鈕文字
    btn_cartoon.config(
        text="🎨 關閉卡通濾鏡" if cartoon_filter_on else "🎨 開啟卡通濾鏡"
    )

# 建立「拍照」按鈕,點擊時執行 take_photo 函式
btn_capture = tk.Button(root, text="📸 拍照", font=("Arial", 14), command=take_photo)
btn_capture.pack(pady=10)  # 加上上下間距並顯示

# 建立「卡通濾鏡」按鈕,點擊時執行 toggle_cartoon 函式
btn_cartoon = tk.Button(root, text="🎨 開啟卡通濾鏡", font=("Arial", 14), command=toggle_cartoon)
btn_cartoon.pack(pady=5)  # 加上間距並顯示

# 啟動畫面更新(從攝影機取得影像並顯示)
update_frame()

def on_close():
    """關閉視窗時釋放攝影機資源"""
    cap.release()  # 關閉攝影機
    root.destroy()  # 關閉主視窗

# 綁定關閉事件,當使用者關掉視窗時執行 on_close
root.protocol("WM_DELETE_WINDOW", on_close)

# 啟動主事件迴圈(保持視窗運作)
root.mainloop()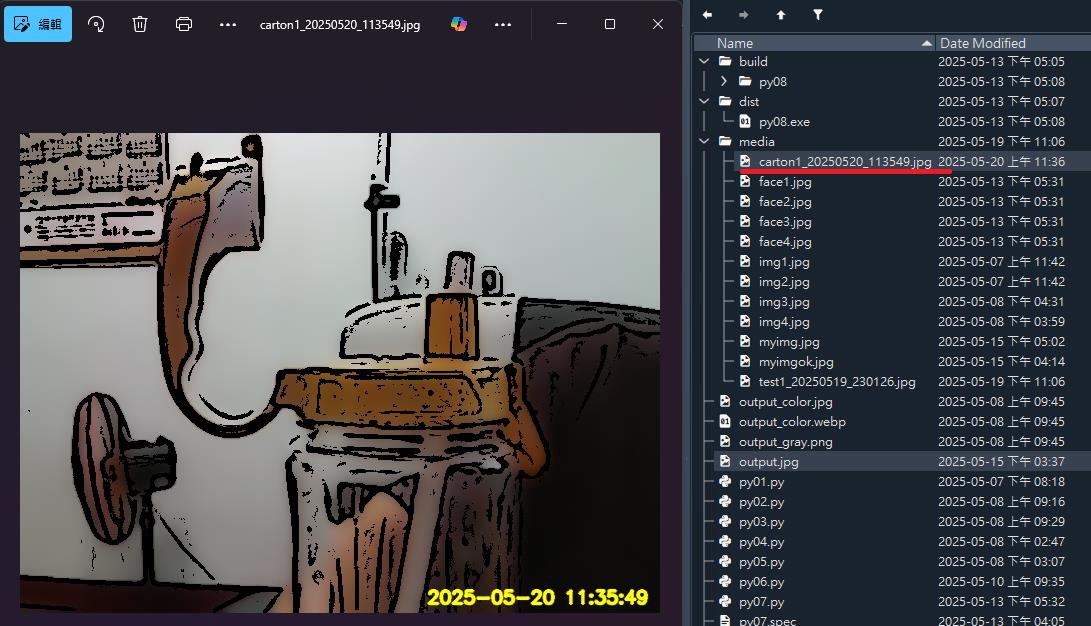
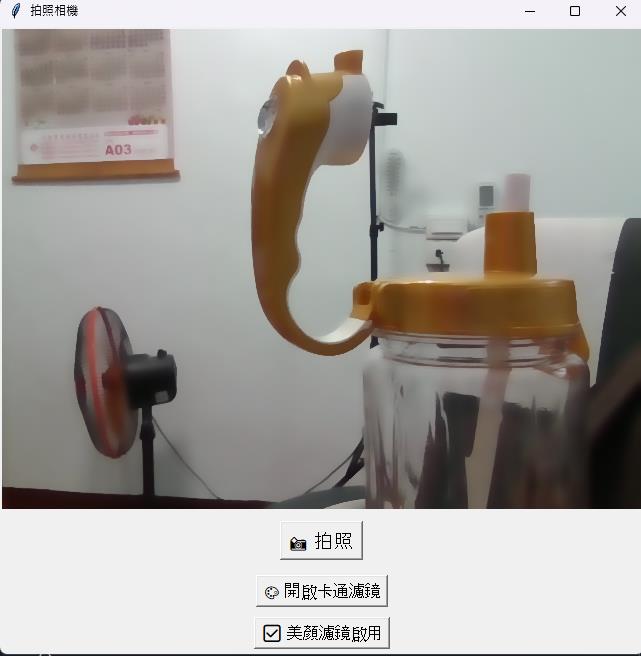
特效美顏濾鏡
py15.py
import cv2 # 匯入 OpenCV,用於影像處理和攝影機操作
import tkinter as tk # 匯入 tkinter 套件,建立 GUI 視窗
from tkinter import messagebox, simpledialog # 匯入 tkinter 的訊息盒與輸入對話框
from PIL import Image, ImageTk # 匯入 PIL 模組來轉換 OpenCV 圖像為 tkinter 可顯示格式
import datetime # 匯入日期時間模組,用來產生時間戳
import os # 匯入作業系統模組,用來處理檔案與資料夾
# 建立主視窗物件
root = tk.Tk()
root.title("拍照相機") # 設定視窗標題
# 建立顯示影像的 Label 元件
label = tk.Label(root)
label.pack() # 加入視窗中並自動配置位置
# 開啟攝影機(索引 0 為預設攝影機)
cap = cv2.VideoCapture(0)
# 設定濾鏡狀態的變數(目前為 None,代表無濾鏡)
current_filter = None # 可為 None / 'cartoon' / 'beauty'
def apply_cartoon_filter(img):
"""卡通濾鏡效果的實作"""
img_small = cv2.pyrDown(img) # 縮小影像以加速處理
img_small = cv2.bilateralFilter(img_small, 9, 75, 75) # 雙邊濾波,平滑但保留邊緣
for _ in range(2): # 再次濾波,加強卡通效果
img_small = cv2.bilateralFilter(img_small, 9, 75, 75)
img_up = cv2.pyrUp(img_small) # 放大回原尺寸
gray = cv2.cvtColor(img, cv2.COLOR_BGR2GRAY) # 轉為灰階
edges = cv2.adaptiveThreshold(
cv2.medianBlur(gray, 7), 255,
cv2.ADAPTIVE_THRESH_MEAN_C, cv2.THRESH_BINARY, 9, 2
) # 邊緣偵測
edges_colored = cv2.cvtColor(edges, cv2.COLOR_GRAY2BGR) # 邊緣圖轉為彩色
cartoon = cv2.bitwise_and(img_up, edges_colored) # 將邊緣與彩圖結合為卡通效果
return cartoon # 回傳卡通風格影像
def apply_beauty_filter(img):
"""美顏濾鏡效果(磨皮 + 柔膚)"""
return cv2.bilateralFilter(img, d=15, sigmaColor=75, sigmaSpace=75) # 雙邊濾波,柔化肌膚
def update_frame():
"""讀取攝影機影像、套用濾鏡並更新畫面"""
ret, frame = cap.read() # 從攝影機讀取一幀畫面
if ret: # 如果成功讀取
# 根據目前濾鏡設定套用對應效果
if current_filter == 'cartoon':
display_frame = apply_cartoon_filter(frame)
elif current_filter == 'beauty':
display_frame = apply_beauty_filter(frame)
else:
display_frame = frame # 無濾鏡,顯示原圖
frame_rgb = cv2.cvtColor(display_frame, cv2.COLOR_BGR2RGB) # OpenCV 為 BGR,需轉成 RGB
img_pil = Image.fromarray(frame_rgb) # 將 NumPy 陣列轉為 PIL 影像
imgtk = ImageTk.PhotoImage(image=img_pil) # 再轉成 tkinter 可用格式
label.imgtk = imgtk # 儲存參考避免被垃圾回收
label.configure(image=imgtk) # 設定 Label 顯示影像
root.after(30, update_frame) # 每 30 毫秒更新畫面(約每秒 30 幀)
def take_photo():
"""拍照並儲存目前畫面"""
ret, frame = cap.read() # 讀取攝影機畫面
if not ret: # 如果讀取失敗
messagebox.showerror("錯誤", "拍照失敗") # 顯示錯誤訊息
return
# 根據濾鏡設定處理照片
if current_filter == 'cartoon':
frame = apply_cartoon_filter(frame)
elif current_filter == 'beauty':
frame = apply_beauty_filter(frame)
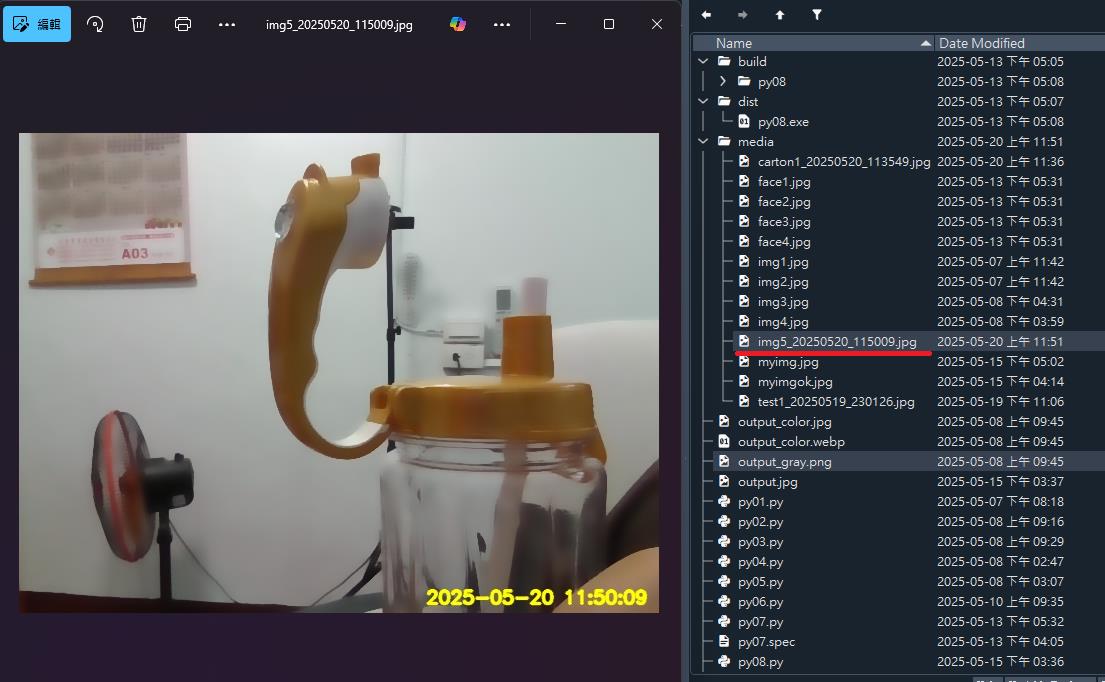
# 取得目前時間與時間字串
now = datetime.datetime.now()
timestamp_str = now.strftime("%Y-%m-%d %H:%M:%S") # 時間戳字串(顯示用)
filename_time = now.strftime("%Y%m%d_%H%M%S") # 檔案用的時間字串
# 設定文字樣式與位置,將時間戳記印在照片右下角
font = cv2.FONT_HERSHEY_SIMPLEX
font_scale = 0.6
thickness = 2
color = (0, 255, 255) # 黃色
(text_width, text_height), baseline = cv2.getTextSize(timestamp_str, font, font_scale, thickness)
x = frame.shape[1] - text_width - 10
y = frame.shape[0] - 10
cv2.putText(frame, timestamp_str, (x, y), font, font_scale, color, thickness, cv2.LINE_AA)
# 詢問使用者檔名
user_filename = simpledialog.askstring("輸入檔名", "請輸入檔名(不含副檔名):")
if not user_filename:
messagebox.showwarning("取消", "未輸入檔名,已取消儲存")
return
# 儲存圖片到 media 資料夾
save_folder = "media"
os.makedirs(save_folder, exist_ok=True) # 若資料夾不存在則建立
full_filename = f"{user_filename}_{filename_time}.jpg"
save_path = os.path.join(save_folder, full_filename)
cv2.imwrite(save_path, frame) # 儲存影像檔案
messagebox.showinfo("成功", f"圖片已儲存:\n{save_path}") # 顯示成功訊息
def toggle_cartoon():
"""切換卡通濾鏡的開關"""
global current_filter
if current_filter == 'cartoon': # 若已啟用,則關閉
current_filter = None
btn_cartoon.config(text="🎨 開啟卡通濾鏡")
else:
current_filter = 'cartoon' # 啟用卡通濾鏡
btn_cartoon.config(text="✅ 卡通濾鏡啟用")
btn_beauty.config(text="💄 開啟美顏濾鏡") # 關閉其他濾鏡的啟用狀態顯示
def toggle_beauty():
"""切換美顏濾鏡的開關"""
global current_filter
if current_filter == 'beauty': # 若已啟用,則關閉
current_filter = None
btn_beauty.config(text="💄 開啟美顏濾鏡")
else:
current_filter = 'beauty' # 啟用美顏濾鏡
btn_beauty.config(text="✅ 美顏濾鏡啟用")
btn_cartoon.config(text="🎨 開啟卡通濾鏡") # 關閉其他濾鏡的啟用狀態顯示
# 拍照按鈕(點擊後呼叫 take_photo 函式)
btn_capture = tk.Button(root, text="📸 拍照", font=("Arial", 14), command=take_photo)
btn_capture.pack(pady=10)
# 濾鏡選擇按鈕(卡通)
btn_cartoon = tk.Button(root, text="🎨 開啟卡通濾鏡", font=("Arial", 12), command=toggle_cartoon)
btn_cartoon.pack(pady=5)
# 濾鏡選擇按鈕(美顏)
btn_beauty = tk.Button(root, text="💄 開啟美顏濾鏡", font=("Arial", 12), command=toggle_beauty)
btn_beauty.pack(pady=5)
# 啟動影像畫面更新
update_frame()
def on_close():
"""視窗關閉時釋放資源"""
cap.release() # 釋放攝影機
root.destroy() # 關閉視窗
# 設定關閉視窗時的行為(呼叫 on_close)
root.protocol("WM_DELETE_WINDOW", on_close)
# 啟動 tkinter 主事件迴圈
root.mainloop()
調整雙邊濾波,柔化肌膚
sigmaColor=75, sigmaSpace=75
Yiru@Studio - 關於我 - 意如