現在在開發上逐漸強調可以持續整合 (CI) 和持續發佈 (CD),希望工程師可以更快速的交付程式碼,因此會使用 Feature branch 的 Git 策略來開發,在開發完成之後就可以馬上合併回主分支,這時候就會需要 Feature Toggle/Flag 機制,它可以透過一個設定值來控制功能的啟用和關閉,就可以在快速交付程式碼時候先隱藏或關閉開發中的功能,等測試完成之後再打開就好,或是再配合一些 Feature Toggle 的服務來管理設定,也可以針對特定使用者或按照比例來開發功能給使用者使用,而在 Azure 上面我們可以透過 App Configuration 的其中 Feature manager 功能來實做出這樣的機制,後面我就以一些實務上可以使用的情境來介紹功能的使用。
情境
假設我們有一個電商平台,接下來配合公司策略,會有底下的情境和需求發生,後面就可以針對這些情境一一介紹如何使用 App Configuration 來完成需求。
- 在雙 11 時候要上架一個廣告,上架時間為 11/08~11/13。
- 針對平台新功能希望可以先進行 A/B Testing 機制來讓使用者使用看看新功能。
- 針對 VIP 客戶會有特殊的促銷。
實做
初始設定
首先建立一個專案並設定啟用驗證功能。

新增 NuGet 套件 Microsoft.Azure.AppConfiguration.AspNetCore 和 Microsoft.FeatureManagement.AspNetCore
dotnet add package Microsoft.Azure.AppConfiguration.AspNetCoredotnet add package Microsoft.FeatureManagement.AspNetCoreappsettings.json 新增連線字串參數 AppConfig
{
  "ConnectionStrings": {
    "AppConfig": ""
  }
}
在 Program.cs 新增啟用功能和設定連線字串
var appConfigConnectionString = builder.Configuration.GetConnectionString("AppConfig");

builder.Host.ConfigureAppConfiguration(builder =>
{
    builder.AddAzureAppConfiguration(options => options
        .Connect(appConfigConnectionString).UseFeatureFlags());
});

builder.Services.AddFeatureManagement();
到這邊就把前置作業準備好了,接下來就針對情境來實做。如何建立 App Configuration 和取得連線自串請參考前面的文章,就不重複說明了。
在雙 11 時候要上架一個廣告,上架時間為 11/08~11/13
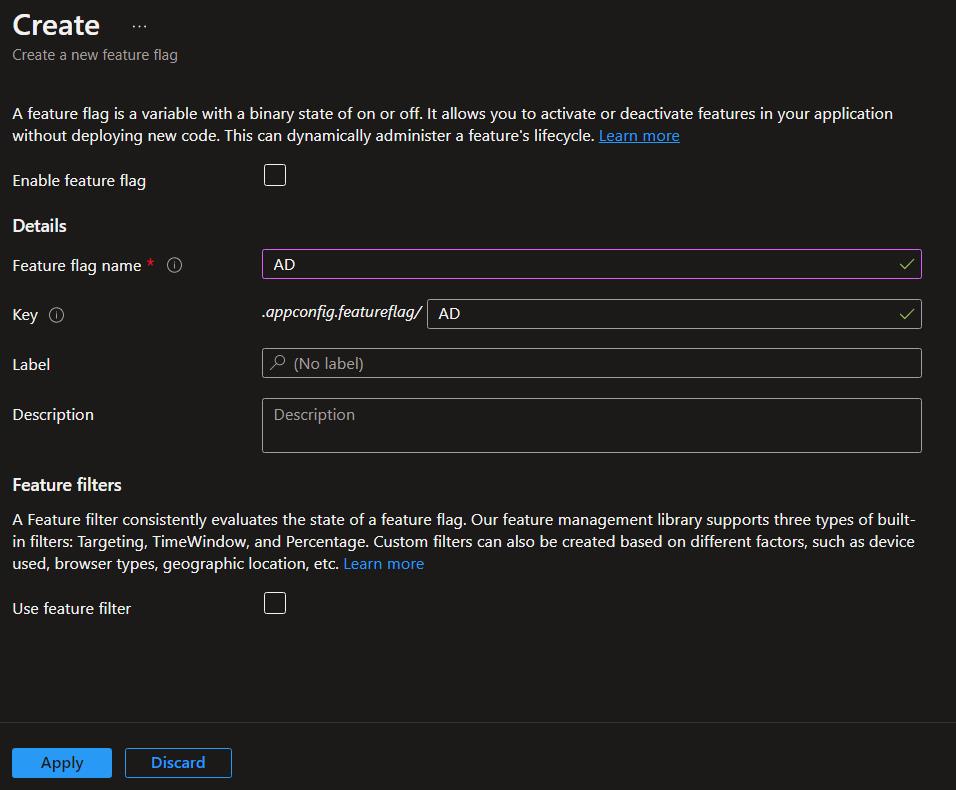
在 App Configuration 點選 Feature manager 來建立一個設定。
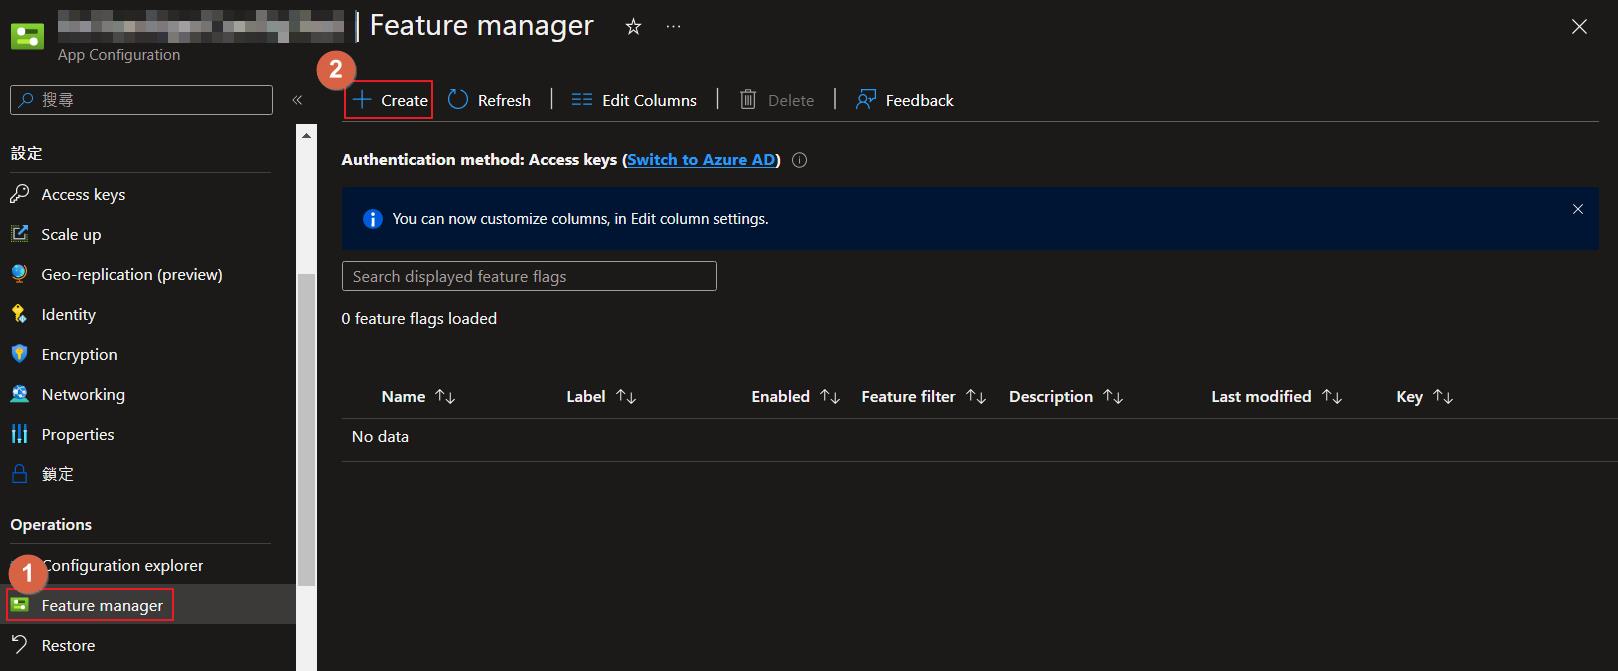
這邊先輸入名稱為 AD 並先不啟用功能。
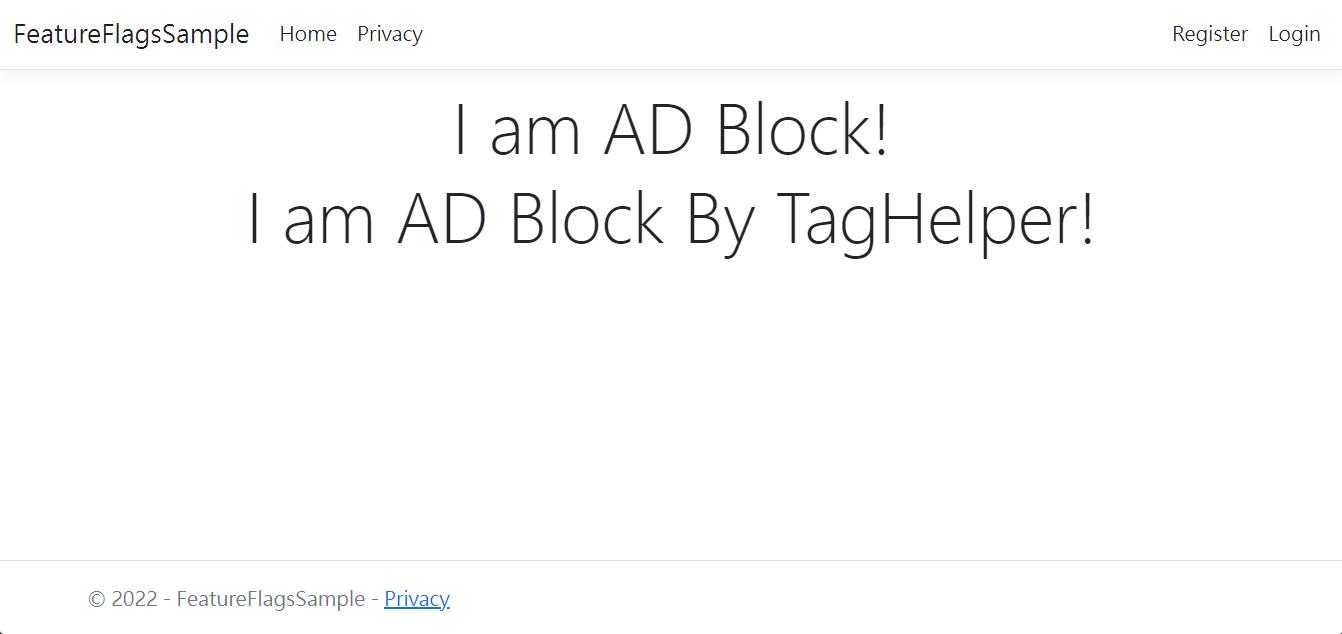
接下來我們打算在首頁顯示一個廣告區塊,這邊有兩個方法可以完成。
方法一
修改 Index.cshtml 以注入 IFeatureManager 來使用相關方法
@inject Microsoft.FeatureManagement.IFeatureManager FeatureManager

@if (await FeatureManager.IsEnabledAsync("AD"))
{
    <div class="text-center">
        <h1 class="display-4">I am AD Block!</h1>
    </div>
}
方法二
使用 TagHelper 方式來顯示相關區塊
在 Shared/_ViewImports.cshtml 新增 TagHelper 設定
@addTagHelper *, Microsoft.FeatureManagement.AspNetCore在 Index.cshtml 使用 TagHelper 來顯示區塊
<feature name="AD">
    <div class="text-center">
        <h1 class="display-4">I am AD Block By TagHelper!</h1>
    </div>
</feature>
接下來先直接啟用功能再執行網站就可以看到廣告區塊如預期顯示出來。
再來回到我們需求是要在特定時間點啟用和廣告的排程,回到設定裡面啟用 Feature filter 並且選擇 Time window 選項並設定我們預期的廣告排程時間,如此一來就會在設定的時間點顯示功能了,也別忘記這個設定也要是在 Enabled 狀態下才會生效喔。

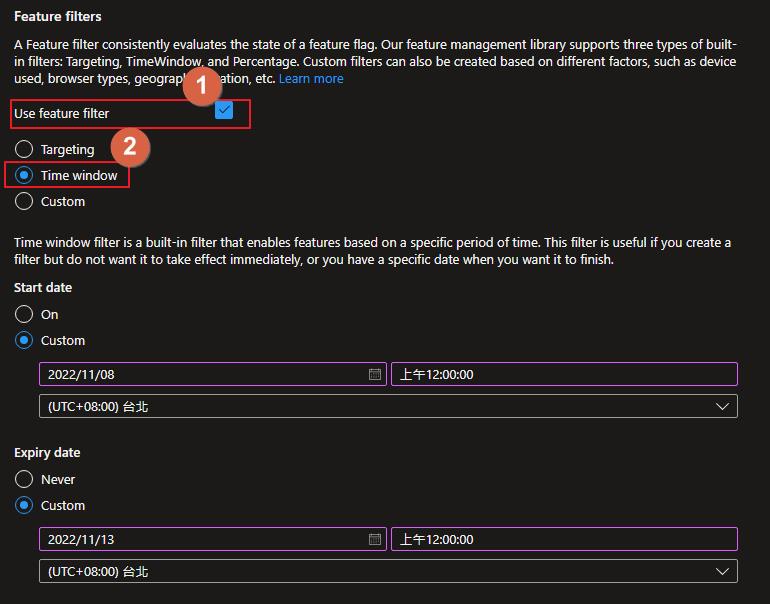
另外也需要修改 Program.cs 裡面原本的設定,新增上 TimeWindowFilter 這樣才有辦法使用此 fiter 功能。
builder.Services.AddFeatureManagement().AddFeatureFilter<TimeWindowFilter>();針對平台新功能希望可以先進行 A/B Testing 機制來讓使用者使用看看新功能
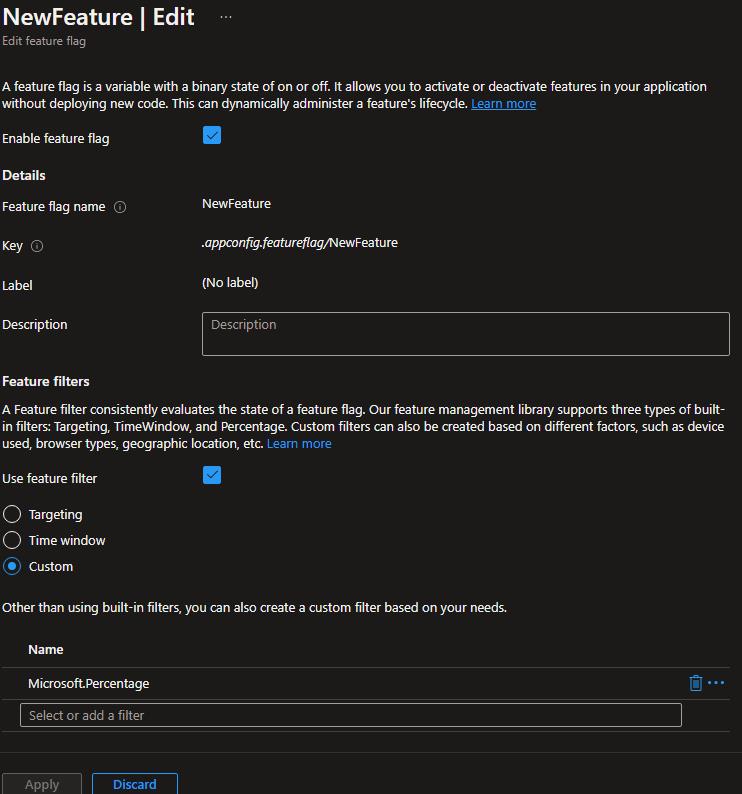
在 Feature manager 新增一個名稱為 NewFeature 的設定,feature filter 則選擇 Custom,在 filter 名稱的地方輸入 Microsoft.Percentage,這是微軟內建的 filter 中的其中一個。
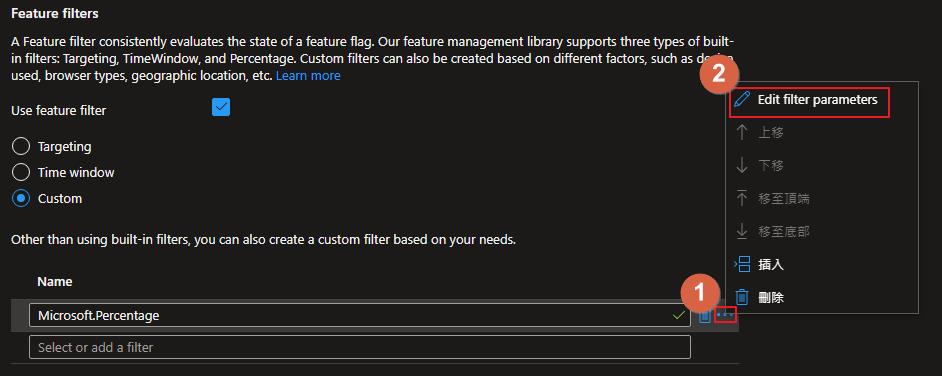
接下來點選旁邊的 … 就會出現選單,選擇 Edit filter parameters。
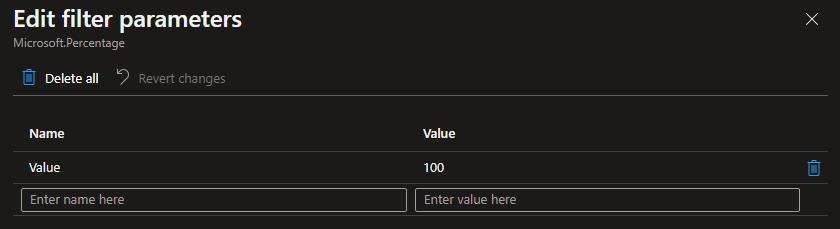
輸入 Value 這一個名稱,並設定要的百分比數,這邊我為了後面可以百分百顯示功能,所以設定 100%,大家可以根據實務上需要設定要如何分 A/B 群的比例囉。
回到程式 Program.cs 新增 PercentageFilter
builder.Services.AddFeatureManagement().AddFeatureFilter<PercentageFilter>();新增一個 NewFeature Controller,並在 Controller 上面新增 FeatureGate Attribute,這邊我有另外定義一個 Enum 來設定功能,也可以直接輸入文字,但是還是建議可以定義,並免打錯字等情形發生。
[FeatureGate(MyFeatureFlags.NewFeature)]
public class NewFeatureController : Controller
{
    public IActionResult Index()
    {
        return View();
    }
}
public enum MyFeatureFlags
{
NewFeature
}也別忘記新增一個 Index.cshtml
接下來修改 _Layout.cshtml 在選單內加上連結選項,這邊就用 TagHelper 的方式來新增。
<feature name="NewFeature">
<li class="nav-item">
<a class="nav-link text-dark" asp-area="" asp-controller="NewFeature" asp-action="Index">NewFeature</a>
</li>
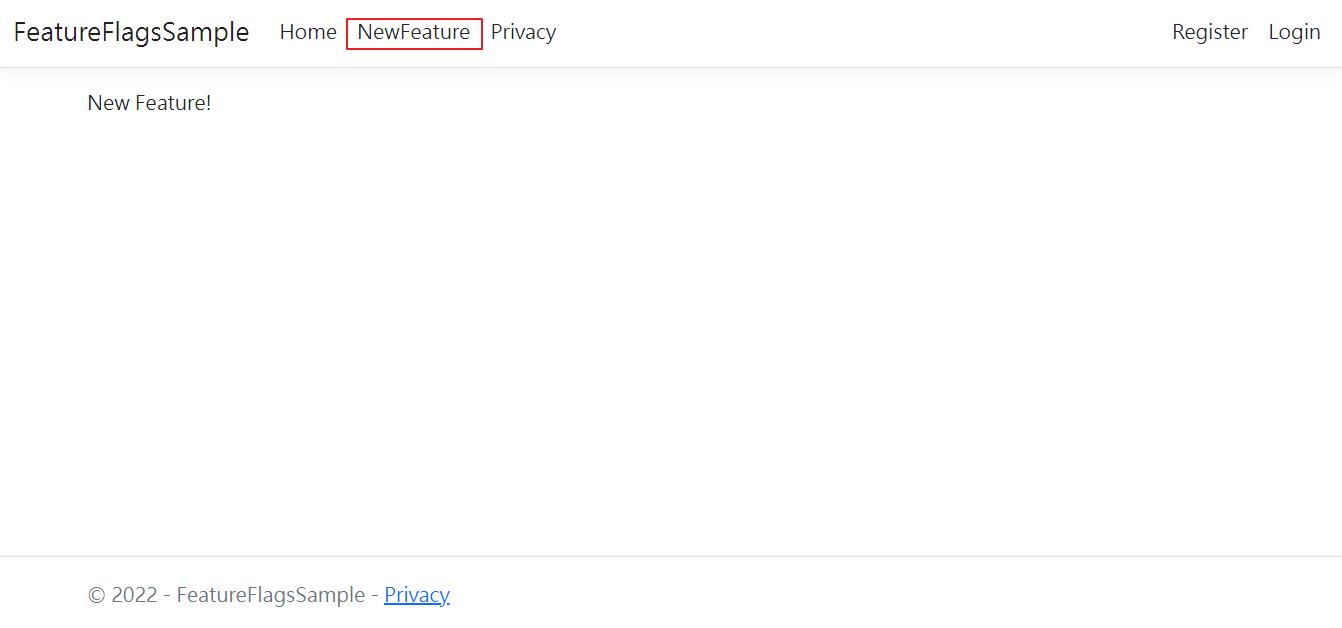
</feature>接下來執行程式可以在選單看到新功能了。
針對 VIP 客戶會有特殊的促銷
首先新增一個 VIP 設定
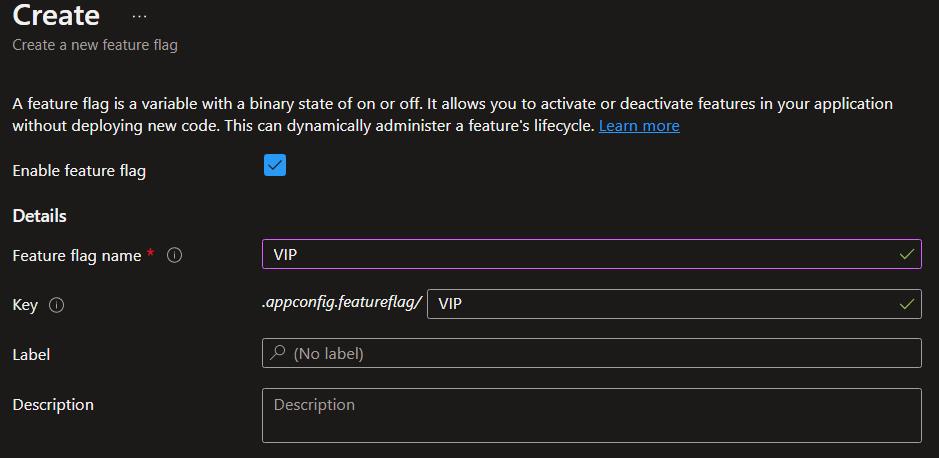
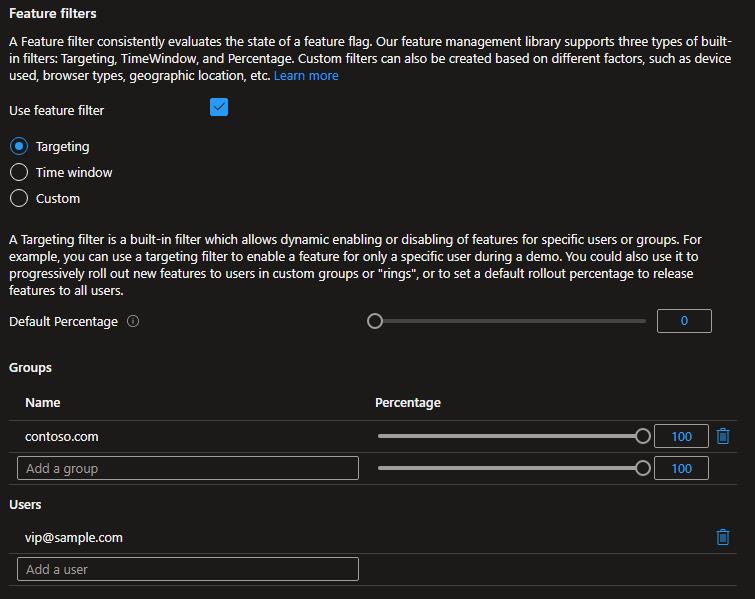
Feature filter 這次設定是 Targeting,因為我們希望是針對所有符合資格的 VIP 客戶所以把 Default Percentage 設定成 0%,Group 部分則是設定 contoso.com 且為 100%,之後我們會針對登入的使用者帳號,假設網域為 contoso.com 的使用者都屬於 VIP 客戶,另外設定一個使用者是 vip@sample.com。
程式部分則是新增一個 VIPTargetingContextAccessor 類別並實做 ITargetingContextAccessor 介面。
public class VIPTargetingContextAccessor : ITargetingContextAccessor
{
    private const string TargetingContextLookup = "VIPTargetingContextAccessor.TargetingContext";
    private readonly IHttpContextAccessor _httpContextAccessor;

    public VIPTargetingContextAccessor(IHttpContextAccessor httpContextAccessor)
    {
        _httpContextAccessor = httpContextAccessor ?? throw new ArgumentNullException(nameof(httpContextAccessor));
    }

    public ValueTask<TargetingContext> GetContextAsync()
    {
        HttpContext httpContext = _httpContextAccessor.HttpContext;
        if (httpContext.Items.TryGetValue(TargetingContextLookup, out object value))
        {
            return new ValueTask<TargetingContext>((TargetingContext)value);
        }

        List<string> groups = new List<string>();
        if (httpContext.User.Identity.Name != null)
        {
            groups.Add(httpContext.User.Identity.Name.Split("@", StringSplitOptions.None)[1]);
        }

        TargetingContext targetingContext = new TargetingContext
        {
            UserId = httpContext.User.Identity.Name,
            Groups = groups
        };

        httpContext.Items[TargetingContextLookup] = targetingContext;

        return new ValueTask<TargetingContext>(targetingContext);
    }
}
要特別說明的部分則是底下這一段邏輯,會從登入的資訊取得使用者名稱,在 Identity 裡面則會是電子信箱,取得網域的部分並加入 Group 群組清單內,最後回傳 TargetingContext,所以 UserId 或是 Groups 有符合前面我們 VIP 的設定,就會套用到 VIP 這個 Feature 了。
        List<string> groups = new List<string>();
        if (httpContext.User.Identity.Name != null)
        {
            groups.Add(httpContext.User.Identity.Name.Split("@", StringSplitOptions.None)[1]);
        }

        TargetingContext targetingContext = new TargetingContext
        {
            UserId = httpContext.User.Identity.Name,
            Groups = groups
        };

        httpContext.Items[TargetingContextLookup] = targetingContext;
這次 Program.cs 的修改則為加入 TargetingFilter 並且注入 VIPTargetingContextAccessor,這樣程式在套用 TargetingFilter 的時候就會使用 VIPTargetingContextAccessor 的邏輯了。
builder.Services.AddFeatureManagement().AddFeatureFilter<TargetingFilter>();

builder.Services.AddSingleton<ITargetingContextAccessor, VIPTargetingContextAccessor>();
後面就一樣新增一個 VIP Controller
[FeatureGate(MyFeatureFlags.VIP)]
public class VIPController : Controller
{
    public IActionResult Index()
    {
        return View();
    }
}
Layout.cshtml 就和前面差不多。
<feature name="VIP">
<li class="nav-item">
<a class="nav-link text-dark" asp-area="" asp-controller="VIP" asp-action="Index">VIP</a>
</li>
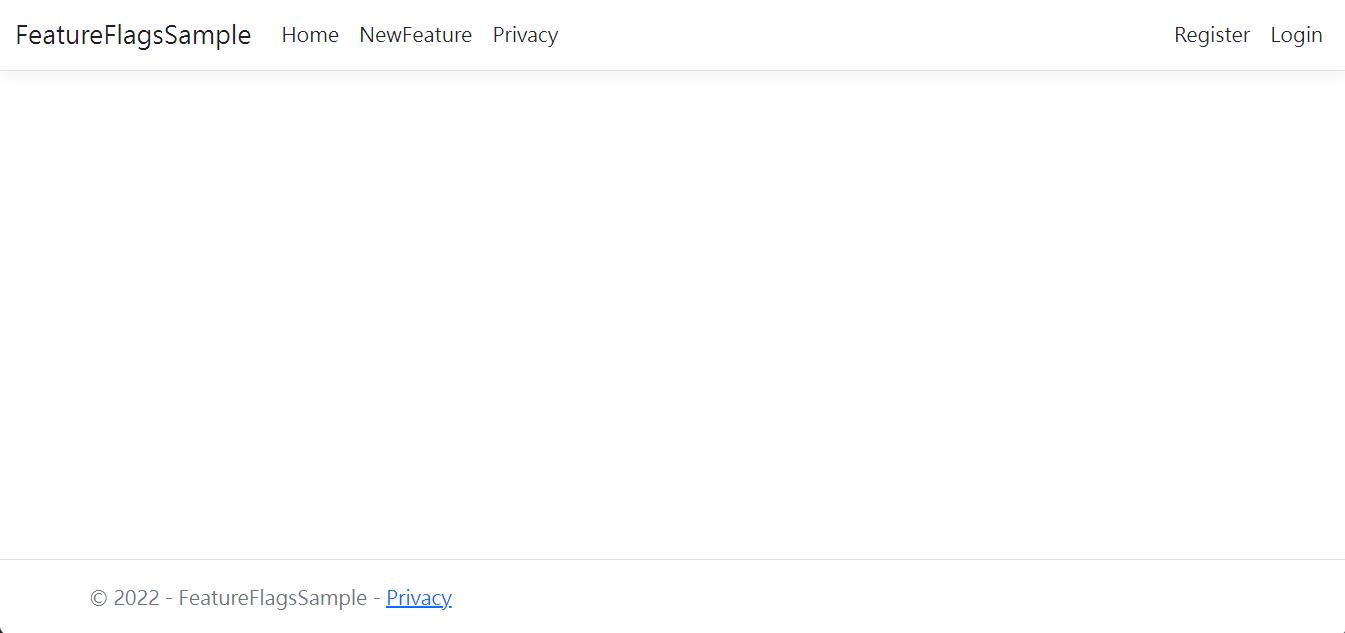
</feature>執行程式之後預設是沒有 VIP 選項的。
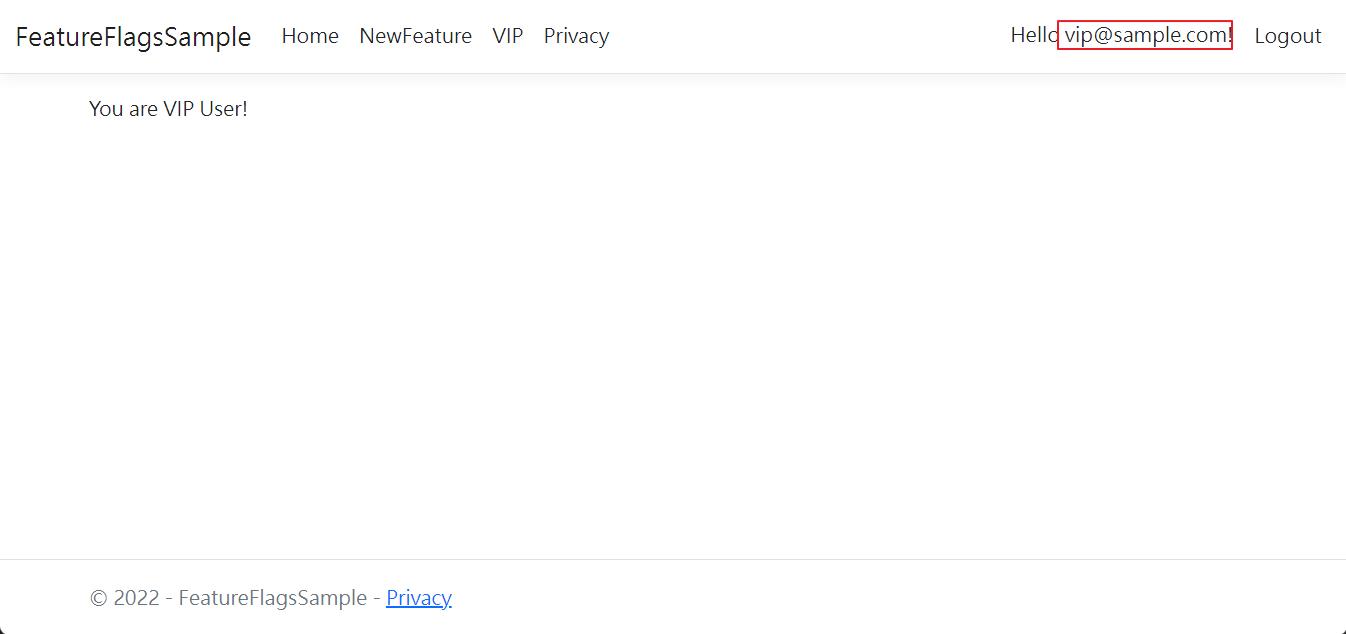
接下來我們會分別使用底下三組帳號登入來測試。
| 帳號 | 符合項目 |
| vip@sample.com | 特定的 User |
| user@contoso.com | 指定的 Group |
| user@sample.com | 不符合 |
vip@sample.com
user@contoso.com
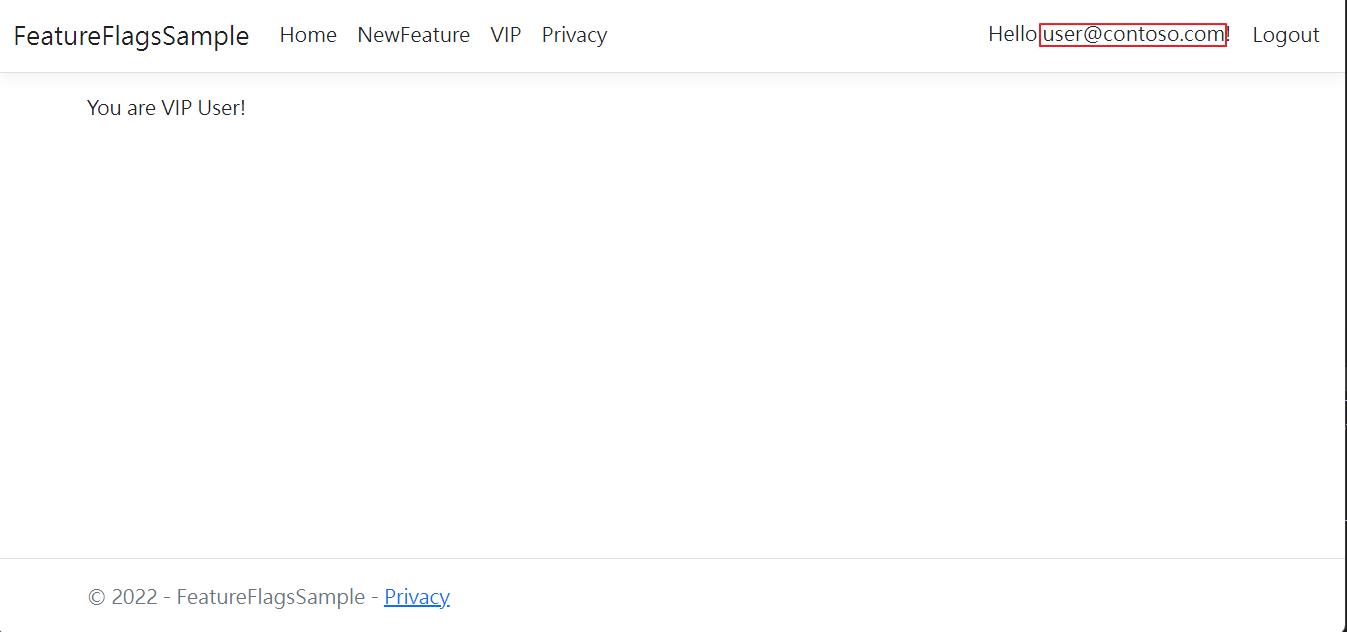
user@sample.com
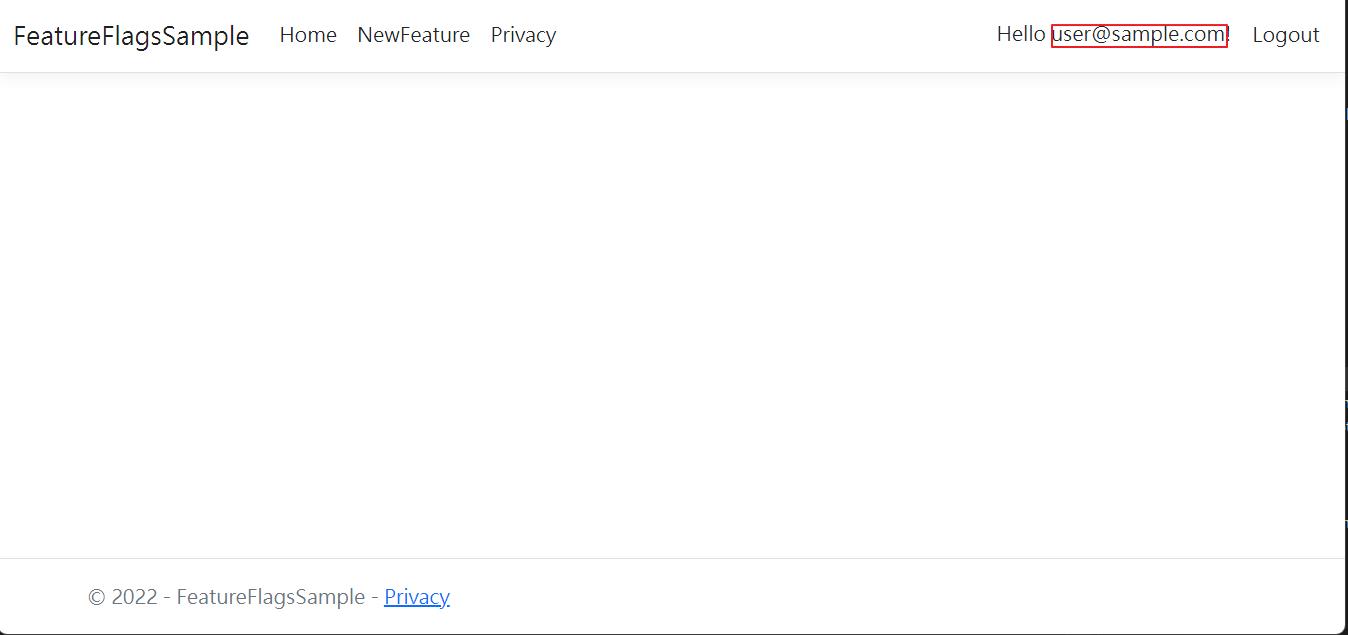
三個結果就都符合預期的結果,這樣我們就完成了這一個需求了。
結論
透過一個電商平台可能遇到的情境,將三種 Filter 都介紹到了一次,互相搭配著使用就可以完成大部分的 Feature Toggle 情境了。
如需要本文完整程式碼可以到 GitHub 察看。