本篇將介紹ASP.Net Core中Exception的兩種處理機制 - Filter & Middleware。
只要是用手寫code的工程師,
一定都會碰到例外處理的需求。
在ASP.Net Core中,
除了使用Exception Filter來解決之外,
你也可以實作Exception Middleware。
以下將針對兩者進行介紹及實作。
Exception Filter
在講Exception Filter之前,
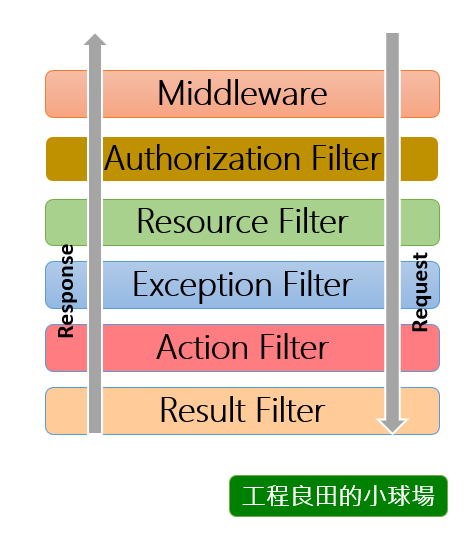
我們先來看一張圖。

從上圖可以很清楚的看到,
Request進來經過Exception Filter後,
只摸的到Action Filter跟Result Filter兩層。
也就是說你在Middleware、Authorization Filter、Resource Fiter所發生的錯誤,
都不會被Exception Filter捕捉!
這個是使用Exception Filter與Exception Middleware的最大差異,
不過我們還是要實作一下XD。
透過實作 IExceptionFilter 、 IAsyncExceptionFilter 介面,
就可以自訂發生錯誤時的處理機制。
官方提供的範例為自訂錯誤頁面,
我們拿它來做一點改變。
寫功能總是要有個需求,
情境假設如下:
所以....
開發環境發生錯誤時 => 顯示完整的錯誤訊息。
正式環境發生錯誤時 => 顯示「系統忙碌中,請稍後...」。
但兩者皆要記錄Log。
第一步起手式:實作IExceptionFilter
public class MyExceptionFilter : IExceptionFilter
{
    private readonly ILogger _logger;
    private readonly IModelMetadataProvider _modelMetadataProvider;

    public MyExceptionFilter(ILogger<MyExceptionFilter> logger,IModelMetadataProvider modelMetadataProvider)
    {
        this._logger = logger;
        this._modelMetadataProvider = modelMetadataProvider;
    }

    public  void OnException(ExceptionContext context)
    {
        var errorMessage = $"{DateTime.Now.ToLongTimeString()} | {context.Exception}";
        _logger.LogError(errorMessage);

        var result = new ViewResult { ViewName = "CustomError" };
        result.ViewData = new ViewDataDictionary(_modelMetadataProvider, context.ModelState);

#if DEBUG
        result.ViewData.Add("Exception", context.Exception);
#else
        result.ViewData.Add("Exception", "系統忙碌中,請稍後...");
#endif
        context.Result = result;
    }
}
我們實作了 OnException 方法,
在建構子中將ILogger及IModelMetaDataProvider注入(滿滿的DI),
透過判斷是否為DEBUG模式將要回傳的訊息塞進 ViewData["Exception"] 中,
並統一回傳至自訂錯誤的頁面(CustomError.cshtml)。
好了之後在 /Views/Shared 中新增一個 CustomError.cshtml 。
@{
    ViewData["Title"] = "CustomError";
}

<br/>
<div class="alert alert-success">
    @ViewData["exception"]
</div>
最後在Home/Index中故意製造一個錯誤。
public class HomeController : Controller
{
    public IActionResult Index()
    {
        int i = 1;
        int j = i / 0;
        return View();
    }
}
Debug Mode測試結果:

Release Mode測試結果:

Exception Middleware
透過用Middleware的形式,
能夠自行調整例外處理的順序(例如放在Middleware第一層),
範例程式碼如下:
public class MyExceptionMiddleware
{
    private readonly RequestDelegate _next;
    private readonly ILogger _logger;

    public MyExceptionMiddleware(ILogger<MyExceptionMiddleware> logger, RequestDelegate next)
    {
        this._logger = logger;
        this._next = next;
    }

    public async Task Invoke(HttpContext context)
    {
        try
        {
            await _next(context);
        }
        catch (Exception ex)
        {
            var errorMessage = $"Catch Exception from Middleware : {GetType().Name} - {ex.Message}";
            _logger.LogCritical(errorMessage);

            await context.Response
                .WriteAsync(errorMessage);
        }
    }
}
我們可以在Startup Configure()中,
透過IApplicationBuilder 的UseMiddleware<MyExceptionMiddleware>() ,
來使用自訂的Middleware。
範例程式如下:
public void Configure(IApplicationBuilder app, IHostingEnvironment env)
{
    app.UseMiddleware<MyExceptionMiddleware>();

    app.Use(async (context, next) =>
    {
        await context.Response.WriteAsync("middleware2 - before\n");
        int i = 0;
        int j = 1 / i;
        await next();
        await context.Response.WriteAsync("middleware2 - after\n");
    });

    app.Run(async context =>
    {
        await context.Response.WriteAsync("middleware3 - run test in the end\n");
    });
}
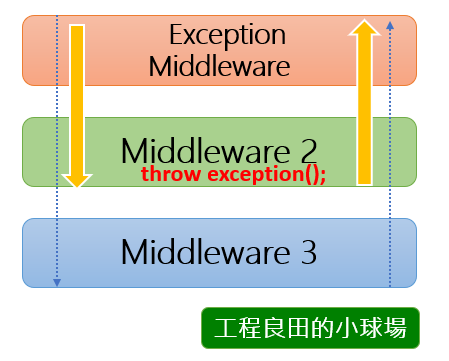
我們將ExceptionMiddleware擺在第一層,
並故意在第二層Middleware拋出例外錯誤,
當發生錯誤時後面的Middleware將不會被執行,
示意圖如下。

測試結果:

Middleware Extension Method
補充一下常用的Middleware Extension Method寫法,
藉由擴充方法可以自訂名稱,
寫起來比較有爽感XD。
程式碼如下:
public static class MyMiddlewareExtensions
{

    public static IApplicationBuilder UseMyExceptionMiddleware(this IApplicationBuilder app)
    {
        return app.UseMiddleware<MyExceptionMiddleware>();
    }
}
最後把Startup中的程式碼換掉。
//app.UseMiddleware<MyExceptionMiddleware>();
app.UseMyExceptionMiddleware();
Exception的部分介紹到此,
如內容有誤再麻煩指正!
參考
https://www.devtrends.co.uk/blog/dependency-injection-in-action-filters-in-asp.net-core
