介紹如何使用 Vuex 做 Vue 的狀態管理,以及些使用上的心得。
前言
使用 Vue 建立網站非常快速,但當 Component 一多之後,使用 props 和 event bus 做狀態的溝通變的很棘手,Vuex 則是目前 Vue 做狀態管理的最佳解,使用 Vuex 也已經變成很平常的事,想說好好記錄一下使用的過程給需要的朋友參考一下。
安裝及引入 Vuex
在既有的專案上使用以下指令安裝
$ npm install vuex
在 src 目錄下新增 store.js 檔,並引入 Vuex,以建立一個 計數器為例
import Vue from 'vue';
import Vuex from 'vuex';

Vue.use(Vuex);

const store = new Vuex.Store({
  state: {
    count: 0,
  },
  mutations: {
    addCount(state) {
      state.count += 1;
    },
  },
});

export default store;
mutations,所以 callback function 會需要傳入 state。actions 會於隨後會介紹,它則是不能直接改變 state,而是需要透過呼叫 mutations 來達成改變 state 的目的。
在 main.js 檔引入 store.js
import Vue from 'vue';
import App from './App.vue';
import store from './store';

Vue.config.productionTip = false;

new Vue({
  store,
  render: h => h(App),
}).$mount('#app');
this.$store 取得 store,如果不這樣做,則需要在每個需要 store 的組件先 impore store 進去才可以使用。
Mutations
取得資料: 在 computed 內使用 this.$store.state.count 取得值
變更資料: 使用 this.$store.commit("addCount") 提交 mutations,commit 的名稱即 mutations 的 function 名稱
<div id="app">
  {{ count }}
  <button @click="addCount">Add Count</button>
</div>
export default {
  name: 'app',
  computed: {
    count () {
      return this.$store.state.count;
    }
  },
  methods: {
    addCount () {
      this.$store.commit('addCount');
    },
  }
}
如果 mutations 的方法有傳入變數的需求,例如每一次都 +2 為例
this.$store.commit("addCount", 2);
這時候在 mutations 就可以從第二個參數取得值,同理也可以 commit 時傳入物件給 mutations
mutations: {
 addCount(state, payload) {
   state.count += payload;
 },
}
Actions
Mutations 和 Actions 的差別在於前者用來處理同步動作且可以變更 state,後者專門執行非同步的處理且不能直接操作 state 的資料。
提交的方法分別為:
- Mutations: 使用
commit,如:this.$store.commit('xxx') - Actions: 使用
dispatch,如:this.$store.dispatch('xxx')
以下為使用 actions 的情境,以 axios 執行非同步的帳戶登入為例。
const store = new Vuex.Store({
    state: {
        isLogin: false,
        isLoading: false,
        user: {},
    },
    actions: {
        login({ commit, dispatch }, payload) {
            commit('switchLoading', true);

            axios.post('/user', {
                    username: payload.username,
                    password: payload.password
                })
                .then(function (response) {
                    commit('loginSuccess', response.date.user);
                    commit('switchLoading', false);
                })
                .catch(function (error) {
                    commit('loginFailure');
                    dispatch('saveErrorLog', 'Login fail.');
                    commit('switchLoading', false);
                });
        },
        saveErrorLog({ commit }, payload) {
            // Do something
            axios.post('/saveError', {
                    message: payload,
                })
                .then(function (response) {
                    // Deal with response
                })
                .catch(function (error) {
                    // Deal with error
                });
        },
    },
    mutations: {
        switchLoading(state, isLoading) {
            state.isLoading = isLoading
        },
        loginSuccess(state, user) {
            state.user = user;
        },
        loginFailure(state) {
            state.user = null;
        },
    }
});
注意部分:
- actions 內可以再使用 commit 和 dispatch 來叫用其他 mutations 及 actions
- mutations 只有很單純的去改變 state 資料
{ commit, dispatch }是要透過解構得到context.commit及context.dispatch,當然也可以不解購直接使用 context 來處理,只是這樣後面寫起來會比較冗長。- actions 後面要接其他變數的作法和 mutations 一樣
使用 Map Helper 指派
在 mutations 的介紹中,我在 computed 取得 store 的值,以及在 methods 提交 mutations 的方法,但如果取得值和提交 mutations 的次數很多,則建議使用 mapState 和 mapMutations 來指派,可以避免寫一堆 this.$store...。
import { mapState, mapMutations } from 'vuex'

export default {
  name: 'app',
  computed: mapState(['count']),
  methods: mapMutations(['addCount']),
}
mapMutations 後如果有需要提交其他參數,這時候只要在 @click 的函式內傳入即可。<button @click="addCount(2)">Add Count</button>
如果方法名稱不想要跟 mutations 內的一樣,可以使用物件的方式指派
methods: mapMutations({
  add: 'addCount'
}),
而 actions 的話則可以使用 mapActions ,做法和 mapMutations 是一樣的,也同樣有不同名稱的指派方式。
methods: mapActions(['actionsName']);

methods: mapActions({
  act: 'actionsName'
}),
Modules
當 store 隨著專案越來越大,放在他身上的資料和方法也會不斷變多,而使用 Modules 能夠很方便的結構化 store ,官方文件 針對 Modules 的說明很詳細,以下我會針對我使用上的心得列出我認為比較重要或覺得不錯的部分。
結構化 store 和檔案
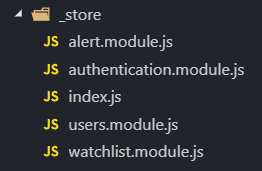
因為 Modules 就是要拿來分割 store 的資料,我的習慣是將 .js 檔也 依照 module 一併分割開來。

在 index.js 裡面再 import 進來所有 module 的 .js 檔並包進 store。
import Vue from 'vue';
import Vuex from 'vuex';

import { alert } from './alert.module';
import { authentication } from './authentication.module';
import { users } from './users.module';
import { watchlist } from './watchlist.module';

Vue.use(Vuex);

export const store = new Vuex.Store({
  modules: {
    alert,
    authentication,
    users,
    watchlist
  }
});
局部及非局部狀態
使用了 Module 後要非常注意當下所執行的 state, getters, commit, dispatch 是屬於自身模組還是有可能是其他模組的,Vuex 提供以下方式來做區別。
getters
getters: {
  someGetter (state, getters, rootState, rootGetters) {
    // state, getters 為當前模組的 (局部)
    state.count;
    getters.newCount;

    // rootState, rootGetters 為全域的 (非局部)
    rootState.count;
    rootGetters.newCount;
  },
},
actions
actions: {
  someAction ({ state, dispatch, commit, getters, rootState, rootGetters }) {
    // state, getters, dispatch, commit 為當前模組的 (局部)
    state.count;
    getters.count;
    dispatch('someAction');
    commit('someMutation');

    // rootState, rootGetters 為全域的 (非局部)
    rootState.count;
    rootGetters .count;

    // 全域的 dispatch
    dispatch('someOtherAction', null, { root: true });

    // 全域的 commit
    commit('someMutation', null, { root: true });
  },
}
{ root: true }
命名空間
建議 namespaced: true 要設定,這樣能夠直接使用模組名稱作為路徑來只使用 getters, dispatch, commit,然後強迫自己好好整理 function 名稱 (無誤
getters['moduleName/getterName']
dispatch('moduleName/actionName')
commit('moduleName/mutationName')
設定命名空間並不影響以下的全域使用:
rootState,rootGetters仍然是用於全域的- dispatch 和 commit 加上
{ root: true }仍然是用於全域的
簡單總結
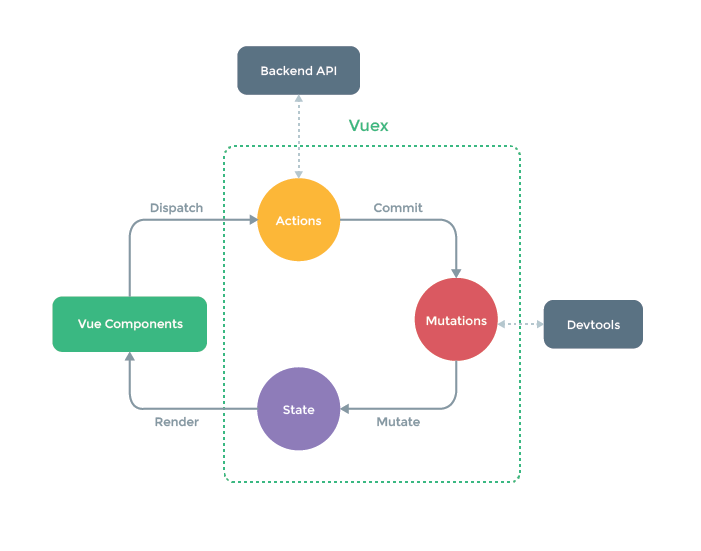
最後用 Vuex 官方的這張圖來做個簡單的總結。

這張圖呼應了前面提到的重點:
- Vuex 最主要包含了 Actions, Mutations, State 的存取和操作
- 使用 Commit 呼叫 Mutations,Dispatch 呼叫 Actions,只能透過 Mutations 來更新 State
- 只能用 Actions 來呼叫外部資源、API,執行完如需更新 State 仍需要透過 Mutations 來做
最後,導入 Vuex 可以將 Vue 各個 Component 的變數與狀態集中起來管理,讓程式更容易維護和做溝通,但隨著 store 變龐大,開發者要花一些功夫好好整理整個專案的資料流,並適當的使用 Modules 做結構化喔。
Reference