看到這個標題許多人一定也很好奇,咦~一般來說,不是3種資料存取方式,怎麼會有5種呢,先前在測試Silverlight存取 .NET Remoting時小朱大提醒了Silverlight也可以存取以Base on ASP.NET 的 ASMX的 Web Service,老實說筆者還真的忘了這個東西
看到這個標題許多人一定也很好奇,咦~一般來說,不是3種資料存取方式,怎麼會有4種5種呢,先前在測試Silverlight存取 .NET Remoting時小朱大提醒了Silverlight也可以存取以Base on ASP.NET 的 ASMX的 Web Service,老實說筆者還真的忘了這個東西,這個在.NET 1.0/1.1時代我也用得很兇的 Web Service我居然給忘了,回頭想想雖然WCF許多細節也是Base on Web Service的技術,但嚴格來說還是不可混為一談,如果要分類,傳統Web Service還是得算一種,嚴格來說會有下面四種小朱提醒其實還少了一種(HTTP方式,也就是WebRequest & HttpWebRequest的方式,因此在此做個更新。本於上星期要修改,因為忙於1/1後上線五都的修改,總算今天有時間寫完剩餘程式)
- RIA Service (或Domain Service)
- WCF Data Service (之前稱為ADO.NET Data Service)
- WCF Service
- 傳統 Web Service
- 直接 HTTP (WebRequest & HttpWebRequest) 方式取得資料
下面將這種分別列出來,以方便比較
1.RIA Service 方式
建立新的專案時必須使用 [Web 應用程式類型] 專案,如果選擇 [ASP.NET網站] 會發現 RIA 服務會無法選取:

而當您有勾選啟用[RIA 服務]時,在Serverlight的專案下即會自動產生一個Generated_Code 資料夾,並自動產生繼承WebContxtBase 的 Proxy類型的類別,初次內容如下:
1: //------------------------------------------------------------------------------
2: // <auto-generated>
3: // 這段程式碼是由工具產生的。
4: // 執行階段版本:4.0.30319.1
5: //
6: // 對這個檔案所做的變更可能會造成錯誤的行為,而且如果重新產生程式碼,
7: // 變更將會遺失。
8: // </auto-generated>
9: //------------------------------------------------------------------------------
10:
11: namespace RIAServiceSilverlightTestApp1
12: {
13: using System;
14: using System.Collections.Generic;
15: using System.ComponentModel;
16: using System.ComponentModel.DataAnnotations;
17: using System.Linq;
18: using System.ServiceModel.DomainServices;
19: using System.ServiceModel.DomainServices.Client;
20: using System.ServiceModel.DomainServices.Client.ApplicationServices;
21:
22:
23: /// <summary>
24: /// Context for the RIA application.
25: /// </summary>
26: /// <remarks>
27: /// This context extends the base to make application services and types available
28: /// for consumption from code and xaml.
29: /// </remarks>
30: public sealed partial class WebContext : WebContextBase
31: {
32:
33: #region Extensibility Method Definitions
34:
35: /// <summary>
36: /// This method is invoked from the constructor once initialization is complete and
37: /// can be used for further object setup.
38: /// </summary>
39: partial void OnCreated();
40:
41: #endregion
42:
43:
44: /// <summary>
45: /// Initializes a new instance of the WebContext class.
46: /// </summary>
47: public WebContext()
48: {
49: this.OnCreated();
50: }
51:
52: /// <summary>
53: /// Gets the context that is registered as a lifetime object with the current application.
54: /// </summary>
55: /// <exception cref="InvalidOperationException"> is thrown if there is no current application,
56: /// no contexts have been added, or more than one context has been added.
57: /// </exception>
58: /// <seealso cref="System.Windows.Application.ApplicationLifetimeObjects"/>
59: public new static WebContext Current
60: {
61: get
62: {
63: return ((WebContext)(WebContextBase.Current));
64: }
65: }
66: }
67: }
檔案位置如下圖:

爾後IDE工具拖曳DataGrid項目進來設計畫時會在自動在Generated_Code下的RIAServiceSilverlightTestApp1.Web.g.cs做手腳。在網路許多的範例都從資料來源視窗拖曳出來後工具即會自動產生程式碼,如下

資料來源多了Domain Service做為資料來源,並不是從這裡新增資料來源,應該說您只要新增一個Domain Service資料來源後也會顯示在這個 [資料來源] 的畫面中,如下筆者先新增一個 [Employees]

完成後 [資料來源] 隨即出現 NorthwindDomainContext –> Employees

此時起實是剛才的RIAServiceSilverlightTestApp1.Web.g.cs也會同步更新的結果,如下圖 NorthwindDomainContext 就定義在其中:

此時藉由IDE工具的支援,我們只需要將 [Employees] 這個物件來源以 DataGrid方式拖曳至 Silverlight 設計畫面中即可。

拖曳後完成的畫面如下,Columns 都幫您定義好了

從RIAServiceSilverlightTestApp1.Web.g.cs 也可以看出它其實叫用了這個背後產生的WCF服務 [
RIAServiceSilverlightTestApp1-Web-NorthwindDomainService.svc]

這時程式可以直接執行,即會撈取資料出來,如下執行畫面:

其實我們什麼程式碼都沒寫,程式一執行隨即透過DomainDataSource 向後端撈取資料,因為拖曳到設計畫面上產生的不只DataGrid物件,還有一個
<riaControls:DomainDataSource> 物件,如下自動產生的XAML:
1: <riaControls:DomainDataSource AutoLoad="True" d:DesignData="{d:DesignInstance my:Employees, CreateList=true}" Height="0" LoadedData="employeesDomainDataSource_LoadedData" Name="employeesDomainDataSource" QueryName="GetEmployeesQuery" Width="0">
2: <riaControls:DomainDataSource.DomainContext>
3: <my:NorthwindDomainContext />
4: </riaControls:DomainDataSource.DomainContext>
5: </riaControls:DomainDataSource>
6: <sdk:DataGrid AutoGenerateColumns="False" Height="302" HorizontalAlignment="Left" ItemsSource="{Binding ElementName=employeesDomainDataSource, Path=Data}" Margin="21,49,0,0" Name="employeesDataGrid" RowDetailsVisibilityMode="VisibleWhenSelected" VerticalAlignment="Top" Width="601">
7: <sdk:DataGrid.Columns>
8: <sdk:DataGridTextColumn x:Name="addressColumn" Binding="{Binding Path=Address}" Header="Address" Width="SizeToHeader" />
9: <sdk:DataGridTemplateColumn x:Name="birthDateColumn" Header="Birth Date" Width="SizeToHeader">
10: <sdk:DataGridTemplateColumn.CellEditingTemplate>
11: <DataTemplate>
12: <sdk:DatePicker SelectedDate="{Binding Path=BirthDate, Mode=TwoWay, NotifyOnValidationError=true, ValidatesOnExceptions=true, TargetNullValue=''}" />
13: </DataTemplate>
14: </sdk:DataGridTemplateColumn.CellEditingTemplate>
15: <sdk:DataGridTemplateColumn.CellTemplate>
16: <DataTemplate>
17: <TextBlock Text="{Binding Path=BirthDate, StringFormat=\{0:d\}}" />
18: </DataTemplate>
19: </sdk:DataGridTemplateColumn.CellTemplate>
20: </sdk:DataGridTemplateColumn>
21: <sdk:DataGridTextColumn x:Name="cityColumn" Binding="{Binding Path=City}" Header="City" Width="SizeToHeader" />
22: <sdk:DataGridTextColumn x:Name="countryColumn" Binding="{Binding Path=Country}" Header="Country" Width="SizeToHeader" />
23: <sdk:DataGridTextColumn x:Name="employeeIDColumn" Binding="{Binding Path=EmployeeID, Mode=OneWay}" Header="Employee ID" IsReadOnly="True" Width="SizeToHeader" />
24: <sdk:DataGridTextColumn x:Name="extensionColumn" Binding="{Binding Path=Extension}" Header="Extension" Width="SizeToHeader" />
25: <sdk:DataGridTextColumn x:Name="firstNameColumn" Binding="{Binding Path=FirstName}" Header="First Name" Width="SizeToHeader" />
26: <sdk:DataGridTemplateColumn x:Name="hireDateColumn" Header="Hire Date" Width="SizeToHeader">
27: <sdk:DataGridTemplateColumn.CellEditingTemplate>
28: <DataTemplate>
29: <sdk:DatePicker SelectedDate="{Binding Path=HireDate, Mode=TwoWay, NotifyOnValidationError=true, ValidatesOnExceptions=true, TargetNullValue=''}" />
30: </DataTemplate>
31: </sdk:DataGridTemplateColumn.CellEditingTemplate>
32: <sdk:DataGridTemplateColumn.CellTemplate>
33: <DataTemplate>
34: <TextBlock Text="{Binding Path=HireDate, StringFormat=\{0:d\}}" />
35: </DataTemplate>
36: </sdk:DataGridTemplateColumn.CellTemplate>
37: </sdk:DataGridTemplateColumn>
38: <sdk:DataGridTextColumn x:Name="homePhoneColumn" Binding="{Binding Path=HomePhone}" Header="Home Phone" Width="SizeToHeader" />
39: <sdk:DataGridTextColumn x:Name="lastNameColumn" Binding="{Binding Path=LastName}" Header="Last Name" Width="SizeToHeader" />
40: <sdk:DataGridTextColumn x:Name="notesColumn" Binding="{Binding Path=Notes}" Header="Notes" Width="SizeToHeader" />
41: <sdk:DataGridTextColumn x:Name="photoPathColumn" Binding="{Binding Path=PhotoPath}" Header="Photo Path" Width="SizeToHeader" />
42: <sdk:DataGridTextColumn x:Name="postalCodeColumn" Binding="{Binding Path=PostalCode}" Header="Postal Code" Width="SizeToHeader" />
43: <sdk:DataGridTextColumn x:Name="regionColumn" Binding="{Binding Path=Region}" Header="Region" Width="SizeToHeader" />
44: <sdk:DataGridTextColumn x:Name="reportsToColumn" Binding="{Binding Path=ReportsTo}" Header="Reports To" Width="SizeToHeader" />
45: <sdk:DataGridTextColumn x:Name="titleColumn" Binding="{Binding Path=Title}" Header="Title" Width="SizeToHeader" />
46: <sdk:DataGridTextColumn x:Name="titleOfCourtesyColumn" Binding="{Binding Path=TitleOfCourtesy}" Header="Title Of Courtesy" Width="SizeToHeader" />
47: </sdk:DataGrid.Columns>
48: </sdk:DataGrid>
由XAML中可以清楚的知道,先前若有學習過Silverlight/WPF 的資料繫結 (Binding ) 在這裡幾乎都用到了,DataGrid所自動產生的欄位都已經繫結到
繼承於System.ServiceModel.DomainServices.Client.Entity的Employees的Model物件的欄位,其中DataGrid的ItemsSource 屬性已經繫結到employeesDomainDataSource物件,
也就是前面提到的<riaControls:DomainDataSource>物件,再加上AutoLoad屬性預設設為true,所以畫面一產生隨即向DB撈資料。如果不希望一開始就向
DB撈取資料,這邊筆者提供個簡單的方式,就是將AutoLoad設為"False",當需要時叫用employeesDomainDataSource的Load() 方法
,如下範例程式,在Button1_Click時才讀取資料:
1: private void button1_Click(object sender, RoutedEventArgs e)
2: {
3: employeesDomainDataSource.Load();
4: }
此方式已經少寫不少程式碼,透過工具可以達到快速開發的目的。但是真的能夠滿足所有的需求嗎,真的不需要了解資料取得的實作細節嗎?另外還有另一種方式,因為RIA Service其實主要的實作核心的來源是Domain Service,它不單只是資料的Proxy,操作它如同操作EDM一般,即使不使使用上面拖曳的方式,透過Domain Service就可以取得資料了,直接叫用RIAServiceSilverlightTestApp1.Web.g.cs 裡的NorthwindDomainContext 物件,直接以LINQ方式查詢,然後呼叫DomainContext的Load()方法,以非同步方式取得資料,程式碼會是這樣:
1: NorthwindDomainContext context = new NorthwindDomainContext();
2: var query = (from q in context.Employees
3: select q).Take<Employees>(10);
4:
5: context.Load<Employees>(context.GetEmployeesQuery(), (X) =>
6: {
7: if (X.IsComplete)
8: {
9: dataGrid1.ItemsSource = X.Entities.ToList();
10: }
11: }, context);
如果追到RIAServiceSilverlightTestApp1.Web.g.cs 中會發現NorthwindDomainContext 其實是繼承DomainContext ,而DomainContext其實只是一個實做
INotifyPropertyChanged介面的類別,GetEmployeesQuery()傳回的為一個EntityQuery物件,在DomainContext的Load()方法的第二個引數是
Action<LoadOperation<TEntity>>的CallBack物件,因此可以在這裡已非同步方式取得資料。一樣達到前面範例中相同的效果,
雖然程式碼多了一些,不過RIA Service的精髓應該是在Domain Service當中。其實還有許多寶沒挖出來,留著以後吧!
然而有時候提供資料的外部服務往往不是自己開發的,這時還是得呼叫第三方所提供的資料,可能是WCF,也許是Web Service,
除了這兩種可以使用外,因此我們先來看看之前所提出,可將資料公開在網路上的 WCF Data Service。下面比較一下WCF Data Service 的資料存取的方式。
2. 使用 WCF Data Services 方式取得資料
使用WCF Data Service同樣需要一個EDM的模型,筆者就不再重複。筆者先新增一個NorthwindWcfDataService.svc,並將程式修改程如下:
1: using System;
2: using System.Data.Services;
3: using System.Data.Services.Common;
4: using System.Collections.Generic;
5: using System.Linq;
6: using System.ServiceModel.Web;
7: using NorthwindModel;
8:
9: public class NorthwindWcfDataService : DataService<NorthwindEntities>
10: {
11: // 只呼叫一次方法初始化全服務原則。
12: public static void InitializeService(DataServiceConfiguration config)
13: {
14: // TODO: 設定規則,指出哪些實體集及服務作業可見、可更新等等。
15: // 範例:
16: config.SetEntitySetAccessRule("Employess", EntitySetRights.AllRead);
17: //config.SetServiceOperationAccessRule("MyServiceOperation", ServiceOperationRights.All);
18: config.DataServiceBehavior.MaxProtocolVersion = DataServiceProtocolVersion.V2;
19: }
		  20:  }

如程式,筆者只公開出一個Employees 這個Entity出來,接著在Silverlight專案中將服務參考進來,然後在設計畫面先拖曳一個Button與DataGrid,如下畫面:

接著就是開始寫程式了,WCF Data Service 的用戶端主要都定義在System.Data.Services.Client 這一顆Assembly中,在自動產生的Proxy的References.cs檔案中NorthwindEntities也是繼承System.Data.Services.Client.DataServiceContext,因此在這我們須以System.Data.Services.Client.DataServiceQuery的BeginExecute 方法已非同步方式來取得資料。在BeginExceute的第個引數為AsyncCallBack的委派,也就是CallBack方法,所以宣告AsyncCallBack時透過Lamdba運算式來撰寫在簡潔不過了,我覺得小弟我真的是愛上了這個寫法。程式會是如下:
1: NorthwindEntities context = new NorthwindEntities(new Uri("NorthwindWcfDataService.svc/", UriKind.Relative));
2: var query = (from c in context.Employees
3: select c).Take(10);
4: try
5: {
6: AsyncCallback ac = asResult =>
7: {
8: if (asResult.IsCompleted)
9: {
10: var orderResult = (query as DataServiceQuery<Employees>).EndExecute(asResult);
11: dataGrid1.ItemsSource = orderResult.ToList();
12: }
13: };
14: (query as DataServiceQuery<Employees>).BeginExecute(ac, context);
15: }
16: catch (Exception ex)
17: {
18: MessageBox.Show(ex.Message);
		  19:              }

因為只是測試,所以筆者將資料控制在10筆呈現出結果即可! 與前面的RIA Service 的Domain Service做比較,差異性應該很清楚了。執行結果如下:

如圖資料已經回來,不過有一個地方要注意的是,因為不像RIA Services 拖曳過來時IDE工具已經幫我們產生了<sdk:DataGridTextColumn> 等,所以直接Binding資料就會呈現,但是現在dataGrid1中我們並沒有敲欄位進來,因此要將AutoGenerateColumns屬性設為True,否則dataGrid是空空如也,你是看不到任何資料的。筆者初次使用時就是忘了設定,我還以為我的WCF Service 有問題,還查了一下…@@

另外、就是使用WCF Data Service 有個好處就是可將Entity使用服務切開,如剛才筆者只開放出Employees這個Entity,如果以IE開啟這個服務只會看見Employess,如下:

其實EDM中並不只這個Entity,我們也可以另外新增一個CustomerWcfDataService.svc,在CustomerWcfDataService.cs中只開放Customers這個Entity,如下:
![]()
若不清楚WCF Data Service 的也可以參考筆者之前寫的如何透過WCF Data Services呼叫Store Procedure 或 如何限制WCF Data Service存取的用戶端IP,上面也有一些相關的說明。
3. WCF Service 方式
使用WCF的方式,如果只是抓資料那真的是太簡單了,畫面與上面共用,筆者就直接列出程式碼:
(ServiceContract部分,定義一個取Employees的介面)
1: [ServiceContract]
2: public interface INorthwindWCFService
3: {
4: [OperationContract]
5: List<Employees> GetEmployessDataByTake(int TopCount);
	   6:    }

實做的部分:
1: public class NorthwindWCFService : INorthwindWCFService
2: {
3: public List<Employees> GetEmployessDataByTake(int TopCount)
4: {
5: NorthwindEntities context = new NorthwindEntities();
6: var query = (from q in context.Employees
7: select q).Take(TopCount);
8:
9: return query.ToList<Employees>();
10: }
11: }
在Silverlight中的程式大概是如下:
1: public partial class MainPage : UserControl
2: {
3: public MainPage()
4: {
5: InitializeComponent();
6: }
7:
8: private void button1_Click(object sender, RoutedEventArgs e)
9: {
10: NorthwindWCFServiceClient context = new NorthwindWCFServiceClient();
11: context.GetEmployessDataByTakeCompleted += new EventHandler<GetEmployessDataByTakeCompletedEventArgs>(context_GetEmployessDataByTakeCompleted);
12: context.GetEmployessDataByTakeAsync(10, context);
13: }
14:
15: void context_GetEmployessDataByTakeCompleted(object sender, GetEmployessDataByTakeCompletedEventArgs e)
16: {
17: if (!e.Cancelled)
18: {
19: dataGrid1.ItemsSource = e.Result.ToList<Employees>();
20: }
21: }
22: }
執行結果相同

4. Web Service 方式
其實如果是用System.ServiceModel 4.0的Web Service基本上與WCF沒什麼不同,它們的Client端的(Proxy)都是繼承System.ServiceModel.ClientBase。程式碼如下:
(Web Method 的部分)
1: [WebMethod]
2: public List<Employees> GetEmployessDataByTake(int TopCount)
3: {
4: NorthwindEntities context = new NorthwindEntities();
5: var query = (from q in context.Employees
6: select q).Take(TopCount);
7:
8: return query.ToList<Employees>();
9: }
在Silverlight 叫用的程式碼幾乎抄WCF的過來也可以使用:
1: private void button1_Click(object sender, RoutedEventArgs e)
2: {
3: NorthwindWebServiceSoapClient context = new NorthwindWebServiceSoapClient();
4: context.GetEmployessDataByTakeCompleted += new EventHandler<GetEmployessDataByTakeCompletedEventArgs>(context_GetEmployessDataByTakeCompleted);
5: context.GetEmployessDataByTakeAsync(5);
6: }
7:
8: void context_GetEmployessDataByTakeCompleted(object sender, GetEmployessDataByTakeCompletedEventArgs e)
9: {
10: if (!e.Cancelled)
11: {
12: dataGrid1.ItemsSource = e.Result.ToList<Employees>();
13: }
14: }
5. 直接以 HTTP (WebRequest & HttpWebRequest) 方式取得資料
除了前面所提的幾種方式之外,Silverlight 也可以直接使用WebRequest & HttpWebRequest 的方式存取資料 (小弟忘了也可以使用這種方式存取資料^^",感謝小朱大的提醒 ^_^),不過要使用這種方式當然,程式碼會稍微多一些些,而且因為Silverlight 先天執行環境的因素,就算是使用WebRequest & HttpWebRequest 方式,還是得以非同步方式來執行。還有,由於小弟的執著,因為前面都以DataGrid來呈現資料,所以就算是使用WebRequest & HttpWebRequest 小弟還是想透過一個類似服務的機制來取得資料,小朱大建議可以玩玩Xml Serializer! 而的確,這就是可以解決這個問題的Solution!!。而既然要將類別以(XmlSerializer) 方式序列化丟回Client端,然後Client再反序列化取得資料的結果,於是想使用最簡單的方式,將一個透過 (XmlSerializer) 後的XML結果公開在一個泛型處理常式中,程式碼如下:
1: <%@ WebHandler Language="C#" Class="XmlSerializerHandler" %>
2:
3: using System;
4: using System.Web;
5: using System.Collections.Generic;
6:
7: public class XmlSerializerHandler : IHttpHandler {
8: string SerializeAnObject(object obj)
9: {
10: System.Xml.Serialization.XmlSerializer serializer = new System.Xml.Serialization.XmlSerializer(obj.GetType());
11: System.IO.MemoryStream stream = new System.IO.MemoryStream();
12: try
13: {
14: serializer.Serialize(stream, obj);
15: stream.Position = 0;
16: TextReader tr = new StreamReader(stream);
17: return tr.ReadToEnd();
18: }
19: catch(Exception ex)
20: {
21: throw ex;
22: }
23: finally
24: {
25: stream.Close();
26: stream.Dispose();
27: }
28: }
29: public void ProcessRequest (HttpContext context) {
30: context.Response.ContentType = "text/xml";
31: List<Employees> result = new List<Employees>();
32: result.Add(new Employees { EmployeeID = "1", LastName = "Wu", FirstName = "Gelis", Title = "專案經理", TitleOfCourtesy = "PM" });
33: result.Add(new Employees { EmployeeID = "2", LastName = "Lin", FirstName = "Grace", Title = "系統設計師", TitleOfCourtesy = "SD" });
34: result.Add(new Employees { EmployeeID = "3", LastName = "Chang", FirstName = "William", Title = "程式設計師", TitleOfCourtesy = "PG" });
35: context.Response.Write(SerializeAnObject(result));
36: }
37:
38: public bool IsReusable {
39: get {
40: return false;
41: }
42: }
43: }
直接以IE執行會取得如下資料:
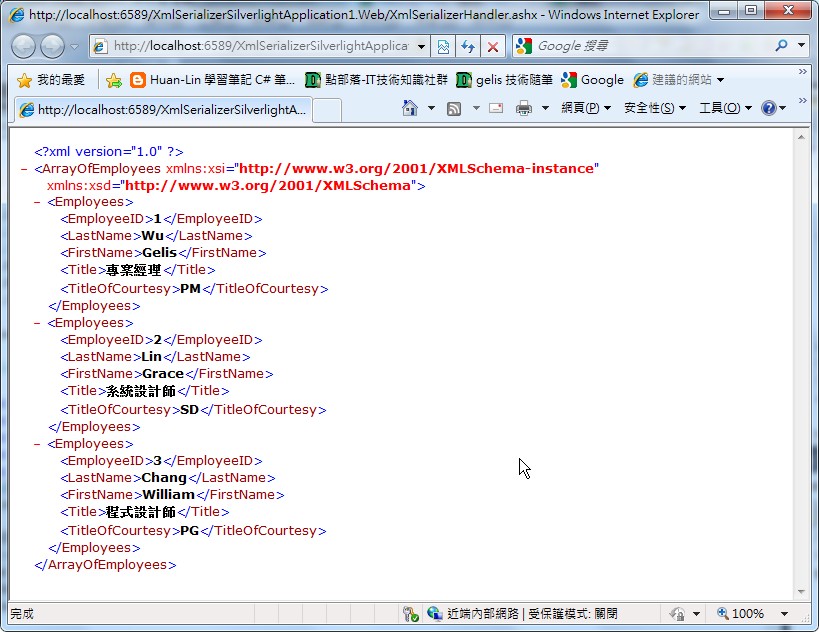
不過為了方便起見小弟在這個處理常式中就沒有真的到DB去取得資料,因為這裡的重點會在於WebRequest與Xml Serializer。當中被封送處理的Employees內容如下 (仿Northwind的 Employees資料表中,不過這裡只取五個欄位):
1: public class Employees
2: {
3: public string EmployeeID { get; set; }
4: public string LastName { get; set; }
5: public string FirstName { get; set; }
6: public string Title { get; set; }
7: public string TitleOfCourtesy { get; set; }
8: }
下面就是重點部分了!要將泛型處理常式所取的一段XML資料將其反序列化回來後並呈現在DataGrid中,下面程式碼就是筆者試出來以非同步方式WebRequest 取得資料:
1: HttpWebRequest request = (HttpWebRequest)WebRequest.Create("http://localhost:6589/XmlSerializerSilverlightApplication1.Web/XmlSerializerHandler.ashx");
2: request.ContentType = "application/xml";
3: request.Method = "POST";
4:
5: AsyncCallback ac = (asyncResult) =>
6: {
7: if (asyncResult.IsCompleted)
8: {
9: Stream stream = request.EndGetResponse(asyncResult).GetResponseStream();
10: StreamReader reader = new StreamReader(stream);
11: string ResponseStr = reader.ReadToEnd();
12:
13: this.Dispatcher.BeginInvoke(delegate()
14: {
15: List<Employees> queryResult = XmlSerializerClass.DeSerializeAnObject(ResponseStr) as List<Employees>;
16: dataGrid1.ItemsSource = queryResult;
17: }
18: );
19: }
20: };
21:
22: this.Dispatcher.BeginInvoke(delegate()
23: {
24: request.BeginGetResponse(ac, request);
25: });
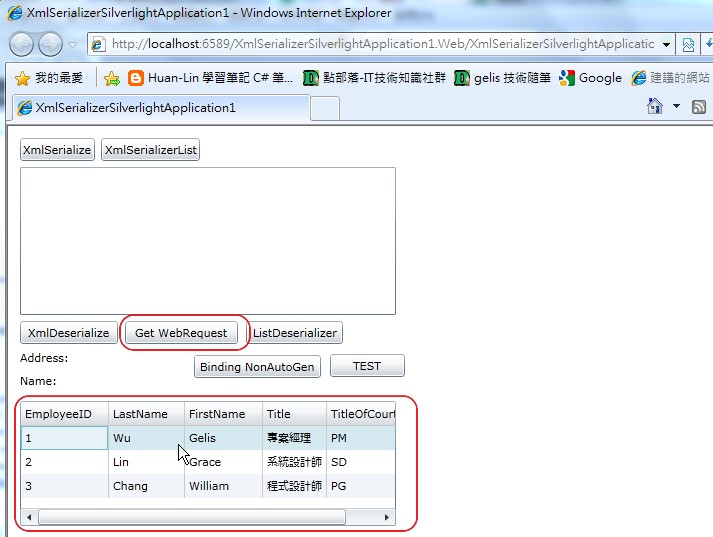
程式的畫面有些複雜,因為筆者在測試XmlSerializer,執行結果如下:
總結:
使用WCF & Web Service 有些好處,同一個服務可同時服務多種用戶端,即使是一個 .NET Framework 2.0 的 Windows Form的應用程式也可以直接使用,直接做為服務資料來源:

在資料行的地方,Byte[] 欄位的資料自動以 photoDataGridViewImageColumn 欄位套用:

有時後覺得Windows Form還是挺好用的 (進行一些Debug或是分析的時候),執行結果如下 (photoDataGridViewImageColumn 的效果):

有時視情況選擇適合資料來源會避免到時因為增加了某些用戶端又必須撰寫另一個服務來服務該用戶端的狀況
如上! 簡單的列出目前Silverlight 上幾種資料存取方式。
謝謝各位
簽名:
學習是一趟奇妙的旅程
這當中,有辛苦、有心酸、也有成果。有時也會有瓶頸。要能夠繼續勇往直前就必須保有一顆最熱誠的心。
軟體開發之路(FB 社團):https://www.facebook.com/groups/361804473860062/
Gelis 程式設計訓練營(粉絲團):https://www.facebook.com/gelis.dev.learning/
如果文章對您有用,幫我點一下讚,或是點一下『我要推薦』,這會讓我更有動力的為各位讀者撰寫下一篇文章。
非常謝謝各位的支持與愛護,小弟在此位各位說聲謝謝!!! ^_^


