如前一篇文章中,筆者很榮幸的受到 Demo 邀請到 TW MVC 講一場 ASP.NET MVC 4 新增功能介紹(快速上手系列),由於相同內容在先前有王寧疆老師與保哥講過了,所以想來些不一樣的,於是就想到來個 Web API 的實作課程,當然有些即興的實作就沒有在投影片中了
如前一篇文章中,筆者很榮幸的受到 Demo 邀請到 TW MVC 講一場 ASP.NET MVC 4 新增功能介紹(快速上手系列),由於相同內容在先前有王寧疆老師與保哥講過了,所以想來些不一樣的,於是就想到來個 Web API 的實作課程,當然有些即興的實作就沒有在投影片中了。所以筆者再將實作的細節與內容撰寫成文章再分享出來以便提供給有需要的人參考。
再說明一下本範例適用的環境:
本範例無法以 MVC 4 Beta 的版本,必須使用 RC 以上的版本才可以實作。
下面範例會使用 Visual Studio 2012 Ultimate 來實作。
如果您使用Visual Studio 2010 ,可以至下面網址下載 for Visual Studio 2010 使用的 ASP.NET MVC 4 的獨立安裝檔案。
或是使用 Windows Platform Installer 4.0 來安裝。
還不了解什是 Web API 的可以參考下面的投影片:
接下來文章對於 ASP.NET MVC 4 RC & ASP.NET MVC 4 RTM 會簡稱 RTM版 & RC 版。
一、首先第一步、建立一個 Web API 的 ASP.NET MVC 4 的專案:
在按下確定之後,在空的專案中,在 Controller 資料夾的內容即有一個 ValuesController.cs 檔案,他是一個簡易的 Sample Code,只是示意 apiControler 這個類別如何使用,
1: using System;
2: using System.Collections.Generic;
3: using System.Linq;
4: using System.Net;
5: using System.Net.Http;
6: using System.Web.Http;
7:
8: namespace Mvc4WebAPI_CRUDTestApplication1.Controllers
9: {
10: public class ValuesController : ApiController
11: {
12: // GET api/values
13: public IEnumerable<string> Get()
14: {
15: return new string[] { "value1", "value2" };
16: }
17:
18: // GET api/values/5
19: public string Get(int id)
20: {
21: return "value";
22: }
23:
24: // POST api/values
25: public void Post([FromBody]string value)
26: {
27: }
28:
29: // PUT api/values/5
30: public void Put(int id, [FromBody]string value)
31: {
32: }
33:
34: // DELETE api/values/5
35: public void Delete(int id)
36: {
37: }
38: }
39: }
而在 RTM 版的MVC裡面,在 Post & Put 的方法中,你會看見一個新的屬性 [FromBody],其實這也不是新的屬性了,在RC版裡的 System.Web.Http.DLL 中就已經定義了,只是在範本檔案中沒有納入而已。它的功用在於可以允許傳入的參數是來自於 HttpRequestMessage 的強型別中。
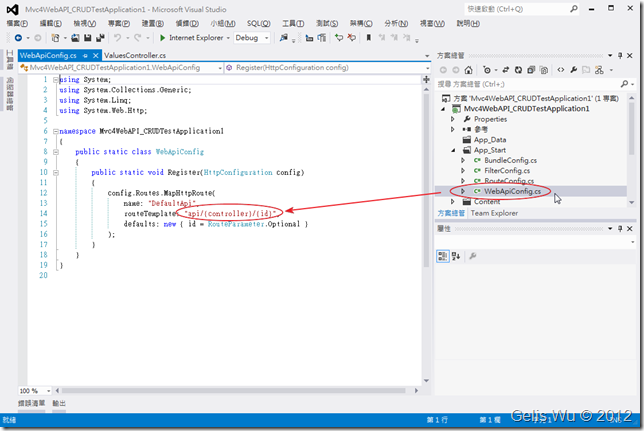
首先我們必須先 Compiler 一下,當然這個專案當然本身就是可以執行的,因為在 App_Start 資料夾底下已經定義了 Web API 的 Routes 如下:
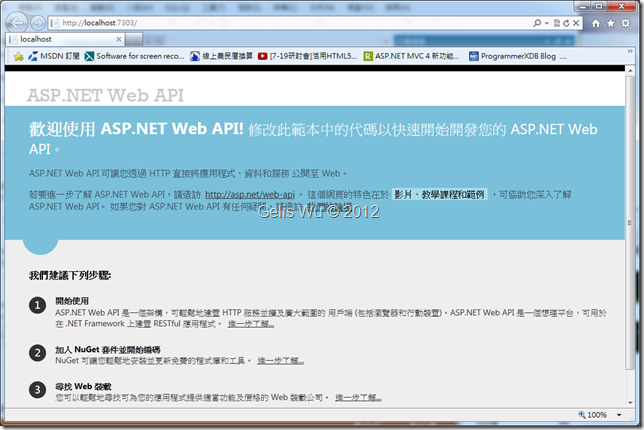
執行後,預設會帶出 RouteConfig.cs 中所定義好的 HomeController 的 Index 範例頁面,在 RTM 版中也改成了中文了,如下:
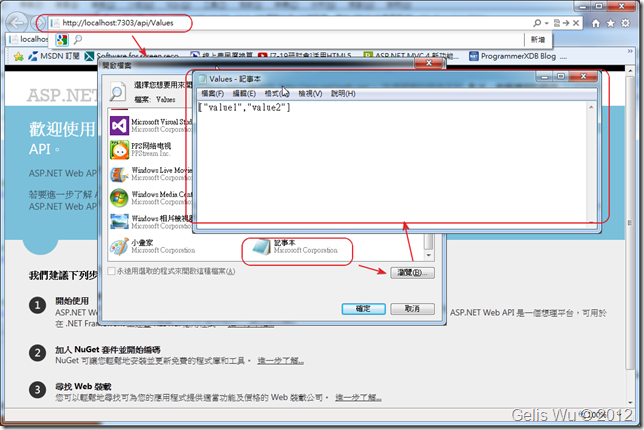
在 WebApiConfig.cs 中已經定義了 Web API 的 Routes 的格式,所以在網址列加上 api/Values/ 時,Web API 的 Host 會幫我們呼叫 IEnumable<string>的 Get()方法,傳回 "value1", "value2",由於傳回來的是 HTTP 的 Response Stream,是一個沒有附檔名的 JSON 字串,所以 IE 會詢問您用什麼來起,開啟後可以看見 JSON 格是字串,如下
二、加入 Northwind 資料庫
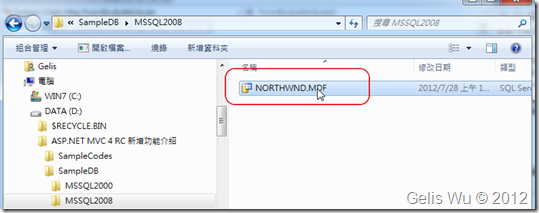
在本範例中,我們要使用 Northwind 資料庫來實作一個客戶基本資料維護 CRUD 程式,在這裡我們會需要使用 SQL Express ,所以請確認您的 SQL Express 服務有在執行中,然後請將我提供的 SampleDB\MSSQL2008 下面的 NORTHWND.MDF 複製出來:
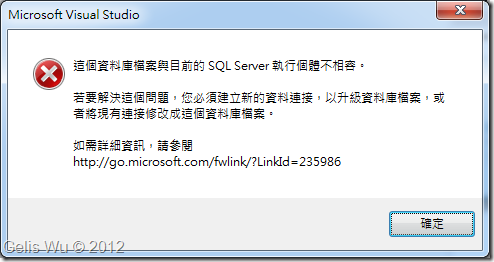
然後直接貼到 App_Data 的資料夾下面,然後再點兩下開啟,這時 Visual Studio 2012 會提示該 MDF 檔案與 SQL Express 不相容,
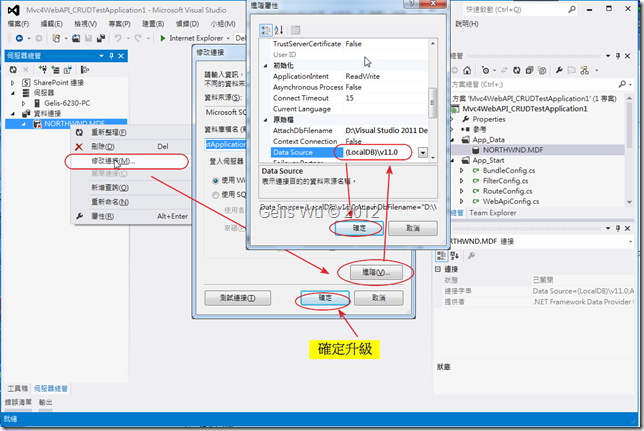
這是因為筆者直接將 SQL Server 2008 上執行的 Northwind 資料庫的 MDF 檔案直接COPY 過來使用,不過沒有關係,工具一定可以幫我們升級為 v11 版的 SQL Express 的資料庫,操作的方式為到伺服器總管透過 [修改連接] 的方式,如下:
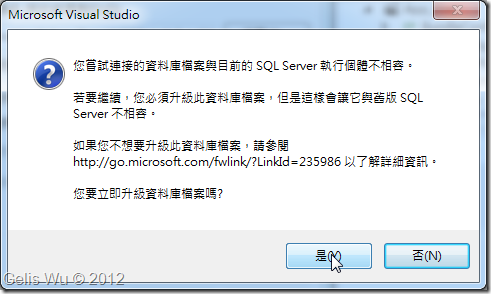
在最後點選[修改連接] 的確定扭之後,會再出現一個資料庫升級的確認視窗,如下:
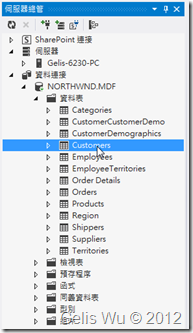
點選確定之後,系統會稍微花個10-20秒鐘的處理時間,完成後就可以直接在 [伺服器總管] 展開 NORTHWND.MDF 連接:
三、加入 EDM 模型
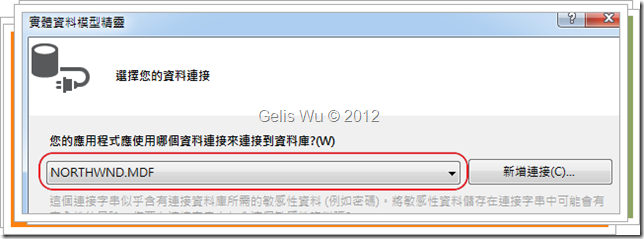
在先前的一些介紹 MVC 的系列文章中,均有介紹過 EDM 模型的部分,因此筆者就不再熬述,需要注意的地方是這裡是使用 SQL Express ,所以在專案中可以選擇的資料連結會自動帶出,不要選錯了。
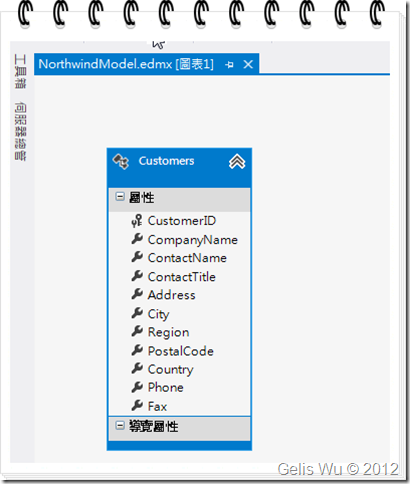
只是在這裡我們只加入 Customers 這個 Model
完成後,記得先將專案編譯一下,以免待會加入 Controller 時無法找到該 Model 。
四、加入 apiController
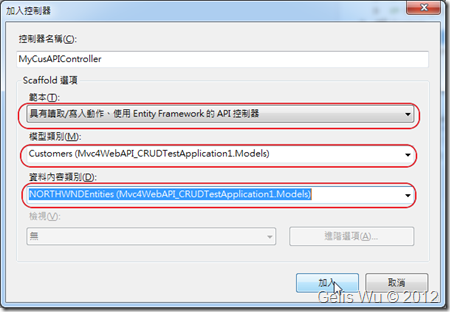
接下來差不多要進入撰寫程式的部份了,在此之前我們必須先加入一個 apiController。首先,請先將 ValuesController.cs 檔案砍掉,然後在 Controller 資料夾點選加入 [控制器] ,這裡我們必須選擇 [具有讀取/寫入動作、使用Entity Framework 的API 控制器] , 模型就是 Customers 、資料內容 (Data Context) 選擇這個 EDM 模型,如下:
注意:
- 這個 Web API範本檔案只有 RC版以上才有提供。
- 要注意英文、中文版的敘述不太一樣的地方。
控制器名稱筆者取為 "MyCusAPIController" ,完成後,MVC 4 會自動產生屬於 Customers 使用的 apiController ,在這個控制器中包括了在 Web API 中所必須使用的基本 HTTP 的四個 Method (GET/POST/PUT/DELETE) ,為使文章更清楚,筆者就列出工具所產生的程式碼:
1: using System;
2: using System.Collections.Generic;
3: using System.Data;
4: using System.Data.Entity;
5: using System.Data.Entity.Infrastructure;
6: using System.Linq;
7: using System.Net;
8: using System.Net.Http;
9: using System.Web;
10: using System.Web.Http;
11: using Mvc4WebAPI_CRUDTestApplication1.Models;
12:
13: namespace Mvc4WebAPI_CRUDTestApplication1.Controllers
14: {
15: public class MyCusAPIController : ApiController
16: {
17: private NORTHWNDEntities db = new NORTHWNDEntities();
18:
19: // GET api/MyCusAPI
20: public IEnumerable<Customers> GetCustomers()
21: {
22: return db.Customers.AsEnumerable();
23: }
24:
25: // GET api/MyCusAPI/5
26: public Customers GetCustomers(string id)
27: {
28: Customers customers = db.Customers.Find(id);
29: if (customers == null)
30: {
31: throw new HttpResponseException(Request.CreateResponse(HttpStatusCode.NotFound));
32: }
33:
34: return customers;
35: }
36:
37: // PUT api/MyCusAPI/5
38: public HttpResponseMessage PutCustomers(string id, Customers customers)
39: {
40: if (ModelState.IsValid && id == customers.CustomerID)
41: {
42: db.Entry(customers).State = EntityState.Modified;
43:
44: try
45: {
46: db.SaveChanges();
47: }
48: catch (DbUpdateConcurrencyException)
49: {
50: return Request.CreateResponse(HttpStatusCode.NotFound);
51: }
52:
53: return Request.CreateResponse(HttpStatusCode.OK);
54: }
55: else
56: {
57: return Request.CreateResponse(HttpStatusCode.BadRequest);
58: }
59: }
60:
61: // POST api/MyCusAPI
62: public HttpResponseMessage PostCustomers(Customers customers)
63: {
64: if (ModelState.IsValid)
65: {
66: db.Customers.Add(customers);
67: db.SaveChanges();
68:
69: HttpResponseMessage response = Request.CreateResponse(HttpStatusCode.Created, customers);
70: response.Headers.Location = new Uri(Url.Link("DefaultApi", new { id = customers.CustomerID }));
71: return response;
72: }
73: else
74: {
75: return Request.CreateResponse(HttpStatusCode.BadRequest);
76: }
77: }
78:
79: // DELETE api/MyCusAPI/5
80: public HttpResponseMessage DeleteCustomers(string id)
81: {
82: Customers customers = db.Customers.Find(id);
83: if (customers == null)
84: {
85: return Request.CreateResponse(HttpStatusCode.NotFound);
86: }
87:
88: db.Customers.Remove(customers);
89:
90: try
91: {
92: db.SaveChanges();
93: }
94: catch (DbUpdateConcurrencyException)
95: {
96: return Request.CreateResponse(HttpStatusCode.NotFound);
97: }
98:
99: return Request.CreateResponse(HttpStatusCode.OK, customers);
100: }
101:
102: protected override void Dispose(bool disposing)
103: {
104: db.Dispose();
105: base.Dispose(disposing);
106: }
107: }
108: }
五、加入 Index 檢視,並撰寫程式碼顯示資料
這裡為了方便起見,我們沿用既有的 HomeController,也就是使用此控制器來存取 MyCusAPIController 的資料,而當然,在實際的情況,通常 Web API 是存在在遠端,在Web伺服器執行的只是網頁程式而已。那麼在撰寫程式之前,先將檢視加入,因為我們還是想使用 Index 作為預設的首頁,所以我們就將原本的 Index 檢視刪除,並加入 Customers 的 Index 檢視。
接著,就開始來撰寫 HomeController 的 Index 程式碼了。
因為在 Index 首頁一進入時,我們就必須帶入 Customers 的資料,所以在這裡使用 HttpClient 物件,並透過 GetAsync 方法先取回 HttpResponseMessage 物件,如下:
因為我們要叫用的是 Web API 所開放出來 Get() 方法,所以這裡所使用的 requestUri="api/MyCusAPI/"
讀者會發現,GetAsync 傳回的是 Task 類型的物件,這是 .NET 4.5 為了非同步作業新增的類別。在這裡筆者會透過 await 關鍵字來等待資料更新完成,否則你可能取不到最新的資料,因為通常 PostAsync 還沒執行完畢,RedirectToAction 就已經被執行了。在新版非同步支援的 Task 的封裝下,也可以存取其 Result 物件以同步的方式取得資料。
接著,在取回的 HttpResponseMessage 物件下會實做一個 HttpContent 類型的 Content 屬性,該物件會封裝該 Get 回來的結果,(眼尖的讀者會發現,在 ReadAsAsync 之中有一個泛型方法) 這時我們可以使用 HttpContent 提供的 ReadAsAsync 泛型方法來讀取其內容,因為這裡我們的 MyCusAPIController 會回傳強行別的資料回來,相關參數內容如下:
因此我將泛型 T 填補為 IEnumable<Customers> ,那麼就表示我們回傳資料使用此型態。如下,Result 便成 IEnumable<Customers> 型態:
最後完成程式如下:
1: public class HomeController : Controller
2: {
3: public ActionResult Index()
4: {
5: HttpClient client = new HttpClient();
6: client.BaseAddress = new Uri("http://localhost:7303/");
7: HttpResponseMessage message = client.GetAsync("api/MyCusAPI/").Result;
8: IEnumerable<Customers> customers = message.Content.ReadAsAsync<IEnumerable<Customers>>().Result;
9: return View(customers);
10: }
11: }
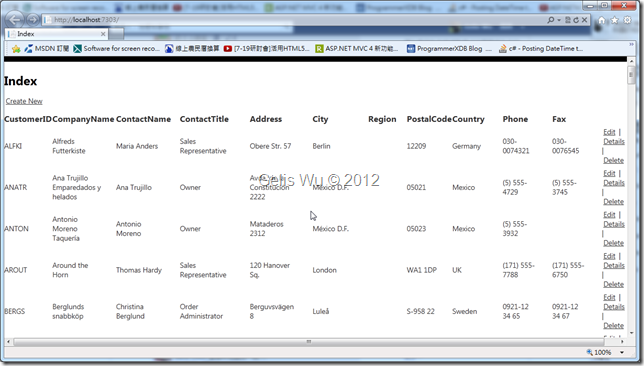
此時程式執行應該可以得到如下結果:
六、建立 Create 檢視、及撰寫新增的程式碼
完成了資料的顯示之後,首先,先來撰寫新增的程式碼,新增的部分有一個 Controller 為了顯示空的表單供使用者登打資料,所以會需要兩個 Create 方法,一個有 Customers 參數,一個為空的方法。空的方法比較簡單,回傳一個空的 View() 即可,實際新增的 Create 方法依據模型繫結可以得到一個 Customers 型別的變數。那麼我們就開始撰寫程式了。
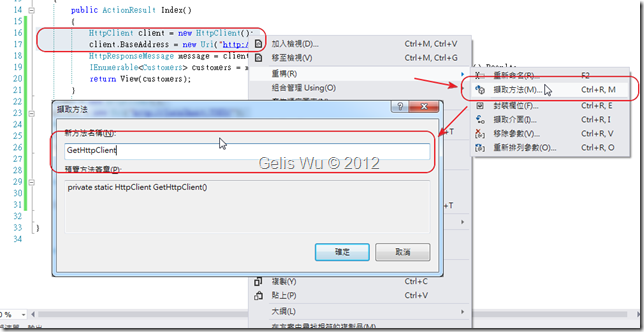
而在開始撰寫時,我們發現,HttpClient 許多地方都會用到,所以筆者將取得 HttpClient 物件的部分獨立出來,使用重構功能,如下:
接著繼續撰寫程式碼,當然,不要忘了加入 Create 的檢視。而在新增的部分,Web API 會實作在 HTTP 的 POST 方法中,所以我們已 HttpClient 的 PostAsync<T> 的泛型方法進行呼叫即可,因為在 MyCusAPIController.cs 的 PostCustomers 方法中接受的為強型別的 Customers ,所以我們在這裡要帶入的 T 即為 Customers,這時 PostAsync<T> 裡的第二個參數 T 就代換成 Customers 了,如下:
各位注意到了,在這裡我們使用第一個 overloading 就可以了,第一個參數的 requestUri="api/MyCusAPI/", 第二參數就是 Customers,第三個參數就是指定第二個參數的格式,這裡強型別的 customers 回傳過去會是 XML 格式,所以新增的程式碼會是如下:
1: public ActionResult Create()
2: {
3: return View();
4: }
5:
6: [HttpPost]
7: public async Task<ActionResult> Create(Customers customer)
8: {
9: HttpClient client = GetHttpClient();
10: HttpResponseMessage message = await client.PostAsync<Customers>("api/MyCusAPI/", customer, new XmlMediaTypeFormatter());
11: return RedirectToAction("Index");
12: }
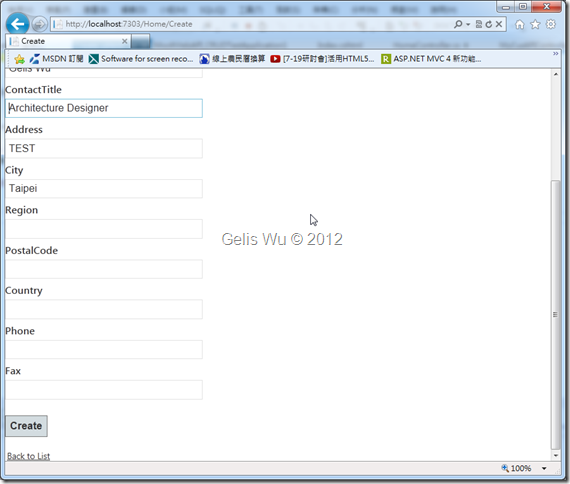
在 Create 的檢視中,輸入如下資料後:
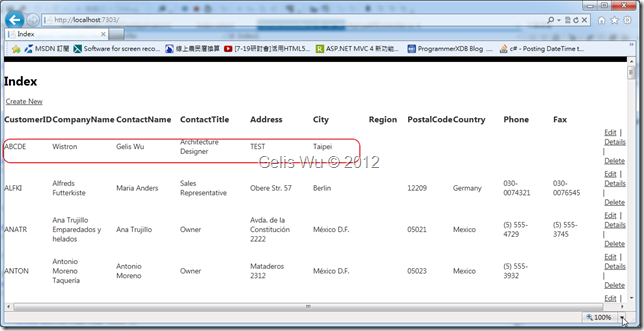
若沒有任何意外,應該可以新增成功,並 Redirect 回到 Index 頁面,並出現那一筆新的資料,如下:
七、建立編輯 Edit 檢視、及撰寫編輯的程式碼
到了這裡,相信讀者對於 ASP.NET Web API 的開發上已經有一些概念了,不過接下來編輯的部分也是一段很有趣的部分,因為編輯需要先顯示一筆資料給 User 查看,接著才是真的進行實際編輯作業,所以同樣需要兩個 Action。
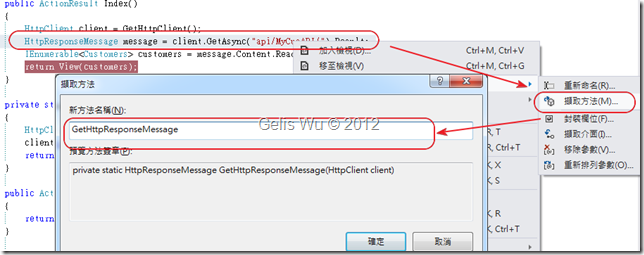
當寫到 client.GetAync 方法的時候,不知讀者注意到沒有,這裡與叫用所有 IEnumable<Customers> 資料回來的差別只在於 requestUri 的不同而已,因此再次使用重構,將 Index 的 Action 中,取得 HttpResponseMessage 的單一行程式獨立出來,並取名為 GetHttpResponseMessage 如下:
並將原本寫死的 "api/MyCusAPI/" 改為由外部傳入,如下:
這麼一來,程式就變得很活,其它有需要取得 HttpResponseMessage 的程式只要傳入不同的 Uri 即可取得所需資料,
1: public ActionResult Edit(string id)
2: {
3: HttpClient client = GetHttpClient();
4: HttpResponseMessage message = GetHttpResponseMessage(client, string.Format("api/MyCusAPI/{0}", id));
5: Customers customer = message.Content.ReadAsAsync<Customers>().Result;
6: return View(customer);
7: }
這時可以先來測試一下 Edit 的檢視是否可以抓回單一筆資料了。如下:
接著是撰寫實際編輯的 Action 的程式碼了,一開始的做法與前面的都相同,筆者就不再多說,差別是叫用的是 PutAsync<T> 泛型方法,這裡要注意的是使用第 4 個 Overloading 方法,當中的參數有一個 T value ,如下:
最後,Edit 的 Post 的程式碼如下:
1: [HttpPost]
2: public async Task<ActionResult> Edit(Customers customer)
3: {
4: HttpClient client = GetHttpClient();
5: HttpResponseMessage message = await client.PutAsync<Customers>(string.Format("api/MyCusAPI/{0}", customer.CustomerID), customer, new XmlMediaTypeFormatter());
6: return RedirectToAction("Index");
7: }
不過到了這裡我們發現了一個問題,就是無論我們怎麼叫用 PutAsync<T> 方法,總是沒辦法更新成功!因為 MyCusAPIController.cs 裡的 PutCustomers 方法根本沒有被叫用,為什麼呢?因為 Route 機制在 IIS 7 上是獨立被管理的,要確保每個路徑都會被執行的話,在 IIS 7 以上的伺服器中的 web.config 裡的 <system.webServer> 區段下面必須補上 <modules> 標籤,並將 runAllManagedModulesForAllRequests 屬性設為 true,如下 :
此設定也可以確保 IIS 7 的 UrlReWrite Module 都會被執行。
而這個時候我們可以再來試驗一下是否可以順利編輯,果然,可以順利的進入 PutCustomers 方法,如下:
八、建立刪除的檢視 Delete 及程式碼
終於到了最後的部分了,做到這裡,相信此時各位應該都對 Wep API 有些概念了,刪除的程式碼也是大同小異,由於一樣會抓出一筆資料供檢視,所以筆者再次進行重構,將 Edit 的 Action 結取出一個 GetCustomerById 方法,因為概念與前面相同,筆者就直接列出程式碼,如下:
1: private static Customers GetCustomerById(string id)
2: {
3: HttpClient client = GetHttpClient();
4: HttpResponseMessage message = GetHttpResponseMessage(client, string.Format("api/MyCusAPI/{0}", id));
5: Customers customer = message.Content.ReadAsAsync<Customers>().Result;
6: return customer;
7: }
8:
9: public ActionResult Delete(string id)
10: {
11: return View(GetCustomerById(id));
12: }
13:
14: [HttpPost]
15: public async Task<ActionResult> Delete(string id, FormCollection f)
16: {
17: HttpClient client = GetHttpClient();
18: HttpResponseMessage message = await client.DeleteAsync(string.Format("api/MyCusAPI/{0}", id));
19: return RedirectToAction("Index");
20: }
到這裡基本上一個 CRUD 的 ASP.NET Web API 的應用程式就完成了!下次筆者再將這個 Web API 改存取 Self-Host 在時做給各位看。
感謝各位^^
簽名:
學習是一趟奇妙的旅程
這當中,有辛苦、有心酸、也有成果。有時也會有瓶頸。要能夠繼續勇往直前就必須保有一顆最熱誠的心。
軟體開發之路(FB 社團):https://www.facebook.com/groups/361804473860062/
Gelis 程式設計訓練營(粉絲團):https://www.facebook.com/gelis.dev.learning/
如果文章對您有用,幫我點一下讚,或是點一下『我要推薦』,這會讓我更有動力的為各位讀者撰寫下一篇文章。
非常謝謝各位的支持與愛護,小弟在此位各位說聲謝謝!!! ^_^


