在前一篇的內容中,筆者大概的介紹了 ASP.NET MVC Web API 整個運作的架構,接下來真的就是重頭戲了。相信許多人都已經入手了 Windows Phone 8 的手機了,使用 Windows Phone 8 來開發自己的 App 應該也是許多微軟開發人員的夢想之一,而開發 Windows Phone 8 App 不外乎要存取網路服務
在前一篇的內容中,筆者大概的介紹了 ASP.NET MVC Web API 整個運作的架構,接下來真的就是重頭戲了。相信許多人都已經入手了 Windows Phone 8 的手機了,使用 Windows Phone 8 來開發自己的 App 應該也是許多微軟開發人員的夢想之一,而開發 Windows Phone 8 App 不外乎要存取網路服務,而需要那些網路服務這端看您的 App 應用為何。比如典型的台北市停車查詢,這可以存取台北市政府的開放資料平台的查詢服務即可,天氣資訊可以存取中央氣象局的公開網路服務。
但這些都是公開的,您不需要自行開發,因此今天假設一種狀況,你需要替某供應商開發內部系統,這個系統希望透過手機、平板等系統來操作,那麼您可能就須要自行開發這個網路服務,而且他必須同時可以讓各種不同的平台裝置,如:Windows Phone 8 App、Windows Phone 7.1、Windows Store App、Wndows Form、ASP.NET 一般網頁應用程式來存取,
而當然,在開發 Windows Phone & Store App 的服務當中,目前最簡便的當然就是微軟首推的 Windows Azure 中的 Mobile Services 服務了,您可以在Windows Azure 的 Portal 首頁中找到這個服務的說明與範例檔案。
如果您沒有現有的主機可以架設 AP 的話,那這也會是個不錯的解決方案。不過因為這與本篇探討的 Web API 較無直接關係,除非您直接將 MVC 網站放置在 Azure 上、或直接在上面架 VIRSUAL MACHINES 。有機會筆者在介紹Azure 中的 Mobile Services 服務了。
接著是本文章所使用的開發環境:
- 作業系統 Windows 8 Enterpise
- 安裝好 Microsoft Studio Express 2012 for Windows Phone
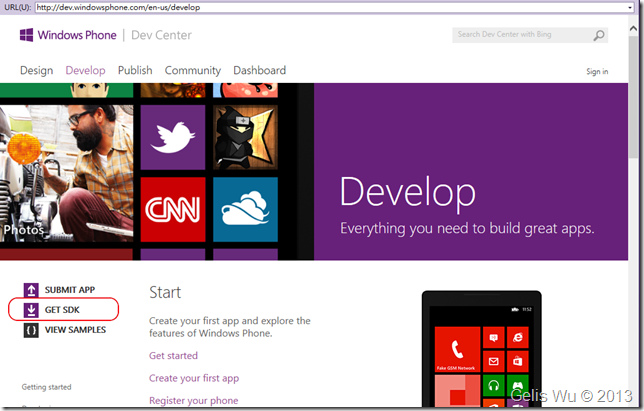
若您的 Windows 8 的環境有安裝 Microsoft Studio 2012 ,那麼在起始頁籤就有 [Windows Phone 程式開發] 連結可以下載
該連結點入後就有一個 [GET SDK] 的連結如下:
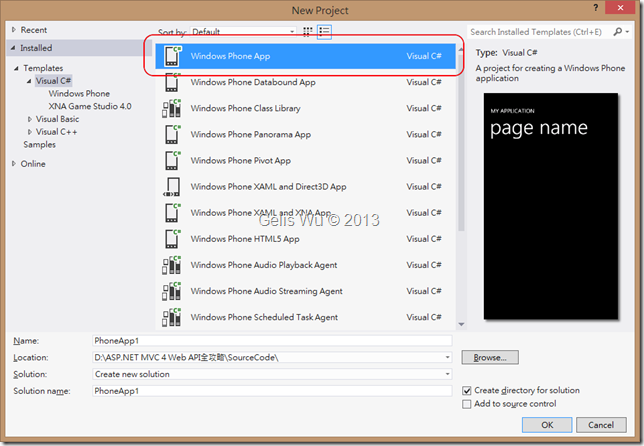
(1). 在環境一切作業準備就緒之後,我們先建立一個 Windows Phone App 專案,如下:
(2). 設計 ViewModel
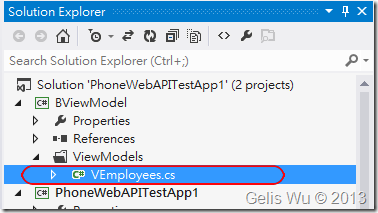
另外建一個 Windows Phone Class Library 專案來存放這裡會使用到的 ViewModel,可以將我們在 MVC 的 Mvc4BLLArchitectApp1 專案裡的 VEmpoyees 類別複製過來,存放在這個 Windows Phone Class Libray 專案裡,然後讓 Windows Phone 專案參考,如下:
(3). 設計基本畫面
使用的 ViewModel 便會決定我們的畫面大致上會有那些欄位,而筆者的構思為,我希望畫面一開始只顯示清單,而清單中我只顯示幾個相關欄位,當然我可以上下滑動,當我決定要檢視哪一筆資料後,我就點選那筆資料,點選後則帶到另外一頁並顯示詳細的資料。這時就可以決定是否修改此筆資料。
這裡筆者就不詳加介紹 XAML 的設計概念,若缺少概念可參考筆者以前的文章 再談XAML與WPF ,而 XAML 一切的基礎都脫離不了 WPF,所以您也可以參考 MSDN Windows Presentation Foundation 。不過當然,Phone 只是 WPF 的子集而已,還有您也可以用 HTML 設計 UI。
這裡筆者設計的 MainPage.xaml 如下:
1: <phone:PhoneApplicationPage
2: x:Class="PhoneWebAPITestApp1.MainPage"
3: xmlns="http://schemas.microsoft.com/winfx/2006/xaml/presentation"
4: xmlns:x="http://schemas.microsoft.com/winfx/2006/xaml"
5: xmlns:phone="clr-namespace:Microsoft.Phone.Controls;assembly=Microsoft.Phone"
6: xmlns:shell="clr-namespace:Microsoft.Phone.Shell;assembly=Microsoft.Phone"
7: xmlns:d="http://schemas.microsoft.com/expression/blend/2008"
8: xmlns:mc="http://schemas.openxmlformats.org/markup-compatibility/2006"
9: mc:Ignorable="d" d:DesignWidth="480" d:DesignHeight="768"
10: FontFamily="{StaticResource PhoneFontFamilyNormal}"
11: FontSize="{StaticResource PhoneFontSizeNormal}"
12: Foreground="{StaticResource PhoneForegroundBrush}"
13: SupportedOrientations="Portrait" Orientation="Portrait"
14: shell:SystemTray.IsVisible="True">
15:
16: <!--LayoutRoot is the root grid where all page content is placed-->
17: <Grid x:Name="LayoutRoot" Background="Transparent">
18: <Grid.RowDefinitions>
19: <RowDefinition Height="Auto"/>
20: <RowDefinition Height="*"/>
21: </Grid.RowDefinitions>
22:
23: <!--TitlePanel contains the name of the application and page title-->
24: <StackPanel x:Name="TitlePanel" Grid.Row="0" Margin="12,17,0,28">
25: <TextBlock x:Name="ApplicationTitle" Text="Northwind 資料庫" Style="{StaticResource PhoneTextNormalStyle}"/>
26: <TextBlock x:Name="PageTitle" Text="Employees App" Margin="9,-7,0,0" Style="{StaticResource PhoneTextTitle1Style}" FontSize="64" />
27: </StackPanel>
28:
29: <!--ContentPanel - place additional content here-->
30: <Grid x:Name="ContentPanel" Grid.Row="1" Margin="12,0,12,0">
31: <Button Content="Get Data" Height="72" HorizontalAlignment="Left" Margin="-12,6,0,0" Name="button1" VerticalAlignment="Top" Width="156" Click="button1_Click" />
32: <ListBox Height="527" HorizontalAlignment="Left" Margin="0,84,0,0" Name="listBox1" VerticalAlignment="Top" Width="450" >
33: <ListBox.ItemTemplate>
34: <DataTemplate>
35: <Button Width="460" Height="120" Click="Button_Click" CommandParameter="{Binding EmployeeID}">
36: <Button.Content>
37: <StackPanel Orientation="Horizontal" Height="80" Width="400">
38: <StackPanel Orientation="Vertical" Height="80">
39: <StackPanel Orientation="Horizontal" Height="40">
40: <TextBlock Width="130" Height="40" FontSize="22" Text="EmployeeID:" />
41: <TextBlock Width="20" Height="40" FontSize="22" Text="{Binding EmployeeID}" />
42: <TextBlock Height="40" FontSize="22" Text="Title:"/>
43: <TextBlock Width="180" Height="40" FontSize="22" Text="{Binding Title}"/>
44: </StackPanel>
45: <StackPanel Orientation="Horizontal" Height="40">
46: <TextBlock Width="110" Height="40" FontSize="22" Text="FirstName:" />
47: <TextBlock Width="80" Height="40" FontSize="22" Text="{Binding FirstName}" />
48: <TextBlock Height="40" FontSize="22" Text="LastName:"/>
49: <TextBlock Width="100" Height="40" FontSize="22" Text="{Binding LastName}"/>
50: </StackPanel>
51: </StackPanel>
52: </StackPanel>
53: </Button.Content>
54: </Button>
55: </DataTemplate>
56: </ListBox.ItemTemplate>
57: </ListBox>
58: <Button Content="Get Data by WebClient" Height="72" HorizontalAlignment="Left" Margin="134,6,0,0" Name="button2" VerticalAlignment="Top" Width="316" Click="button2_Click" />
59: </Grid>
60: </Grid>
61: </phone:PhoneApplicationPage>
各位會看見筆者主要使用 ListBox ,並ListBox.Template 裏頭放置 Button ,又在 Button 的 Content 在放 StackPanel , 使用 Button 的方式我就可以直接點選跳下一頁,比較簡便。這時設計畫面如下:
由於 ListBox 裡面放了好幾層的 StackPanel ,內部 TextBlock 的 Text 屬性也是 Binding 而來,所以設計畫面此時無法看見內容的。
(4). 決定存取資料方式、(HttpWebRequest 或 WebClient)
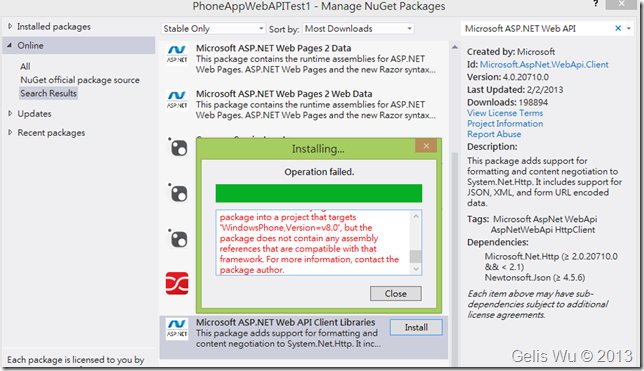
由於 Windows Store App 的 RT 才有提供 HttpClient ,在 Windows Phone 8 的專案裡你可能也無法安裝 Microsoft ASP.NET Web API,因為你在安裝的時候可能會得到下面的錯誤:
因為它還不支援 Windows Phone 8 的版本。
HttpWebRequest 或 WebClient 這兩種方式都是可行的,不過筆者會以較建議使用 HttpWebRequest 的方式。為什麼呢?雖然它可能需要較多的程式碼,但是它的靈活度比較高,可控制性也較佳,甚至我們可以使用 HttpWebRequest + HttpWebResponse 自己開發一個 HttpClient 物件,不過這要留給下一個篇幅了。
(5). 撰寫取資料的程式碼
如上第 3 步驟中,筆者繫結了 EmployeesID、Title、FirstName、LastName 等四個欄位。如果您對於原生地 HttpWebRequest 物件操作有些概念的話,那麼取得資料的程式碼非常的簡單,主要在於取得 ResponseStream ,[Get Data] 按鈕的程式碼如下:
1: WebRequest request = HttpWebRequest.Create(new Uri("http://192.168.1.36/Mvc4BLLArchitectApp1/api/EmpAPI"));
2: request.BeginGetResponse((ar) =>
3: {
4: WebResponse response = request.EndGetResponse(ar);
5: Stream stream = response.GetResponseStream();
6: long count = stream.Length;
7: DataContractJsonSerializer serializer = new DataContractJsonSerializer(typeof(IEnumerable<VEmployees>));
8: IEnumerable<VEmployees> empList = (IEnumerable<VEmployees>)serializer.ReadObject(stream);
9: List<VEmployees> list = empList.ToList();
10: Dispatcher.BeginInvoke(delegate()
11: {
12: listBox1.ItemsSource = list;
13: });
14:
15: }, null);
上方程式中,主要重點的地方在於將 Response Stream 透過 DataContractJsonSerializer 物件將其反序列化為 IEnumerable<VEmployees> 物件。各位會發現 DataContractJsonSerializer 在初始化時需要告知它 ReadObject 的物件行型態為何。
使用 DataContractJsonSerializer 物件必須引用:
using System.Runtime.Serialization.Json;
與 DataContractJsonSerializer 物件的相關說明可以參考下面連結:
蔡煥麟老師的 [利用 DataContractJsonSerializer 實現物件序列化與反序列化]
MSDN [DataContractJsonSerializer Class]
最後為什麼在指定 listBox1.ItemsSource 的外層包一個 Dispatcher 我想我就不再說明了。由於平台底層的限制得用非同步方式,還不熟悉的可以參考筆者以前的文章 [Silverlight][小技巧]使用Dispatcher使非UI執行緒可存取UI。
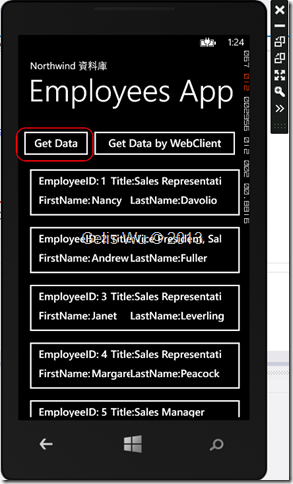
程式的執行結果如下 (這是在按下 [Get Data] 的按鈕之後):
如上,畫面如預期的可以撈回我們所要的資料,並將資料以 Button 的樣式秀在 ListBox 中,長方形的框框便是 Button 物件。
而在上面的畫面中,還有一個 [Get Data by WebClient] 的按鈕,相信有些讀者可能會好奇,那透過 WebClient 取資料的程式碼長得怎樣呢?筆者就還是列出來給各位參考,如下:
1: private void button2_Click(object sender, RoutedEventArgs e)
2: {
3: WebClient client = new WebClient();
4: client.OpenReadCompleted += new OpenReadCompletedEventHandler(client_OpenReadCompleted);
5: client.OpenReadAsync(new Uri("http://192.168.1.36/Mvc4BLLArchitectApp1/api/EmpAPI"));
6: }
7:
8: void client_OpenReadCompleted(object sender, OpenReadCompletedEventArgs e)
9: {
10: Stream stream = e.Result;
11: DataContractJsonSerializer serializer = new DataContractJsonSerializer(typeof(IEnumerable<VEmployees>));
12: IEnumerable<VEmployees> empList = (IEnumerable<VEmployees>)serializer.ReadObject(stream);
13: List<VEmployees> list = empList.ToList();
14: Dispatcher.BeginInvoke(delegate()
15: {
16: listBox1.ItemsSource = list;
17: });
18: }
到這裡,取資料部分告一段落。接著我們也要可以修改資料才行,如果到這無任何問題,接著往下吧 ![]()
(7). 實作修改畫面
修改畫面的設計,筆者只先修改幾個較關鍵的欄位,因為目前主要還是先測試基本的 CRUD 給各位看,編輯的 XAML 原始碼的部分筆者就不在文章內節錄出來了,文章之後會提供範例程式下載。
整個 IDE 工具,設計完成的編輯畫面如下:
為了使 EditPage.xaml 可以正常的運作,他必須有:
- EmpAPIController 需實作 Get(int id) 方法 與 Put(VEmployees employees) 方法
- 撰寫 BNorthwind.cs 的 EditEmployee() 方法,提供 EmpAPIController 的 Put 叫用
首先先把 EditEmployee(VEmployees employee) 方法撰寫完成,以提供 Controller 叫用,程式碼如下:
1: public void EditEmployee(VEmployees employee)
2: {
3: DataAccess dal = new DataAccess();
4: SqlGenerator generator = new SqlGenerator();
5: try
6: {
7: dal.ExecuteSQL(
8: generator.GetUpdate(typeof(VEmployees), new string[] { "EmployeeID" }),
9: GetSqlParameterByModel<VEmployees>(employee));
10: }
11: catch (Exception ex)
12: {
13: throw ex;
14: }
15: }
在 EmpAPIController 裡的 Put(VEmployees employees)與 Get(int id) 方法的程式碼如下:
1: // GET api/empapi/5
2: public VEmployees Get(int id)
3: {
4: BNorthwind BLL = new BNorthwind();
5: VEmployees emp = BLL.Get(id);
6: if (emp == null)
7: {
8: throw new HttpResponseException(new HttpResponseMessage(HttpStatusCode.NotFound));
9: }
10: return emp;
11: }
12:
13: public void Put(VEmployees employees)
14: {
15: if (employees == null)
16: {
17: throw new HttpResponseException(new HttpResponseMessage(HttpStatusCode.BadRequest));
18: }
19: BNorthwind BLL = new BNorthwind();
20: BLL.EditEmployee(employees);
21: }
寫完了 EmpAPIController 的 Get 之後,那麼當然,在我們的 Phone 的 EditPage.xaml 裡面,我們也得叫用它,並取得資料,所以在Page_Loaded 的地方,會呼叫兩個筆者自己撰寫的方法,第一個是先取得 QueryString 的 GetDataByEmpID() 方法,第二是取得資料,並顯示在 EditPage.xaml 畫面中。詳細的程式碼如下:
1: private void GetDataByEmpID()
2: {
3: EmployeesID = NavigationContext.QueryString["EmpID"];
4: }
5:
6: private void PhoneApplicationPage_Loaded(object sender, RoutedEventArgs e)
7: {
8: GetDataByEmpID();
9: GetOneEmployee();
10: }
11:
12: private void GetOneEmployee()
13: {
14: WebRequest request = HttpWebRequest.Create(new Uri(string.Format("http://192.168.1.36/Mvc4BLLArchitectApp1/api/EmpAPI/{0}", EmployeesID)));
15: request.BeginGetResponse((ar) =>
16: {
17: WebResponse response = request.EndGetResponse(ar);
18: Stream stream = response.GetResponseStream();
19: long count = stream.Length;
20: DataContractJsonSerializer serializer = new DataContractJsonSerializer(typeof(VEmployees));
21: VEmployees employee = (VEmployees)serializer.ReadObject(stream);
22: Dispatcher.BeginInvoke(delegate()
23: {
24: txtLastName.Text = employee.LastName;
25: txtFirstName.Text = employee.FirstName;
26: txtTitle.Text = employee.Title;
27: txtAddress.Text = employee.Address;
28: txtCountry.Text = employee.Country;
29: txtCity.Text = employee.City;
30: txtHomePhone.Text = employee.HomePhone;
31: });
32:
33: }, null);
34: }
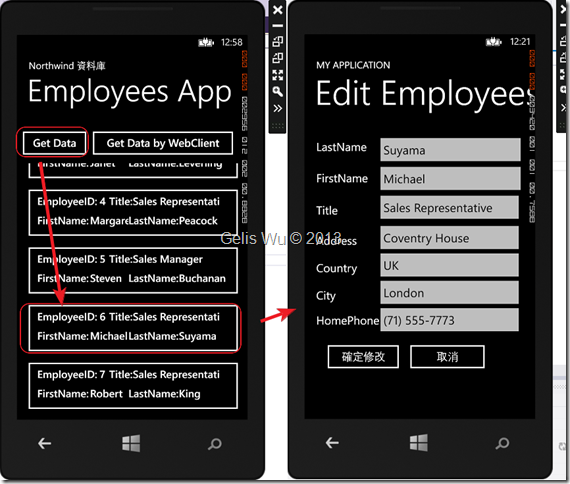
在上方的程式撰寫完畢之後,現在,我們的 Phone 8 App 應該可以做到從 Web API 取得資料、任意點選畫面上一筆資料後帶到 EditPage.xaml 畫面中,並顯示所點選的那筆的詳細資料。整個運作狀況如下:
接下來則是文章中比較精隨的地方了,我們不是只有可以秀詳細資料而已,我們還要可以修改資料與新增資料,這樣才算是完整的 App吧。接著開始撰寫畫面編輯的程式了。
編輯資料的部分,我們同樣先使用 HttpWebRequest 建立一個 ResponseStream 的呼叫,與取資料不同的地方在於,取資料直接在回傳的 ResponseStresm 裡讀取出我們要的資料即可,而當你是要 POST 或 PUT 出去的時候,你就變成是要寫入這個 ResponseStream 裡了。如下程式碼:
要注意的地方是,取得畫面資料的地方同樣需要包在 Dispatcher.BeginInvoke(delegate()) 方法中,以及之後的 BeginGetResponse() 的呼叫都必須包括在內,否則,在 serializer 的 WriteObject 時,同樣會發生違規存取的錯誤,因為當真正要 WriteObject 的時候,它還是會去(存取/參照) 畫面上的資料。
如此一來,我們現在已經可以最資料做編輯的動作了!而且是透過 Web API 喔!有沒有覺得很興奮呢? ^^
當我們任意編修一筆資料,按下確定修改之後,便可以如我們預期的秀出 『儲存成功』訊息對話框。如下:
到目前為止,我們已經完成了編輯資料的部分了,接下來是新增資料的部分。而在新增資料的處理方面,撰寫程式時會發現,除了 request.Method = "PUT" 改為 request.Method = "POST" 之外,還有就是在取得畫面的 VEmployees 物件的 GetEmployeeByPage(vemployees); 的方法中,由於新增資料時,EmployeeID 是識別自動加一,所以筆者簡單寫一個邏輯判別,也就是當 Navigate 過來 EditPage.xaml 畫面時,如果沒有 EmpID 這個參數時,就不指定 EMPLOYEESID 的屬性值。
所以筆者就先偷懶一下,直接在 GetEmployeeByPage 方法裡判斷 EMPLOYEESID 事是否為 null 值,null 則表示目前為 [新增] 模式,以便共用這個畫面,如下:
在撰寫 Phone 8 App 用戶端的程式碼的時候,當然我們得先寫好服務端的程式。剛才我們還未補足 apiController 中新增的程式碼與 BNorthwind.cs 中的 AddEmployee ,筆者就直接列出程式碼了,如下:
1: public void AddEmployee(VEmployees employee)
2: {
3: DataAccess dal = new DataAccess();
4: SqlGenerator generator = new SqlGenerator();
5: try
6: {
7: dal.ExecuteSQL(
8: generator.GetInsert(typeof(VEmployees), new string[] { "EmployeeID" }, "Employees"),
9: GetSqlParameterByModel<VEmployees>(employee));
10: }
11: catch (Exception ex)
12: {
13: throw ex;
14: }
15: }
相同的透過筆者事先撰寫的 SqlGenerator 取得 Insert 敘述,再執行 DAL 的 ExecuteSQL 方法,這邊一樣會提供 apiController 呼叫,所以在 apiController 的 Post 方法與 Put 的方法一樣只有簡單幾行如下:
1: public void Post(VEmployees employees)
2: {
3: if (employees == null)
4: {
5: throw new HttpResponseException(new HttpResponseMessage(HttpStatusCode.BadRequest));
6: }
7: BNorthwind BLL = new BNorthwind();
8: BLL.AddEmployee(employees);
9: }
再回到 Phone 8 App 中,所以這時在 btnEdit_Click 的事件處理中,筆者就將畫面的模式放置在 Button 的 CommandParameter 中,並加以判斷目前是 Add 或是 Edit,這時候我們的 EditPage.xaml.cs 的程式碼如下:
1: public string EMPLOYEESID { get; set; }
2:
3: private void GetDataByEmpID()
4: {
5: if(NavigationContext.QueryString.Keys.Where(c => c=="EmpID").FirstOrDefault()!=null)
6: EMPLOYEESID = NavigationContext.QueryString["EmpID"];
7: }
8:
9: private void PhoneApplicationPage_Loaded(object sender, RoutedEventArgs e)
10: {
11: GetDataByEmpID();
12: CheckPageMode();
13: }
14:
15: private void CheckPageMode()
16: {
17: if (EMPLOYEESID == null)
18: {
19: btnEdit.Content = "確定新增";
20: btnEdit.CommandParameter = "Add";
21: PageTitle.Text = "Add Employees";
22: }
23: else
24: {
25: btnEdit.Content = "確定修改";
26: btnEdit.CommandParameter = "Edit";
27: PageTitle.Text = "Edit Employees";
28: GetOneEmployee();
29: }
30: }
31: /// <summary>
32: /// 取得一筆 Employees 資料
33: /// </summary>
34: private void GetOneEmployee()
35: {
36: WebRequest request = HttpWebRequest.Create(new Uri(string.Format("http://192.168.1.36/Mvc4BLLArchitectApp1/api/EmpAPI/{0}", EMPLOYEESID)));
37: request.BeginGetResponse((ar) =>
38: {
39: WebResponse response = request.EndGetResponse(ar);
40: Stream stream = response.GetResponseStream();
41: long count = stream.Length;
42: DataContractJsonSerializer serializer = new DataContractJsonSerializer(typeof(VEmployees));
43: VEmployees employee = (VEmployees)serializer.ReadObject(stream);
44: Dispatcher.BeginInvoke(delegate()
45: {
46: txtLastName.Text = employee.LastName;
47: txtFirstName.Text = employee.FirstName;
48: txtTitle.Text = employee.Title;
49: txtAddress.Text = employee.Address;
50: txtCountry.Text = employee.Country;
51: txtCity.Text = employee.City;
52: txtHomePhone.Text = employee.HomePhone;
53: });
54:
55: }, null);
56: }
57:
58:
59: private void AddOneEmployee()
60: {
61: CallWebAPI("POST");
62: }
63:
64: private void EditOneEmployee()
65: {
66: CallWebAPI("PUT");
67: }
68:
69: private void CallWebAPI(string HttpMethod)
70: {
71: WebRequest request = HttpWebRequest.Create(new Uri("http://192.168.1.36/Mvc4BLLArchitectApp1/api/EmpAPI"));
72: request.Method = HttpMethod;
73: request.ContentType = "application/json";
74: request.BeginGetRequestStream((ar) =>
75: {
76: try
77: {
78: Stream requestStream = request.EndGetRequestStream(ar);
79: MemoryStream ms = new MemoryStream();
80:
81: DataContractJsonSerializer serializer = new DataContractJsonSerializer(typeof(VEmployees));
82: VEmployees vemployees = null;
83: Dispatcher.BeginInvoke(delegate()
84: {
85: vemployees = GetEmployeeByPage(vemployees);
86: serializer.WriteObject(ms, vemployees);
87: byte[] bs = ms.ToArray();
88: requestStream.Write(bs, 0, bs.Length);
89: requestStream.Flush();
90: requestStream.Close();
91:
92: request.BeginGetResponse((ar2) =>
93: {
94: WebResponse response = request.EndGetResponse(ar2);
95: Stream stream = response.GetResponseStream();
96: }, null);
97: MessageBox.Show("儲存成功!");
98: });
99: }
100: catch (Exception ex)
101: {
102: MessageBox.Show(ex.Message);
103: }
104: }, null);
105: }
106:
107:
108: private VEmployees GetEmployeeByPage(VEmployees vemployees)
109: {
110: vemployees = new VEmployees()
111: {
112: EmployeeID = EMPLOYEESID!=null?int.Parse(EMPLOYEESID):0,
113: LastName = txtLastName.Text,
114: FirstName = txtFirstName.Text,
115: Title = txtTitle.Text,
116: Address = txtAddress.Text,
117: Country = txtCountry.Text,
118: City = txtCity.Text,
119: HomePhone = txtHomePhone.Text
120: };
121: return vemployees;
122: }
123:
124: private void btnEdit_Click(object sender, RoutedEventArgs e)
125: {
126: Button btn = sender as Button;
127: switch (btn.CommandParameter.ToString())
128: {
129: case "Add":
130: AddOneEmployee();
131: break;
132: case "Edit":
133: EditOneEmployee();
134: break;
135: }
136: }
如程式中,很簡單的透過 CallWebAPI 方法決定使用 PUT 或 POST,目前已經可以做到新增資料。
最後只剩下刪除的部分了,有了前面的基礎,相信對各位並不困難,只是將 request.Method 改為 "DELETE" 而已,Web API 的伺服器端程式碼筆者就直接列出。
ApiController:
1: public void Delete(int id)
2: {
3: BNorthwind BLL = new BNorthwind();
4: BLL.DeleteEmployee(id);
5: }
BNorthwind.cs 的程式碼:
1: public void DeleteEmployee(int EmployeeID)
2: {
3: DataAccess dal = new DataAccess();
4: SqlGenerator generator = new SqlGenerator();
5: try
6: {
7: VEmployees employee = new VEmployees() { EmployeeID=EmployeeID};
8: dal.ExecuteSQL(
9: generator.GetDelete<VEmployees>(employee, new string[] { "EmployeeID" }, "Employees"),
10: GetSqlParameterByModel<VEmployees>(employee, new string[] { "EmployeeID" }));
11: }
12: catch (Exception ex)
13: {
14: throw ex;
15: }
16: }
呼叫端的 App 程式碼非常簡單,只是 Route 最後的 {id} 要給,以及使用 "DELETE" Method 而已。
1: WebRequest request = HttpWebRequest.Create(new Uri(string.Format("http://192.168.1.36/Mvc4BLLArchitectApp1/api/EmpAPI/{0}", EMPLOYEESID)));
2: request.Method = "DELETE";
3: request.BeginGetResponse((ar) =>
4: {
5: WebResponse response = request.EndGetResponse(ar);
6: Stream stream = response.GetResponseStream();
7: }, null);
8: MessageBox.Show("刪除成功!");
文章範例程式下載:
伺服器端程式下載 (Mvc4BLLArchitectApp1)
Windows Phone 8 App (PhoneWebAPITestApp1)
總結:
今天所介紹的這個 Windows Phone 8 App 的範例同樣是 CRUD 的範例,不過有這樣的基礎後,相信各位再之後開發 Phone 8 App 的其他應用應該更能得心應手。
簽名:
學習是一趟奇妙的旅程
這當中,有辛苦、有心酸、也有成果。有時也會有瓶頸。要能夠繼續勇往直前就必須保有一顆最熱誠的心。
軟體開發之路(FB 社團):https://www.facebook.com/groups/361804473860062/
Gelis 程式設計訓練營(粉絲團):https://www.facebook.com/gelis.dev.learning/
如果文章對您有用,幫我點一下讚,或是點一下『我要推薦』,這會讓我更有動力的為各位讀者撰寫下一篇文章。
非常謝謝各位的支持與愛護,小弟在此位各位說聲謝謝!!! ^_^


