在這一次的公司內訓中,筆者以 "Visual Studio 2012 與 ASP.NET 4.5 (新功能與開發介紹)" 這樣的主題,介紹了整個在 Visual Studio 2012 中關於網頁系統的開發與雲端系統的開發與建置,其中,應觀眾要求,希望在課堂上的實作中,可以講解關於 一般 ASP.NET Web Form 在開發上如何做簡單的切割,並在需要時,又可以在最少的修改下,快速轉換為 ASP.NET MVC
在這一次的公司內訓中,筆者以 "Visual Studio 2012 與 ASP.NET 4.5 (新功能與開發介紹)" 這樣的主題,介紹了整個在 Visual Studio 2012 中關於網頁系統的開發與雲端系統的開發與建置,從.NET Framework 4.5 新增功能簡介講到ASP.NET 4.5 的 Web 開發、HTML5/JavaScript、軟體開發生命週期管理、TFS2012相關新增功能、到程式碼的品質-CodeReview、Code Clone、IntelliTrace、Team Build 等等。
在第一天中,也介紹了 ASP.NET 與 ASP.NET MVC 在開發上的比較,其中,應觀眾要求,希望在課堂上的實作中,可以講解關於 一般 ASP.NET Web Form 在開發上如何做簡單的切割,並在需要時,又可以在最少的修改下,快速轉換為 ASP.NET MVC (這裡使用的版本為MVC4,以下稱為ASP.NET MVC) 的應用程式,由於實作的部分並未在投影片中,因此筆者再次於文章中記錄這個過程。
簡單的 ASP.NET Web Form 的應用程式
這個範例的應用程式非常的簡單,小弟一樣以 Northwind 資料庫的 Employee 資料表為基礎,並使用先前開發好的 DAL 的 Framework 來進行 CRUD 的資料存取部分。
而這個範例剛開始還未妥善的完成分層,只是單存的以 ViewModel 向我的 WistronITs.DLL 取資料而已。下面我們先從整個範例一開始的建置開始說明。
首先:
1. 定義 Employee 的 ViewModel 的 Entity 的專案
一開始就將 Employee 這個獨立一個 BizNorthwind.ViewModels 專案中,並讓主要的網頁專案 EmployeeWebApplication1 參考。而這個範例為求簡單,先放置一個 Employees 的 Entity 類別,如下:
1: public class Employees
2: {
3: public Int32 EmployeeID { get; set; }
4: public String LastName { get; set; }
5: public String FirstName { get; set; }
6: public String Title { get; set; }
7: public String TitleOfCourtesy { get; set; }
8: public DateTime? BirthDate { get; set; }
9: public DateTime? HireDate { get; set; }
10: public String Address { get; set; }
11: public String City { get; set; }
12: public String Region { get; set; }
13: public String PostalCode { get; set; }
14: public String Country { get; set; }
15: public String HomePhone { get; set; }
16: public String Extension { get; set; }
17: public String Notes { get; set; }
18: public Int32? ReportsTo { get; set; }
19: public String PhotoPath { get; set; }
20: }
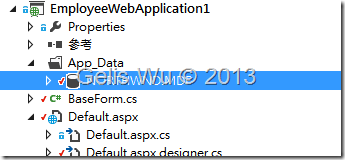
2. 在主要的 EmployeeWebApplication1 專案中的 App_Data 中加入 Northwind.mdb 資料庫
這裡直接將原本在 MS SQL Server 2008 中執行的 mdb 檔案貼入即可,如果您是低於 2008 以下的版本,Visual Studio 2012 會提示要升級。
3. 建立 BizNorthwind 專案
這個專案主要放置會實際透過 WistronITs 這個 DAL 的 Framework (以下簡稱為 WistronITs),所以這個專案裡也只有一個對 Employees 資料表進行 CRUD 的實作部分,只是它會透過 WistronITs 這個 DAL Framework 來進行,要操作使用這個 Framework ,筆者只要撰寫程式碼即可對 Employees 這個資料表進行基本的 CRUD,如下:
1: using System;
2: using System.Collections.Generic;
3: using System.Linq;
4: using System.Web;
5: using BizNorthwind.Models;
6: using BizNorthwind.ViewModels;
7: using WistronITs.Data.DAL;
8: using WistronITs.Data.Sql.SqlHelper;
9:
10: namespace BizNorthwind.Models
11: {
12: public class BizEmployee
13: {
14: /// <summary>
15: /// 取回所有資料
16: /// </summary>
17: /// <returns></returns>
18: public IQueryable<Employees> GetAll()
19: {
20: MSSQLObject obj = new MSSQLObject(new DataAccess());
21: obj.SqlStatement = new SqlGenerator().GetSelect(typeof(Employees), "Employees");
22: return obj.GetAll<Employees>().AsQueryable();
23: }
24: /// <summary>
25: /// 新增一筆資料
26: /// </summary>
27: /// <param name="emp"></param>
28: /// <returns></returns>
29: public int Add(Employees emp)
30: {
31: MSSQLObject obj = new MSSQLObject(new DataAccess());
32: obj.SqlStatement = new SqlGenerator().GetInsert(typeof(Employees), new string[] { "EmployeeID" }, "Employees");
33: return obj.UpdateData<Employees>(emp);
34: }
35: /// <summary>
36: /// 修改一筆資料
37: /// </summary>
38: /// <param name="emp"></param>
39: /// <returns></returns>
40: public int Edit(Employees emp)
41: {
42: MSSQLObject obj = new MSSQLObject(new DataAccess());
43: obj.SqlStatement = new SqlGenerator().GetUpdate(typeof(Employees), new string[] { "EmployeeID" }, "Employees");
44: return obj.UpdateData<Employees>(emp);
45: }
46: /// <summary>
47: /// 刪除一筆資料
48: /// </summary>
49: /// <param name="id"></param>
50: /// <returns></returns>
51: public int Del(int id)
52: {
53: MSSQLObject obj = new MSSQLObject(new DataAccess());
54: Employees emp = new Employees() { EmployeeID = id };
55: obj.SqlStatement = new SqlGenerator().GetDelete<Employees>(
56: emp,
57: new string[] { "EmployeeID" },
58: "Employees");
59: return obj.UpdateData<Employees>(emp);
60: }
61: }
62: }
上面程式所使用的是公司所使用的 DAL 的設計模式,所以文章內可能不會公布 SqlGenerator 與 UpdateData 的實作細節,本文的重點會放在再有妥善架構下,ASP.NET Web Form 如何在極短的時間轉換為 ASP.NET MVC 的應用程式。
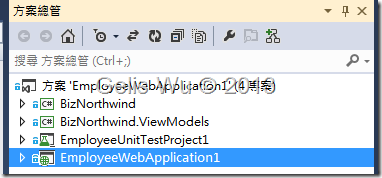
這時方案總管會有這些專案,如下:
3. 建立 BaseForm
就 ASP.NET 的 Web Form 來說,由於架構上的限制,應用程式越來越巨大時,可維護性就急遽的降低,所以在 Web Form 中定義一個 BaseForm 可以算是是基本要素之一,起碼將頁面共用的程式碼,比如 EditMode、Alert、LOG 等等定義在一起,而畫面共用的部分就使用 Master Page。
BaseForm 程式碼的部分如下,讀者會發現我的頁面上有使用了 MultiView,因為我為了使前端在控制 EDIT_MODE 時的程式碼可以簡潔一點,最好可以使用 Lembda Expression,所以在這裡使用了不需要傳回值的 Action<MultiView> 來定義,不清楚的讀者可以參考 MSDN 關於 Action<T> Delegate 的說明,詳細的程式碼如下:
1: public class BaseForm: System.Web.UI.Page
2: {
3: #region 頁面狀態設定
4: protected enum page_status { NONE, QUERY_MODE, ADD_MODE, EDIT_MODE, DEL_MODE}
5: /// <summary>
6: /// 頁面狀態設定
7: /// </summary>
8: protected page_status Page_Status
9: {
10: get
11: {
12: if (ViewState["Page_Status"] == null)
13: ViewState["Page_Status"] = page_status.QUERY_MODE;
14: return (page_status)ViewState["Page_Status"];
15: }
16: set { ViewState["Page_Status"] = value; }
17: }
18: #endregion
19:
20: /// <summary>
21: /// 設定頁面狀態為 ADD
22: /// </summary>
23: /// <param name="funcRef"></param>
24: protected void SetPageStatus2Add(Action<MultiView> funcRef)
25: {
26: PageActionInvoke(funcRef);
27: Page_Status = page_status.ADD_MODE; //設定為新增模式
28: }
29: /// <summary>
30: /// 設定頁面狀態為 EDIT
31: /// </summary>
32: /// <param name="funcRef"></param>
33: protected void SetPageStatus2Edit(Action<MultiView> funcRef)
34: {
35: PageActionInvoke(funcRef);
36: Page_Status = page_status.EDIT_MODE; //設定為編輯模式
37: }
38: /// <summary>
39: /// 設定頁面狀態為 DELETE
40: /// </summary>
41: /// <param name="funcRef"></param>
42: protected void SetPageStatus2Del(Action<MultiView> funcRef)
43: {
44: PageActionInvoke(funcRef);
45: Page_Status = page_status.DEL_MODE; //設定為刪除模式
46: }
47: /// <summary>
48: /// 設定頁面狀態為 QUERY
49: /// </summary>
50: /// <param name="funcRef"></param>
51: protected void SetPageStatus2Query(Action<MultiView> funcRef)
52: {
53: PageActionInvoke(funcRef);
54: Page_Status = page_status.QUERY_MODE; //設定為查詢模式
55: }
56: /// <summary>
57: /// 執行沒有傳回值的 Lambda Expression 運算式.
58: /// </summary>
59: /// <param name="funcRef"></param>
60: private static void PageActionInvoke(Action<MultiView> funcRef)
61: {
62: MultiView multiView = ((System.Web.UI.Page)funcRef.Target).FindControl("MultiView1") as MultiView;
63: funcRef((MultiView)multiView); //執行 Lambda Expression 運算式.
64: }
65:
66: #region 顯示 JavaScript Alert
67: /// <summary>
68: /// 顯示 JavaScript Alert
69: /// </summary>
70: /// <param name="Message"></param>
71: protected virtual void Alert(string Message)
72: {
73: ClientScript.RegisterClientScriptBlock(
74: Page.GetType(),
75: "_JAVASCRIPT_ALERT",
76: string.Format("alert('{0}');",
77: Message),
78: true);
79: }
80: #endregion
81: }
從上面的程式可以看出 編輯、刪除、查詢 等, 每一個方法都是叫用 PageActionInvoke 方法。
4. 建立 Default.aspx
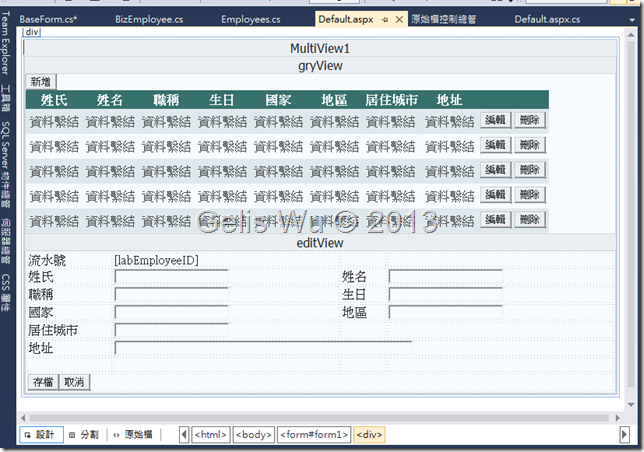
上面動作都完成之後就是建立主要頁面了,主頁面使用了 MultiView 來切割查詢與編輯的畫面,畫面其實並不複雜,長得像這樣,如下圖:
頁面的 ASPX 原始檔筆者就不拿來佔篇幅了,因 ASP.NET Web Form 透過拖拉的方式真的蠻容易製作畫面的。
重點在之後如何修改為 ASP.NET MVC,並套用 IRepository 的樣式,這時候的 Default.aspx.cs 的程式碼者撰寫如下:
1: using System;
2: using System.Collections.Generic;
3: using System.Linq;
4: using System.Web;
5: using System.Web.UI;
6: using System.Web.UI.WebControls;
7: using BizNorthwind.ViewModels;
8: using BizNorthwind.Models;
9:
10: namespace EmployeeWebApplication1
11: {
12: public partial class Default : BaseForm
13: {
14: #region 取得資料
15: /// <summary>
16: /// 取得資料
17: /// </summary>
18: private void GetData()
19: {
20: BizEmployee biz = new BizEmployee();
21: GridView1.DataSource = biz.GetAll().ToList();
22: GridView1.DataBind();
23: }
24: /// <summary>
25: /// 取得單一筆資料
26: /// </summary>
27: /// <param name="ID"></param>
28: private void GetOneData(int ID)
29: {
30: BizEmployee biz = new BizEmployee();
31: var result = from query in biz.GetAll()
32: where query.EmployeeID == ID
33: select query;
34:
35: Employees emp = result.FirstOrDefault();
36: if (emp != null)
37: {
38: labEmployeeID.Text = emp.EmployeeID.ToString();
39: txtLastName.Text = emp.LastName;
40: txtFirstName.Text = emp.FirstName;
41: txtCountry.Text = emp.Country;
42: txtRegion.Text = emp.Region;
43: txtTitle.Text = emp.Title;
44: txtbithDate.Text = emp.BirthDate.HasValue ? emp.BirthDate.Value.ToString("yyyy/MM/dd") : "";
45: txtCity.Text = emp.City;
46: txtAddress.Text = emp.Address;
47: }
48: }
49: #endregion
50:
51: #region Page_Load
52: protected void Page_Load(object sender, EventArgs e)
53: {
54: if (!Page.IsPostBack)
55: {
56: GetData();
57: }
58: }
59: #endregion
60:
61: #region 清除所有欄位
62: private void CleanAllColumns()
63: {
64: txtFirstName.Text =
65: txtLastName.Text =
66: txtTitle.Text =
67: txtRegion.Text =
68: txtbithDate.Text =
69: txtCountry.Text =
70: txtCity.Text =
71: txtAddress.Text = "";
72: }
73: #endregion
74:
75: #region GridView 事件
76: protected void GridView1_RowCommand(object sender, GridViewCommandEventArgs e)
77: {
78: switch (e.CommandName)
79: {
80: case "Edit":
81: SetPageStatus2Edit(c => c.SetActiveView(editView));
82: int id = int.Parse(e.CommandArgument.ToString());
83: GetOneData(id);
84: break;
85: case "Del":
86: BizEmployee biz = new BizEmployee();
87: if (biz.Del(int.Parse(e.CommandArgument.ToString())) > 0)
88: {
89: Alert("刪除成功!");
90: GetData();
91: }
92: else
93: Alert("刪除失敗!");
94: break;
95: }
96: }
97:
98: protected void GridView1_RowEditing(object sender, GridViewEditEventArgs e)
99: {
100: e.Cancel = true;
101: }
102: #endregion
103:
104: #region 相關按鈕事件
105: protected void btnSave_Click(object sender, EventArgs e)
106: {
107: BizEmployee biz = new BizEmployee();
108: Employees emp = new Employees() {
109: EmployeeID = Page_Status==page_status.EDIT_MODE? int.Parse(labEmployeeID.Text):0,
110: LastName = txtLastName.Text,
111: FirstName = txtFirstName.Text,
112: Title = txtTitle.Text,
113: Country = txtCountry.Text,
114: Region = txtRegion.Text,
115: City = txtCity.Text,
116: Address = txtAddress.Text,
117: BirthDate = txtbithDate.Text.Trim()!=""?(Nullable<DateTime>) DateTime.Parse(txtbithDate.Text):null
118: };
119: int result = 0;
120: switch (Page_Status)
121: {
122: case page_status.ADD_MODE:
123: result = biz.Add(emp);
124: break;
125: case page_status.EDIT_MODE:
126: result = biz.Edit(emp);
127: break;
128: }
129: if (result>0)
130: {
131: Alert("儲存成功。");
132: MultiView1.SetActiveView(gryView);
133: GetData();
134: }
135: else
136: Alert("儲存失敗!");
137: }
138:
139: protected void btnCancel_Click(object sender, EventArgs e)
140: {
141: MultiView1.SetActiveView(gryView);
142: GetData();
143: }
144:
145: protected void btnAdd_Click(object sender, EventArgs e)
146: {
147: SetPageStatus2Add(c => c.SetActiveView(editView));
148: CleanAllColumns();
149: }
150: #endregion
151: }
152: }
程式碼的部分只能說是可以運作的狀態,透過 Page_Load 裡叫用 GetData() 取得資料,畢竟是使用 ASP.NET Web Form 的方便之處。值得注意的是,現在也已經是透過 BizEmployee 來取得與編輯資料。且程式也絕對是可以運作沒有任何的問題。
接著,重點的部分來了,我們要將專案改為 ASP.NET MVC 的專案,再將 BizEmployee 的資料存取部分以 IRepository 方式抽離出來,所以我們必須捨棄掉 EmployeeWebApplication1 這個專案了,下面是轉換的步驟。
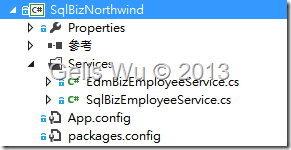
1. 建立介面專案 InterfaceNorthwind 與 服務專案 SqlBizNorthwind
A. InterfaceNorthwind 專案
這個介面很簡單,只有 CRUD 的部分。
1: public interface IRepository<T> where T: class
2: {
3: /// <summary>
4: /// 新增一筆資料
5: /// </summary>
6: /// <param name="entity"></param>
7: int Add(T entity);
8: /// <summary>
9: /// 刪除一筆資料
10: /// </summary>
11: /// <param name="id"></param>
12: /// <returns></returns>
13: int Del(int id);
14: /// <summary>
15: /// 編輯一筆資料
16: /// </summary>
17: /// <param name="entity"></param>
18: /// <returns></returns>
19: int Edit(T entity);
20: /// <summary>
21: /// 取得所有資料
22: /// </summary>
23: /// <returns></returns>
24: IEnumerable<T> GetAll();
25: }
B. SqlBizNorthwind 專案
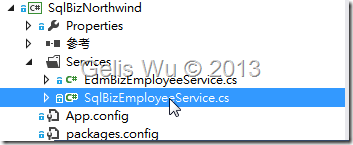
我們先看在 Services 資料夾下面的 SqlBizEmployeeService.cs 這個檔案。接著進入下一步驟。
2. 將實作抽離到 SqlBizNorthwind 的 Service 下面
原先撰寫在 BizEmployee.cs 的程式碼會直接參考並叫用 WistronITs.DLL 的 DAL 實體來存取資料庫,所以在 SqlBizNorthwind 專案也必須參考 WistronITs.DLL 這個 Assembly。
程式碼的部分與原先其實幾乎沒什麼不同,只是多繼承了 IRepository<T> ,且 T 的部分就帶入 Employees 的實體物件。
如下程式碼:
1: public class SqlBizEmployeeService: IRepository<Employees>
2: {
3: #region IRepository<Employees> 成員
4: /// <summary>
5: /// 新增一筆 Employees
6: /// </summary>
7: /// <param name="entity"></param>
8: /// <returns></returns>
9: public int Add(Employees entity)
10: {
11: MSSQLObject obj = new MSSQLObject(new DataAccess());
12: obj.SqlStatement = new SqlGenerator().GetInsert(typeof(Employees), new string[] { "EmployeeID" }, "Employees");
13: return obj.UpdateData<Employees>(entity);
14: }
15: /// <summary>
16: /// 刪除一筆 Employees
17: /// </summary>
18: /// <param name="id"></param>
19: /// <returns></returns>
20: public int Del(int id)
21: {
22: MSSQLObject obj = new MSSQLObject(new DataAccess());
23: Employees emp = new Employees() { EmployeeID = id };
24: obj.SqlStatement = new SqlGenerator().GetDelete<Employees>(
25: emp,
26: new string[] { "EmployeeID" },
27: "Employees");
28: return obj.UpdateData<Employees>(emp);
29: }
30: /// <summary>
31: /// 編輯一筆 Employees
32: /// </summary>
33: /// <param name="entity"></param>
34: /// <returns></returns>
35: public int Edit(Employees entity)
36: {
37: MSSQLObject obj = new MSSQLObject(new DataAccess());
38: obj.SqlStatement = new SqlGenerator().GetUpdate(typeof(Employees), new string[] { "EmployeeID" }, "Employees");
39: return obj.UpdateData<Employees>(entity);
40: }
41: /// <summary>
42: /// 取得所有 Employees
43: /// </summary>
44: /// <returns></returns>
45: public IEnumerable<Employees> GetAll()
46: {
47: MSSQLObject obj = new MSSQLObject(new DataAccess());
48: obj.SqlStatement = new SqlGenerator().GetSelect(typeof(Employees), "Employees");
49: return obj.GetAll<Employees>().AsQueryable();
50: }
51:
52: #endregion
53: }
看到這裡應該很清楚,其實還蠻簡單的,因為程式碼幾乎沒什麼變。
3. 修改原先的 BizEmployee 專案的 BizEmployee.cs
到了這裡就仔細看好了,這裡就有些變化了,原先的入口 BizEmployee 類別改為泛型的 BizEmployee<T>,並在 Constructor 中可以注入進來,也就是說,只要有實作 IRepository<T> 介面的物件都可以注入進來,這麼一來,靈活度就高了,因為在這裡我不需要知道資料會更新到哪裡去。 因此原先的 BizEmployee.cs 的內容變得很簡單。
實作的步驟如下:
A. 宣告為泛型的類別,並給條件約束
1: public class BizEmployee<T>
2: where T: class
B. 在類別內宣告 private 的 IRepository<T> 類型的泛型介面的物件
1: private IRepository<T> _repository;
C. 將類別的 Constructor 加入一個 IRepository<T> 類型的引數
1: public BizEmployee(IRepository<T> repository)
2: {
3: _repository = repository;
4: }
D. 各個原先的實作都改以 _repository 介面提供服務,當然原本的 Employees 的實體物件就代換為泛型的 T
1: /// <summary>
2: /// 取回所有資料
3: /// </summary>
4: /// <returns></returns>
5: public IEnumerable<T> GetAll()
6: {
7: return _repository.GetAll();
8: }
9: /// <summary>
10: /// 新增一筆資料
11: /// </summary>
12: /// <param name="emp"></param>
13: /// <returns></returns>
14: public int Add(T emp)
15: {
16: return _repository.Add(emp);
17: }
18: /// <summary>
19: /// 修改一筆資料
20: /// </summary>
21: /// <param name="entity"></param>
22: /// <returns></returns>
23: public int Edit(T entity)
24: {
25: return _repository.Edit(entity);
26: }
27: /// <summary>
28: /// 刪除一筆資料
29: /// </summary>
30: /// <param name="id"></param>
31: /// <returns></returns>
32: public int Del(int id)
33: {
34: return _repository.Del(id);
35: }
4. 新增 EmployeeMvc4Application1 的 MVC 4 應用程式
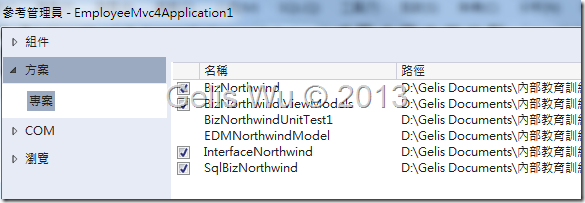
將相關參考的專案參考進來
5. 撰寫 Controller
詳細建立 View 的細節本文就不再多做說明,不清楚的讀者可以參考筆者先前的 ASP.NET MVC 基礎 (內部訓練) 投影片分享 內有建立View 基礎的說明。
這個 Controller 我們就取名為 EmployeeController 好了,重點的地方是,它呼叫步驟 3 的 BizEmployee<T> 類別,其實這邊可以再建立一個 Factory 類別來建立這個物件,但了為了不複雜化,筆者先在 EmployeeController 中建立一個 CreateInstance() 方法,以建立出 BizEmployee<T> 的實體物件以方便讓 Controller 內各個 Action 呼叫,如下:
1: private static BizEmployee<Employees> CreateInstance()
2: {
3: BizEmployee<Employees> context = new BizEmployee<Employees>(new SqlBizEmployeeService());
4: return context;
5: }
接著就是撰寫 Index 的 Action
1: public ActionResult Index()
2: {
3: BizEmployee<Employees> context = CreateInstance();
4: return View(context.GetAll());
5: }
如上程式,非常的簡單,只要透過 GetAll 方法即可取回我們所需要的所有結果。
然後 Create 的部分程式碼也很容易,只是需一個回傳空的 ActionResult 物件的 Create 方法,一個則是實際新增到資料庫的 Create 方法,程式碼如下:
1: public ActionResult Create()
2: {
3: return View();
4: }
5:
6: [HttpPost]
7: public ActionResult Create(Employees emp)
8: {
9: BizEmployee<Employees> context = CreateInstance();
10: ViewBag.AddResult = context.Add(emp);
11: return RedirectToAction("Index");
12: }
而編輯的部分也一樣,有一個是進入空的 Edit 頁面,所以會有一個空的 Edit 方法,只是在實作的時候,我們發現除了 Edit 有取得一筆資料的需求之外,其他如:Details、Delete 等也會使用到,所以我們分離出一個 GetOneEmployee(id) 方法。
詳細的 Edit 程式碼如下:
1: public ActionResult Edit(int id)
2: {
3: Employees emp = GetOneEmployee(id);
4: return View(emp);
5: }
6:
7: private static Employees GetOneEmployee(int id)
8: {
9: BizEmployee<Employees> context = CreateInstance();
10: Employees emp = context.GetAll().Where(c => c.EmployeeID == id).FirstOrDefault();
11: return emp;
12: }
13:
14: [HttpPost]
15: public ActionResult Edit(Employees emp)
16: {
17: BizEmployee<Employees> context = CreateInstance();
18: ViewBag.EditResult = context.Edit(emp);
19: return RedirectToAction("Index");
20: }
Detailds 頁面的部份就真的簡單到只是回傳一筆資料的實體
1: public ActionResult Details(int id)
2: {
3: Employees emp = GetOneEmployee(id);
4: return View(emp);
5: }
刪除的部分也是一樣如法炮製而已,筆者就直接列出程式碼:
1: public ActionResult Delete(int id)
2: {
3: Employees emp = GetOneEmployee(id);
4: return View(emp);
5: }
6:
7: [HttpPost]
8: public ActionResult Delete(int id, FormCollection form)
9: {
10: BizEmployee<Employees> context = CreateInstance();
11: ViewBag.DelResult = context.Del(id);
12: return RedirectToAction("Index");
13: }
結語:
如上,將這個原先是 ASP.NET Web Form 的網站改為 ASP.NET MVC 4 的網站我們其實才花沒多久的時間就改完了,依照筆者實際的經驗,五個鐘頭左右即可修改完成一個約十個畫面左右的網站,只要有原本畫面設計師所提供的 HTML 頁面檔,對筆者來說只是多寫一個 Controller 、以及套 View 而已,其他參照的部分都可以直接使用,沒什麼不同。
簽名:
學習是一趟奇妙的旅程
這當中,有辛苦、有心酸、也有成果。有時也會有瓶頸。要能夠繼續勇往直前就必須保有一顆最熱誠的心。
軟體開發之路(FB 社團):https://www.facebook.com/groups/361804473860062/
Gelis 程式設計訓練營(粉絲團):https://www.facebook.com/gelis.dev.learning/
如果文章對您有用,幫我點一下讚,或是點一下『我要推薦』,這會讓我更有動力的為各位讀者撰寫下一篇文章。
非常謝謝各位的支持與愛護,小弟在此位各位說聲謝謝!!! ^_^
