在上一篇中筆者介紹了全新的 Visual Studio 2015 與 為什麼要重新設計 ASP.NET ,以及和 MVC 6 之間的關係。也介紹了 bower 、grunt 是什麼?與如何使用。接下來,來看 MVC 6 的有那些新增功能。
在上一篇中筆者介紹了全新的 Visual Studio 2015 與 為什麼要重新設計 ASP.NET ,以及和 MVC 6 之間的關係。也介紹了 bower 、grunt 是什麼?與如何使用。
接下來,來看 MVC 6 的有那些新增功能。
ASP.NET 5 with MVC 6 新增功能
在這一次 Release 的 MVC 6 裡面,有三個新增功能:
1. VCs (View Components) 頁面檢視元件
一個類似於 Partial View 的功能,但是 VCs 更像一個 View 的元件,他不需要從原本的 Controller 的 ViewResult 一起回傳,甚至可以自己有一個小型的 Controller ,所以 VCs 不會跟主要 View 的 Controller 有相依性,所以他可以解決我們以前用 Partial View 不容易解決的問題,如:
- 動態的互動選單
- 互動購物車
- 登入頁簽
- .........等等
步驟一、要建立 VCs 也非常的容易,首先建立繼承 ViewComponent 類別的 class
1: public class EmpVCsViewComponent : ViewComponent2: {3: public EmpVCsViewComponent()4: {5: }6:7: public async Task<IViewComponentResult> InvokeAsync()8: {9: var result = await GetItemsAsync();10:11: return View("EVc", result);12: }13:14: private Task<IEnumerable<Employee>> GetItemsAsync()15: {16: var result = new List<Employee>(17: new Employee[] {18: new Employee() {19: ID = 1,20: EmpName = "Gelis"21: },22: new Employee() {23: ID = 2,24: EmpName = "Allan"25: }26: });27:28: return Task.FromResult(result.AsEnumerable());29: }30: }
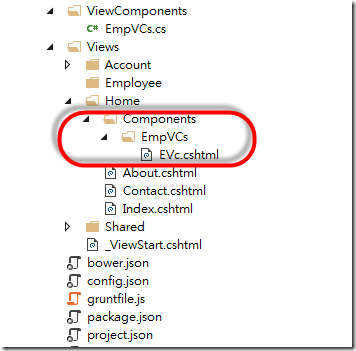
建立一個資料夾 ViewComponents 來放置這個 ViewComponent。
在程式碼第 11 行的地方,回傳 View 的第一個參數,必須與實際的 VCs 的名稱相同。
步驟二、建立 VCs 的檢視頁面
1: @model IEnumerable<ASPNET5VCsTest1.Models.Employee>2:3: <h2> ASP.NET MVC 6 View Component Test.</h2>4: <h4>@ViewBag.Message</h4>5: <table border="1">6: <tr>7: <td>Emp ID</td>8: <td>Emp Name</td>9: </tr>10: @foreach (var emp in Model)11: {12: <tr>13: <td>@emp.ID</td>14: <td>@emp.EmpName</td>15: </tr>16: }17: </table>記得將此 VCs 檢視元件放置在 Home\Components\EmpVCs\EVc.cshtml
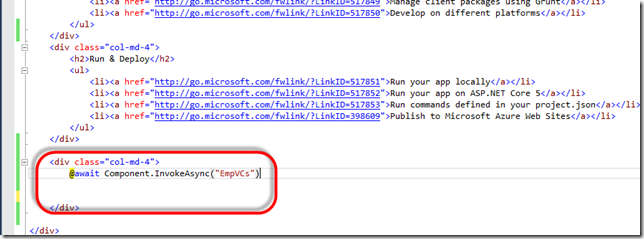
步驟三、在頁面 View 上,插入下面的 Razor 語法,可以放置在你想要放置的任意位置。
@await Component.InvokeAsync("EmpVCs")
我放置在 的最下方:
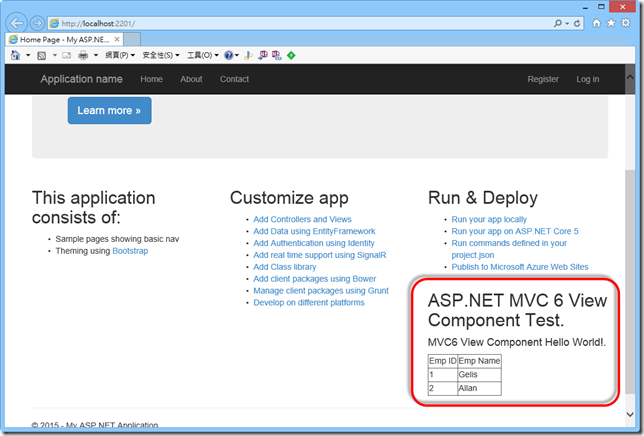
完成後,就可以在 Index.cshtml 上測試效果。
2. (Injecting a service into a view) 服務檢視注入
在 ASP.NET 5 中,非常大量地使用到 DI (Dependency Injection) 的概念,連 MVC 本身都是被注入進來的,當需要什麼功能,就注入什麼功能,所以當然服務檢視也是利用這種方式注入進來,進而輕易的使用在 View 上面,只要任意 class 如下:
1: using System;2: using System.Threading.Tasks;3:4: namespace ASPNET5VCsTest1.Services5: {6: public class StatisticsService7: {8: public async Task<int> GetCount()9: {10: return await Task.FromResult(1);11: }12:13: public async Task<int> GetCompletedCount()14: {15: return await Task.FromResult(2);16: }17:18: public async Task<double> GetAveragePriority()19: {20: return await Task.FromResult(0.0);21: }22: }23: }
再將它註冊在 startup.cs 的 ConfigureServices 中,如下:
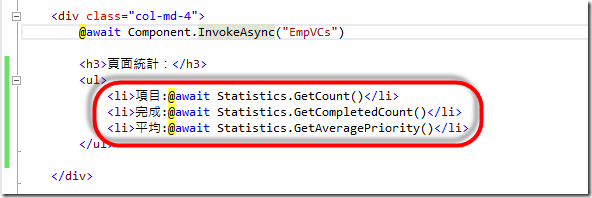
需要使用到的 View 只要在上方放置 @inject 敘述,如下:
接著,在 View 的任意位置都可以使用。
3. TagHelper 標籤補助方法
第三個功能說起來還真有趣,因為筆者 Survey 之後,怎越看越像是 Web Form 的 Web Control 的標籤的感覺,因為它雖然繼承的是一個稱作 TagHelper 的類別,然後實作 Process 方法,然而在 Process 方法中,官方的範例都是在使用 StringBuilder 類別組合 HTML,這幾乎就跟筆者以前撰寫自訂 WebControl 裡的 Render 方法幾近相同,而有識曾相識的感覺。
OK,費話就不多說了,我們就直接來看一個實作 TagHelper 類別,如下程式碼:
1: using Microsoft.AspNet.Razor.Runtime.TagHelpers;2: using Microsoft.AspNet.Razor.TagHelpers;3: using System;4: using System.Text;5:6: namespace ASPNET5VCsTest1.Services7: {8: [TagName("myLabel")]9: [ContentBehavior(ContentBehavior.Replace)]10:11: public class MyLabelTagHelper : TagHelper12: {13: public override void Process(TagHelperContext context, TagHelperOutput output)14: {15: output.TagName = "";16:17: StringBuilder sb = new StringBuilder();18: sb.AppendFormat("<label id={0} name={0}>{1}</label>", "myLabel", "我的LABEL");19:20: output.Content = sb.ToString();21: }22: }23: }
如上程式碼,我們繼承了 TagHelper 類別,複寫 Process 方法傳回 Html 敘述,所以在 Class 上方打上 ContentBehavior 標籤,並設為 ContentBehavior.Replace 表示輸出整個由 ouput.Content 替換掉。
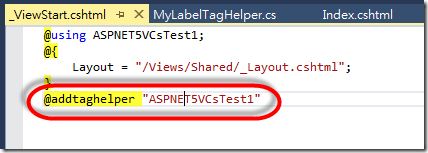
接著,在 _ViewStart.cshtml 裡,加入 @addtaghelper "(主要命名空間)"
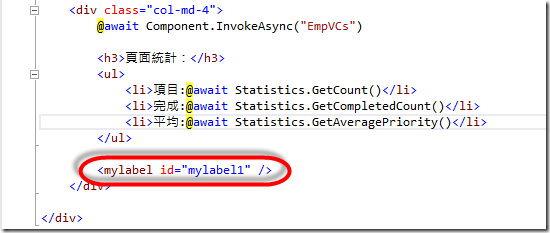
然後我們只要在任一個 View 的檢視頁面加入如下敘述:
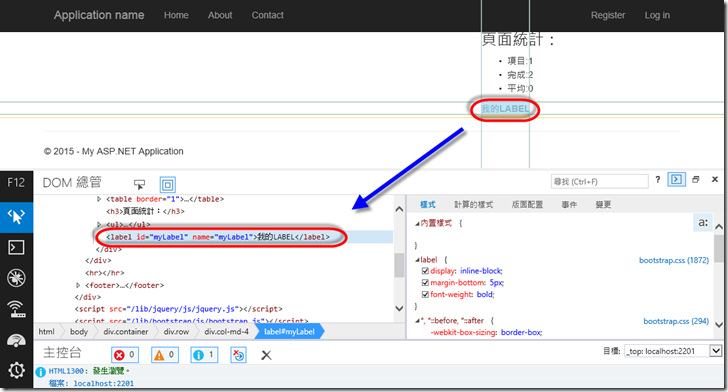
執行結果如下:
DI in ASP.NET 5 with MVC 6
在 ASP.NET 5 的 .NET Core CLR 上大量地使用了 DI (Dependency Injection) 的概念,在 ASP.NET 5 裡面,包括了連 MVC 的功能都是使用 DI 的方式注入進來的,不過在 ASP.NET 5 裡面的 DI 有兩種類型。
- 管線型的 DI
透過在 Startup.cs 裡面的 Configure 方法傳入的 app 物件,它型態是一個 IApplicationBuilder 類型的物件,提供在應用程式層 middleware 中,在 ASP.NET 5 新的管線服務裡,所會使用到的 Services 會由 Configre 這個方法注入進來。而一般來說,我們只要在傳入的 IApplicationBuilder 物件裡呼叫 Use 方法,即表示要使用其服務。且 Startup 類別裡的 Configure 方法會自動被 ASP.NET 5 框架主動呼叫。
Configure 的程式碼如下,下方是當需要使用 MVC 服務時,使用 UseMvc 與加入 MVC 的 Routing 的做法:
1: public void Configure(IApplicationBuilder app)2: {3: // For more information on how to configure your application, visit http://go.microsoft.com/fwlink/?LinkID=3989404: app.UseMvc(routes =>5: {6: routes.MapRoute(7: name: "default",8: template: "{controller}/{action}/{id?}",9: defaults: new { controller = "Home", action = "Index" });10: });11: }
- 由 Microsoft.Framework.DependencyInjection 提供的正規的 DI 容器
同樣的它也是撰寫在會被 ASP.NET 5 框架主動呼叫的 ConfigureService 方法裡,透過傳入的 IServiceCollection 物件來註冊物件的型別對應關係,也就是向 DI 容器註冊型別。他其實就是標準的 DI 容器,且支援四種 DI 作法,代表不同等級的物件生命週期,如下:
- Instance:不管任何時候,針對特定物件,總是回傳給你最初建立的物件實體。
- Transient:每次叫用時,都重新 new 新的物件給你。
- Singleton:對於目前的容器而言,幾乎就是全域物件。
- Scoped:針對程式碼特定範圍內,等於 Singleton 物件。
ConfigureService 的程式碼如下,下方是當需要使用 MVC 服務時,會叫用 IServiceCollection 的 AddMvc 方法, 表示需要來進行
1: public void ConfigureServices(IServiceCollection services)2: {3: services.AddMvc();4: }IServiceCollection 是一個 DI 的容器,所以這裡的 AddMvc 方法是表示對 MVC 功能的類別進行註冊,才可以使用 Controller 、View 、View Injection 等。AddMvc 方法是定義在 Microsoft.Framework.DependencyInjection 命名空間下的 MvcServiceCollectionExtensions 類別。
1: namespace Microsoft.Framework.DependencyInjection2: {3: public static class MvcServiceCollectionExtensions4: {5: public static IServiceCollection AddMvc(this IServiceCollection services, IConfiguration configuration = null);6: }7: }
註:在 ASP.NET 5 的框架裡,一切的初始化工作都由 Startup 來進行,且它會先呼叫 ConfigureService 方法後,再呼叫 Configure 方法。
OK,那麼如何 MVC 6 裡面使用 DI ,在 Controller 注入需要的物件,而不透過第三方的 DI 套件呢?照著以下步驟進行:
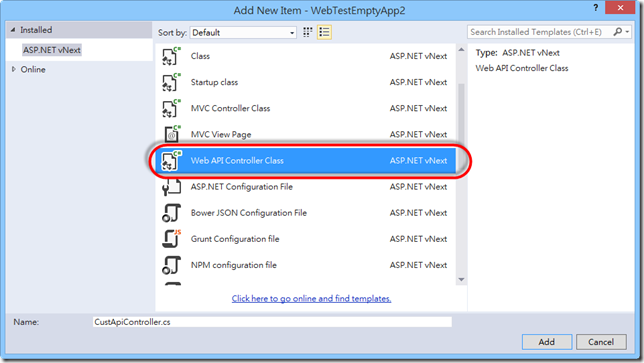
1. 首先,我們先加入一個 Web API 的類別,如下:
將這個 Web API Controller 命名為 CustApiController。
2. 加入 ICustomer 介面與 Customer 類別
因為我們要定義一個 GetData 方法,而實作的部分放在 CustomerService 中,然後只需要在 Api Controller 裡注入實作 ICustomer 介面的物件即可。我們的 ICustomer 介面如下:
1: public interface ICustomer
2: {
3: IEnumerable<Customer> GetData();
4: }
Customer 類別中,我們定義了簡單兩個欄位
1: public class Customer
2: {
3: public string CusID { get; set; }
4: public string CusName { get; set; }
5: }
3. 加入實作 ICustomer 的 CustomerService 類別
1: public class CustomerService : ICustomer
2: {
3: public IEnumerable<Customer> GetData()
4: {
5: return new List<Customer>(new Customer[] {
6: new Customer() { CusID = "1", CusName = "Gelis Wu"},
7: new Customer() { CusID = "2", CusName = "Allan"}
8: }).AsEnumerable();
9: }
10: }
如上程式中,筆者只是為了演示 IServiceCollection 的 DI 容器可自動注入我們需要的 CustomerService 類別,所以簡單的傳回兩筆資料。
4. 為 CustApiController 加入建構式,並修改 Get 方法
修改完成的 CustApiController 程式碼如下:
1: using System;
2: using System.Collections.Generic;
3: using System.Linq;
4: using Microsoft.AspNet.Mvc;
5: using WebTestEmptyApp2.Services;
6: using WebTestEmptyApp2.Models;
7:
8: // For more information on enabling Web API for empty projects, visit http://go.microsoft.com/fwlink/?LinkID=397860
9:
10: namespace WebTestEmptyApp2.Controllers.Controllers
11: {
12: [Route("api/[controller]")]
13: public class CustApiController : Controller
14: {
15: private ICustomer _customer;
16:
17: public CustApiController(ICustomer customer)
18: {
19: _customer = customer;
20: }
21: // GET: api/values
22: [HttpGet]
23: public IEnumerable<Customer> Get()
24: {
25: return _customer.GetData();
26: }
27:
28: // GET api/values/5
29: [HttpGet("{id}")]
30: public string Get(int id)
31: {
32: return "value";
33: }
34:
35: // POST api/values
36: [HttpPost]
37: public void Post([FromBody]string value)
38: {
39: }
40:
41: // PUT api/values/5
42: [HttpPut("{id}")]
43: public void Put(int id, [FromBody]string value)
44: {
45: }
46:
47: // DELETE api/values/5
48: [HttpDelete("{id}")]
49: public void Delete(int id)
50: {
51: }
52: }
53: }
5. 最後記得在 Startup.cs 裡,加入對 ICustomer 與 CustomerService 的註冊
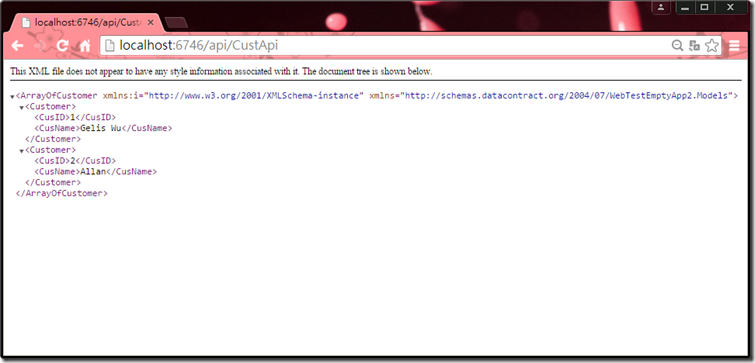
然後,我們可以來執行看看了。
如上,可以成功的執行,在這裡我們都沒有依靠第三方的 DI 套件,如 Autofac 等等,即可以成功的注入我們所需要的 CustomerService 物件,不過目前內建的 DI 容器稍嫌陽春,如果我們的建構式有多個參數,內建的 DI 可能就無法讓我們選擇使用特定的建構函式,這時可能還是得依靠第三方的 DI 容器套件,所以它也保留了一些彈性,你可以換掉它的抽象層 IServiceProvider 介面,讓其它的 DI 容器橋接進來,也就是說,你不一定要遷就 Microsoft.Framework.DependencyInjection 所提供的功能。
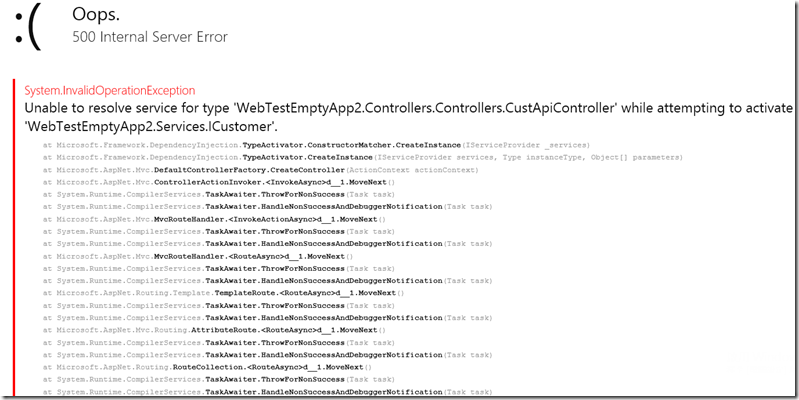
另外,做個簡單的測試,如果沒有註冊我們所需要的 CustomerService 物件,那麼 Microsoft.Framework.DependencyInjection 會給以一個錯誤訊息。
從 ASP.NET MVC 5 到 ASP.NET MVC 6?有移轉問題嗎?
許多人都會問這個問題,到底從 MVC 5 到 MVC 6 是否有移轉問題呢?其實如果你的應用程式如果沒有考慮要跨所有平台 (如:Linux、UNIX、MAC OS 等) 作業環境,其實你並不需要做移轉這件事,也就是說,原有的 MVC 5 還是可以在 .NET Framework 4.6 以上繼續運作,不過,當然,這邊指的.NET Framework 4.6 是 Full .NET CLR,不是 .NET Core CLR,因為 .NET Core CLR 是真正跨平台的 .NET CLR,它拔除掉許多與作業系統、IIS 相依的部分,所以如果你的應用程式要達到跨平台時,才需要考慮移轉問題。如果真的需要移轉,那麼,你得移除掉程式裡,使用到與 System.Web 的部分,改用 OWIN ,或是其他 Handler 的功能,或是第三方元件提供的功能,那你才有辦法進行移轉。
因此,也就是說,如果您要移轉到 .NET Core CLR 的是 ASP.NET MVC 5 之前的應用程式,那麼移轉較無問題,如果是 Web Form 的話,那麼你可能要有心理準備。筆者會建議,Web Form 就繼續運作在 IIS 上的 Full .NET CLR 中,直到微軟對此有解決方案,再進行移轉,不過這部分,相信就算有解決方案,原本的程式免不了做少部分修改。
如果,您要移轉的是 MVC 5 的應用程式,那麼這個移轉作業其實非常的簡單。
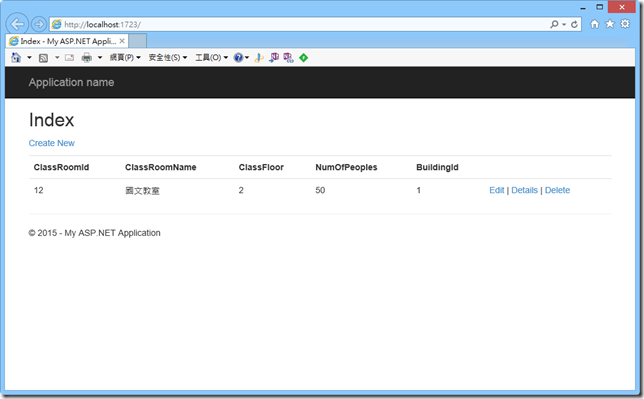
下方,我們以既有的 MVC 5 的 Code-First 應用程式為例,這個 Code-First 應用程式很單純是一個 ClassRoom 教室借用,單檔維護的程式。
這個程式原本的執行畫面如下:
那麼,就利用這個 MVC 5 的程式來示範一下這個移轉作業:
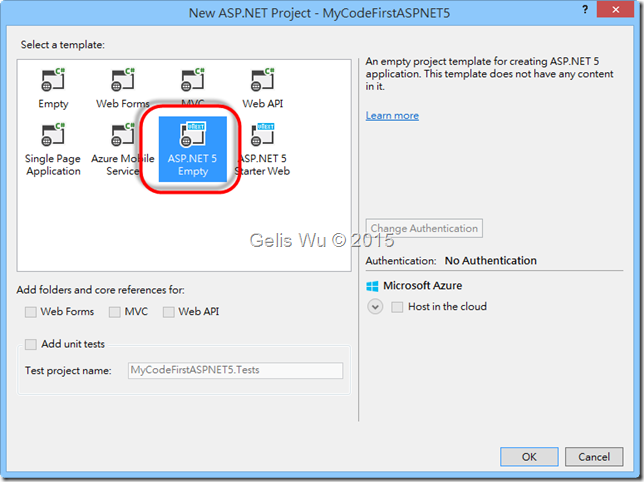
1. 首先、建立一個 ASP.NET 5 的空專案
2. 在 project.json 加入對 MVC 與 Entity Framework 的引用
上面相關的參考都必須加入。
3. 加入 config.json 設定
如下,可使用 Add New Item 方式加入 Configuration File
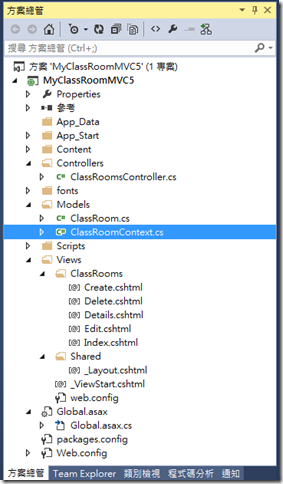
4. 加入 Models 資料夾,並加入:ClassRoomContext、ClassRoom 兩個類別
ClassRoomContext 類別:
1: using System;
2: using System.Collections.Generic;
3: using System.ComponentModel.DataAnnotations;
4: using System.Linq;
5:
6: namespace MyCodeFiratAPNET5.Models
7: {
8: /// <summary>
9: /// 教室
10: /// </summary>
11: public class ClassRoom
12: {
13: /// <summary>
14: /// 流水號
15: /// </summary>
16: [Key]
17: public int id { get; set; }
18: /// <summary>
19: /// 教室編號
20: /// </summary>
21: [Required]
22: [StringLength(10)]
23: public string ClassRoomId { get; set; }
24: /// <summary>
25: /// 教室名稱
26: /// </summary>
27: [Required]
28: [StringLength(200)]
29: public string ClassRoomName { get; set; }
30: /// <summary>
31: /// 教室樓層
32: /// </summary>
33: [Required]
34: public virtual int ClassFloor { get; set; }
35: /// <summary>
36: /// 人數
37: /// </summary>
38: [Required]
39: public int NumOfPeoples { get; set; }
40: /// <summary>
41: /// 參考的大樓流水號
42: /// </summary>
43: [Required]
44: public int BuildingId { get; set; }
45: }
46: }
ClassRoom 類別:
1: using Microsoft.Data.Entity;
2: using System;
3: using System.Collections.Generic;
4: using System.Linq;
5: using Microsoft.Data.Entity.Metadata;
6:
7: namespace MyCodeFiratAPNET5.Models
8: {
9: public class ClassRoomContext : DbContext
10: {
11: public DbSet<ClassRoom> ClassRooms { get; set; }
12:
13: protected override void OnConfiguring(DbContextOptions options)
14: {
15: options.UseSqlServer(Startup.Configuration.Get("Data:DefaultConnection:ConnectionString"));
16: }
17:
18: protected override void OnModelCreating(ModelBuilder modelBuilder)
19: {
20: base.OnModelCreating(modelBuilder);
21: }
22: }
23: }
5. 在 startup.cs 加入使用 EntityFramework 的敘述與註冊需要的 DbContext 物件
在空的 ASP.NET 5 Empty 專案裡只有一個空的 Configure 方法,現在,我們得替它加入 ConfigureServices 方法 與 Startup 的 初始化 方法。
如上程式,重點在於 ConfigureServices 的 AddEntityFramework 方法的 AddSqlServer 方法,表示我們要取用 Entity Framework 的服務,且是使用 MS SQL。然後呼叫 AddSqlServer 的 AddDbContext 以註冊我們的 DbContext 類別。
5. 透過 bower 安裝 bootstrap & jquery 相關元件
安裝方式與前面所述相同,這裡就不再多做說明。
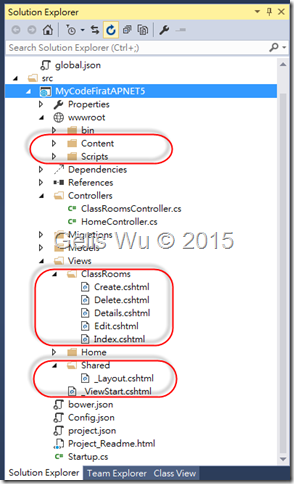
6. 複製需要的 Controller & Views & Scripts 與 Content
注意:還記得我們前面有提到,靜態檔案的部分,如 Scripts 與 Content 需要複製到 wwwroot 下面。
7. 修改 ClassRoomsController 部分程式碼
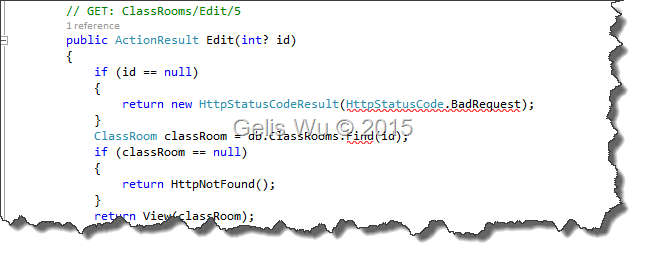
當你把對 Code-First 操作的程式碼貼過來時,可能會發生如下錯誤,一個是 HttpStatusCodeResult 只能接收 int 類型的參數,以及在 Entity 裡面,目前沒有 Find 方法可使用,所以你可能需要改變一下作法。
筆者調整後程式碼如下:
1: using Microsoft.AspNet.Mvc;
2: using Microsoft.Data.Entity;
3: using MyCodeFiratAPNET5.Models;
4: using System;
5: using System.Collections.Generic;
6: using System.Linq;
7: using System.Net;
8:
9:
10: namespace MyCodeFiratAPNET5.Controllers
11: {
12: public class ClassRoomsController : Controller
13: {
14: private ClassRoomContext db = new ClassRoomContext();
15:
16: // GET: ClassRooms
17: public ActionResult Index()
18: {
19: return View(db.ClassRooms.ToList());
20: }
21:
22: // GET: ClassRooms/Details/5
23: public ActionResult Details(int? id)
24: {
25: if (id == null)
26: {
27: return new HttpStatusCodeResult((int)HttpStatusCode.BadRequest);
28: }
29: ClassRoom classRoom = db.ClassRooms.Where(c => c.id==id).FirstOrDefault();
30: if (classRoom == null)
31: {
32: return HttpNotFound();
33: }
34: return View(classRoom);
35: }
36:
37: // GET: ClassRooms/Create
38: public ActionResult Create()
39: {
40: return View();
41: }
42:
43: // POST: ClassRooms/Create
44: // 若要免於過量張貼攻擊,請啟用想要繫結的特定屬性,如需
45: // 詳細資訊,請參閱 http://go.microsoft.com/fwlink/?LinkId=317598。
46: [HttpPost]
47: [ValidateAntiForgeryToken]
48: public ActionResult Create([Bind(include: "id,ClassRoomId,ClassRoomName,ClassFloor,NumOfPeoples,BuildingId")] ClassRoom classRoom)
49: {
50: if (ModelState.IsValid)
51: {
52: db.ClassRooms.Add(classRoom);
53: db.SaveChanges();
54: return RedirectToAction("Index");
55: }
56:
57: return View(classRoom);
58: }
59:
60: // GET: ClassRooms/Edit/5
61: public ActionResult Edit(int? id)
62: {
63: if (id == null)
64: {
65: return new HttpStatusCodeResult((int)HttpStatusCode.BadRequest);
66: }
67: ClassRoom classRoom = db.ClassRooms.Where(c => c.id == id).FirstOrDefault();
68: if (classRoom == null)
69: {
70: return HttpNotFound();
71: }
72: return View(classRoom);
73: }
74:
75: // POST: ClassRooms/Edit/5
76: // 若要免於過量張貼攻擊,請啟用想要繫結的特定屬性,如需
77: // 詳細資訊,請參閱 http://go.microsoft.com/fwlink/?LinkId=317598。
78: [HttpPost]
79: [ValidateAntiForgeryToken]
80: public ActionResult Edit([Bind(include: "id,ClassRoomId,ClassRoomName,ClassFloor,NumOfPeoples,BuildingId")] ClassRoom classRoom)
81: {
82: if (ModelState.IsValid)
83: {
84: db.Entry(classRoom).State = EntityState.Modified;
85: db.SaveChanges();
86: return RedirectToAction("Index");
87: }
88: return View(classRoom);
89: }
90:
91: // GET: ClassRooms/Delete/5
92: public ActionResult Delete(int? id)
93: {
94: if (id == null)
95: {
96: return new HttpStatusCodeResult((int)HttpStatusCode.BadRequest);
97: }
98: ClassRoom classRoom = db.ClassRooms.Where(c => c.id == id).FirstOrDefault();
99: if (classRoom == null)
100: {
101: return HttpNotFound();
102: }
103: return View(classRoom);
104: }
105:
106: // POST: ClassRooms/Delete/5
107: [HttpPost, ActionName("Delete")]
108: [ValidateAntiForgeryToken]
109: public ActionResult DeleteConfirmed(int id)
110: {
111: ClassRoom classRoom = db.ClassRooms.Where(c => c.id == id).FirstOrDefault();
112: db.ClassRooms.Remove(classRoom);
113: db.SaveChanges();
114: return RedirectToAction("Index");
115: }
116:
117: protected override void Dispose(bool disposing)
118: {
119: if (disposing)
120: {
121: db.Dispose();
122: }
123: base.Dispose(disposing);
124: }
125: }
126: }
8. 加入 add migrtion
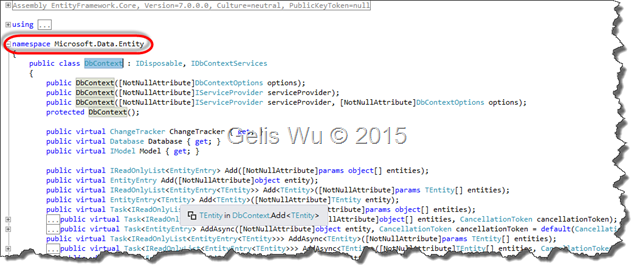
在 ASP.NET 5 讀者應該會發現,這裡使用的 Entity Framework 7 所使用的命名空間與 Entity Framework 6 有些不同,不再是 System.Data.Entity 開頭了,是改由 Microsoft.Data.Entity 取代了,所以前面才需要修改部分程式碼。
所以,這裡目前還必須透過 K 來進行 Code-First 的 add migration 作業。也就是說,當我們在程式裡加了 Context 類型的物件,目前得到命令列、或是 Manage Package Console 下透過 K 來產生。
如下命令:
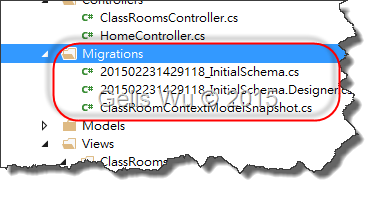
k ef migration add InitialSchema
執行完畢後,會在專案裡增加 Migrations 資料夾。
注意:如果你的 config.json 設定不正確,那麼在這個步驟就會失敗。
接著是執行命令:
k ef migration add apply
對於 K 還有不清楚地可回到上面對 K 的介紹,已經清楚的就繼續往下,要這麼做的原因是因為,目前 Visual Studio 2015 CTP 與 K 的整合還沒有這麼密切,未來正式版推出時,應該都會完整的整合,我們只要在 Visual Studio 2015 裡操作即可。
9. 執行程式
如果上述作業都成功,那麼我們就可以來執行看看。因為我們已經產生了 InitialSchema 檔,也執行了 apply,所以正常來說,config.json 裡找的到 ClassRoomContext 的連線字串的話,Entity Framework 7 的 Code-First 就可以正常的運作了。
如下執行畫面:
結語:
這次釋出的 Visual Studio 2015 還是有許多讓人驚豔的地方,我想讓微軟開發人員覺得變動最大的莫過於就是 Open Sources 與 跨平台了 這兩個部分。我想,未來若 C# 真的成為 Open Source 中大家愛用的語言也不是件壞事,重點在於您所開發的服務、或是您的客戶選擇開發平台時,都不會再說 .NET 開發的應用程式只能 Run 在 Windows,這無法再成為不使用 C# 的理由。只是對於微軟的開發人員而言,初期一定無法習慣這樣的轉變,所以你可能也只能擁抱這樣的改變,多了解現在 Open Source 的市場大家都在玩些什麼?這對開發人員,不失為一件好事,因為這樣你會學得更多,會覺得,世界真的很寬廣。然後到最後你會發現,其實 Open Source 才是最大的市場。
因為,未來,服務無遠佛界,跨平台只是初步而已。
參考資料:
http://www.asp.net/vnext/overview/aspnet-vnext/vc#efm
http://blogs.msdn.com/b/msdntaiwan/archive/2015/02/04/net-core-clr.aspx
https://github.com/aspnet/Home/wiki/KRuntime-structure
http://blogs.msdn.com/b/dotnet/archive/2015/02/03/coreclr-is-now-open-source.aspx
http://www.gtwang.org/2013/12/grunt-javascript-task-runner.html
http://blogs.msdn.com/b/webdev/archive/2014/06/17/dependency-injection-in-asp-net-vnext.aspx
http://www.dotblogs.com.tw/regionbbs/archive/2014/12/19/asp.net.5.dependency.injection.aspx
http://www.dotblogs.com.tw/regionbbs/archive/2014/12/18/kre.kvm.kpm.in.asp.net.5.aspx
http://huan-lin.blogspot.com/2014/11/aspnet-5-di-and-web-api-controller.html
http://huan-lin.blogspot.com/2014/12/replacing-aspnet-5-default-di-container.html
簽名:
學習是一趟奇妙的旅程
這當中,有辛苦、有心酸、也有成果。有時也會有瓶頸。要能夠繼續勇往直前就必須保有一顆最熱誠的心。
軟體開發之路(FB 社團):https://www.facebook.com/groups/361804473860062/
Gelis 程式設計訓練營(粉絲團):https://www.facebook.com/gelis.dev.learning/
如果文章對您有用,幫我點一下讚,或是點一下『我要推薦』,這會讓我更有動力的為各位讀者撰寫下一篇文章。
非常謝謝各位的支持與愛護,小弟在此位各位說聲謝謝!!! ^_^




![image_thumb7[1] image_thumb7[1]](https://dotblogsfile.blob.core.windows.net/user/gelis/1502/121646b8f38f_13E0F/image_thumb71%5B1%5D_thumb.png)
![image_thumb9[1] image_thumb9[1]](https://dotblogsfile.blob.core.windows.net/user/gelis/1502/121646b8f38f_13E0F/image_thumb911_thumb.png)


![SNAGHTML2ba7f4e_thumb[1] SNAGHTML2ba7f4e_thumb[1]](https://dotblogsfile.blob.core.windows.net/user/gelis/1502/121646b8f38f_13E0F/SNAGHTML2ba7f4e_thumb1_thumb.png)


