昨天我們稍微地說明 Prism MVVM 的一些命名規則,以及應用程式的進入點,也說明了 View 和 ViewModel 的自動繫結,和參數的傳遞。今天就來新增幾個頁面,練習在各個頁面間切換。
新增 View
首先在 Views 資料夾底下新增一個 Prism ContentPage 名稱可自訂(建議取有意義的名稱):
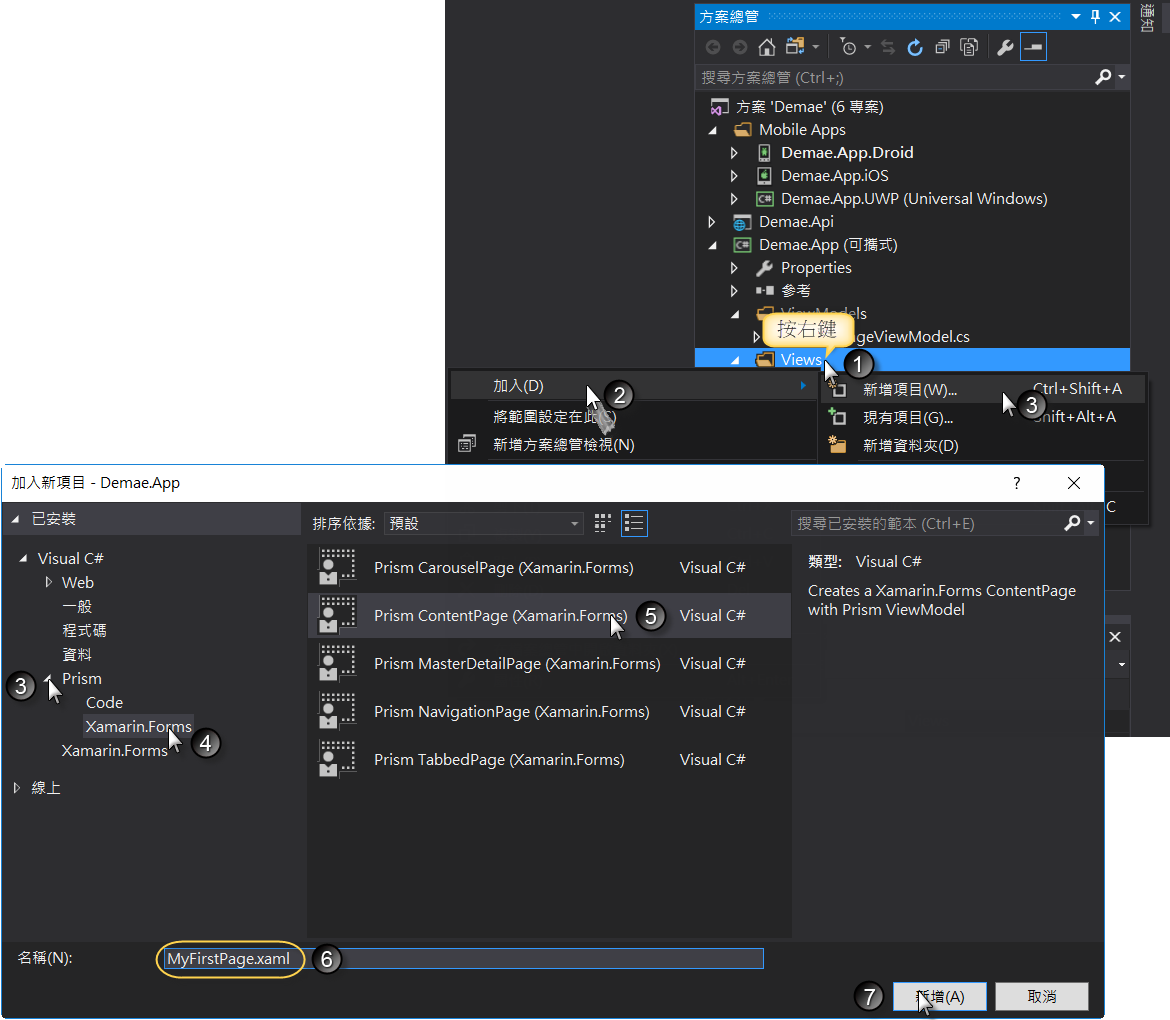
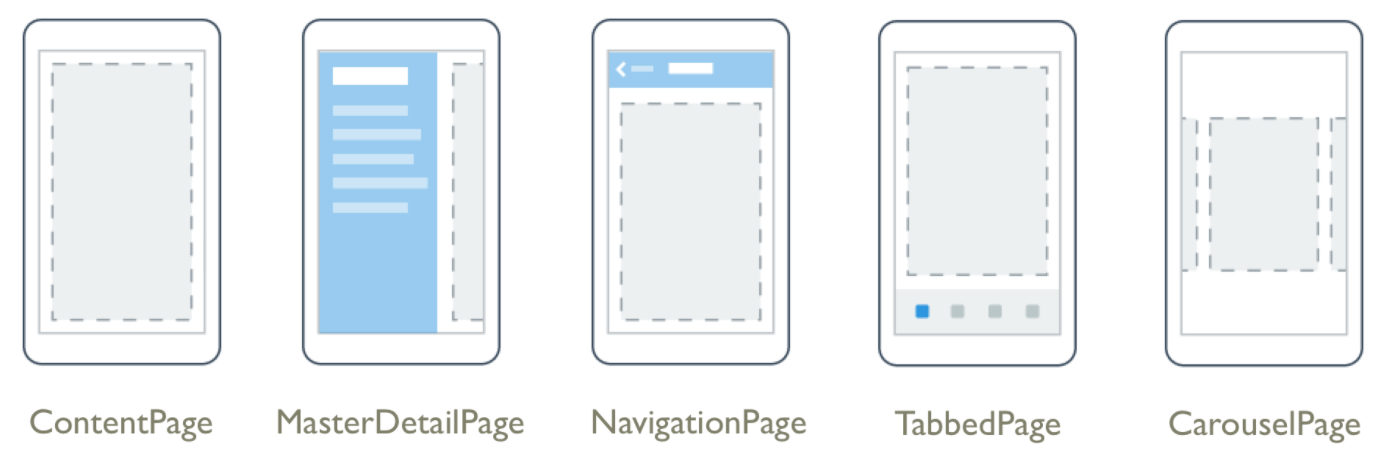
請留意,在項目範本裡有五種頁面(Page):
- CarouselPage
- ContentPage
- MasterDetailPage
- NavagationPage
- TabbedPage
在 MVVM 的術語裡 View 是指一個頁面,而在 Xamarin.Forms 一個頁面稱為 Page。
因為 ContentPage 是所有頁面(Page)的基礎,所以今天就先從 ContentPage 學起,改天再來學別種。
接著請在新增的 View 的 XAML 檔案裡加入 Title="第一頁" 屬性,如下所示:
<?xml version="1.0" encoding="utf-8" ?>
<ContentPage xmlns="http://xamarin.com/schemas/2014/forms"
             xmlns:x="http://schemas.microsoft.com/winfx/2009/xaml"
             xmlns:prism="clr-namespace:Prism.Mvvm;assembly=Prism.Forms"
             prism:ViewModelLocator.AutowireViewModel="True"
             x:Class="Demae.App.Views.MyFirstPage"
             Title="第一頁">

</ContentPage>
目前加入 Title="第一頁" 並沒有什麼特別的意義,目的只是等一下在切換頁面時可以與前一頁做區別,以及說明 NavigationPage 的功能。
新增 ViewModel
加入 View 之後,項目範本會自動幫我們產生對應的 ViewModel(遵循昨天所說明的命名規則),可以省下一些加入 ViewModel 操作過程:
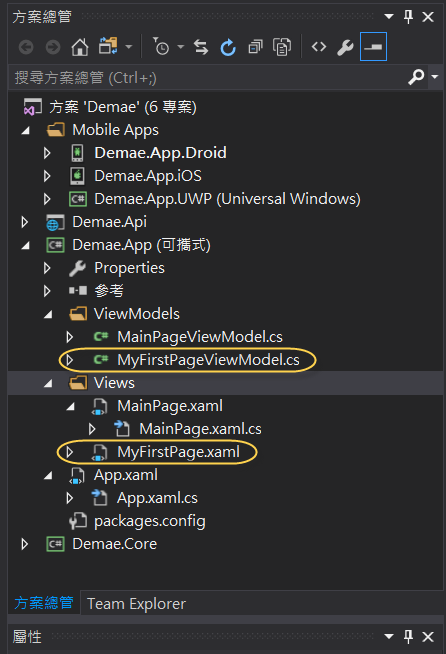
註冊 View
還記得昨天曾經說過的,新增的 View 都要註冊才能使用嗎?打開 App.xaml.cs 一看,竟然自動幫我們註冊了,又省下一道手續,真的太感謝 Prism 的開發者,分享了這麼好用的套件。
protected override void RegisterTypes()
{
    Container.RegisterTypeForNavigation<NavigationPage>();
    Container.RegisterTypeForNavigation<MainPage>();
    Container.RegisterTypeForNavigation<MyFirstPage>();
}
新增導覽按鈕
首先,假設我們希望當應用程式啟動,在進入首頁之後有一個按鈕,當按下該按鈕之後會切換到剛才新增的那一頁。
請在 MainPage.xaml 中加入一按鈕元件:<Button Text="切換到第一頁" Command="{Binding GotoMyFirstPageCommand}" /> 請留意,在這個按鈕元件中繫結了一個命名為 GotoMyFirstPageCommand 的命令,加入後的程式碼如下所示:
<?xml version="1.0" encoding="utf-8" ?>
<ContentPage xmlns="http://xamarin.com/schemas/2014/forms"
             xmlns:x="http://schemas.microsoft.com/winfx/2009/xaml"
             xmlns:prism="clr-namespace:Prism.Mvvm;assembly=Prism.Forms"
             prism:ViewModelLocator.AutowireViewModel="True"
             x:Class="Demae.App.Views.MainPage"
             Title="MainPage">
    <StackLayout HorizontalOptions="Center" VerticalOptions="Center">
        <Label Text="{Binding Title}" />
        <Button Text="切換到第一頁" Command="{Binding GotoMyFirstPageCommand}" />
    </StackLayout>
</ContentPage>
導覽服務 - NavigationService
接著請在 MainPage.xaml 所對應的 ViewModel 也就是 MainPageViewModel.cs 的建構函式中加入 NavigationService 如下所示:
private INavigationService _navigationService;
public MainPageViewModel(INavigationService navigationService)
{
    _navigationService = navigationService;
}
實作命令
接著,同樣在 MainPageViewModel.cs 加入如下 GotoMyFirstPageCommand 的實作:
private DelegateCommand gotoMyFirstPageCommand;
public DelegateCommand GotoMyFirstPageCommand =>
    gotoMyFirstPageCommand ?? (gotoMyFirstPageCommand = new DelegateCommand(GotoMyFirstPage, CanGotoMyFirstPage));

private bool CanGotoMyFirstPage()
{
    return true;
}

private void GotoMyFirstPage()
{
    _navigationService.NavigateAsync("MyFirstPage");
}
對於上述的程式碼,比較感到陌生的可能是 DelegateCommand 委派命令,這是 Prism 所特有的類別,在初始化該類別時,傳入兩個參數,第一個參數(本案例是 GotoMyFirstPage)指明真正執行該命令的方法,而第二個參數(本案例是 CanGotoMyFirstPage)指明用來判斷該命令在什麼情況下可被執行的方法,在該方法內加入判斷式,當回傳 true 時,命令可被執行(按鈕可被按下),當回傳 false 時,命令不可被執行(按鈕不可被按下),目前為了方便解說,所以只是簡單地未經判斷一律回傳 true。
在執行命令的方法裡使用 _navigationService.NavigateAsync("MyFirstPage"); 將頁面導向 MyFirstPage。
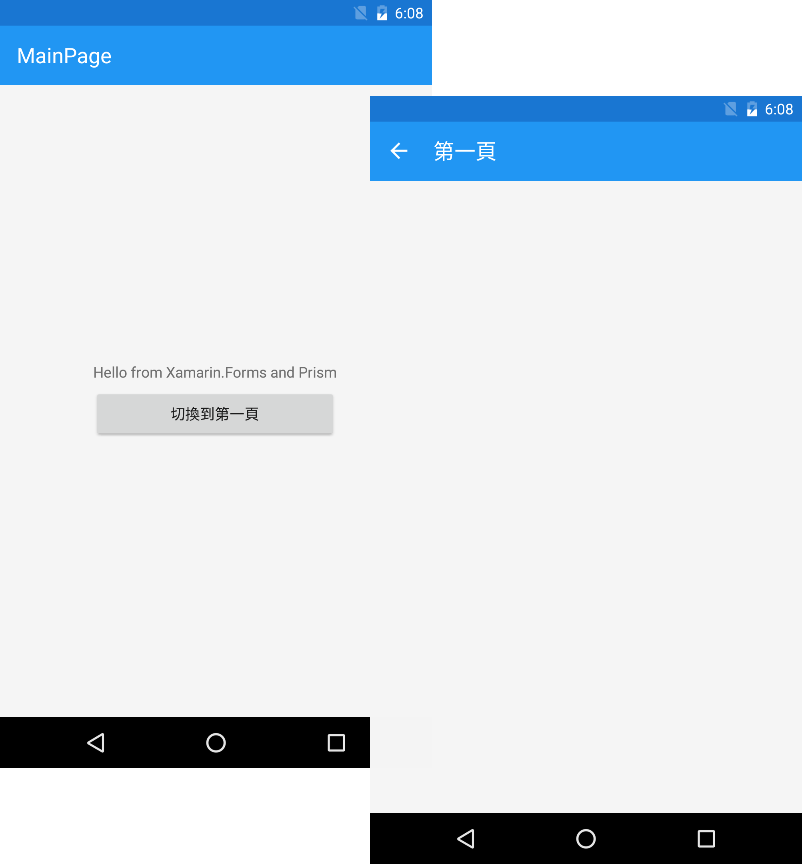
實際執行
接著使用 Android 模擬器,實際執行確定可以在兩個頁面間相互切換:
好吧!今天就暫時學習到這裡,下星期一再來學習如何在頁面內加入展示資料的元件 ListView 好了。