Windows Phone 7 – Push Notification基本概念詳述 – 2
還記得之前<Windows Phone 7 – Push Notification基本概念詳述 – 1>這一篇介紹的內容嗎?現在隨著SDK 7.1RC後,
Push notification提供的功能也更多的功能,讓推播的除了可以通知之外,也可以夾帶更多的參數與指定的要啟動的
畫面,讓開發人員可以為App增加更彈性的操作。以下就來看看7.1後Push Notification增加的功能。
〉Push Notification 運作原理:
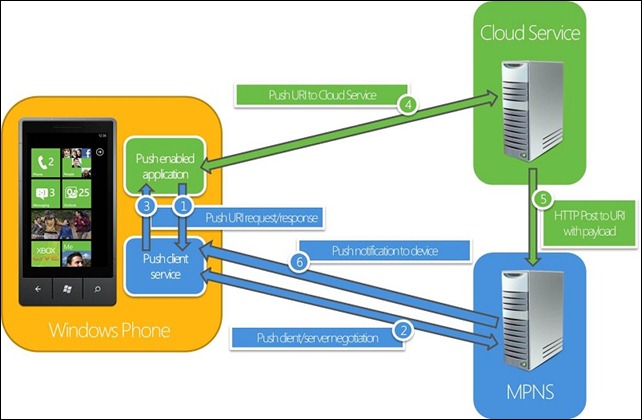
根據MSDN上介紹Push Notification運作的原理,大致上跟WP7.0的時候沒有太大的差別,步驟簡單來說:
a. 由Device中的App向MPNS要求代表這個Device與這個App使用的Channel(一個URI);
b. Device透過App向Cloud Service註冊這個Channel;
c. Cloud Service針對MPNS發送訊息時夾帶指定的Channel;
d. MPNS就可以根據Channel找到對應的Device將資料送給Device;
上述的原理與過去雖沒有差別,但這次的Push Client Service也提升了不少的效能,讓App透過Push Client Service
運作Push Notification時可以有比較好的效能。
接下來了解這次7.1增加的新功能:
〉新的Tile標籤:
Tile notification將會影響於Start上的動態磚(Tile)。根據<Tiles Overview for Windows Phone>介紹,到了7.1SDK後,
Tile支援開發者可以自訂Second Tile,不僅可以透過Push Notification影響Application Title,更可設定Secondary Title
要呈現的內容,至於Tile的Push限制請參考<Tiles Overview for Windows Phone>。
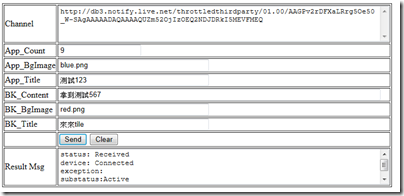
(a) Application Tile:
a-1. Count:整數格式:1~99。如果Count未指定預設被認為是0,該count就不會顯示出來。
a-2. Background Image:指定App Tile的背景圖,預設是App的Icon,可以配合Push Notification或ShellTileSchedule來修改。
到了7.1 SDK在App Tile的操作,更支援ShellTile APIs的使用。
a-3. Title:預設為該App的名稱。可以透過Push Notification或ShellTileSchedule來修改。該內容需符合單行(single-line)的限制,
大約15個字元,超過的內容將不會顯示出來。
(b) Secondary Tiles:
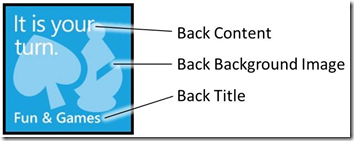
b-1. Back Content:設定Back Tile要呈現的內容,大約40個字元。
b-2. Back Background Image:設定Back Tile的圖像。
b-3. Back Title:設定要呈現的標題。跟App Tile一樣大約15個字元,支援單行呈現。
在操作Secondary Tile時,更詳細的操作會在下一篇<Windows Phone 7 - 學習Tile的應用>進行說明,這邊只是簡單說明
在結合Push Notification時可以操作的方式,由於Tile是整個WP7比較特別的設計概念,因此,在設計Tile要呈現的內容
要記得做處理,以重點訊息提示為主要。
[注意]
1. 上述針對Back系列的:BackTitle、BackContent、BackBackgroundImage只有支援7.1以後的Device,如果是使用WP 7.0
將會出現錯誤訊息:「PushErrorTypePayloadFormatInvalid」。
2. Tile的Background Image或Back Background Image支援 *.png或 *.jpg的檔案格式。如果*.png有設定透明的部分,在Tile
的顯示時,透明的部分會依照WP7的Theme填滿。
3. 雖然Tile提供指定URL給予Image的參考來源,但在網路與效能的考量下,建議使用Local resourcees。
Tile Image僅支援173x173,如果圖示大於這個像素將會被自動Fit。
4. Tile Image的URL不支援https,最大檔案Size:80KB,超過將無法下載。如果Image的URL下載過於30秒,將會失敗。
[格式內容]
1: <?xml version="1.0" encoding="utf-8"?>
2: <wp:Notification xmlns:wp="WPNotification">
3: <wp:Tile>
4: <wp:BackgroundImage>APPBackImage.png</wp:BackgroundImage>
5: <wp:Count>4</wp:Count>
6: <wp:Title>My App</wp:Title>
7: <wp:BackBackgroundImage>Back2Image.png</wp:BackBackgroundImage>
8: <wp:BackTitle>Show back title</wp:BackTitle>
9: <wp:BackContent>Show back content</wp:BackContent>
10: </wp:Tile>
11: </wp:Notification>
〉新的Toast標籤:
Toast訊息呈現的格式相信大家不陌生,它呈現於畫面的最上方出現約10秒的時間,點擊該Toast將啟動App。
它在7.0時期,能呈現只有二個Tag:Text1(Title)與Text2(Subtitle)。到了7.1 SDK推出之後,除了二個Tag之外,
還增加了Parameter的參數,如下簡單的說明:
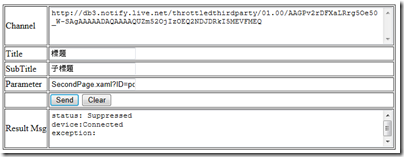
(a) Title:顯示於Toast訊息的粗體字串,位於icon之後的第一個字串(Text1)。
(b) Sub-Title:顯示於Toast訊息的非粗體字串,位於Title之後(Text2),用於呈現該Toast的說明標題。
如果只有設定Sub-Title的話,可以最多47個字元;如果有設定Title與Sub-Title的話,Sub-Title可以設定約41字元;
(c) Paramter:該Tag的內容不會出現於Toast訊息中,但App會記住它。它可以設定該Toast被用戶點擊後要啟動的
Page與需要帶入的參數(key/value),等App啟動進入該Page時,配合NativeService來取得參數的內容。
[注意]
注意如果送出的訊息是指定給WP 7.0的系統,將會出現錯誤訊息:「PushErrorTypePayloadFormatInvalid」。
[格式內容]
1: <?xml version="1.0" encoding="utf-8" ?>
2: <wp:Notification xmlns:wp="WPNotification">
3: <wp:Toast>
4: <wp:Text1>Push Title</wp:Text1>
5: <wp:Text2>Push Subtitle</wp:Text2>
6: <wp:Param>/PushPage.xaml?Key1=Pou&Key2=HelloPush</wp:Param>
7: </wp:Toast>
8: </wp:Notification>
〉發送Push Notification,Provider需要注意的項目:
Provider發送Push notificiation的Content給MPNS,採用HTTP POST的方式將推播內容XML轉換成binary資料,
放置POST的Request中一併送出,然而使用HTTP POST時需要設定一些特定的Header讓MPNS知道要處理什麼。
另外,每一次發送給MPNS的訊息,Tile、Toast或Raw只能選一種發送,不能三種都合在一起發送。
接下來針對發送Push Notification要注意的地方加以說明:
a. Custom Http Header:
針對發送的HTTP POST需要加上指定的Header,如下表:
| Header | Specification | Description |
| MessageID | other | 設定MessageID會影響的是MPNS針對發送訊息後的Response,Response中回應該MessageID的資訊。如果沒有設定,MPNS將會在回應訊息內將省略。 |
| NotificationClass | other | 它是個batching interval(時間區段),設定該值會影響MPNS時針對訊息類型的發送時間區段,不同的訊息類型有對應的值。如果沒有設定,MPNS則會立即發送推播訊息。 |
| NotificationType | other | 設定通知訊息的類型,Tile、Toast、Raw。如果沒有設定,MPNS會自動視為Raw進行發送。 |
| CallbackURI | other | 該custom header只用於註冊authenticated web service的callback message。詳細的訊息可以參考<How to: Set up a Callback Registration Request for Windows Phone>。 |
[NotificationClass針對不同Type的Interval列表]
| Type | Value | Delivery interval |
| Toast | 2 | 立即發送。 |
| 12 | 450秒內發送。 | |
| 22 | 900秒內發送。 | |
| Tile | 1 | 立即發送。 |
| 11 | 450秒內發送。 | |
| 21 | 900秒內發送。 | |
| Raw | 3 | 立即發送。 |
| 13 | 450秒內發送。 | |
| 23 | 900秒內發送。 |
b. Special Characters:
在針對發送訊息的類型是為:Tile或Toast時,需要傳送內容中的某些特定字元加以處理(Encoding),如下表:
| Character | XML Encoding |
| < | < |
| > | > |
| & | & |
| ' | ' |
| " | " |
c. Notification Payloads:
針對Notification的發送內容不同的推播類型有不同的格式,Toast與Tile主要是針對WP7內鍵的元件,因此有格式,
仍而Raw是直接在App啟動時接收的訊息格式,因此,格式是按照自己App的需求來定義。針對發送內容,可以參考
上述的介紹,需注意發送對象是WP 7.0或7.1喔,有些新的Tag不支援舊的系統要記得。
往下來看一下發送一個訊息在Header的寫法:
1: //準備POST Message
2: HttpWebRequest sendNotificationRequest = (HttpWebRequest)WebRequest.Create(tChannel);
3: sendNotificationRequest.Method = WebRequestMethods.Http.Post;
4: sendNotificationRequest.ContentType = "text/xml; charset=utf-8";
5:
6: //準備HttpHeader
7: sendNotificationRequest.Headers = new WebHeaderCollection();
8: //指定MessageID;
9: sendNotificationRequest.Headers["X-MessageID"] = Guid.NewGuid().ToString();
10: //指定發送推播類型為:Toast;
11: sendNotificationRequest.Headers.Add("X-WindowsPhone-Target", "toast");
12: //指定發送Class為2,立即發送;
13: sendNotificationRequest.Headers.Add("X-NotificationClass", "2");
順帶一提,如果Provider需要對發送訊息給MPNS後的Response進行處理或是相關向MPNS註冊Service的話,可以進一步參考
<Push Notification Service Response Codes for Windows Phone>這一篇文章的介紹。
〉範例說明:
‧建立Push Notification發送者:
發送者的角色主要工作有:取得設備的HttpChannel、決定推播的訊息內容與格式,與發送推播至MPNS。以WP7的Provder來說
其實算是非常容易實作的了,只需要Provider取得到設備的HttpChannel透過HTTP POST的方式就可以把資料送給MPNS再至設備。
那麼,接下來看看Provder要準備的程式內容:
a. 建立Tile物件:
1: public class TileMsg
2: {
3: public string BackgroundImage { get; set; }
4: public int Count { get; set; }
5: public string Title { get; set; }
6:
7: public string BackBackgroundImage { get; set; }
8: public string BackTitle { get; set; }
9: public string BackContent { get; set; }
10:
11: /// <summary>
12: /// 組合Tile訊息內容。
13: /// </summary>
14: /// <returns></returns>
15: public string GetTileMsg()
16: {
17: string tTilePushXML = "<?xml version=\"1.0\" encoding=\"utf-8\"?>" +
18: "<wp:Notification xmlns:wp=\"WPNotification\">" +
19: "<wp:Tile>" +
20: "<wp:BackgroundImage>{0}</wp:BackgroundImage>" +
21: "<wp:Count>{1}</wp:Count>" +
22: "<wp:Title>{2}</wp:Title>" +
23: "<wp:BackBackgroundImage>{3}</wp:BackBackgroundImage>" +
24: "<wp:BackContent>{4}</wp:BackContent>" +
25: "<wp:BackTitle>{5}</wp:BackTitle>" +
26: "</wp:Tile>" +
27: "</wp:Notification>";
28: tTilePushXML = string.Format(tTilePushXML, this.BackgroundImage, this.Count, this.Title,
29: this.BackBackgroundImage, this.BackContent, this.BackTitle);
30: return tTilePushXML;
31: }
32: }
b. 建立Toast物件:
1: public class ToastMsg
2: {
3: public string Title { get; set; }
4: public string SubTitle { get; set; }
5:
6: private string gParam = string.Empty;
7: public string Parameter {
8: get { return gParam; }
9: set { gParam = value; }
10: }
11:
12: /// <summary>
13: /// 設定Toast Param的內容。
14: /// </summary>
15: /// <param name="pPage">指定的Page頁</param>
16: /// <param name="pParam">指定需要的參數</param>
17: public void SetParameter(string pPage, Dictionary<string, string> pParam)
18: {
19: List<string> tKeyValue = new List<string>();
20: string tParamStr = string.Empty;
21: foreach (string tKey in pParam.Keys)
22: {
23: tKeyValue.Add(string.Format("{0}={1}", tKey, HttpUtility.HtmlEncode(pParam[tKey])));
24: }
25: tParamStr = string.Join("&", tKeyValue.ToArray());
26: tParamStr = string.Format("/{0}?{1}", pPage, tParamStr);
27: gParam= tParamStr;
28: }
29:
30: /// <summary>
31: /// 建立Toast訊息內容。
32: /// </summary>
33: /// <returns></returns>
34: public string GetToastMsg()
35: {
36: string tToastPushXML = "<?xml version=\"1.0\" encoding=\"utf-8\"?>" +
37: "<wp:Notification xmlns:wp=\"WPNotification\">" +
38: "<wp:Toast>" +
39: "<wp:Text1>{0}</wp:Text1>" +
40: "<wp:Text2>{1}</wp:Text2>" +
41: "<wp:Param>{2}</wp:Param>" +
42: "</wp:Toast>" +
43: "</wp:Notification>";
44: tToastPushXML = string.Format(tToastPushXML, this.Title, this.SubTitle, this.Parameter);
45: return tToastPushXML;
46: }
47: }
c. 建立發送的HTTP Request與HTTP Response:
1: /// <summary>
2: /// 發送Push Notification。
3: /// </summary>
4: /// <param name="pChannel">指定Device的Channel</param>
5: /// <returns>NotificationResult</returns>
6: public NotificationResult SendNotification(string pChannel)
7: {
8: NotificationResult tNResult = new NotificationResult();
9: try
10: {
11: //將訊息物件轉成byte array
12: byte[] tBytes = new UTF8Encoding().GetBytes(this.NotificationMsg);
13:
14: //準備POST Message
15: HttpWebRequest tSendRequest = (HttpWebRequest)WebRequest.Create(pChannel);
16: tSendRequest.Method = WebRequestMethods.Http.Post;
17: tSendRequest.ContentType = "text/xml; charset=utf-8";
18: tSendRequest.ContentLength = tBytes.Length;
19: //準備HttpHeader
20: tSendRequest.Headers = new WebHeaderCollection();
21: tSendRequest.Headers["X-MessageID"] = Guid.NewGuid().ToString();
22: //指定訊息的類型
23: tSendRequest.Headers.Add("X-WindowsPhone-Target", this.NotificationType.ToString());
24: //指定訊息發送間隔
25: tSendRequest.Headers.Add("X-NotificationClass", GetBatchInterval(this.BatchInterval));
26:
27: using (Stream requestStream = tSendRequest.GetRequestStream())
28: {
29: requestStream.Write(tBytes, 0, tBytes.Length);
30: }
31:
32: HttpWebResponse tResponse = (HttpWebResponse)tSendRequest.GetResponse();
33: tNResult.NotificationStatus = tResponse.Headers["X-NotificationStatus"];
34: tNResult.DeviceConnectionStatus = tResponse.Headers["X-DeviceConnectionStatus"];
35: tNResult.NotificationChannelStatus = tResponse.Headers["X-SubscriptionStatus"];
36: }
37: catch (Exception ex)
38: {
39: tNResult.ExceptionMsg = ex.Message;
40: }
41: return tNResult;
42: }
‧App端建立接收Tile與Toast訊息的處理:
a. 註冊HttpChannel URI擷取事件、註冊擷取Toast訊息與啟動監聽Toast與Tile訊息:
1: #region 處理Push Notification
2: private HttpNotificationChannel gChannel = null;
3: private string gChannelName = "ToastSample1";
4: private void InitChannel()
5: {
6: gChannel = HttpNotificationChannel.Find(gChannelName);
7: if (gChannel == null)
8: {
9: gChannel = new HttpNotificationChannel(gChannelName);
10: gChannel.ChannelUriUpdated += new EventHandler<NotificationChannelUriEventArgs>(gChannel_ChannelUriUpdated);
11: gChannel.ErrorOccurred += new EventHandler<NotificationChannelErrorEventArgs>(gChannel_ErrorOccurred);
12: //註冊當收到toast要處理的事件
13: //gChannel.ShellToastNotificationReceived += new EventHandler<NotificationEventArgs>(gChannel_ShellToastNotificationReceived);
14:
15: gChannel.Open();
16: //啟動監聽Toast與Tile訊息
17: gChannel.BindToShellToast();
18: gChannel.BindToShellTile();
19: }
20: else
21: {
22: gChannel.ChannelUriUpdated += new EventHandler<NotificationChannelUriEventArgs>(gChannel_ChannelUriUpdated);
23: gChannel.ErrorOccurred += new EventHandler<NotificationChannelErrorEventArgs>(gChannel_ErrorOccurred);
24:
25: gChannel.ShellToastNotificationReceived += new EventHandler<NotificationEventArgs>(gChannel_ShellToastNotificationReceived);
26: }
27: //將HttpChannel寫到Console中
28: System.Diagnostics.Debug.WriteLine(gChannel.ChannelUri.ToString());
29: //將HttpChannel顯示出來
30: MessageBox.Show(String.Format("Channel Uri is {0}",
31: gChannel.ChannelUri.ToString()));
32: }
b. 撰寫處理Toast訊息(由於Tile會由WP7自行處理,所以不需特別處理):
1: /// <summary>
2: /// 處理當app被啟動時的toast通知的內容。並且把處理出的內容顯示出來。
3: /// </summary>
4: /// <param name="sender"></param>
5: /// <param name="e"></param>
6: void gChannel_ShellToastNotificationReceived(object sender, NotificationEventArgs e)
7: {
8: StringBuilder message = new StringBuilder();
9: string relativeUri = string.Empty;
10:
11: message.AppendFormat("Received Toast {0}:\n", DateTime.Now.ToShortTimeString());
12:
13: // Parse out the information that was part of the message.
14: foreach (string key in e.Collection.Keys)
15: {
16: message.AppendFormat("{0}: {1}\n", key, e.Collection[key]);
17:
18: if (string.Compare(
19: key,
20: "wp:Param",
21: System.Globalization.CultureInfo.InvariantCulture,
22: System.Globalization.CompareOptions.IgnoreCase) == 0)
23: {
24: relativeUri = e.Collection[key];
25: }
26: }
27:
28: // Display a dialog of all the fields in the toast.
29: Dispatcher.BeginInvoke(() => MessageBox.Show(message.ToString()));
30: }
‧測試方法:
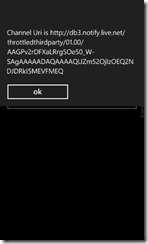
a. 啟動Device與App,透過App取得HttpChannel在Token中,將它複製起來;
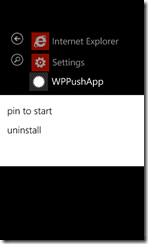
b. 將App加到開始區域中(pint to Start);
c. 選擇要發送訊息(tile/toast)的網頁;
d. 將HttpChannel與相對的參數設定好,發送通知,即可完成。
[範例程式下載]
======
以上是介紹新的Push Notification增加的新功能,其實可以看出這次Push notification的更新提供了更完整的參數支援,
也配合7.1新的元素增加可以控制的能力。我自己寫過Apple與Google推播的整合,對於WP7上的推播機制,我覺得是比
較中規中矩的,Google相對非常彈性讓開發者可以針對不同的App提供不同的參數設定也蠻棒的。使用起來的,我覺得
推播大同小異,最需要是收到推播後啟動程式時,要向Provider要求什麼才能讓App完整運作才是重點。
References:
‧.NET Walker: [教學影片] Windows Phone 7 - 程式設計關鍵報告(108 Push Notification) (必讀)
‧Push Notifications for Windows Phone 7.1
‧Receiving Push Notifications for Windows Phone (實作App時必看)
‧How to: Send and Receive Toast Notifications for Windows Phone
‧How to: Send and Receive Tile Notifications for Windows Phone
‧How to: Send and Receive Raw Notifications for Windows Phone
==>針對Push Notification發送者Web Service如果需要向MPNS認證的話,可以參考這二篇:
‧Setting Up an Authenticated Web Service to Send Push Notifications for Windows Phone
‧How to: Set up a Callback Registration Request for Windows Phone
‧Push Notification Service Response Codes for Windows Phone (必懂)
