Windows Phone 7 – 寫一個會Record Audio的錄音程式
過去在唸書的時候總是會看到同學帶著錄音筆去參加meeting或是上課,擔心會漏掉上課的種種內容,隨著智慧手機的發展,
有很多App都方便地透過內鍵的麥克風錄下聲音,不需在另外帶一個設備來錄音。然而錄音的程式在Windows Mobile時代很容易做到,
透過一些內鍵的API與取得麥克風的Instance即可以完成功能,那麼在WP7內要怎麼實作呢?往下便仔細的來介紹有那些API可以使用。
〉Micorsoft.Xna.Framework.Audio:
在WP7裡,要實作一個支援錄音的程式,主要是透過Micorsoft.Xna.Framework.Audio裡的Microphone類別,
由於相關多媒體資源存取的功能都納入在XNA系列裡,相關圖片、音樂、影片這些資源要使用到XNA的Dll就對了。
不過這有點扯遠了,接下來在介紹撰寫一個錄音程式前,有幾個重要的類別我覺得要先認識一下:
a. Microphone Class:
該類別提供了豐富的屬性、方法與事件來透過手機麥克風來擷取聲音。在使用前有幾個重要的屬性(均是唯讀):
| 類別 | 名稱 | 說明 |
| 屬性 | All | 靜態屬性,回傳目前設備可用的麥克風集合。例如:手機內鍵的麥克風、藍芽耳機的麥克風或連接式耳麥。 |
| Default | 靜態屬性,回傳預設設備使用的麥克風類型。如果回傳是null代表該設備不支援麥克風,預設麥克風即為手機的內鍵麥克風。 | |
| BufferDuration | 設定/取得麥克風擷取聲音時,錄音資料寫入緩衝區對應的容納時間長度。換句話說,為擷取聲音長度達到設定的緩衝大小時,代表已達容納時間長度需觸發BufferReady事件。 舉個例子說明:當設定「Microphone.BufferDuration = TimeSpan.FromMilliseconds(1000)」代表當麥克風擷取聲音長達1秒後,立刻觸發BufferReady事件。 BufferDuration可設定容納時間範圍:100毫秒至1000毫秒(1秒)。超過或低於會發生ArgumentOutOfRangeException例外事件。 |
|
| IsHeadset | 識別目前設備是否有外接麥克風,不管是接線式或藍芽耳機,如果有為true;沒有為false。 | |
| SampleRate | 回傳麥克風擷取聲音資料的採樣率,以Hertz (Hz)為單位。 | |
| State | 回傳麥克風目前運作的狀態,值為MicrophoneState列舉,包括:Started、Stoped。 | |
| 方法 | GetData | 取得由麥克風擷取聲音資料的最新緩衝區資料,以byte array為單位。 該方法為多載的方式,可以指定要擷取的範圍(Byte[], start, length)或是整個Byte[]回傳。 |
| GetSampleDuration | 回傳指定麥克風錄音的資料大小為對應的時間長度。舉例來說,錄音聲音byte array大小為3200,透過「TimeSpan duration = Microphone.GetSampleDuration(totalSize)」指定取得的回傳值為約7秒。 | |
| GetSampleSizeInBytes | 回傳指定麥克風錄音的容納時間長度對應於Bytes的大小,該回傳值代表該錄音檔案需要byte arrray大小。 | |
| Start | 啟動錄音程序。 | |
| Stop | 結束錄音程序。 | |
| 事件 | BufferReady | 當擷取聲音的緩衝被填滿後,即觸發該事件。代表實作該事件時,可以透過GetData方法取得目前已被寫入緩衝的錄音資料(byte array)。 |
由上表可以看出幾個重要的屬性:
BufferDuration:指定要錄音的時間長度,透過TimSpan做為設定的時間長度,以毫秒為單位;
GetSampleSizeInBytes:根據指定的時間長度轉換成對於byte arrary的大小;
BufferReady:代表該事件觸發時,可以取得真正被錄好的binary資料,將binary資料寫成檔案即可以進行播放。
[注意事項]
在使用Microphone類別進行錄音時,有一件事是需要注意的那就是需要去執行:「FrameworkDispatcher.Update();」。
為什麼呢?由於在XNA中每33fp就會更新畫面一次,但在Silverlight Application並沒有這樣的機制,為了確保錄音的功能
持續的更新狀態與進行擷取動作,因此,需要透過指定一個定期執行「FrameworkDispatcher.Update();」的事件。
詳細說可參考<Enable XNA Framework Events in Windows Phone Applications>。
通常直接使用DispatcherTimer讓它自己一個執行緒,定期呼叫上述指令,例如:
1: DispatcherTimer tDT = new DispatcherTimer();
2: //定期每33毫秒執行一次FrameworkDispatcher.Update(); 方法
3: tDT.Interval = TimeSpan.FromMilliseconds(33);
4: tDT.Tick += delegate { try { FrameworkDispatcher.Update(); } catch { } };
5: tDT.Start();
b. SoundEffect Class:
該類別提供載入聲音資源的功能,該類別最常用於XNA Game中播放特定的音效,由於它不像MediaElement需指定特定的處理才能播放,
又支援非前景下進行。因此,在錄音程式完成後通常也會配合該類別將聲音資源直接播放出來,等到確定儲存時,再將資料儲存為實體檔案。
但使用該類別要特別注意,SoundEffect針對載入的聲音資源是寫入記憶體中的,它配合多個SoundEffectInstance來播放多個聲音,代表
手機記憶體的管理是需要特別被處理的。
c. 需注意的Exception:NoAudioHardwareException與NoMicrophoneConnectedException:
這二個Exception發生於當麥克風硬體或連接Microphone API出現問題時,例如:安裝外接式麥克風後發生Driver不支援或無法擷取聲音時。
由於我在是試用手機連接藍芽耳機時所遇到的例外,所以特別標示出來。當時發生的情形是剛接上藍芽後,啟動App立即點擊錄音,API連接一
會後就出現該Exception了。
〉實作範例:
該實作範例主要是撰寫透過麥克風錄下正在播放的音樂,在錄製20秒後結束並自動存成*.wav檔案。往下便加以說明如何實作:
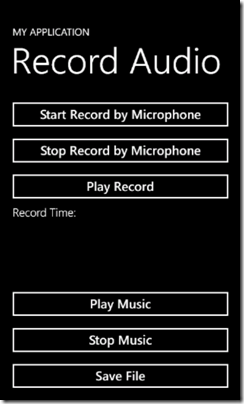
a. 在畫面中加下幾個錄音與播放音樂用的控件:
1: <!--ContentPanel - place additional content here-->
2: <Grid x:Name="ContentPanel" Grid.Row="1" Margin="12,0,12,0">
3: <Grid.RowDefinitions>
4: <RowDefinition Height="50*" />
5: <RowDefinition Height="30*" />
6: </Grid.RowDefinitions>
7: <StackPanel Grid.Row="0">
8: <Button Name="btnRecord" Content="Start Record by Microphone" Click="btnRecord_Click" />
9: <Button Name="btnStopRecord" Content="Stop Record by Microphone" Click="btnStopRecord_Click" />
10: <Button Name="btnPlay" Content="Play Record" Click="btnPlay_Click" />
11: <StackPanel Orientation="Horizontal">
12: <TextBlock Text="Record Time: " Style="{StaticResource PhoneTextTitle3Style}" />
13: <TextBlock x:Name="tblSpendTime" Style="{StaticResource PhoneTextTitle3Style}" />
14: </StackPanel>
15: </StackPanel>
16: <StackPanel Grid.Row="1">
17: <MediaElement x:Name="media" Width="0" Height="0"
18: Grid.Column="0" Grid.Row="0" />
19: <Button Name="btnPlayMusic" Content="Play Music" Click="btnPlayMusic_Click" />
20: <Button Name="btnStopMusic" Content="Stop Music" Click="btnStopMusic_Click" />
21: <Button Name="btnSaveRingtone" Content="Save Ringtone" Click="btnSaveRingtone_Click" />
22: </StackPanel>
23: </Grid>
預覽畫面如圖:
b. 實作錄音的功能:
b-1. 先定義公用變數,記錄microphone實體、緩衝用的byte[]、記錄音檔資料的stream與要播放的SoundEffect。
1: Microphone gMicrophone = Microphone.Default;
2: byte[] gAudioBuffer;
3: MemoryStream gStream = new MemoryStream();
4:
5: SoundEffect gSoundEffect;
6: //定義記錄播放20秒的token
7: int gSpendTime = 0;
8:
9: public MainPage()
10: {
11: InitializeComponent();
12:
13: init();
14: }
b-2. 撰寫程式啟動後,初始化的任務,包括:
(1) 定義要週期性呼叫FrameworkDispatcher.Update();
(2) 註冊microphone的BufferReady事件處理;
1: //定義初始化副程式
2: private void init()
3: {
4: DispatcherTimer tDT = new DispatcherTimer();
5: //定期每33毫秒執行一次FrameworkDispatcher.Update(); 方法
6: tDT.Interval = TimeSpan.FromMilliseconds(33);
7: tDT.Tick += delegate { try { FrameworkDispatcher.Update(); } catch { } };
8: tDT.Start();
9: //註冊BufferReady事件的處理者
10: gMicrophone.BufferReady += new EventHandler<EventArgs>(gMicrophone_BufferReady);
11: }
12:
13: void gMicrophone_BufferReady(object sender, EventArgs e)
14: {
15: //設定每1秒加1次目前錄音花掉的時間
16: gSpendTime += 1;
17: Dispatcher.BeginInvoke(() =>
18: {
19: tblSpendTime.Text = string.Format("{0} seconds.", gSpendTime.ToString());
20: });
21:
22: //每1秒到時,取出在緩衝的Buffer資料,並寫入Stream中。
23: gMicrophone.GetData(gAudioBuffer);
24: gStream.Write(gAudioBuffer, 0, gAudioBuffer.Length);
25:
26: //滿足20秒後自動呼叫關閉錄音
27: if (gSpendTime == 20)
28: {
29: btnStopRecord_Click(sender, new RoutedEventArgs());
30: gSpendTime = 0;
31: Dispatcher.BeginInvoke(() =>
32: {
33: tblSpendTime.Text = "Record finished!";
34: });
35: }
36: }
b-3. 註冊"啟動錄音”與”結束錄音”的按鈕事件:
在實作啟動錄音與結束錄音,出現了WavHedaer的類別功能,主要是用於將Stream中的資料按造Wav Format的格式進行
編譯,為何需要這樣呢?由於WP7目前還不支援將錄好的Audio File直接轉成mp3或wav,因此,如何將Byte Array轉成指
定的音檔格式,目前我找到的可以參考:<Storing WP7 recorded audio as WAV format streams >的做法,直接把Byte Array
wav檔案,並且寫入Isolated Storage之中。
1: private void btnRecord_Click(object sender, RoutedEventArgs e)
2: {
3: //指定要將錄音的資料轉成WAV格式
4: WavHeader.WriteWavHeader(gStream, gMicrophone.SampleRate);
5:
6: //指定錄音的BufferDuration為1秒觸發一次BufferReady事件
7: gMicrophone.BufferDuration = TimeSpan.FromMilliseconds(1000);
8:
9: //透過指定的BufferDuration,轉換出大約需要的byte array size
10: gAudioBuffer = new byte[gMicrophone.GetSampleSizeInBytes(gMicrophone.BufferDuration)];
11:
12: //啟動錄音
13: gMicrophone.Start();
14: }
15:
16: private void btnStopRecord_Click(object sender, RoutedEventArgs e)
17: {
18: if (gMicrophone.State == MicrophoneState.Started)
19: {
20: //結束錄音
21: gMicrophone.Stop();
22:
23: //指定將錄音的資料結束時補上特定標籤
24: WavHeader.UpdateWavHeader(gStream);
25:
26: //結束寫入記憶體
27: gStream.Close();
28: }
29: }
b-4. 註冊播放錄好音的聲音資料按鈕事件:
1: private void btnPlay_Click(object sender, RoutedEventArgs e)
2: {
3: //由於錄好音的資料是記錄在MemoryStream之中,
4: //因此,直接使用SoundEffect配合是最好的作法,Stream.ToArray把資料轉換出來。
5: //設定SampleRate告訴SoundEffect音軌的頻率,AudioChannels.Mono與頻道的模式
6: gSoundEffect = new SoundEffect(gStream.ToArray(),
7: gMicrophone.SampleRate, AudioChannels.Mono);
8: gSoundEffect.Play();
9: }
c. 實作播放音樂的功能:
實作b步驟中的所有流程,即可以進行錄音與播放錄好的聲音功能。接下來c的部分,主要透過MediaElement載入要播放的音樂。
1: private void btnPlayMusic_Click(object sender, RoutedEventArgs e)
2: {
3: if (media.CurrentState == MediaElementState.Closed)
4: {
5: //指定播放的音樂
6: Uri tUri = new Uri("mms://bcr.media.hinet.net/RA000040",
7: UriKind.Absolute);
8: media.Source = tUri;
9: media.Play();
10: }
11: }
12:
13: private void btnStopMusic_Click(object sender, RoutedEventArgs e)
14: {
15: if (media.CurrentState == MediaElementState.Playing)
16: media.Stop();
17: }
d. 實作寫入Isolated Storage與播放WAV的功能的功能:
1: private void btnSaveFile_Click(object sender, RoutedEventArgs e)
2: {
3: //將檔案存在IsolatedStorage之中
4: WriteStraminIsolatedStorage("cusrecord.wav", gStream);
5:
6: //透過SoundEffect載入放在IsolatedStorage中的wav
7: using (var tStore = IsolatedStorageFile.GetUserStoreForApplication())
8: {
9: using (var tFStream = new IsolatedStorageFileStream("cusrecord.wav", FileMode.Open, tStore))
10: {
11: //使用SoundEffect直接播放wav檔案
12: SoundEffect effect = SoundEffect.FromStream(tFStream);
13: //記得在加上一次update,告訴mediaplayer要進行播放
14: FrameworkDispatcher.Update();
15: effect.Play();
16: }
17: }
18: }
19:
20: private void WriteStraminIsolatedStorage(string pFileName, Stream pStream)
21: {
22: using (var tStore = IsolatedStorageFile.GetUserStoreForApplication())
23: {
24: //取得檔案名稱,並且檢查是否已經有檔案存在,如果有則先刪除,再重新寫入。
25: if (tStore.FileExists(pFileName))
26: {
27: tStore.DeleteFile(pFileName);
28: }
29: //建立檔案
30: using (var tFStream = new IsolatedStorageFileStream(pFileName, FileMode.Create, tStore))
31: {
32: byte[] tByteInStream = gStream.ToArray();
33: tFStream.Write(tByteInStream, 0, tByteInStream.Length);
34: tFStream.Flush();
35: }
36: }
37: }
e. 測試流程:
1. 點擊[Play Music] ;
2. 點擊[Start Record by Microphone],等錄製20秒後會自動關閉錄音出現「record finished」;
3. 點擊[Save File],程式會自動產生*.wav與播放wav檔案。
[範例程式]
======
以上是說明如何實作一個錄音程式的功能。其實錄音程式在XNA類別裡還有很多相關的應用,值得去研讀。
不過目前範例中介紹的功能我覺得非常適用。不過由於目前WP7針對錄音資料沒有辦法直接儲存成mp3, wav或wma,
老實說真的不是很方便,希望能夠快點支援才好。不然就要來找看看怎麼把它轉過去了。
References:
‧在App中讀取Windows Phone 7手機內的音樂資源(Music Hub整合) (必讀)
‧Sound Recording in Windows Phone 7
‧How to capture audio from your microphone in WP7
‧WP7 and Microsoft.Xna.Framework.Audio.Microphone
‧梦想成真 XNA (6) - 声音和音效 & 梦想成真XNA(6)-声音和音效(2)
‧Recording Audio in Silverlight on Windows Phone 7
‧How To Record Audio On Windows Phone 7 And Copy Recorded Files To Your PC ()
‧How to: Record Video in a Camera Application for Windows Phone
‧How to: Use the DeviceStatus Class for Windows Phone
‧Audio recorder Silverlight 4 sample & Silverlight 4 – WebCams.OnceMoreWithAudio()
‧Saving Microphone Stream to mp3 or wave & Storing WP7 recorded audio as WAV format streams (必讀)
‧Upload Files from Windows Phone
‧Silverlight 4 Rough Notes: Camera and Microphone Support (重要)
‧Saving the microphone recording byte[] in a file ? & Aumplib: C# Namespace And Classes For Audio Conversion
‧silverlight中播放Wav文件 & Windows Phone7 播放WAV 和 MP3 & Playing .MP3 and .WMA Audio Files in XNA
‧Video Recording in Windows Phone 7
‧Record Silverlight 4 MediaElement content & Steps to Record Voice & Podcast on Windows Phone 7
‧WPF save streamed video using MediaElement & MediaElement Record

