Windows Phone 7 - 了解Accelerometer Sensor概念
最近看到很多App多少都有加上一些體感的東西,讓App充滿樂趣與新的玩法,因此,我也想要來了解一下,
怎麼在WP7提供那些Sensor來協助開發人員實作體感的操作。在那之前照舊一樣要把原理跟可用的SDK做一個說明。
〉WP7目前支援的Sensor類型:
根據<Sensors Overview for Windows Phone>整理下來,目前支援Sensor的類型,如下表:
| 類型 | 說明 |
| Accelerometer | 加速度感應器用於測量設備在時間裡的運動,識別用戶如何移動設備、移動的方向。 acceleration value的值來自三個維度:X、Y、Z軸。透過這三個值識別設備的方向性。 例如:Z軸 = –1g時,代表手機螢幕向上;Y軸 = -1g時,代表手機直立於桌面上。 透過Accelerometer類別以取得手機的運作所產生的三個維度與重力。 |
| Compass | 指南針或稱磁力儀(magnetometer),用於確定設備相對地球的北磁極所旋轉的角度(angle)。可透過該原始的磁力計數值(raw magnetometer readings)檢測設備周圍的磁力。 注意該Sensor並非Windows Phone手機必備的元件,如果開發的Application必需用的它時,需在程式裡進行判斷以確保可用性,或提供其他方式輸入值來完成功能。 |
| Gyroscope | 陀羅儀用於測量設備在每一個軸的旋轉速度。可用測量值獲得設備在空間裡的方向。 如果對Gyroscope測量的值怎麼算出角度,可透過Motion類別以取代Gyroscope API所測量的結果。 注意該Sensor並非Windows Phone手機必備的元件,如果開發的Application必需用的它時,需在程式裡進行判斷以確保可用性,或提供其他方式輸入值來完成功能。 |
| Combined Motion | 該API提供了收集所有Sensor回傳的資料,協助進行處理,包括了:方向、運動的資訊。 上述三種API的值,均可以透過整合的API一併取得。 例如:透過Motion類別,可同時取得設備中多個Sensors的值,往下透過acceleration的值去分離重力加速度,進一步計算設備目前的偏航、俯仰和滾轉角度。 注意Motion API使用二種不同的Sensor配置。 一般運動模式:使用Compass與Accelerometer; 進階運動模式:使用Compass、Accelerometer與Gyroscope; 同樣的,如果您需要用進階運動模式,記得檢查設備是否具有Gyroscope Sensor。 |
透過上表的功能,可協助識別目前手機的方向與運動的方式,進一步將這些Sensor的結果當成另一種Input的方式,
啟動對應的功能與服務增加用戶體驗。
另外,這些Sensor APIs均基於SensorBase<TSensorReading>類別往下實作,遵守一個簡單的模式,以啟動並運用該API。
其中,Combined Motion的好處是將上述三個API所收到最原始數據,透過Motion類別加以處理,讓開發人員可以直接
取得需要的數據,包括:設備的屬性(偏航,俯仰和滾轉)、旋轉加速度、線性加速度…等,所以如果您跟我一樣對空間
概念或計算物理性不是很懂得的話,建議使用Motion API會節省不少時間,進階的可直接使用另外三個API。
[注意]
‧Sensor APIs不支援在鎖定螢幕下(under the lock screen)進行。<Idle Detection for Windows Phone>
‧Sensor APIs不能使用於Background Agents。<Background Agents Overview for Windows Phone>
======
上述大致說明了WP7在Sensor上支援的類型後,該篇先針對Combined Motion API做一個使用上的說明:
〉Combined Motion API:
透過上表說明,對於Motion API有了一定的了解,那麼Motion API究竟包括了那些屬性與方法,該怎麼來使用它呢。
(1) Motion API:
該類別主要提供應用程式,目前設備的方向、運動資訊。它收集Accelerometer、Compass、Gyroscope的原始資訊,
將這些資料透過easy-to-use的屬性、事件,讓開發人員得以取得資料並且邏輯的處理,形成另一種Input mechanism。
(A) 重點屬性:
| 屬性 | 說明 |
| IsSupported | 設定/取得設備是否支援Motion執行時所需要的感應器。該屬性不需要實例化Motion類型可直接使用。 |
| IsDataValid | 取得感應器的資料是否具有效性。 |
| CurrentValue | 取得一個實作ISensorReading的物件,該物件包含感應器所收集的當前值。該物件可能是下列類型的其中一種: ‧AccelerometerReading ‧CompassReading ‧GyroscopeReading ‧MotionReading |
| TimeBetweenUpdates | 設定/取得CurrentValueChanged事件之間發生的首選時間(preferred time)。 |
上述這些屬性均是在實作應用程式時,一定會使用的,包括檢查設備是否支援Motion,是否取得的資料是有效的,
進一步使用當前的值去進行處理。
(B) 重點事件與方法:
| 方法 | 說明 |
| Start | 開始從感應器收集數據資料。要擷取資料記得註冊CurrentValueChanged事件。 |
| Stop | 停止從感應器收集數據資料。 |
| Dispose | 釋放託管或未託管的感應器資源。 |
| Finalize | 在Object被GC釋放前,允許Object嘗試去釋放資源並執行其他清理操作。 |
由於Sensor會更新頻率太頻繁會造成電池大量消耗,因此Dispose與Finalize可搭配使用。
| 事件 | 說明 |
| Calibrate | 該事件發生於Compass需要校準(calibration)時,會被觸發。 |
| CurrentValueChanged | 該事件發生當有新的數據資料被Sensor擷取到時。 發生的頻率,根據TimeBetweenUpdates屬性設定時間而定。 不同的Sensor在該事件取得的參數有所不同: ‧SensorReadingEventArgs<AccelerometerReading> ‧SensorReadingEventArgs<CompassReading> ‧SensorReadingEventArgs<GyroscopeReading> ‧SensorReadingEventArgs<MotionReading> |
(C) 重點類別:
在上述說明屬性、方法與事件時,一直看到這些功能很多均繼承SensorBase<TSensorReading>類別,那麼它到底是什麼呢?
它是所有Sensor的最基礎類別,實作了驗證數據資料的有效性、取得數據資料、發生數值改變的擷取時機…等,因此,當使
用Accelerometer或其他Sensor時,它們則實作了Reading的內容,才能讓開發人員取得實際的數據。
‧SensorReadingEventArgs<MotionReading>:
SensorReadingEventArgs<T> Class該類別提供CurrentValueChanged事件主要觸發來源的參數資料,不同的Sensor來源帶的T
有所不同。以該篇而言,T則為:MotionReading。往下進一步看MotionReding的結構:
| 屬性 | 說明 |
| Attitude | 取得設備的弧度,包括:偏航(yaw)、俯仰(pitch)、滾動(roll)弧度。 |
| DeviceAcceleration | 取得設備的線性加速度(linear acceleration),以G力(gravitational)為單位。 |
| DeviceRotationRate | 取得設備的旋轉速度,以每秒的弧度為單位。 |
| Gravity | 取得與MotionReading相關的重力載體物件。 |
| Timestamp | 取得MotionReading計算的時間戳的時間,這可用於關聯整個Sensor取得數據與計算原始資料的演算法。 |
〉實作範例:<擷錄How to: Use the Combined Motion API for Windows Phone的內容>
由於要使用Motion API需要實體設備,並且最少要支援Compass的Sensor,所以HTC Radar沒有支援Compass,因此,建議台灣
的開發者可用HTC Mozart來測試。以下擷取How to: Use the Combined Motion API for Windows Phone的內容功能加以說明。
(1) 註冊Motion API;
1: Motion gMotion = null;
2:
3: protected override void OnNavigatedTo(System.Windows.Navigation.NavigationEventArgs e)
4: {
5: base.OnNavigatedTo(e);
6: //在進入程式時識別,如果不支援Motion API則不可以使用。
7: if (Motion.IsSupported == false)
8: {
9: MessageBox.Show("the Motion API is not supported on this device.");
10: return;
11: }
12:
13: if (gMotion == null)
14: {
15: gMotion = new Motion();
16: //設定TimeBetweenUpdates的時間
17: gMotion.TimeBetweenUpdates = TimeSpan.FromMilliseconds(20);
18: gMotion.CurrentValueChanged += new EventHandler<SensorReadingEventArgs<MotionReading>>(Motion_CurrentValueChanged);
19: }
20:
21: try
22: {
23: //啟動Motion API
24: gMotion.Start();
25: }
26: catch (Exception ex)
27: {
28: MessageBox.Show("unable to start the Motion API.");
29: }
30: }
(2) 加上要呈現的Attitude與DeviceAcceleration的XAML畫面;
1: <!--ContentPanel - place additional content here-->
2: <Grid x:Name="ContentPanel" Grid.Row="1" Margin="0,0,0,0">
3: <StackPanel>
4: <!-- 設定顯示Motion Attitude效果的範圍 -->
5: <TextBlock Text="attitude" Style="{StaticResource PhoneTextLargeStyle}"/>
6: <Grid Margin="12 0 12 0">
7: <TextBlock Height="30" HorizontalAlignment="Left" Name="yawTextBlock" Text="YAW: 000" VerticalAlignment="Top" Foreground="Red" FontSize="25" FontWeight="Bold"/>
8: <TextBlock Height="30" HorizontalAlignment="Center" Name="pitchTextBlock" Text="PITCH: 000" VerticalAlignment="Top" Foreground="Green" FontSize="25" FontWeight="Bold"/>
9: <TextBlock Height="30" HorizontalAlignment="Right" Name="rollTextBlock" Text="ROLL: 000" VerticalAlignment="Top" Foreground="Blue" FontSize="25" FontWeight="Bold"/>
10: </Grid>
11: <Grid Height="200">
12: <!-- 繪製三角型 -->
13: <Polygon Name="yawtriangle"
14: Points="205,135 240,50 275,135"
15: Stroke="Red"
16: StrokeThickness="2">
17: <Polygon.Fill>
18: <SolidColorBrush Color="Red" Opacity="0.3"/>
19: </Polygon.Fill>
20: <Polygon.RenderTransform>
21: <RotateTransform CenterX="240" CenterY="100"></RotateTransform>
22: </Polygon.RenderTransform>
23: </Polygon>
24: <Polygon Name="pitchtriangle"
25: Points="205,135 240,50 275,135"
26: Stroke="Green"
27: StrokeThickness="2">
28: <Polygon.Fill>
29: <SolidColorBrush Color="Green" Opacity="0.3"/>
30: </Polygon.Fill>
31: <Polygon.RenderTransform>
32: <RotateTransform CenterX="240" CenterY="100"></RotateTransform>
33: </Polygon.RenderTransform>
34: </Polygon>
35: <Polygon Name="rolltriangle"
36: Points="205,135 240,50 275,135"
37: Stroke="Blue"
38: StrokeThickness="2" >
39: <Polygon.Fill>
40: <SolidColorBrush Color="Blue" Opacity="0.3"/>
41: </Polygon.Fill>
42: <Polygon.RenderTransform>
43: <RotateTransform CenterX="240" CenterY="100"></RotateTransform>
44: </Polygon.RenderTransform>
45: </Polygon>
46: </Grid>
47: <!-- 設定顯示Motion DeviceAcceleration效果的範圍 -->
48: <TextBlock Text="acceleration" Style="{StaticResource PhoneTextLargeStyle}"/>
49: <Grid Margin="12 0 12 0">
50: <TextBlock Height="30" HorizontalAlignment="Left" Name="xTextBlock" Text="X: 000" VerticalAlignment="Top" Foreground="Red" FontSize="25" FontWeight="Bold"/>
51: <TextBlock Height="30" HorizontalAlignment="Center" Name="yTextBlock" Text="Y: 000" VerticalAlignment="Top" Foreground="Green" FontSize="25" FontWeight="Bold"/>
52: <TextBlock Height="30" HorizontalAlignment="Right" Name="zTextBlock" Text="Z: 000" VerticalAlignment="Top" Foreground="Blue" FontSize="25" FontWeight="Bold"/>
53: </Grid>
54: <Grid Height="300">
55: <!-- 繪製代表accelerometer運作的三個軸 -->
56: <Line x:Name="xLine" X1="240" Y1="150" X2="340" Y2="150" Stroke="Red" StrokeThickness="4"></Line>
57: <Line x:Name="yLine" X1="240" Y1="150" X2="240" Y2="50" Stroke="Green" StrokeThickness="4"></Line>
58: <Line x:Name="zLine" X1="240" Y1="150" X2="190" Y2="200" Stroke="Blue" StrokeThickness="4"></Line>
59: </Grid>
60: </StackPanel>
61: </Grid>
(3) 實作處理Attitude屬性的事件;
1: void Motion_CurrentValueChanged(object sender, SensorReadingEventArgs<MotionReading> e)
2: {
3: // This event arrives on a background thread. Use BeginInvoke to call
4: // CurrentValueChanged on the UI thread.
5: Dispatcher.BeginInvoke(() => CurrentValueChanged(e.SensorReading));
6: }
7:
8: private void CurrentValueChanged(MotionReading e)
9: {
10: // Check to see if the Motion data is valid.
11: if (gMotion.IsDataValid)
12: {
13: //處理Attitude
14: HandleAttitude(e.Attitude);
15: }
16: }
17:
18: private void HandleAttitude(AttitudeReading pReading)
19: {
20: // Show the numeric values for attitude.
21: yawTextBlock.Text = "YAW: " + MathHelper.ToDegrees(pReading.Yaw).ToString("0") + "°";
22: pitchTextBlock.Text = "PITCH: " + MathHelper.ToDegrees(pReading.Pitch).ToString("0") + "°";
23: rollTextBlock.Text = "ROLL: " + MathHelper.ToDegrees(pReading.Roll).ToString("0") + "°";
24:
25: // Set the Angle of the triangle RenderTransforms to the attitude of the device.
26: ((RotateTransform)yawtriangle.RenderTransform).Angle = MathHelper.ToDegrees(pReading.Yaw);
27: ((RotateTransform)pitchtriangle.RenderTransform).Angle = MathHelper.ToDegrees(pReading.Pitch);
28: ((RotateTransform)rolltriangle.RenderTransform).Angle = MathHelper.ToDegrees(pReading.Roll);
29: }
根據取得的Attitude去調整畫面三角型的三個弧度類型,透過設定RenaderTransform的Angle屬性進行呈現。
(4) 實作處理DeviceAcceleration屬性的事件;
1: void Motion_CurrentValueChanged(object sender, SensorReadingEventArgs<MotionReading> e)
2: {
3: // This event arrives on a background thread. Use BeginInvoke to call
4: // CurrentValueChanged on the UI thread.
5: Dispatcher.BeginInvoke(() => CurrentValueChanged(e.SensorReading));
6: }
7:
8: private void CurrentValueChanged(MotionReading e)
9: {
10: // Check to see if the Motion data is valid.
11: if (gMotion.IsDataValid)
12: {
13: //處理DeviceAcceleration
14: HandleDeviceAcceleration(e.DeviceAcceleration);
15: }
16: }
17:
18: private void HandleDeviceAcceleration(Vector3 pDeviceVector3)
19: {
20: // Show the numeric values for acceleration.
21: xTextBlock.Text = "X: " + pDeviceVector3.X.ToString("0.00");
22: yTextBlock.Text = "Y: " + pDeviceVector3.Y.ToString("0.00");
23: zTextBlock.Text = "Z: " + pDeviceVector3.Z.ToString("0.00");
24:
25: // Show the acceleration values graphically.
26: xLine.X2 = xLine.X1 + pDeviceVector3.X * 100;
27: yLine.Y2 = yLine.Y1 - pDeviceVector3.Y * 100;
28: zLine.X2 = zLine.X1 - pDeviceVector3.Z * 50;
29: zLine.Y2 = zLine.Y1 + pDeviceVector3.Z * 50;
30: }
根據取得的DeviceAcceleration去調整畫面三軸線長度,透過調整三條軸線的X或Y屬性進行呈現。
(5) 執行畫面;
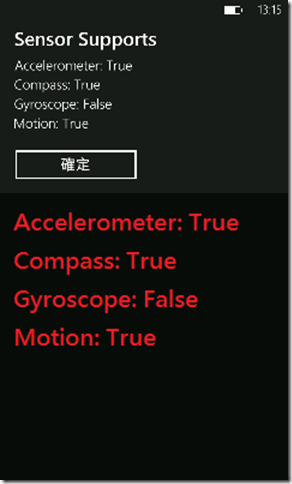
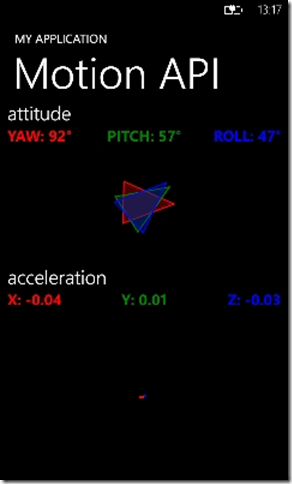
第一張圖:檢查設備Mozart支援Accelerometer、Compass與Motion;第二圖顯示透過Motion API調整YAW、PITCH、ROLL
三種角度與Acceleration的值,不過Motion API取得Acceleration的值會根據Motion API所整理過的結果,值會比直接取得
Accelerometer API的有些許差異。
[補充]
〉應用程式使用Sensor API,對於上架至Marketplace的影響:
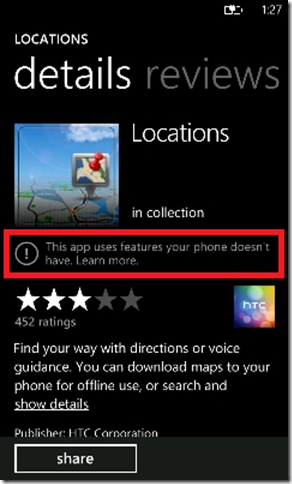
當用戶想下載一個應用程式時,該應用程式用到的Sensor該設備所沒有的,在Marketplace會出現如下圖:
因此,對於Marketplace怎麼檢查設備是否有支援應用程式裡所使用到的Sensor有幾個依據:
(a) 如果應用程式使用Motion API,那至少該設備需要支援Compass Sensor;(如果有Gyroscope會有更好數據)
(b) 如果應用程式直接使用的Accelerometer、Compass或Gyroscope Sensor,只要缺一就會出現;
〉檢查設備支援那些Sensor的方法:
1: #region 檢查設備支援那些Sensor的方法
2: /// <summary>
3: /// 確認設備支援那些Sensor。
4: /// </summary>
5: private void CheckSensor()
6: {
7: string tMsg = string.Format("Accelerometer: {0}\nCompass: {1}\nGyroscope: {2}\nMotion: {3}",
8: Accelerometer.IsSupported,
9: Compass.IsSupported,
10: Gyroscope.IsSupported,
11: Motion.IsSupported);
12: MessageBox.Show(tMsg, "Sensor Supports", MessageBoxButton.OK);
13: }
14: #endregion
======
以上是分享Combined Motion API的使用,可惜我的HTC Radar只有支援Accelerometer感應器,所以範例借別人的手機玩。
說實在話,如果在撰寫過程中,遇到像我一樣沒有什麼空間概念的話,建議拿出一個實體物直接練習,有助於快速了解空
間的概念,進一步理解Accelerometer 中的x, y ,z三軸的應用。希望該篇對大家有些幫助,謝謝。
References:
‧Sensors Overview for Windows Phone
‧How to: Get Data from the Accelerometer Sensor for Windows Phone
‧How to: Get Data from the Compass Sensor for Windows Phone
‧How to: Get Data from the Gyroscope Sensor for Windows Phone
‧How to: Use the Combined Motion API for Windows Phone
‧Windows Phone > 邊做邊學 Windows Phone 7 開發 > 手機操控方式
‧Windows Phone 7 Motion Sensor 使用指南
‧什么是Motion Sensor? & 你不可不知的Mango — 开发者篇(1)


