Windows Phone - 深入使用Bing Map - 客製Pushpin
在<Windows Phone 7 - 學習Location Service與Map地圖>介紹過相關使用Bing Map後,我自己遇到在撰寫Bing Map
時還是一些相關的問題,因此,特別將使用過程裡遇到的問題與相關功能做了一個整理。
〉. 自訂Pushpin控件:
Pushpin提供開發人員可增加圖標至地圖中,可透過ContentTemplate、Content、Background等項目來調整樣式,並且
配合Tap或DoubleTap事件,補捉到用戶點擊的是那一個Pushpin,並配合自訂的Tip或Content來顯示圖標內容。
(A). 重要屬性與事件:
‧ 屬性:
| 名稱 | 說明 |
| Background |
設定/取得背景顏色。 可提供簡易調整Pushpin的色系,來代表不同的圖標。 |
| Content |
設定/取得Pushpin繼承ContentControl的屬性值。 可放入多種物件,例如:string、UIElement,甚至DateTime。 Content是ContentPresenter的屬性,也可用於自訂要設定的值如何加以呈現。 設定了ContentPresent後,它會自動與ContentTemplate、Content自動binding。 可詳細可參考<Customizing the Appearance of an Existing Control by Using a ControlTemplate>。 |
| ContentTemplate |
設定/取得Data Template用於呈現ContentControl的Content。 每一個UIElement均有預設的ContentTemplate,可透過XAML的方式自行調整,或配合ContentPresenter調整資料Binding對象,產生新的外貌,但是無法改變原始事件功能。 |
| Location | 設定/取得Pushpin在地圖上的座標。 |
上述四個屬性裡,個人覺得Content與ContentTemplate是最值得注意的地方,尤其是對開發人員,因為透過XAML
即可以調整這些內容,但有時會後想透過程式來改反而變成更複雜,非常建議先了解Content與ContentTemplate
的原理,可以透過定義與動態引入的方式,讓程式更活用。
‧ 事件:
| 名稱 | 說明 |
| onTap |
觸發控件被輕拍(Tap)的事件。 這個事件與之前看過的<How to: Handle Manipulation Events>有更詳細的說明。 |
| onDoubleTap | 觸發控件被連續二次輕拍(Tap)的事件。 |
以上事件是處理當點擊圖標時,希望出現有Tip或相關應用時可以使用,由於Pushpin本身沒有OnClick的事件,
因此,可以透過上述二個事件來互相搭配完成任務。
(B). 點擊Pushpin時,出現一個提示框:
在實作前,如果您跟我一樣對ContentTemplate不清楚的話,可以先參考這一篇<Windows Phone 7 - 淺談Custom Control>
我將學習過程對ContentTemplate的暸解配合MSDN上說明加以描述,希望對接下來的範例說明有所幫助。
引用<Windows Phone Pushpin Custom Tooltip: Different Techniques>的範例,將它修改成支援簡單動態產生Pushpin時可以使用。
B-1. 擷取範例:將定義好的ContentTemplate擷取出來;
1: <!-- 直接修改Pushpin的ContentTemplate -->
2: <my:Pushpin x:Name="pushPin" Tap="pushPin_Tap" >
3: <my:Pushpin.Template>
4: <ControlTemplate TargetType="my:Pushpin">
5: <StackPanel>
6: <ContentPresenter x:Name="content" HorizontalAlignment="Center"
7: Content="{TemplateBinding Content}"
8: />
9: <!-- 定義Path呈現對話框的尾端, 注意Visibility的呈現方式-->
10: <Path
11: Data="M0,0 L0,1 L1,0"
12: Fill="{TemplateBinding Background}"
13: Stretch="Fill"
14: Margin="32,0"
15: Height="12"
16: Width="18"
17: Visibility="{Binding RelativeSource={RelativeSource TemplatedParent},
18: Path=Content.Visibility, Mode=TwoWay}"
19: HorizontalAlignment="Left" />
20: <Image Source="MapPin.png" Stretch="None" HorizontalAlignment="Left"/>
21: </StackPanel>
22: </ControlTemplate>
23: </my:Pushpin.Template>
24: <my:Pushpin.Content>
25: <!-- 定義OnTap時要呈現的內容,預設Visibility = Collapsed-->
26: <Border Background="Black" Width="200" Visibility="Collapsed" x:Name="border" HorizontalAlignment="Center" >
27: <StackPanel Orientation="Horizontal">
28: <TextBlock Text="Test" Margin="10"/>
29: <Image Source="Images/appbar.cup.png" Stretch="None" />
30: <Image Source="Images/appbar.gas.png" Stretch="None"/>
31: <Image Source="Images/appbar.home.png" Stretch="None" />
32: </StackPanel>
33: </Border>
34: </my:Pushpin.Content>
35: </my:Pushpin>
上述客製的ContentTemplate定義了Pushpin的呈現方式,它重新定義了Path物件讓它可支援圖標的引入,加上Content是可自行填入的內容。
尤其是:「Path element: Visibility="{Binding RelativeSource={RelativeSource TemplatedParent}, Path=Content.Visibility, Mode=TwoWay}".」是
產生箭頭的重點。
B-2. 修改方式:先將上述的ContentTemplate整理成通用的結構,並在App.xaml中加上Pushpin的ContentTemplate;
1: <!-- //20120715.. ..Pou:增加Pushpin的客製ContentTemplate-->
2: <!--Application Resources-->
3: <Application.Resources>
4: <ControlTemplate TargetType="my:Pushpin" x:Key="CustomPushPin">
5: <StackPanel>
6: <ContentPresenter x:Name="content"
7: HorizontalAlignment="Center"
8: Content="{TemplateBinding Content}" />
9: <!-- 保留原有的Path設定內容 -->
10: <Path
11: Data="M0,0 L0,1 L1,0"
12: Fill="{TemplateBinding Background}"
13: Stretch="Fill"
14: Margin="32,0"
15: Height="12"
16: Width="18"
17: Visibility="{Binding RelativeSource={RelativeSource TemplatedParent},
18: Path=Content.Visibility, Mode=TwoWay}"
19: HorizontalAlignment="Left" />
20: <Image Source="/AliceDontLeave;component/Images/iconpoint.png"
21: Stretch="Fill" Width="26" Height="35"
22: HorizontalAlignment="Left"/>
23: </StackPanel>
24: </ControlTemplate>
25: </Application.Resources>
修改B-1的內容,去掉定義Pushpin的Content,其原因是內容需要動態產生,在ContentTemplate無法定義,因此移動至B-3的動態程式裡。
B-3. 修改方式:建立Pushpin、動態引入ContentTemplate、加上OnTap的事件;
1: /// <summary>
2: /// 將地轉換成的座標加入Pushpin,並且套用新的ContentTempalte與OnTap事件。
3: /// </summary>
4: /// <param name="pGAddressPoint"></param>
5: private void PinAlicePoint(List<GAddressPoint> pGAddressPoint)
6: {
7: //產生一個MapLayer來加入Pushpin
8: MapLayer tMapLayer = new MapLayer();
9: foreach (GAddressPoint tItem in pGAPItem)
10: {
11: Pushpin tPpItem = new Pushpin();
12: //套用定義好的ContentTemplate
13: tPpItem.Template = (ControlTemplate)Application.Current.Resources["CustomPushPin"];
14: //呼叫建立ToolTip的內容
15: tPpItem.Content = BuildPushPinContent(tItem);
16: //註冊OnTap的事件
17: tPpItem.Tap += new EventHandler<System.Windows.Input.GestureEventArgs>(pushPin_Tap);
18: //指定Pushpin的座標
19: tPpItem.Location = new GeoCoordinate(double.Parse(tItem.gtag_latitude),
20: double.Parse(tItem.gtag_longitude));
21: tMapLayer.Children.Add(tPpItem);
22: }
23: map1.Children.Add(tMapLayer);
24: map1.ZoomLevel = 12;
25: }
26:
27: /// <summary>
28: /// 將GAdressPoint轉成Pushpin的Content。
29: /// </summary>
30: /// <param name="pEntity">GAdressPoint</param>
31: /// <returns>Border</returns>
32: private Border BuildPushPinContent(GAdressPoint pEntity)
33: {
34: //將範例中定義的Content透過動態程式加以產生
35: Border tBorder = new Border
36: {
37: //Width = 300,
38: Visibility = System.Windows.Visibility.Collapsed,
39: Name = "border",
40: HorizontalAlignment = System.Windows.HorizontalAlignment.Center
41: };
42: StackPanel tStakPanel = new StackPanel
43: {
44: Orientation = System.Windows.Controls.Orientation.Vertical,
45: Background = new SolidColorBrush(Colors.Black)
46: };
47: TextBlock tAddress = new TextBlock
48: {
49: Margin = new Thickness(5, 0, 0, 0),
50: Text = pEntity.xaddress,
51: TextWrapping = TextWrapping.Wrap
52: };
53: tStakPanel.Children.Add(tAddress);
54: tBorder.Child = tStakPanel;
55: return tBorder;
56: }
沿用<Windows Phone 7 - 使用Google Map API將地址轉成座標>撰寫的範例,將地址轉換出來的座標繪制於地圖上。
在動態引入ContentTemplate時,可參考[13行]的程式段,將定義好的ContentTemplate指定給Pushpin.Template屬性,
並且透過ControlTemplate型別加以轉換。
B-4. 註冊OnTap事件、Map控件的OnTap事件;
1: private Pushpin gCurrenTipPushpin = null;
2:
3: void pushPin_Tap(object sender, System.Windows.Input.GestureEventArgs e)
4: {
5: //處理在用戶點擊了Pushpin,顯示其Content的內容。
6: gCurrenTipPushpin = sender as Pushpin;
7: Border tUC = (Border)gCurrenTipPushpin.Content;
8: tUC.Visibility = System.Windows.Visibility.Visible;
9: e.Handled = true;
10: }
11:
12: private void map1_Tap(object sender, System.Windows.Input.GestureEventArgs e)
13: {
14: //處理在用戶地圖其他地方,隱藏目前顯示的Content內容。
15: if (gCurrenTipPushpin != null)
16: {
17: Border tUC = (Border)gCurrenTipPushpin.Content;
18: tUC.Visibility = System.Windows.Visibility.Collapsed;
19: gCurrenTipPushpin = null;
20: }
21: }
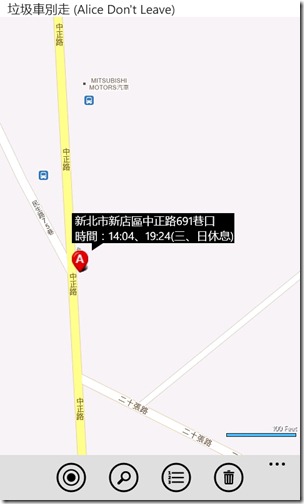
上方程式定義了二個事件,一個給Pushpin的onTap事件,讓它被擊點時可以顯示其指定的Content內容;
並且在Map控件觸發OnTap時將被顯示的Content給隱藏起來。
B-5. 執行結果;
======
以上介紹這些屬性是我在學習使用Pushpin的時候,所遇到的問題,特別把它們記錄下來,希望對大家有所幫助。
老實說XAML這東西真的充滿了驚奇,尤其在FrameworkElement的部分需要再多花時間熟悉與了解其結構才能設計更好的元件。
References:
‧Windows Phone Pushpin Custom Tooltip: Different Techniques (重要)
‧Custom Template in PushPin & Pushpin-Styles in Bing Maps for the Windows Phone (重要)
‧Windows Phone 7 - the Bing Maps Control & Setting the Map View
‧Using the Silverlight Map Control on Windows Phone 7
‧【Silverlight】Bing Maps开发应用与技巧二:自定义图钉标注控件和动态ToolPanel
‧Show a tooltip for tapped pushpin on Windows Phone
‧Multiple Pushpins and Infoboxes in Bing Maps V7
‧[Silverlight] Bing Map 加入標記點(pushpin)
‧Windows Phone Pushpin Custom Tooltip using Customized ContextMenu (重要,使用contextmenu)
‧Show a tooltip for tapped pushpin on Windows Phone (自訂contextmenu)
‧Windows Phone 7 : Adding a Pushpin
‧Using Listpicker in Windows Phone 7
‧【Silverlight】Bing Maps开发应用与技巧六:使用样式美化图钉(Pushpin)控件的ToolTip外观
‧How to add tool tip to Pushpin in Bing Map Silverlight control

