Windows Phone - Deep Zoom概要
剛好最近比較有在處理圖像的效果,例如:包括配合手勢、Zooming/out、平移(Panning)等,所以一直在找相關
處理圖像的機制,發現Silverlight有提供一個好東西Deep Zoom,自己也沒有用過,所以就寫該篇來記錄一下。
該元件提供高品質解析圖像(high-resolution image)的功能,讓User可Zoom in/out圖像且不影響Application本身的效能,
並且支援Smooth的載入、多張圖像載入與操作等功能。
1. Deep Zoom主要用在那些情境呢?
‧Exploration of Very Large or High Resolution Images:
常見的情境就是用於瀏覽大型或高品質的圖像、地圖,例如:透過手指移動、Zoom in/out…等。
‧3-D Photography:
建立一個3D外型的圖像瀏覽清單,把所有的圖像組合成一個個小格式,並且集合於一個Room。讓用戶選擇格式,
顯示圖像內容。
‧Advertisements:
可建立一個相對低品質的圖像載入,代表總主題的廣告。再逐一載入比較高品質的圖像顯示產品的廣告內容。
透過逐步載入的方式可以讓原有的Application或Web不會造成效能的影響,可以在廣告不同的區域加上Zoom的效果。
2. 有關Deep Zoom的特性:
在使用Facebook或比較知名的App時,總是會想說為什麼它們載圖的時候,一開始出現的圖解析度很差,接著慢慢的變到原有解析度。
這樣的效果為的是加快初始化載入的速度,再慢慢改載入,常見的使用也包括:Zooming與Panning效果的呈現。Deep Zoom也採用這樣的
體驗效果,如下圖示:
透過spring animation效果讓用戶感覺圖示更在平順地改變,因此,當用戶Zooming/Panning時,即啟動該效果讓圖像不會
呈現忽然改變的樣式。
3. 如何建立一個Deep Zoom Image:
大略了解了Deep Zoom元件的特性與使用情境後,接下來先小試學習建立一個Deep Zoom的檔案。有幾個觀念要注意:
‧在應用程式使用Deep Zoom之前,必需先建立好Deep Zoom Image;
‧該Deep Zoom Image是一個由Tile組合而成的,並且JPG與PNG圖像採用不同的解析度;
‧每一個Tile的Size預設為:256x256,隨著關注的範圍而有所變動;
‧每一個Tile被儲存在一個分割的檔案,每一個圖像解析度level被分開存在不同的資料夾;
‧使用Tile的機制可讓Deep Zoom不用整個圖像下載下來,只需載入目前Screen要呈現範圍的Tile;
關於Tile與Deep Zoom運作的機制,可透過下圖解釋:
上圖可以得知為什麼圖像在載入時一開始是解析度較低的小圖,隨著Zooming/Panning後而所有不同更細緻的呈現。
那怎麼把原始的圖轉成這種多Tile的方式呢?先下載Deep Zoom Composer工具後,透過它來幫我們進行圖像的處理。
詳細介紹Deep Zoom Composer的可參考<Deep Zoom File Format Overview>,另外可以配合Photosynth工具可以建立成
360度或3個維度的呈現機制。
建立好了Deep Zoom Image檔案後,需一個載入Depp Zoom Object的元件,例如:MultiScaleImage來載入它。
該類別允許用戶開啟多個分辨度(multi-resolution)的圖像,而且透過它進行Zooming與Panning。它是Deep Zoom中最重要的元件。
預設使用者不能Zooming或Panning圖像,需透過開發者將MultiScaleImage的縮放與平移功能開發出來才能使用,並且預設情境下,
MultiScaleImage在圖像第一次載入時會自動放大,可透過UseSprings屬性來關閉。
(A) 配合屬性:
| 屬性 | 說明 |
| ViewportWidth | 設定/取得圖像實際顯示面積的寬度。 |
| ViewportOrigin | 設定/取得圖像實際顯示的左上角座標。 |
| UseSprings | 設定/取得指示是否啟動MultiScaleImage的spring animations。 |
| Source | 設定/取得MultiScaleTileSource物件,以用於MultiScaleImage的資料來源。 |
| ActualHeight | 取得FrameworkElement呈現的高度。 |
| ActualWidth | 取得FrameworkElement呈現的寬度。 |
| AllowDownloading | 設定/取得指定該MultiScaleImage是否允許被小載。 |
| AspectRatio | 取得做為MultiScaleImage圖像來源的寬高比率,該值為:圖像的寬度除以高度。 |
上述使用是常被用到的部分,尤其是ViewportWidth與ViewportOrigin這二個主要是針對MultiScaleImage目前
顯示的範圍與過去圖像處理是比較不相同的,要特別注意。
(B) 配合方法/事件:
| 方法/事件 | 說明 |
| ImageOpenFailed | 發生於執行失敗第一次載入所需要的Tile與開啟這些Tile時的事件,發生該事件也代表所有的Tile都不會被打開。 |
| ImageOpenSucceeded | 發生於執行成功第一次載入所需要的Tile與開啟這些Tile時的事件。 |
| CaptureMouse | 設定開始監控Mouse在該UIElement上的事件。 |
| ReleaseMouseCapture | 移除對該UIElement上的Mouse事件監控。 |
| ElementToLogicalPoint | 取得相對從MultiScaleImage的logic point (值為:0~1)與像素座標點。 透過該方法取得目前MultiScaleImage要進行縮放與移動內容圖像的依據,再根據改的指定值進行圖像的改變。 |
| ZoomAboutLogicalPoint | 提供用戶可以指定放大或縮小MultiScaleImage中的一固定範圍(Point)。 |
上述事件與方法中,在下述的範例也會用到,要注意在於ElementToLogicalPoint與ZoomAboutLogicalPoint二者,
它們採用的都是圖像與MultiScaleImage中的相對logical Point與像素座標點進行運算,雖然其計算原理不是重點,
但在我們進行Zooming或Panning這二個屬性是我們最關鍵的參數來源。
[範例] (以下人像圖示由該本人與所屬公司所擁有)
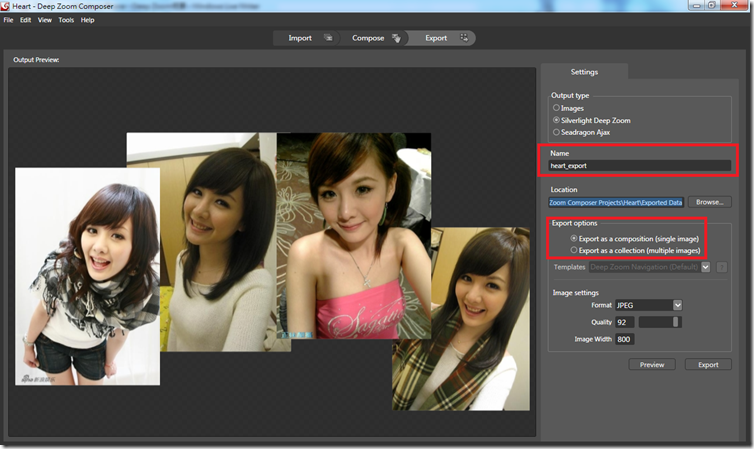
0. 透過Deep Zoom Composer工具將顯示的圖片建立成一個多解析度的圖像包;
建立好檔案後,記得Export出來,檔案目錄如下,並且下列檔案複制至Windows Phone專案中;
記得選擇Export options為:Export as a composition (single image)。
這是輸出的內容物,注意dzc_output.xml該檔案記錄了所有該專案中用到的圖示,並記下圖像分成多個
像素後的資料位置,如dzc_output_files裡的內容。
[建議]
由於圖像要跟著不同解析度分成多個檔案與相對應的Metadata資料,所有的檔案加起來的大小,老實說並不適合直接
儲存於手機中,這樣會造成XAP檔過大。所以建議將這些檔案放至於網站上,透過動態載入的方式來使用。
1. 在XAML中使用MultiScaleImage物件,將建立好的Deep Zoom Image加入,如下:
XAML檔定義:
1: <Grid x:Name="LayoutRoot" Background="Transparent">
2: <Grid.RowDefinitions>
3: <RowDefinition Height="Auto"/>
4: <RowDefinition Height="*"/>
5: </Grid.RowDefinitions>
6:
7: <!--ContentPanel - place additional content here-->
8: <Grid x:Name="ContentPanel" Grid.Row="0" Margin="0,0,0,0">
9: <!-- 定義MultiScaleImage物件 -->
10: <MultiScaleImage x:Name="msi" Height="768" Width="481"
11: VerticalAlignment="Top" HorizontalAlignment="Left" />
12: </Grid>
13: </Grid>
14:
15: <!-- 定義放大/縮小/恢復原狀的按鈕事件 -->
16: <phone:PhoneApplicationPage.ApplicationBar>
17: <shell:ApplicationBar IsVisible="True" IsMenuEnabled="True">
18: <shell:ApplicationBarIconButton IconUri="/Images/appbar.minus.rest.png" Text="in" x:Name="btnIn" Click="btnIn_Click"/>
19: <shell:ApplicationBarIconButton IconUri="/Images/appbar.new.rest.png" Text="out" x:Name="btnOut" Click="btnOut_Click" />
20: <shell:ApplicationBarIconButton IconUri="/Images/appbar.check.rest.png" Text="home" x:Name="btnHome" Click="btnHome_Click" />
21: </shell:ApplicationBar>
22: </phone:PhoneApplicationPage.ApplicationBar>
加入Deep Zoom Image,並且註冊相關的事件,包括:ImageOpenSucceeded、MouseEvent。
1: // Constructor
2: public MainPage()
3: {
4: InitializeComponent();
5: Init();
6: }
7:
8: private double zoom = 1;
9: private bool duringDrag = false;
10: private bool mouseDown = false;
11: private Point lastMouseDownPos = new Point();
12: private Point lastMousePos = new Point();
13: private Point lastMouseViewPort = new Point();
14:
15: private void Init()
16: {
17: //註冊載入成功事件
18: msi.ImageOpenSucceeded += new RoutedEventHandler(msi_ImageOpenSucceeded);
19: //指定Source,將Source放置站台中
20: msi.Source = new DeepZoomImageTileSource(
21: new Uri("http://192.168.100.102/proj1/GeneratedImages/dzc_output.xml", UriKind.Absolute));
22:
23: //增加Panning的功能
24: this.MouseMove += new MouseEventHandler(MainPage_MouseMove);
25: this.MouseLeftButtonDown += new MouseButtonEventHandler(MainPage_MouseLeftButtonDown);
26: this.MouseLeftButtonUp += new MouseButtonEventHandler(MainPage_MouseLeftButtonUp);
27: }
28:
29: void msi_ImageOpenSucceeded(object sender, RoutedEventArgs e)
30: {
31: //載入成功後,預設給予的座標與大小
32: Point tPoint = msi.ViewportOrigin;
33: msi.ViewportWidth = 1;
34: msi.ViewportOrigin = new Point(0, 0);
35: }
2. 增加Panning/Zooming功能;
透過對Page本身註冊MouseMove、MouseLeftButtonDown與MouseLeftButtonUp三個事件,增加移動與Zoom的功能。
‧MouseLeftButtonDown:
擷取目前手指點擊的位置、手指點擊位置在MultiScaleImage中的位置,並且進行CaptureMouse()的事件。
1: void MainPage_MouseLeftButtonDown(object sender, MouseButtonEventArgs e)
2: {
3: //擷取目前手指點擊的位置、手指點擊位置在MultiScaleImage中的位置
4: lastMouseDownPos = e.GetPosition(msi);
5: lastMouseViewPort = msi.ViewportOrigin;
6:
7: mouseDown = true;
8: //進行CaptureMouse()
9: msi.CaptureMouse();
10: }
‧MouseMove:
MouseMove藉由LeftButtonDown取得的目前手指座標,隨著識別是否為Drag任務時,讓Viewport隨著Mouse與它的比例進行
移動與Sprints效果的使用。
1: void MainPage_MouseMove(object sender, MouseEventArgs e)
2: {
3: lastMousePos = e.GetPosition(msi);
4: //識別是否點擊左鍵,並且還尚未進行Drag動作
5: if (mouseDown && !duringDrag)
6: {
7: //啟動Drag任務
8: duringDrag = true;
9: //取得目前ViewportWidth與座標
10: double w = msi.ViewportWidth;
11: Point o = new Point(msi.ViewportOrigin.X, msi.ViewportOrigin.Y);
12: //暫時關閉UserSprings效果,修改Viewport座標與Width
13: msi.UseSprings = false;
14: msi.ViewportOrigin = new Point(o.X, o.Y);
15: msi.ViewportWidth = w;
16: //記要縮放的比率
17: zoom = 1 / w;
18: //開啟UserSprings效果
19: msi.UseSprings = true;
20: }
21:
22: //識別如果啟動了Drag任務
23: if (duringDrag)
24: {
25: //取得Mouse左鍵按下去的坐標,進行移動的調整
26: Point newPoint = lastMouseViewPort;
27:
28: //X軸的移動比率為: (實際滑鼠移動的X - 實際在Viewport的X) / (MultiScaleImage實際的Width * MultiScaleImage View呈現的Width)
29: newPoint.X += (lastMouseDownPos.X - lastMousePos.X) / msi.ActualWidth * msi.ViewportWidth;
30: //Y軸的移動比率為: (實際滑鼠移動的Y - 實際在Viewport的Y) / (MultiScaleImage實際的Width * MultiScaleImage View呈現的Width)
31: newPoint.Y += (lastMouseDownPos.Y - lastMousePos.Y) / msi.ActualWidth * msi.ViewportWidth;
32:
33: //指定新的座標
34: msi.ViewportOrigin = newPoint;
35: }
36: }
‧MouseLeftButtonUp:
MouseLeftButtonUp用由對MultiScaleImage中的Viewport進行Zoom與相對位置的移動,透過取得上次Zoom的大小進行調整,
並且指定目前Viewport隨著Zoom後要移動的相對位置。
1: void MainPage_MouseLeftButtonUp(object sender, MouseButtonEventArgs e)
2: {
3: //識別如果不為Drag事件,只是單純的Click事件
4: if (!duringDrag)
5: {
6: //識別是否有按著Shift鍵,但手機裡沒有Shift鍵其實可以不用在意
7: bool shiftDown = (Keyboard.Modifiers & ModifierKeys.Shift) == ModifierKeys.Shift;
8: double newzoom = zoom;
9:
10: if (shiftDown)
11: {
12: newzoom /= 2;
13: }
14: else
15: {
16: //預設是最後一次更新的zoom比例 * 2
17: newzoom *= 2;
18: }
19: //呼叫Zoom方法,設定新的Zoom與相對移動的Point
20: Zoom(newzoom, msi.ElementToLogicalPoint(this.lastMousePos));
21: }
22: //關閉Drag與MouseDown的識別
23: duringDrag = false;
24: mouseDown = false;
25: //釋放擷取Mouse事件的方法。
26: msi.ReleaseMouseCapture();
27: }
3. 增加Zooming功能;
在畫面中加了三個按鈕事件,Zooming in/out與恢復原狀的事件。
1: private void Zoom(double pZoom, Point pPoint)
2: {
3: if (pZoom < 0.5)
4: {
5: pZoom = 0.5;
6: }
7: //指定MultiScaleImage內要縮放的比例與相對移動位置
8: msi.ZoomAboutLogicalPoint(pZoom / zoom, pPoint.X, pPoint.Y);
9: zoom = pZoom;
10: }
11:
12: private void btnIn_Click(object sender, EventArgs e)
13: {
14: //呼叫Zoom方式,並指定要拉進原Zoom Level的1.3倍,並且移動相對位置至新的座標
15: Zoom(zoom / 1.3, msi.ElementToLogicalPoint(new Point(.5 * msi.ActualWidth, .5 * msi.ActualHeight)));
16: }
17:
18: private void btnOut_Click(object sender, EventArgs e)
19: {
20: //呼叫Zoom方式,並指定要拉遠原Zoom Level的1.3倍,並且移動相對位置至新的座標
21: Zoom(zoom * 1.3, msi.ElementToLogicalPoint(new Point(.5 * msi.ActualWidth, .5 * msi.ActualHeight)));
22: }
23:
24: private void btnHome_Click(object sender, EventArgs e)
25: {
26: this.msi.ViewportWidth = 1;
27: this.msi.ViewportOrigin = new Point(0, -0.3);
28: zoom = 1;
29: }
4. 執行畫面:
[範例程式]
(sample code: http://sdrv.ms/NdV5EB)
======
上述有些內容是參考MSDN與<一起学Windows phone 7开发四-(DeepZoom)>一文,介紹Deep Zoom與Deep Zoom Composer
如何使用於Windows Phone上。該元件有助於撰寫一些圖像的App與應用,可以省掉開發過程中透過某些手勢原理與相對
比率計算的成本,一樣可以達成需要的效果,可以參考看看。
References:
‧DeepZoomContainer, Expanded DeepZoom for Silverlight & Windows Phone 7 Series
‧一起学Windows phone 7开发四-(DeepZoom)
‧Windows Phone 7 series will also support DeepZoom
‧Windows Phone 7 不温不火学习之【DeepZoom 详细使用方法】 & 视频:Windows Phone 7实机演示:DeepZoom示例程序
‧Designing the Windows Phone 7 “Mix Zoomery” app
‧实例解析Windows Phone开发中DeepZoom功能


