Windows Phone - 動態建立Tile的PNG圖像
根據當麻在<[WindowsPhone] 動態製作圖片至IsolatedStorage,並更新磁貼>介紹如何動態產生Tile專用的圖像後,
讓我非常有興趣,想要進一步合入我的Appc中,因為剛好有些用戶也有建議。因此,我就來了解一下作法。
本篇將針對<[WindowsPhone] 動態製作圖片至IsolatedStorage,並更新磁貼>的內容加上補充將指定的圖像建立成
PNG檔案的方法。也許你會想說幹嘛要用*.png,其原因在於Tile的BackgroundImage設定為*.png的透明底,才能
隨著Theme的顏色來切換。所以我才會需要有建立Png的需求。
〉ToolStack C# PNG Writer Library:
該篇內容裡提供了重要的元素來協助將BitmapImage轉換成*.png的檔案內容。因為在WP內鍵的WriteBitmap裡,
僅支持產生*.jpg的檔案,這樣對於要產生可以隨著WP內鍵顏色主題切換時,Tile背景色會改變是無法做到的。
因此,來看一下該篇介紹的三大元素:
(a) WriteableBitmapExtensions:
該類別主要為WriteableBitmap的Extensions類別,擴充在使用WriteableBitmap可直接呼叫WritePNG()的方法。
關於怎麼擴充既有的類別功能可以參考<Extension Methods (C# Programming Guide)>。
(b) ToolStackPNGWriterLib系列:
b-1. PNGWriter:
負責將WriteableBitmap轉換成*.png檔案的類別,搭配PngHeader與PngChunkTypes建立*.png檔案必要的元素。
b-2. PngHeader:
定義*.png檔案的標題,包括:Width、Height、BitDepath、ColorType、CompressionMethod、FilterMethod與InterlaceMethod。
b-3. PngChunkTypes:
定義一個合法的*.png檔案需要指定的類型,相關PNG的規範可以參考<PNG (Portable Network Graphics) Specification>。
(c) ToolStackCRCLib系列:
c-1. CRC32:定義CRC32的數據值做為計算之用;
c-2. Adler32:定義 Adler32 CRC 的數據值做為計算之用;
大致上了解其三個類別的觀念就好,最重要的類別在於Extension method的WriteableBitmapExtensions。往下便透過範例來加以說明。
〉範例說明:
(1) 先透過VS 2012的NuGet取得「WriteableBitmapEx」,即會得到如下三個檔案:
(2) 定義要做為Tile的模版:
此處我使用的是UserControl的方式,把要建立的模版定義好,並且開發屬性讓產生者可以使用。圖示如下:
對應的xaml指定如下:
<UserControl x:Class="DynaBuildTile.TileTemplate.Tile_Sample"
xmlns="http://schemas.microsoft.com/winfx/2006/xaml/presentation"
xmlns:x="http://schemas.microsoft.com/winfx/2006/xaml"
xmlns:d="http://schemas.microsoft.com/expression/blend/2008"
xmlns:mc="http://schemas.openxmlformats.org/markup-compatibility/2006"
mc:Ignorable="d"
FontFamily="{StaticResource PhoneFontFamilyNormal}"
FontSize="{StaticResource PhoneFontSizeNormal}"
Foreground="{StaticResource PhoneForegroundBrush}"
d:DesignHeight="159" d:DesignWidth="159">
<Grid x:Name="LayoutRoot">
<Grid.ColumnDefinitions>
<ColumnDefinition Width="40*" />
<ColumnDefinition Width="60*" />
</Grid.ColumnDefinitions>
<StackPanel Grid.Column="0" HorizontalAlignment="Center" VerticalAlignment="Center">
<!-- 定義放置City的TextBlock -->
<TextBlock x:Name="tblCity" Text="高雄" TextWrapping="Wrap"
Style="{StaticResource PhoneTextExtraLargeStyle}" />
</StackPanel>
<StackPanel Grid.Column="1" HorizontalAlignment="Center" VerticalAlignment="Center"
Margin="0,0,0,10">
<!-- 定義放置Bus Name的TextBlock -->
<TextBlock x:Name="tblNumber" Text="紅22-台北港小" TextWrapping="Wrap"
FontWeight="Bold" FontSize="26" FontFamily="Segoe WP Black"
/>
</StackPanel>
</Grid>
</UserControl>
(3) 在MainPage.xaml撰寫建立Tile的邏輯;
在撰寫邏輯時,有一個要特別注意的地方:「要能夠讓WriteableBitmap建立的圖像,均需要顯示於Page之中」,
但是UserControld加到既有的畫面,將會造成排版的問題,而且我不想被用戶看到有這個東西,那該怎麼辦呢?
這其中有一個重點:「設定該UserControl的Margin Top為負的最大值,再加入畫面」(非常感謝當麻的指導)。那往下快來看看怎麼做吧。
3.1. 先在「Shared\SheelContent」建立一個目錄,放置所建立的*.png檔(這是選用的,並不一定要做這個動作);
private async Task<bool> BuildFolder()
{
StorageFolder tFolder = null;
StorageFolder tSTileFolder = null;
try
{
// 取得shared/sharedcontent目錄,並且試著取得指定目錄sencondTiles
tFolder = await Windows.Storage.ApplicationData.Current.LocalFolder.GetFolderAsync("Shared");
tFolder = await tFolder.GetFolderAsync("ShellContent");
tSTileFolder = await tFolder.GetFolderAsync("secondTiles");
}
catch (Exception ex) {}
if (tSTileFolder == null)
{
try
{
//代表不存在,建立一個新的Folder
tSTileFolder = await tFolder.CreateFolderAsync("secondTiles");
}
catch (Exception ex) {}
}
return true;
}
3.2. 建立UserControl並且加入至畫面中;
private async void btnCreateTile_Click(object sender, RoutedEventArgs e)
{
//建立指定的目錄
await BuildFolder();
//Tile範例1
gTileSample = new Tile_Sample();
gTileSample.tblCity.Text = "台北";
gTileSample.tblNumber.Text = "787經瑞芳工業區";
gTileSample.Height = 159;
gTileSample.Width = 159;
//定義該元件需要出現在非用戶可視的範圍
gTileSample.Margin = new Thickness(0, -1000, 0, 0);
LayoutRoot.Children.Add(gTileSample);
}
3.3. 將該UserControl利用WriteableBitmap寫成*.png檔至Shared\ShellContent\secondTiles,並且建立Tile至畫面中;
private Tile_Sample gTileSample = null;
private string gFileName = "DyncTile";
private string gRelatviePath = @"\Shared\ShellContent\secondTiles\";
private string gRelativePath2 = @"isostore:/Shared/ShellContent/secondTiles/";
private void AddTile()
{
string tFilePath = string.format("{0}{1}.png", gRelatviePath, gFileName);
WriteableBitmap wb = new WriteableBitmap(gTileSample, null);
var isolatedStorage = IsolatedStorageFile.GetUserStoreForApplication();
//如果檔案存在,先刪除
if (isolatedStorage.FileExists(fileName))
isolatedStorage.DeleteFile(fileName);
//建立檔案
var fileStream = isolatedStorage.CreateFile(fileName);
//將WriteableBitmap寫入至PNG
wb.WritePNG(fileStream);
fileStream.Close();
//建立Tile至Start畫面
StandardTileData tTileData = new StandardTileData
{
//指定BackgroundImage需要用Absolute,所以用isostore
BackgroundImage = new Uri(gRelatviePath2 + gFileName + ".png", UriKind.Absolute),
Title = "Sample"
};
ShellTile.Create(new Uri("/MainPage.xaml?Key=pou&id=" + gFileName, UriKind.Relative), tTileData);
}
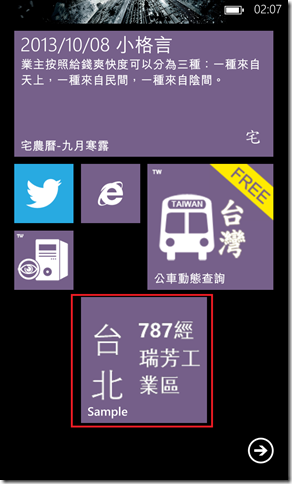
4. 執行結果:
[範例程式]
[注意]
a. ShellTile的BackgroundImage或BackBackgroundImage,需要指定在「Shared\ShellContent」裡的圖像;
b. 要能夠讓WriteableBitmap建立的圖像,均需要顯示於Page之中;
======
以上是簡單改寫了當麻的範例所補充的內容。當然如果你使用的Tile不需要產生透明背景,那就不用太在意了,大家可以參考看看,作為筆記。
References:
‧WriteableBitmapEx & save PNG (transparent picture)
‧ToolStack C# PNG Writer Library (重要)
‧[WindowsPhone] 動態製作圖片至IsolatedStorage,並更新磁貼
‧Windows Phone 7 – Screenshot你的WP7 App
‧Windows Phone 7 - 學習新的Secondary Tile與Application Tile
‧Pre-defined system styles and resources in Windows Phone 7
‧Centering TextBlock text inside border element
‧Is there any way to save an image object as png to keep the transparent colour
‧Saving WriteableBitmap to PNG
‧Saving a bitmap to png and retrieving back - Windows Phone 8
‧Extension Methods (C# Programming Guide) (重要觀念)
‧How to: Implement and Call a Custom Extension Method (C# Programming Guide)


