Windows Phone 8 - 建立App專屬聯絡人資訊(ContactStore)
在WP7的時候介紹了如何操作聯絡人的功能,例如:<Windows Phone 7 - 存取聯絡人與行事曆資料>。
到了WP8之後增加了一個非常不一樣的聯絡人相關的API:ContactStore,也是該篇文章要介紹的主題。
什麼是ContactStore?
‧提供讓App可以建立自己專屬的Contact Store(聯絡人儲存區);
‧系統會自動將建立好的Contact Store整合入People Hub中。
‧除了在App操作既有的Contact集合的資訊(例如:Windows Live、Facebook…等),
也可以增加自訂的Custom Properties加以擴充;
=> 需注意自訂的Custom Properties需儲存於Contact Store中;
=> 並不會顯示在People Hub的Contact Card上,而是需要透過App加以程序化操作;
‧ContactStore API提供讓App自訂義的Contact store可與現有Contact Store加以同步與比對變化;
[注意]
‧每一個App只能有一個Contact Store;
‧App建立Contact Store後,系統在整合入People Hub時,可能會造成People Hub在使用上會有lag的狀況;
=> 不用擔心,等系統整合完畢後該問題即不存在。
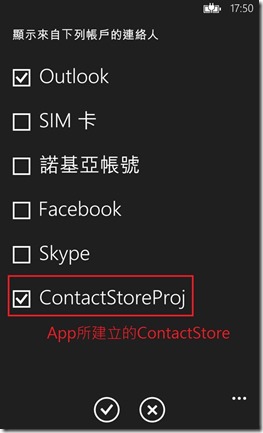
‧App建立的contact Store自動整合入People Hub,如果不想讓People Hub看起來很混亂;
=> 可至「設定->應用程式->聯絡人->篩選我的聯絡人清單」,取消勾選該App的資源來源。
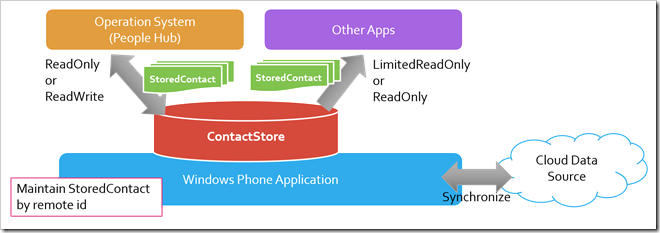
可以利用下圖來說明ContactStore與系統、其他應用程式的關係:
一個App可以建立一個專屬的ContactStore,並且設定該ContactStore被系統或其他Apps存取的權限,
在操作透過StoredContact物件為單位;App經由Cloud Data Source取得最新的資訊並同步至既有的StoredContact裡,
而同步的方式則是依賴StoredContact.RemoteId的屬性來維持一致性,所以每一個RemoteId必需是unique的。
往下便加以針對ContactStore的相關命名空間與類別加以說明:
〉Windows.Phone.PersonalInformation namespace:
主要提供APIs負責管理自訂的contact store。透過下表來概要說明具有的元素:
| 類型 | 名稱 | 說明 |
| Class | ContactAddress | Represents a civic address for StoredContact objects. |
| ContactChangeRecord | Represents a change in contact information that occurred between revisions. | |
| ContactInformation | Represents a contact without an association to a contact store. | |
| ContactQueryOptions | Represents query options for retrieving contacts using CreateContactQuery. | |
| ContactQueryResult | Represents the result of a contact query. 在建立ContactQueryResult可搭配ContactQueryOptions指定查詢的條件與排序的方式。 重要的方法: ‧GetContactCountAsync Gets the number of contacts in the contact store. ‧GetContactsAsync() Retrieves contacts from the contact store. ‧GetContactsAsync(UInt32, UInt32) Retrieves contacts from the contact store given the specified starting index and number of items to return. ‧GetCurrentQueryOptions Gets the current query options. | |
| ContactStore | Represents the custom contact store for a Windows Phone app. | |
| KnownContactProperties | Provides key names for accessing known properties for StoredContact or ContactInformation objects. | |
| StoredContact | Represents a contact associated with a custom contact store. | |
| Enumerations | ContactChangeType | Indicates the type of change represented by a ContactChangeRecord. |
| ContactQueryResultOrdering | The order in which contacts are returned from CreateContactQuery. | |
| ContactStoreApplicationAccessMode | Specifies the application access mode for a custom contact store created with CreateOrOpenAsync. | |
| ContactStoreSystemAccessMode | Specifies the system access mode for a custom contact store created with CreateOrOpenAsync. | |
| VCardFormat | The format of a vCard. | |
| Interface | IContactInformation | Defines the interface for contact information. |
在使該用該Namepsace下的元素時要,要記得開啟對應的<Capabilities />:「ID_CAP_CONTACTS 」。
上述大致上列出該Namesapce具有的元素,往下一一針對如何操作ContactStore與使用StoredContact來加以說明。
為代表每一個App專屬的custom contact store。搭配CreateOrOpenAsync()建立或開啟contact store,搭配StoredContact物件加以
操作該contact store裡的資料。往下說明可用的方法與使用方式:
| 類型 | 名稱 | 說明 |
| Property | RevisionNumber | Read-only。取得contact store的版本號。 |
| Method | CreateContactQuery() | 使用預設的查詢選項建立一個contact query已取得ContactQueryResult。 |
| CreateContactQuery(ContactQueryOptions) | 使用自訂的查詢選項建立一個contact query已取得ContactQueryResult。 ‧ContactQueryOptions: 用於指定contact query的查詢選項,具有二個屬性可以使用: > DesiredField:ready-only,設定/取得查詢結果的contact要顯示的屬性清單; > OrderBy:設定/取得查詢結果的contact要用那一個欄位進行排序; | |
| CreateOrOpenAsync() | 開啟App專屬的custom contact store,如果該store不存在預設會自動建立一個。 | |
| CreateOrOpenAsync(ContactStoreSystemAccessMode, ContactStoreApplicationAccessMode) | 開啟App專屬的custom contact store,如果該store不存在預設會自動建立一個。 搭配ContactStoreSystemAccessMode與ContactStoreApplicationAccessMode來指定contact store被存取的權限,說明如下: ‧ContactStoreSystemAccessMode: 指定系統本身操作該contact store的方式: > ReadOnly:系統僅能讀取該contact store; > ReadWrite:系統可以修改該contact store中的contacts; (through its built-in contacts experience.) ‧ContactStoreApplicationAccessMode: 指定其他應用程式可以操作該contact store的方式: > LimitedReadOnly:只能讀取store中contacts的description、display picture; > ReadOnly:可以讀取所有store中contacts的屬性;
預設指定為:ContactStoreSystemAccessMode.ReadOnly與ContactStoreApplicationAccessMode.LimitedReadOnly; | |
| DeleteAsync | 刪除custom contact store。 | |
| DeleteContactAsync | 刪除custom contact store中指定contact ID的Contact。 | |
| FindContactByIdAsync | 檢索custom contact store中指定contact ID的Contacts,取得IAsyncOperation<StoredContact>的集合。 | |
| FindContactByRemoteIdAsync | 檢索custom contact store中指定contact remote ID的Contacts,取得IAsyncOperation<StoredContact>的集合。 | |
| GetChangesAsync | 獲取變更與所提供的版本號相關聯的聯繫人存儲的列表。 回傳值為:IAsyncOperation<IVectorView>。 | |
| LoadExtendedPropertiesAsync | 為custom contact store載入擴充的屬性集合。 回傳值:IAsyncOperation<IDictionary>。 該方法被用於針對contact store載入擴充的屬性,而不是針對個別的contact。 常見情境即是用於有的contact store加入延伸的屬性,利用revision number來與remote contact store進行同步,取得extension properties來加入既有的contact store。 | |
| SaveExtendedPropertiesAsync | 儲存新提供的name/value清單至custom contact store的擴充屬性。 SaveExtendedPropertiesAsync( IReadOnlyDictionary<String, Object> data ) 。 |
代表關聯於custom contact store的contact物件。相關的建構子、方法與屬性說明如下:
| 類型 | 名稱 | 說明 |
| Constructor | StoredContact(ContactStore) | 初始化StoredContact類別的實體。 |
| StoredContact(ContactStore, ContactInformation) | 初始化StoredContact類別的實體,並給予具有初始化相關屬性的ContactInformation物件。 | |
| Method | GetDisplayPictureAsync | 取得stored contact的顯示圖像。 |
| GetExtendedPropertiesAsync | 取得stored contact的擴充屬性集合,採用name/value pairs呈現。 | |
| GetPropertiesAsync | 取得contact已知的屬性集合。 | |
| ReplaceExistingContactAsync | 利用目前的StoredContact取代指定ID的contact。 | |
| SaveAsync | 儲存目前StoedContact的狀態與屬性至contact store。 | |
| SetDisplayPictureAsync | 使用IInputStream object設定contact的顯示圖像。 | |
| ToVcardAsync() | 採用vCard 3.0 format來將contact加以表示。 | |
| ToVcardAsync(VCardFormat) | 採用特定vCard format來將contact加以表示。 | |
| Property | DisplayName | Read/write。設定/取得stored contact的顯示名稱。 |
| DisplayPicture | Read-only。取得stored contact的顯示圖像。 | |
| FamilyName | Read/write。設定/取得stored contact的家庭名稱。 | |
| GivenName | Read/write。設定/取得stored contact的特定名稱。 | |
| HonorificPrefix | Read/write。設定/取得stored contact的honorific prefix(敬語前綴)。 | |
| HonorificSuffix | Read/write。設定/取得stored contact的honorific suffix(敬語後綴)。 | |
| Id | Read-only。取得stored contact的local identifier(該值由系統自動給予)。 | |
| RemoteId | Read/write。設定/取得stored contact的remote identifier。 | |
| Store | Read-only。取得stored contact所儲存的ContactStore。其值在StoredContact建構子時就會被給予。 |
要使用StoredContact時預先要取得ContactStore,另外StoredContact是利用 local id(來自系統給予)與 remote id來加以管理,
利用remote + local id來建立關聯電話中的contact與cloud上的contact;所以App裡如果要管理自訂義的Contact可給予唯一的
RemoteId來予後端的系統資料加以對應。
如果要操作的聯絡人資訊未被儲存於ContactStore或StoredContact,可藉由ContactInformation加以描述來使用。
以上說明完重要的類別與方法後,往下便藉由範例的方式來說明如何加以運用。
[範例]
該範例的情境,例如:
a. 做一個App專屬於某家公司的零件維修人員專用;
b. App自動會建立專屬的聯絡人,用戶不需要手動建立;
c. 專屬聯絡人的資料由後端系統維護;
了解該範例的情境後,以下分成幾個步驟來加以介紹操作的方式:
A. 建立後端聯絡人資料檔案(以XML檔為例),負責管理StoredContact.RemoteId;
<?xml version="1.0" encoding="utf-8" ?>
<contacts version="1">
<contact rid="10000" dname="jenna" fname="wang" gname="jenna" prefix="" suffix="">
<picture>https://fbcdn-sphotos-f-a.akamaihd.net/hphotos-ak-prn1/t1/75603_10153754407645367_493094653_n.jpg?dl=1</picture>
<mphone>0932111222</mphone>
<mail>jenna@live.com</mail>
<jobtitle>Actor</jobtitle>
</contact>
<contact rid="10001" dname="安心亞" fname="" gname="" prefix="" suffix="">
<picture>https://fbcdn-sphotos-e-a.akamaihd.net/hphotos-ak-prn2/t1/1502517_10153643531660467_768374391_n.jpg?dl=1</picture>
<mphone>0932111222</mphone>
<mail>annie@live.com</mail>
<jobtitle>Actor</jobtitle>
</contact>
<contact rid="10002" dname="Zooey Deschanel" fname="Deschanel" gname="" prefix="" suffix="">
<picture>http://images.artistdirect.com/Images/nad/video/tribune/65426/65426_bc.jpg</picture>
<mphone>0932111123</mphone>
<mail>zooey@live.com</mail>
<jobtitle>Actor</jobtitle>
</contact>
<contact rid="10003" dname="Natalie Portman" fname="" gname="" prefix="" suffix="">
<picture>http://beauty.nownews.com/img/27/i26127-24.jpg</picture>
<mphone>0932147699</mphone>
<mail>portman@live.com</mail>
<jobtitle>Actor</jobtitle>
</contact>
</contacts>
以上是使用XML的方式建立了聯絡人的資訊,當然如果具有自行管理的聯絡人系統就可以不用這樣麻煩。
該範例把建立好的XML檔放置至於網路空間:Skydrvie或Dropbox均可以。
B. 建立一個畫面專門用於同步與匯入遠端聯絡人資料檔;
b-1. XAML:
<!--TitlePanel contains the name of the application and page title-->
<StackPanel x:Name="TitlePanel" Grid.Row="0" Margin="12,17,0,28">
<TextBlock Text="ContactStore Project" Style="{StaticResource PhoneTextNormalStyle}" Margin="12,0"/>
<TextBlock Text="同步" Margin="9,-7,0,0" Style="{StaticResource PhoneTextTitle1Style}"/>
</StackPanel>
<!--ContentPanel - place additional content here-->
<Grid x:Name="ContentPanel" Grid.Row="1" Margin="12,0,12,0">
<StackPanel>
<Button Content="點擊同步" Click="Button_Click" />
<TextBlock x:Name="tblTile" Text="同步狀態" Margin="15,5,5,10" />
<toolkit:WrapPanel Width="450" Height="300">
<TextBlock TextWrapping="Wrap"
x:Name="tblResultMsg"
Width="440" Height="300"
Margin="5" />
</toolkit:WrapPanel>
<Button Content="操作Contact Store" Click="Button_Click_1" />
</StackPanel>
</Grid>
b-2. 在OnNavigationTo初始化ContactStore物件;
private ContactStore gMyCStore = null;
protected async override void OnNavigatedTo(NavigationEventArgs e)
{
base.OnNavigatedTo(e);
// 進行必要元件的初始化
if (gMyCStore == null)
{
gMyCStore = await ContactStore.CreateOrOpenAsync();
// 可搭配對應的AsscessMode來初始化ContactStore。
//gMyCStore = await ContactStore.CreateOrOpenAsync(
// ContactStoreSystemAccessMode.ReadWrite,
// ContactStoreApplicationAccessMode.ReadOnly);
}
}
b-3. 建立按鈕事件來觸發 下載聯絡人資料檔案的任務;
private void Button_Click(object sender, RoutedEventArgs e)
{
// 下載遠端的聯絡人資料檔案
string tURL = "";
HttpWebRequest tRequest = HttpWebRequest.CreateHttp(tURL);
tRequest.BeginGetResponse((IAsyncResult ar) =>
{
if (ar.IsCompleted)
{
HttpWebResponse tResponse =
(HttpWebResponse)tRequest.EndGetResponse(ar);
if (tResponse.StatusCode == HttpStatusCode.OK)
{
using (StreamReader tResponseStream =
new StreamReader(tResponse.GetResponseStream()))
{
string strResult = tResponseStream.ReadToEnd();
XDocument tXDoc = XDocument.Parse(strResult);
// 識別是否需要進行更新
bool tIsNeedUpdate = true;
if (IsolatedStorageSettings.ApplicationSettings.Contains("cs_v") == true)
{
double tV = double.Parse(
IsolatedStorageSettings.ApplicationSettings["cs_v"].ToString());
var tNVersoin = double.Parse(tXDoc.Root.Attribute("version").Value);
if (tNVersoin <= tV) tIsNeedUpdate = false;
}
if (tIsNeedUpdate)
{
// 進行更新
FeedDataToContactStore(tXDoc);
}
}
}
}
}, tRequest);
}
上述程式除了完成下載聯絡人資料檔之外,也做了版本的比對,這樣一來只要管理後端的資料檔,
等用戶按下同步,App就可以取得最新的資料檔案進行更新了。
b-4. 負責匯入聯絡人資料至ContactStore;
/// <summary>
/// 將遠端聯絡人資訊更新至本地的ContactStore。
/// </summary>
/// <param name="pXDoc"></param>
private async void FeedDataToContactStore(XDocument pXDoc)
{
try
{
var tDataSet = from CItem in pXDoc.Descendants().Elements("contact")
select CItem;
// 遂一更新既有的聯絡人
foreach (XElement tCItem in tDataSet)
{
StoredContact tCObj = null;
// 先識別指定的Id是否已經存在了,才不會重覆加入StoredContact
tCObj = await gMyCStore.FindContactByRemoteIdAsync(tCItem.Attribute("rid").Value);
if (tCObj == null)
{
// 代表指定的RemoteId不存在於custom ContactStore
tCObj = new StoredContact(gMyCStore);
tCObj.RemoteId = tCItem.Attribute("rid").Value;
}
// 填入必要的參數
tCObj.DisplayName = tCItem.Attribute("dname").Value;
tCObj.FamilyName = tCItem.Attribute("fname").Value;
tCObj.GivenName = tCItem.Attribute("gname").Value;
tCObj.HonorificPrefix = tCItem.Attribute("prefix").Value;
tCObj.HonorificSuffix = tCItem.Attribute("suffix").Value;
// 利用GetPropertiesAsync填入已知的聯絡人資訊
IDictionary<string, object> props = await tCObj.GetPropertiesAsync();
if (props.ContainsKey(KnownContactProperties.Email))
props[KnownContactProperties.Email] = tCItem.Element("mail").Value;
else
props.Add(KnownContactProperties.Email, tCItem.Element("mail").Value);
if (props.ContainsKey(KnownContactProperties.MobileTelephone))
props[KnownContactProperties.MobileTelephone] = tCItem.Element("mphone").Value;
else
props.Add(KnownContactProperties.MobileTelephone, tCItem.Element("mphone").Value);
if (props.ContainsKey(KnownContactProperties.JobTitle))
props[KnownContactProperties.JobTitle] = tCItem.Element("jobtitle").Value;
else
props.Add(KnownContactProperties.JobTitle, tCItem.Element("jobtitle").Value);
// 增加擴充的屬性描述
IDictionary<string, object> extprops = await tCObj.GetExtendedPropertiesAsync();
if (extprops.ContainsKey("Provider") == false)
extprops.Add("Provider", "Pou Mason - ContactStoreProj");
// 填入呈現的圖像
try
{
HttpWebRequest tRequest = HttpWebRequest.CreateHttp(tCItem.Element("picture").Value);
tRequest.BeginGetResponse(async (IAsyncResult ar) =>
{
if (ar.IsCompleted)
{
HttpWebResponse tResponse = (HttpWebResponse)tRequest.EndGetResponse(ar);
if (tResponse.StatusCode == HttpStatusCode.OK)
{
await tCObj.SetDisplayPictureAsync(tResponse.GetResponseStream().AsInputStream());
// 由於是不同的thread,所以要再使用一次SaveAsync()
await tCObj.SaveAsync();
}
}
}, tRequest);
}
catch (Exception) { }
// 儲存至ContactStore
await tCObj.SaveAsync();
// 更新進度
Dispatcher.BeginInvoke(() =>
{
tblTile.Text += string.Format("\nname: {0}, \t{1}", tCObj.DisplayName, "success");
});
}
}
catch (Exception ex)
{
Dispatcher.BeginInvoke(() =>
{
tblTile.Text += ex.Message;
});
}
}
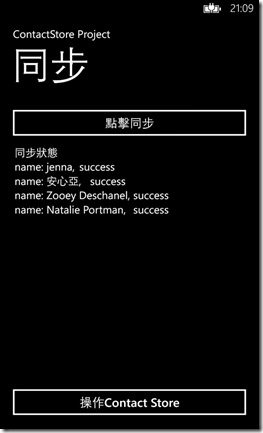
上述程式根據取得的XML資料加以匯入至ContactStore,每一個<contact />搭配一個rid的唯一值來對應ContactStore
中的StoredContact物件,加以識別是否具有存在的Properties與ExtendedProperties,並採用非同步設定它的DisplayPicture。
[注意]
a. 裡面使用了HttpWebRequest的並沒有做最佳化的處理,所以當大量資料匯入時可能會有問題。
b. 採用非同步下載圖像資料時,由於與匯入基本資料屬於不同的Thread,所以要設定二次的SaveAsync()。
c. 如果在撰寫匯入資料至ContactStore太久時,建議可以分批同步,可搭配Backgroun Agent的方式來定期分批匯入;
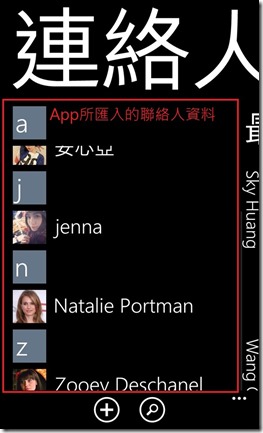
至步驟B就完成了匯入聯絡人至ContactStore的任務,以下為執行的畫面:
透過上圖可以得知自行App所建立的ContactStore對於People Hub也是一個篩選的資料來源,因此,
如果用戶安裝了你的App之後一定會發現不認識的聯絡人增加了很多,此時,可以在App給一些提示告知他們如果隱藏這些聯絡人:
可至「設定->應用程式->聯絡人->篩選我的聯絡人清單」,取消勾選該App的資源來源。
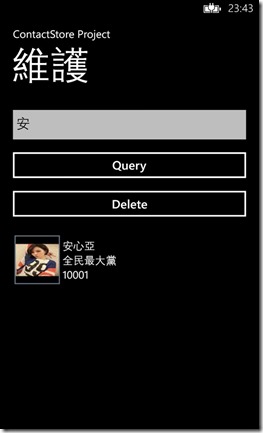
C. 搜尋指定的聯絡人;
c-1. 定義搜尋的畫面:
<!--ContentPanel - place additional content here-->
<Grid x:Name="ContentPanel" Grid.Row="1" Margin="12,0,12,0">
<Grid.RowDefinitions>
<RowDefinition Height="13*" />
<RowDefinition Height="25*" />
<RowDefinition Height="62*" />
</Grid.RowDefinitions>
<TextBox Grid.Row="0" x:Name="txtName" />
<StackPanel Grid.Row="1">
<Button Content="Query" x:Name="btnQuery" Click="btnQuery_Click" />
<Button Content="Delete" x:Name="btnDelete" Click="btnDelete_Click" />
</StackPanel>
<ListBox x:Name="lstContact" Grid.Row="2">
<ListBox.ItemTemplate>
<DataTemplate>
<StackPanel Orientation="Horizontal" Margin="15">
<Border BorderThickness="2"
HorizontalAlignment="Left"
BorderBrush="{StaticResource PhoneAccentBrush}" >
<Image Source="{Binding Converter={StaticResource ContactPictureConverter}}"
Width="80" Height="60"
Stretch="Fill" />
</Border>
<StackPanel Margin="5">
<TextBlock Text="{Binding Path=DisplayName, Mode=OneWay}" VerticalAlignment="Center" />
<TextBlock Text="{Binding Path=FamilyName, Mode=OneWay}" VerticalAlignment="Center" />
<TextBlock Text="{Binding Path=RemoteId, Mode=OneWay}" VerticalAlignment="Center" />
</StackPanel>
</StackPanel>
</DataTemplate>
</ListBox.ItemTemplate>
</ListBox>
</Grid>
c-2. 定義了IValueConvert負責將StoredContact中的DisplyPicture轉換成WriteableBitmap;
/// <summary>
/// 客製一個轉換聯絡人圖片的類別,透過實作IValueConverter Interface覆寫指定轉換的功能。
/// </summary>
public class ContactPictureConverter : IValueConverter
{
public object Convert(object value, Type targetType, object parameter, System.Globalization.CultureInfo culture)
{
if (value == null) return null;
StoredContact tC = value as StoredContact;
// 取得DisplayPciture的值,採用Task的方式取代await的使用方法,強迫執行序等待
var tTask = tC.GetDisplayPictureAsync().AsTask();
tTask.Wait();
// 將取得的IRandomAccessStream轉換成Steam並建立成WriteableBitmap
WriteableBitmap tWbmap = Microsoft.Phone.PictureDecoder.DecodeJpeg(tTask.Result.AsStream());
return tWbmap;
}
public object ConvertBack(object value, Type targetType, object parameter, System.Globalization.CultureInfo culture)
{
throw new NotImplementedException();
}
}
由於DisplyPicture的取得需採用非同步的方式,依照過去的寫法一定會加上await,但這樣會讓IValueConvert無法識別回傳值,
所以沒有辦法直接使用async + await的方式。因此,這篇改用直接將await轉換成一個Task的物件,並且強迫該Task進行等待,
等待取得圖像IRandomAccessStream後,最後再轉換成WriteableBitmap回傳至Image物件。
詳細內容參考<XAML Image From Path>。
c-3. 定義搜尋的邏輯:
private async void btnQuery_Click(object sender, RoutedEventArgs e)
{
// 建立一個ContactQueryResult
ContactQueryResult tResultObj = gMyCStore.CreateContactQuery();
// 也可以搭配指定要搜尋的項目
//ContactQueryOptions tOptions = new ContactQueryOptions();
//tOptions.DesiredFields.Add(KnownContactProperties.Email);
//tOptions.OrderBy = ContactQueryResultOrdering.SystemDefault;
//ContactQueryResult tResultObj = gMyCStore.CreateContactQuery(tOptions);
// 取得目前ContactStore中有聯絡人的數量
uint tCount = await tResultObj.GetContactCountAsync();
// 取得目前所有的聯絡人集合
IReadOnlyList<StoredContact> tContacts = await tResultObj.GetContactsAsync();
// 根據輸入的文字搜尋StoredContact
IEnumerable<StoredContact> tSearch = tContacts.Where(x => x.DisplayName.Contains(txtName.Text));
lstContact.ItemsSource = tSearch;
}
配合ContactQueryResult的物件取得目前在ContactStore中所具有的所有StoredContact,並搭配LINQ進行搜尋。
D. 刪除指定聯絡人的資料;
private async void btnDelete_Click(object sender, RoutedEventArgs e)
{
if (lstContact.SelectedIndex != -1)
{
StoredContact tContact = lstContact.SelectedItem as StoredContact;
// 必須使用StoredContact.Id (local id),因為該值是由系統給予的。
await gMyCStore.DeleteContactAsync(tContact.Id);
MessageBox.Show("移除成功!");
ContactQueryResult tResultObj = gMyCStore.CreateContactQuery();
lstContact.ItemsSource = await tResultObj.GetContactsAsync();
}
}
根據選擇指定的StoredContact,取得它的Id(local Id)指定給ContactStore來進行刪除。
看一下執行的畫面與結果:
E. 搭配vCard的處理:
以上即是介紹如何操作自行建立的ContactStore。
[範例程式]
使用該範例程式時,記得先將裡面的RemoteContact.xml檔案放至Dropbox或其他免費空間,並更換b-3中的tURL變數才有辦法正常使用喔。
======
該篇文章我覺得對於如果您想要做App與People Hub加上整合或是擴充現有聯絡人的功能,
可以詳細去了解其中的運作原理,這樣可以讓你的App更加的強力。
希望解釋的還算清楚對大家有所幫助。
References:
‧Custom contact store for Windows Phone
‧How to perform basic custom contact store operations for Windows Phone
‧Building a Custom Contact Store in Your Windows Phone 8 Application
‧Using the Windows Phone Custom Contact Store
‧How to display the photo of a contact for Windows Phone
‧Contact filtering and matching for Windows Phone & Contacts.SearchAsync Method
‧Convert XML to Object using LINQ
‧《深入浅出Windows Phone 8应用开发》之程序联系人存储
‧Tag Archives: convert Stream to IRandomAccessStream
‧Display Image from Stream in Windows 8 and Windows Phone 8
‧Using User-Provided Images for Secondary Tiles
‧Set display picture of StoredContact from byte[]
‧与众不同 windows phone (39) - 8.0 联系人和日历
‧Drawing / Inking API in WinRT (C#) – II
