UWP - 整合 Google Sign-In 與 Twitter Sign-In API
在<Universal App - 整合 Facebook Login>介紹了如何整合 Facebook 登入機制,接下來這一篇介紹如何整合 Google 與 Twitter 的 Sign-In API。
主要使用的技術仍然是透過 WebAuthenticationBroker 來完成,相關的説明可以參考 <Universal App - 整合 Facebook Login> 整理的内容。
不多說往下直接說主題。
》Google:
UWP App 要整合 Google Sign-In API 不像 iOS/Android 有寫好現成官方的 SDK。不過我們任然可藉由 OAuth for Web 的驗證方式。
參考<Using OAuth 2.0 for Web Server Applications>的説明,主要的步驟如下:
1. 開啓 Google Developer Console 建立一個專案(或是使用已經存在的 Project);
檢查建立好的 Project 是否有開啓對應的憑證,OAuth 授權同意畫面設定,與其他相關的設定,詳細説明可以參考<Using OAuth 2.0 to Access Google APIs>的教學。
其重點就是要取得 OAuth 專用的 Client ID 與 Client Secret。
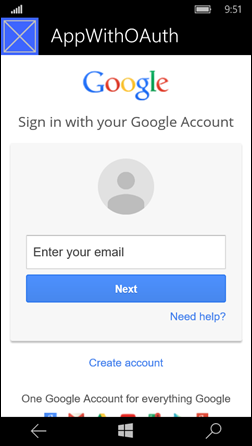
2. 建立一個使用 WebAuthenticationBroker 的類別:GoogleSigninAP 來處理取得 Google Sign-In 的 Access token。
主要運作原理:
(1) https://accounts.google.com/o/oauth2/auth? 請求登入畫面讓用戶輸入帳密取得 code;
(2) 使用 code 向 https://www.googleapis.com/oauth2/v3/token 取得 Access Token;
使用方式:
private async void OnGoogleSignInAPIClick(object sender, RoutedEventArgs e)
{
// 請求取得 access token
var json = await GoogleSignInAPI.InvokeGoogleSignIn();
// 轉換成 json 物件
var accessToken = new GoogleAccessToken(json);
// 取得 user profile
var userProfile = await GoogleSignInAPI.GetUserInfo(accessToken.access_token);
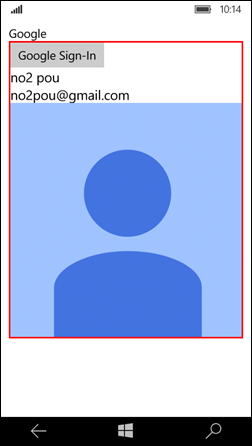
txtGoogleSignInResult.Text = userProfile.name + "\n" + userProfile.email;
var bitmapImage = new BitmapImage();
bitmapImage.UriSource = new Uri(userProfile.picture);
imgPicture.Source = bitmapImage;
imgPicture.Visibility = Visibility.Visible;
}
分別來看如何取得 code:
public static async Task<String> InvokeGoogleSignIn()
{
try
{
String GoogleURL = GetOAuthUrl(clientId, callbackUrl);
System.Uri StartUri = new Uri(GoogleURL);
// When using the desktop flow, the success code is displayed in the html title of this end uri
System.Uri EndUri = new Uri("https://accounts.google.com/o/oauth2/approval?");
WebAuthenticationResult WebAuthenticationResult = await WebAuthenticationBroker.AuthenticateAsync(
StartUri,
EndUri);
WebAuthenticationOptions.UseTitle,
if (WebAuthenticationResult.ResponseStatus == WebAuthenticationStatus.Success)
{
var result = WebAuthenticationResult.ResponseData.ToString();
if (result.Contains("Success"))
{
// 取得需要的 code
String code = result.Replace("Success ", "");
Int32 firstIdx = code.IndexOf("code=");
code = code.Substring(firstIdx + 5);
code = code.Substring(0, code.IndexOf("&"));
result = await RedirectGetAccessToken(code);
}
return result;
}
else if (WebAuthenticationResult.ResponseStatus == WebAuthenticationStatus.ErrorHttp)
{
return "HTTP Error returned by AuthenticateAsync() : " + WebAuthenticationResult.ResponseErrorDetail.ToString();
}
else
{
return "Error returned by AuthenticateAsync() : " + WebAuthenticationResult.ResponseStatus.ToString();
}
}
catch (Exception ex)
{
//
// Bad Parameter, SSL/TLS Errors and Network Unavailable errors are to be handled here.
//
return ex.Message;
}
}
private static String GetOAuthUrl(String id, String back)
{
StringBuilder builder = new StringBuilder();
builder.Append("https://accounts.google.com/o/oauth2/auth?");
builder.AppendFormat("client_id={0}", Uri.EscapeDataString(id));
builder.Append("&response_type=code");
// 宣告取得 openid, profile, email 三個内容。
builder.AppendFormat("&scope={0}", Uri.EscapeDataString("openid profile email"));
builder.Append("&state=foobar");
builder.AppendFormat("&redirect_uri={0}", Uri.EscapeDataString(back));
return builder.ToString();
}
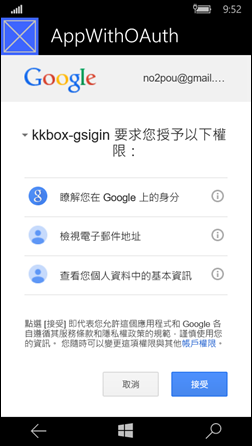
藉由寫好的 GetOAuthUrl() 建立要請求的 URL,并且要指定需要用到用戶的權限,這裏以 "openid profile email" 爲主要。
再發出請求時要記得指定 StartUri 與 EndUri,這樣才能保持 Google 驗證會回到自己的 App 裏面,這個跟 callbackUrl ("urn:ietf:wg:oauth:2.0:oob") 也非常重要。
確定取得了 code 之後,我們需要再發出一個 request 要求取得 access token,如下:
public static async Task<String> RedirectGetAccessToken(String code)
{
Dictionary<String, String> param = new Dictionary<string, string>();
param.Add("code", code);
param.Add("client_id", clientId);
param.Add("client_secret", clientKey);
param.Add("redirect_uri", callbackUrl);
param.Add("grant_type", "authorization_code");
var stringContents = param.Select(s => s.Key + "=" + s.Value);
String stringContent = String.Join("&", stringContents);
HttpContent content = new StringContent(stringContent, Encoding.UTF8, "application/x-www-form-urlencoded");
HttpClient httpClient = new HttpClient();
var requestMessage = new HttpRequestMessage(HttpMethod.Post, "https://www.googleapis.com/oauth2/v3/token");
requestMessage.Content = content;
requestMessage.Version = new Version("1.1");
using (HttpResponseMessage responseMessage = await httpClient.SendAsync(requestMessage))
{
return await responseMessage.Content.ReadAsStringAsync();
}
}
這裏要特別注意爲甚麽需要使用 HttpRequestMessage 將 Version 轉回來 1.1,因爲:
- UWP:預設使用 HTTP protocol 2.0;
- UAP:預設使用 HTTP protocol 1.1;
但是 Google 或是一些目前提供的 REST APIs 雖然有支援 2.0 但是文件可能還沒有特別更新,任然是使用 1.1 的版本,所以要記得改過來,
不然 API 回傳的會是亂碼。詳細可參考<.NET Networking APIs for UWP Apps>。
由於取得 access token 的回傳是一份 JSON,所以建立一個轉換爲物件的類別:
public class GoogleAccessToken
{
public string access_token { get; set; }
public string token_type { get; set; }
public int expires_in { get; set; }
public string refresh_token { get; set; }
public string id_token { get; set; }
public GoogleAccessToken() { }
public GoogleAccessToken(String json)
{
DataContractJsonSerializer tJsonSerial = new DataContractJsonSerializer(typeof(GoogleAccessToken));
MemoryStream tMS = new MemoryStream(Encoding.UTF8.GetBytes(json));
var self = tJsonSerial.ReadObject(tMS) as GoogleAccessToken;
access_token = self.access_token;
token_type = self.token_type;
expires_in = self.expires_in;
refresh_token = self.refresh_token;
id_token = self.id_token;
}
}
3. 藉由 Access Token 取得用戶的 user profile;
得到了 access token 后,我們就可以存取 Google 提供的 REST APIs,這裏以取得 user profile 爲例子,如下:
public static async Task<UserProfile> GetUserInfo(String token)
{
HttpClient tClient = new HttpClient();
var rawData = await tClient.GetStringAsync(string.Format("https://www.googleapis.com/oauth2/v2/userinfo?access_token={0}", token));
return new UserProfile(rawData);
}
public class UserProfile
{
public string id { get; set; }
public string email { get; set; }
public bool verified_email { get; set; }
public string name { get; set; }
public string given_name { get; set; }
public string family_name { get; set; }
public string picture { get; set; }
public string gender { get; set; }
public string locale { get; set; }
public UserProfile() { }
public UserProfile(String json)
{
DataContractJsonSerializer tJsonSerial = new DataContractJsonSerializer(typeof(UserProfile));
MemoryStream tMS = new MemoryStream(Encoding.UTF8.GetBytes(json));
var self = tJsonSerial.ReadObject(tMS) as UserProfile;
id = self.id;
email = self.email;
verified_email = self.verified_email;
name = self.name;
given_name = self.given_name;
picture = self.picture;
gender = self.gender;
locale = self.locale;
}
}
要搭配 json 回傳内容,所以特別在做了一個 UserProfile 的類別來存放。
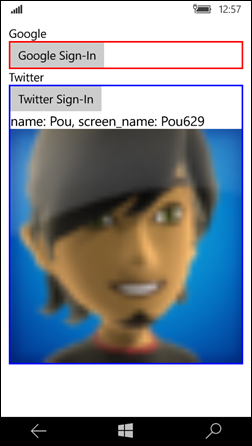
4. 執行畫面;
》Twitter:
相較于 Google Sign-In 整合,我覺得 Twitter 非常的麻煩,不過查過很多相關的文獻與範例后,總算是找到問題點。
往下講整理其重點協助想要借接時可以注意與參考。主要步驟:
1. 開啓 Twitter Application Management 建立一個 Application,得到必要的 ConsumerKey 與 ConsumerSecret。
2. 建立一個使用 WebAuthenticationBroker 的類別,分別提供 Desktop App 與 Mobile App 兩種驗證的處理方式。
由於 Mobile App 需要依賴 App.OnActived 事件的 Protocol 類型來處理。
主要運作原理:
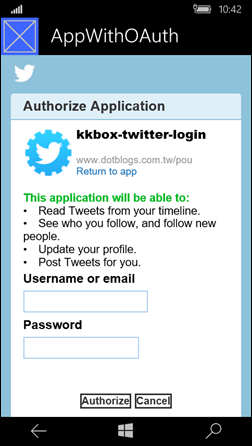
(1) https://api.twitter.com/oauth/request_token 請求登入畫面讓用戶輸入帳密取得 request token;
(2) 使用 request token 向 https://api.twitter.com/oauth/authorize?oauth_token= 注冊取得 oauth_token 與 oauth_verifier;
(3) 使用 oauth_token 與 oauth_verifier 向 https://api.twitter.com/oauth/access_token 取得 Access Token ;
其中要注意的是建立 Signature 與相關的 OAuth headers,這些都會影響在請求造成錯誤的來源,所以要特別注意。
使用方式:
private async void OnTwitterSignInAPIClick(object sender, RoutedEventArgs e)
{
var requestToken = await TwitterOAuthAPI.InvokeTwitterLogin();
// 3. get oatuh_token and oauth_verifier
requestToken = requestToken.Substring(requestToken.IndexOf("?") + 1);
String[] data = requestToken.Split(new String[] { "&" }, StringSplitOptions.RemoveEmptyEntries);
String token = data[0].Replace("oauth_token=", "");
String verifier = data[1].Replace("oauth_verifier=", "");
// 4. get access token
TwitterAccessToken accessToken = await TwitterOAuthAPI.GetAccessToken(token, verifier);
// 5. get user profile
String json = await TwitterOAuthAPI.GetUserInfo(accessToken, verifier);
// convert to object
DataContractJsonSerializer tJsonSerial = new DataContractJsonSerializer(typeof(Twitter.UserProfile));
MemoryStream tMS = new MemoryStream(Encoding.UTF8.GetBytes(json));
Twitter.UserProfile user = tJsonSerial.ReadObject(tMS) as Twitter.UserProfile;
txtTwitterResult.Text = String.Format("name: {0}, screen_name: {1}", user.name, user.screen_name);
var bitmapImage = new BitmapImage();
bitmapImage.UriSource = new Uri(user.profile_image_url);
imgTwitter.Source = bitmapImage;
txtTwitterResult.Visibility = imgTwitter.Visibility = Visibility.Visible;
}
首先先看如何取得 request token:
/// <summary>
/// 請求取得 Request Token。
/// </summary>
/// <returns></returns>
private static async Task<string> GetTwitterRequestTokenAsync()
{
string TwitterUrl = "https://api.twitter.com/oauth/request_token";
string nonce = OAuthUtil.GetNonce();
string timeStamp = OAuthUtil.GetTimeStamp();
string SigBaseStringParams = "oauth_callback=" + Uri.EscapeDataString(CallbackUrl);
SigBaseStringParams += "&" + "oauth_consumer_key=" + ConsumerKey;
SigBaseStringParams += "&" + "oauth_nonce=" + nonce;
SigBaseStringParams += "&" + "oauth_signature_method=HMAC-SHA1";
SigBaseStringParams += "&" + "oauth_timestamp=" + timeStamp;
SigBaseStringParams += "&" + "oauth_version=1.0";
string SigBaseString = "GET&";
SigBaseString += Uri.EscapeDataString(TwitterUrl) + "&" + Uri.EscapeDataString(SigBaseStringParams);
string Signature = OAuthUtil.GetSignature(SigBaseString, ConsumerSecret);
TwitterUrl += "?" + SigBaseStringParams + "&oauth_signature=" + Uri.EscapeDataString(Signature);
HttpClient httpClient = new HttpClient();
string GetResponse = await httpClient.GetStringAsync(new Uri(TwitterUrl));
string request_token = null;
string oauth_token_secret = null;
string[] keyValPairs = GetResponse.Split('&');
for (int i = 0; i < keyValPairs.Length; i++)
{
string[] splits = keyValPairs[i].Split('=');
switch (splits[0])
{
case "oauth_token":
request_token = splits[1];
break;
case "oauth_token_secret":
oauth_token_secret = splits[1];
break;
}
}
return request_token;
}
接著使用 request token 來進一步取得 oauth_token 與 oauth_verifier,這些值是協助建立 signature base parameter 的重要參數。
public static async Task<String> InvokeTwitterLogin()
{
try
{
// 1. get request token
string oauth_token = await GetTwitterRequestTokenAsync();
// 2. invoke user to login the twitter with get access token
string TwitterUrl = "https://api.twitter.com/oauth/authorize?oauth_token=" + oauth_token;
Uri StartUri = new Uri(TwitterUrl);
WebAuthenticationResult WebAuthenticationResult = await WebAuthenticationBroker.AuthenticateAsync(
WebAuthenticationOptions.None,
StartUri,
new Uri(CallbackUrl));
if (WebAuthenticationResult.ResponseStatus == WebAuthenticationStatus.Success)
{
var result = WebAuthenticationResult.ResponseData.ToString();
return result;
}
else if (WebAuthenticationResult.ResponseStatus == WebAuthenticationStatus.ErrorHttp)
{
return "HTTP Error returned by AuthenticateAsync() : " + WebAuthenticationResult.ResponseErrorDetail.ToString();
}
else
{
return "Error returned by AuthenticateAsync() : " + WebAuthenticationResult.ResponseStatus.ToString();
}
}
catch (Exception ex)
{
//
// Bad Parameter, SSL/TLS Errors and Network Unavailable errors are to be handled here.
//
return ex.Message;
}
}
得到 oauth_token 與 oauth_verifier,接著要來取得 oauth_token, oauth_token_secret, screen_name, user_id。
public static async Task<TwitterAccessToken> GetAccessToken(String token, String verifier)
{
String TwitterUrl = "https://api.twitter.com/oauth/access_token";
string timeStamp = OAuthUtil.GetTimeStamp();
string nonce = OAuthUtil.GetNonce();
String SigBaseStringParams = "oauth_consumer_key=" + ConsumerKey;
SigBaseStringParams += "&" + "oauth_nonce=" + nonce;
SigBaseStringParams += "&" + "oauth_signature_method=HMAC-SHA1";
SigBaseStringParams += "&" + "oauth_timestamp=" + timeStamp;
SigBaseStringParams += "&" + "oauth_token=" + token;
SigBaseStringParams += "&" + "oauth_version=1.0";
String SigBaseString = "POST&";
SigBaseString += Uri.EscapeDataString(TwitterUrl) + "&" + Uri.EscapeDataString(SigBaseStringParams);
String Signature = OAuthUtil.GetSignature(SigBaseString, ConsumerSecret);
HttpStringContent httpContent = new HttpStringContent("oauth_verifier=" + verifier, Windows.Storage.Streams.UnicodeEncoding.Utf8);
httpContent.Headers.ContentType = HttpMediaTypeHeaderValue.Parse("application/x-www-form-urlencoded");
string authorizationHeaderParams = "oauth_consumer_key=\"" + ConsumerKey + "\", oauth_nonce=\"" + nonce +
"\", oauth_signature_method=\"HMAC-SHA1\", oauth_signature=\"" + Uri.EscapeDataString(Signature) +
"\", oauth_timestamp=\"" + timeStamp + "\", oauth_token=\"" + Uri.EscapeDataString(token) +
"\", oauth_version=\"1.0\"";
HttpClient httpClient = new HttpClient();
httpClient.DefaultRequestHeaders.Authorization = new HttpCredentialsHeaderValue("OAuth", authorizationHeaderParams);
var httpResponseMessage = await httpClient.PostAsync(new Uri(TwitterUrl), httpContent);
string response = await httpResponseMessage.Content.ReadAsStringAsync();
String[] Tokens = response.Split('&');
string oauth_token_secret = null;
string access_token = null;
string screen_name = null;
String user_id = null;
TwitterAccessToken user = new TwitterAccessToken();
for (int i = 0; i < Tokens.Length; i++)
{
String[] splits = Tokens[i].Split('=');
switch (splits[0])
{
case "screen_name":
screen_name = splits[1];
break;
case "user_id":
user_id = splits[1];
break;
case "oauth_token":
access_token = splits[1];
break;
case "oauth_token_secret":
oauth_token_secret = splits[1];
break;
}
}
user.user_id = user_id;
user.screen_name = screen_name;
user.oauth_token = access_token;
user.oauth_token_secret = oauth_token_secret;
return user;
}
并且建立一個儲存這四個參數的物件:
public class TwitterAccessToken
{
public String screen_name { get; set; }
public String user_id { get; set; }
public String oauth_token { get; set; }
public String oauth_token_secret { get; set; }
}
3. 藉由 Access Token 取得用戶的 user profile;
完成了取得必要的參數 oauth_token,oauth_token_secret 與 oauth_verifier 後,接下來便可藉由它們來取得 user profile,如下:
public static async Task<String> GetUserInfo(TwitterAccessToken accessToken, String verifier)
{
String result = String.Empty;
try
{
string nonce = OAuthUtil.GetNonce();
string timeStamp = OAuthUtil.GetTimeStamp();
String url = "https://api.twitter.com/1.1/account/verify_credentials.json";
// prepare base string parameters, include oauth_token, oauth_verifier
var baseStringParams = new Dictionary<string, string>{
{"oauth_consumer_key", ConsumerKey},
{"oauth_nonce", nonce},
{"oauth_signature_method", "HMAC-SHA1"},
{"oauth_timestamp", timeStamp},
{"oauth_token", accessToken.oauth_token},
{"oauth_verifier", verifier},
{"oauth_version", "1.0"} };
string paramsBaseString = baseStringParams
.OrderBy(kv => kv.Key)
.Select(kv => kv.Key + "=" + kv.Value)
.Aggregate((i, j) => i + "&" + j);
string sigBaseString = "GET&";
// signature base string uses base url
sigBaseString += Uri.EscapeDataString(url) + "&" + Uri.EscapeDataString(paramsBaseString);
// get signature by comsumer secret and oauth_token_secret
string signature = OAuthUtil.GetSignature(sigBaseString, ConsumerSecret, accessToken.oauth_token_secret);
// build header
string data = "oauth_consumer_key=\"" + ConsumerKey +
"\", oauth_nonce=\"" + nonce +
"\", oauth_signature=\"" + Uri.EscapeDataString(signature) +
"\", oauth_signature_method=\"HMAC-SHA1\", oauth_timestamp=\"" + timeStamp +
"\", oauth_token=\"" + accessToken.oauth_token +
"\", oauth_verifier=\"" + verifier +
"\", oauth_version=\"1.0\"";
HttpClient httpClient = new HttpClient();
HttpRequestMessage requestMsg = new HttpRequestMessage();
requestMsg.Method = new HttpMethod("GET");
requestMsg.RequestUri = new Uri(url);
requestMsg.Headers.Authorization = new HttpCredentialsHeaderValue("OAuth", data);
var response = await httpClient.SendRequestAsync(requestMsg);
result = await response.Content.ReadAsStringAsync();
}
catch (Exception)
{
throw;
}
return result;
}
4. 執行畫面;
[範例程式]
https://github.com/poumason/DotblogsSampleCode
請 clone 這個 GitHub 的内容,參考範例《AppWithOAuth》。謝謝。
[補充]
1. 如果撰寫的平臺是 UAP 的話,Windows App 與 Windows Phone App 使用 WebAuthenticationBroker 的方式不一樣。
- for Phone 需要特別在 App.xaml.cs 中注冊 OnActivated 事件來處理完成 Google/Twitter 登入后要做的事情。
- Google 與 Twitter 使用的 callback url 是不一樣的
- Google 針對 windows app 使用:urn:ietf:wg:oauth:2.0:oob;windows phone 使用:http://localhost。
- Twitter 針對 windows app 使用:ms-app://{App 上架后拿到的 SID};windows phone 使用:msft-{app package id,要拿掉 - 符號}://authorize
======
以上是分享如何整合第三方提供的 OAuth 驗證賬號機制,并且藉由得到的 AccessToken 搭配 REST API 取得 User profile 。
希望對于開發 App 時如果需要綁定賬號時,可以減少需要自己耗費成本去管理賬號。謝謝。
References:
〉Authentication Using Facebook, Google and Microsoft Account in Universal Apps Using MVVM
〉Google APIs OAuth2 Client Library 1.6.0-beta
〉Authentication using Facebook, Google and Microsoft account in WP8.0 App (MVVM)
〉Integrating Facebook authentication in Universal Windows apps
〉How to Use the WebAuthenticationBroker for oAuth in a Windows Phone Runtime WP8.1 App
〉Authentication using Facebook, Google and Microsoft account in WP8.0 App (MVVM)
〉Using OAuth 2.0 to Access Google APIs & Using OAuth 2.0 for Installed Applications
〉OpenID Connect & 授權與 Google API
〉Web authentication broker sample
〉Understanding and debugging the web authentication broker workflow (XAML)
〉Web authentication broker sample
〉How to add Google login using OAuth 2.0 in Windows Phone 8 app
〉Google OAuth2 on Windows Phone
〉Implementing Sign in with Twitter Overview
〉Web authentication broker sample (重要)
〉Single Sign On with OAuth in Windows Store Apps
〉Web authentication broker considerations for online providers (XAML)
〉Understanding and debugging the web authentication broker workflow (XAML)
〉Latest Twitter integration in windows phone 8 c#


