App 開發對於 list 内容呈現都需要加上 load more 或是 pull refresh 的功能,爲了讓大量資料不用一次都下載下來,而是看到接近最後的時候再載入下一個區間的内容,另外可以在頂端的時候下拉繼續重新整理。
參考<ListView and GridView data virtualization>這一篇的説明來瞭解怎麽製作一個支援 load more 與 pull refresh 的功 ListView/GridView。
調整 ListView/GridView 不會在顯示大量資料時候卡卡的,有兩種比較容易的方式:Data virtualization 與 UI virtualization,本篇將介紹的是做 Data virtualization,有關 UI virtualization 可以參考<ListView and GridView UI optimization>的介紹。
data virualization 是否適合你開發的需求,有幾個重點:
- The size of your data set (全部資料的 size,如果過大就需要做 data virtualizatoin)
- The size of each item (每一個 item 的資料 size,如果複雜可以先對 item size 瘦身)
- The source of the data set (local disk, network, or cloud) (資料來源如果是 local disk, network, cloud 不同的來源對於讀取的速度都不一樣)
- The overall memory consumption of your app (注意 App 記憶體的消耗,如果還沒有載入資料就已經用了很多,資料部分就要取捨)
首先,先介紹怎麽做到 load more,再介紹怎麽做到 pull refresh 的功能。
- Load more (data incrementally):
爲了不讓一次大量資料都載入到 memory 裏面,需要先給一個初始部分(例如:全部由 100 筆資料,初始部分可以先載入 10 筆),接著按照用戶在 scroll 往下的時候再慢慢載入其他部分。
要做到這樣的效果,需要對資料集合類別加上幾個 interface:
- IList
- INotifyCollectionChanged (C#/VB) or IObservableVector<T> (C++/CX)
- ISupportIncrementalLoading
這 3 個 interface 的用意是爲了讓 data source 在 memory 時可以不斷地被擴展。
ListView/GridView 會利用標準的 IList indexer 與 count 屬性來控制顯示,而 count 屬性的取得來自目前的數量而不是 data source 中的總數。
因此,搭配 ISupportIncrementalLoading 當 ListView/GridView 在用戶滾動后發現到了目前既有資料的 end,它會詢問 ISupportIncrementalLoading.HasMoreItems 是否還有資料,如果回傳是 true,接著觸發 ISupportIncrementalLoading.LoadMoreItemsAsync 事件傳入目前的 count 知道目前的數量進而往下載入。
再載入好資料加入 ListView/GridView 時會通知 INotifyCollectionChanged 或 IObservableVector<T> 知道有新的項目要顯示。
範例説明:
1. 爲資料集合建立一個 class,并且實作 ISupportIncrementalLoading 與 ObservableCollection:
public class UserCollection : ObservableCollection<UserData>, ISupportIncrementalLoading
{
    public bool HasMoreItems
    {
	get;
	private set;
    }

    public IAsyncOperation<LoadMoreItemsResult> LoadMoreItemsAsync(uint count)
    {
	// 實作載入更多資料的邏輯
	return InnerLoadMoreItemsAsync(count).AsAsyncOperation();
    }

    private async Task<LoadMoreItemsResult> InnerLoadMoreItemsAsync(uint count)
    {
	if (currentIndex >= 150)
	{
		HasMoreItems = false;
	}
	else
	{
		LoadData(currentIndex);
	}
	return new LoadMoreItemsResult { Count = (uint)currentIndex };
    }

    private void LoadData(int index)
    {
	int max = index + 50;

	for (int i = index; i < max; i++)
	{
		Add(new UserData { Name = $"Pou{i}" });
	}
	currentIndex = max;
    }

    private int currentIndex = 0;

    public UserCollection()
    {
	LoadData(currentIndex);
	HasMoreItems = true;
    }
}
上述是以 User 的基本資料作爲 item 内容,而 UserCollection 爲集合。加上在 LoadMoreItemsAsync 的邏輯讓資料可以被讀取到 100 筆資料。
2. 建立 MainPageViewModel,加入上述的集合讓畫面可以顯示出來:
public class MainPageViewModel
{
    public UserCollection DataSource { get; set; }

    public MainPageViewModel()
    {
         // 初始化資料集合
         DataSource = new UserCollection();
    }
}
<ListView Grid.Row="1" ItemsSource="{x:Bind ViewModel.DataSource}" Height="200" Background="CornflowerBlue">
	<ListView.ItemTemplate>
		<DataTemplate x:DataType="local:UserData">
			<TextBlock Text="{x:Bind Name}" />
		</DataTemplate>
	</ListView.ItemTemplate>
</ListView>
上述就可以簡單做到 Load more。如果說資料的來源可能是 cloud 或是需要比較長時間的,建立可以多加一個 event 來通知 viewmodel 讓它轉給 UI thread 顯示 progress bar 的效果。
- Pull refresh:
pull refresh 舉例來說就像使用 facebook 的時候,在 timeline 畫面的資料頂端時往下拉動固定距離就會出現下拉更新的功能。
對於這樣的功能可以參考<Pull-to-refresh on a Windows 10 UWP>,<Pull to refresh for WinRT>與</Pull-to-refresh-Scrollviewer-WinRT >的説明,
大致 layout 如下:
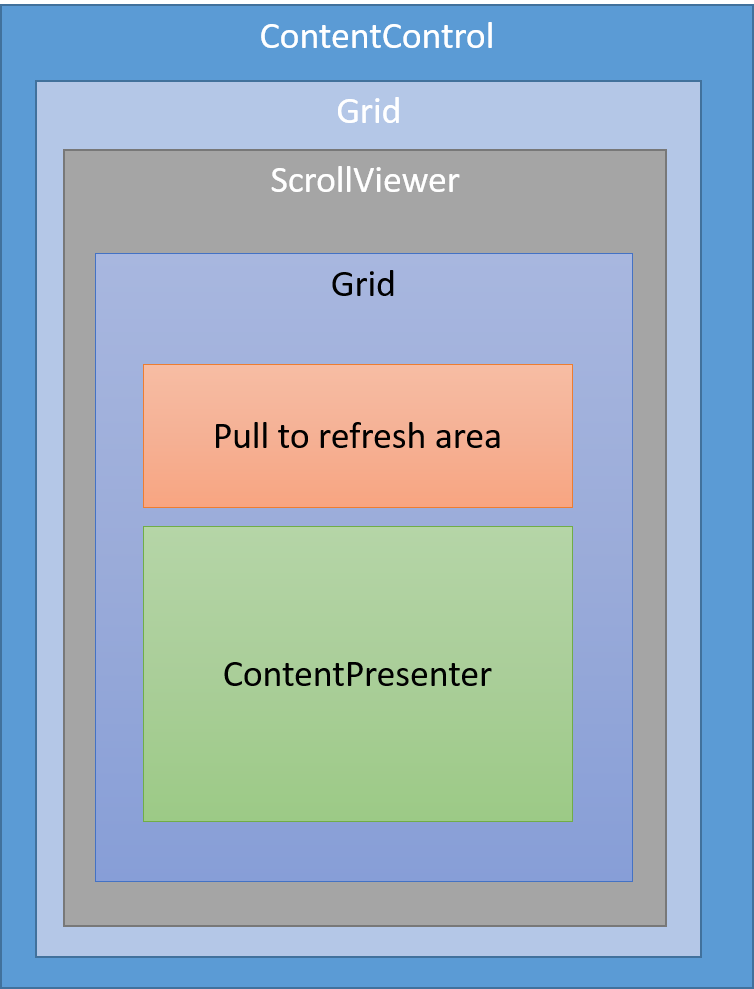 在 PullToRefreshScrollViewer 自訂控制項一開始的時候偷偷先移動 scrollview 到 pull refresh area 的底部,看起來就跟正常的 ListView/GridView 看到的第一筆資料一樣。
其中用一個重要的控制項目:ScrollView,
| Name | Description |
|---|---|
| ViewChanged | Occurs when manipulations such as scrolling and zooming have caused the view to change. |
上面這個 method 最爲重要,因爲要監聽用戶 scroll 它的時候的位置,如果到 0 的時候就要顯示 pull refresh 的範圍。
現在 Windows-universal-samples / Samples / XamlPullToRefresh 提供了完整的程式,整理幾個重點如下:
- 直接繼承 ListView 定義新的控件:RefreshableListView
- 加入 RefreshRequested / PullProgressChanged 分別通知請抓取最新的資料跟要處理 refresh 範圍的特效
- PullThreshold 控制要拉動多少範圍要出發 refresh
- RefreshCommand 執行 refresh 的事件或是注冊 RefreshRequested 都可以
- RefreshIndicatorContent 自定義要顯示在 pull refresh 的内容,放在 RefreshIndicator 裏面顯示
- 在 ListView XAML template 加入
RefreshIndicator代表 pull refresh 顯示的範圍
<ScrollViewer x:Name="ScrollViewer">
    <Grid x:Name="ScrollerContent" VerticalAlignment="Top">
      <Grid.RowDefinitions>
	<RowDefinition Height="Auto"/>
	<RowDefinition Height="*"/>
	<RowDefinition Height="Auto"/>
      </Grid.RowDefinitions>
      <Border x:Name="RefreshIndicator" VerticalAlignment="Top" Grid.Row="1">
	<Grid>
		<TextBlock x:Name="DefaultRefreshIndicatorContent" HorizontalAlignment="Center"
				   Foreground="White" FontSize="20" Margin="20, 35, 20, 20"/>
		<ContentPresenter Content="{TemplateBinding RefreshIndicatorContent}"></ContentPresenter>
	</Grid>
      </Border>
      <ItemsPresenter FooterTransitions="{TemplateBinding FooterTransitions}"
				FooterTemplate="{TemplateBinding FooterTemplate}"
				Footer="{TemplateBinding Footer}"
				HeaderTemplate="{TemplateBinding HeaderTemplate}"
				Header="{TemplateBinding Header}"
				HeaderTransitions="{TemplateBinding HeaderTransitions}"
				Padding="{TemplateBinding Padding}"
				Grid.Row="1"
				x:Name="ItemsPresenter"/>
    </Grid>
</ScrollViewer>
- 注冊 ScrollViewer 的 DirectManipulationStarted/DirectManipulationCompleted 控制是否超過拉動的範圍來出發 refresh 事件
- 根據拉動的顯示高度來調整特效的旋轉程度
- 在放開的時候關閉特效,觸發事件
更多的内容可以參考上述的連結,我這邊就不多做説明。(因爲有些特效的使用我還不是很熟悉)
[補充]
如果在顯示 ListView/GridView 時,希望在 scroll 過程就可以逐步呈現 item 裏面的内容,可以參考<Update ListView and GridView items progressively>介紹,它藉由截取 ContainerContentChanging 事件決定 item 有多少個 phase 來顯示 item 的内容。
======
以上是分享的内容,如果你很常開發 App,我非常建議你可以把上述内容跟程式碼拿去使用,建立自己的 ListView/GridView 這樣就可以共用在很多的專案裏面。希望對大家有幫助,謝謝。
References:
- ListView and GridView data virtualization
- Dramatically Increase Performance when Users Interact with Large Amounts of Data in GridView and ListView
- ListView and GridView UI optimization
- Update ListView and GridView items progressively
- Improve garbage collection performance
- Data virtualisation using the ISupportIncrementalLoading interface
- Pull-to-refresh on a Windows 10 UWP
- A pull-to-refresh ListView for Windows 8.1 Universal Apps
- ListView 樣式與範本