開發 Cortana Skill 的服務 (Bot) 時,如果需要帳號驗證才能繼續使用時,下面介紹怎麽整合帳號驗證到 Skill。
根據 Secure your Skill with Authentication 介紹的内容,Cortana Skill 提供兩種驗證整合方式:
- 讓 Cortana Skill 連結 Connected Account
- 利用 Bot Framework 的 Sign-in Card
1. Connected Account
整合 Connected Account 代表用戶第一次使用該 Skill 時會提示要求登入,但是登入之後 Connected Account 會自動維護與更新認證的 Token,直到用戶從 Cortana’s Notebook 取消該 Skill 的連結或是 Token 無法取得或過期。
目前 Connected Account 在 Cortana Skill 只支援 OAuth2 Authorization Code Grant authentication,詳細的設定方式可參考:Use Connected Account。
下圖是截錄官方文件以整合 Microsoft identify 爲例:  裏面有幾個要注意的地方:
- 使用 Microsoft identify 需要先到 Microsoft ecosystem 註冊該 Skill (爲了拿到 Password,記得要選擇是 Web Platform)
- 註冊時設定的 redirect URL: 必須是
https://www.bing.com/agents/oauth - 回到 Bot Framework portal 設定 Bot 與 Cortana Channel 連結,並到 Cortana Channel 設定需要整合 Connected Account
- 在 Cortana Channel 中設定 Connected Account 的每一個欄位説明可以參考 Use Connected Account
經過測試發現 Connected Account 整合 Microsoft Identify 比較完整,如果使用其他 OAuth 提供者建議使用 Sign-in Card。
2. 利用 Bot Framework 的 Sig-in Card
與 Connected Account 的差別在於第一次使用 Skill 時不要求登入,讓開發人員設計在特定功能使用前再要求登入。例如:查詢飯店的 Skill 讓用戶查詢時都不需要登入,等要訂房再登入即可。
利用 Sign-in Card 也比較適合整合其他 OAuth 提供者的驗證,例如: Twitter, Google, OAuth2, Azure Active Directory (AAD), Office 365。
使用 Sign-in Card 時幾個重點:
- 設定 authorization URL 時需要加入 redirect_uri 這個 query string, 因為在 token URL 時會需要用到
- 如果沒有給 redirect_uri , Cortana 不會顯示 Sign-in card
- 它與 Connected Account 機制不一樣,是把 Access Token 放在 Contenxt.UserData 裏面, 所以需要處理 Access Token 不合法或是過期時,重新要求用戶登入
var message = context.MakeMessage() as IMessageActivity;
message.Speak = "This is a Sign-in card";
message.Summary = "This is a Sign-in card";
message.Text = "Message Text";
message.Attachments.Add(SigninCard.Create("You need to authorize me",
                                          "Login",
                                          "https://login.microsoftonline.com/?redirect_uri=http%3a%2f%2fbing.com%2fagents%2foauth"
                                          ).ToAttachment());
await context.PostAsync(message);
知道了 Sign-in Card 怎麽用之後,那該怎麽做 Bot + Authorization?
參考 MicrosoftDX/AuthBot 的做法,主要分成幾個部分:
- 為原本提供給 Cortana Skill 用的 message endpoint 加入一個 OAuthCallback 的 RESTFul API (例如:/api/OAuthCallback)
- OAuthCallback 的 URI 要記得設定到 OAuth 提供者的 redirect URL 與 Sign-in Card 的 redirect_uri 參數
- 驗證後拿到的 Access Token 可以保存在 Contenxt.UserData 裏面,作爲之後使用
- 傳送 Sign-in Card 給用戶前,記得把此次對話的 ConversationReference (或是使用 ResumptionCookie)先保存起來,作爲 OAuthCallback 收到用戶驗證結果之後可以接續剛才的 conversation 回復到相同的對話裏面
MicrosoftDX/AuthBot 也有提供 Nuget,如果您使用上懶得開發也可以使用。
其他關於利用 Sign-in Card 整合驗證的説明也可以參考: https://channel9.msdn.com/Shows/Office-Dev-Show/Office-Dev-Show-Episode-34-Getting-Started-with-Bots-and-the-Microsoft-Graph
[範例]
接著利用 Google OAuth 做為範例説明,我整理上面做 OAuth + Bot 的流程如下圖:
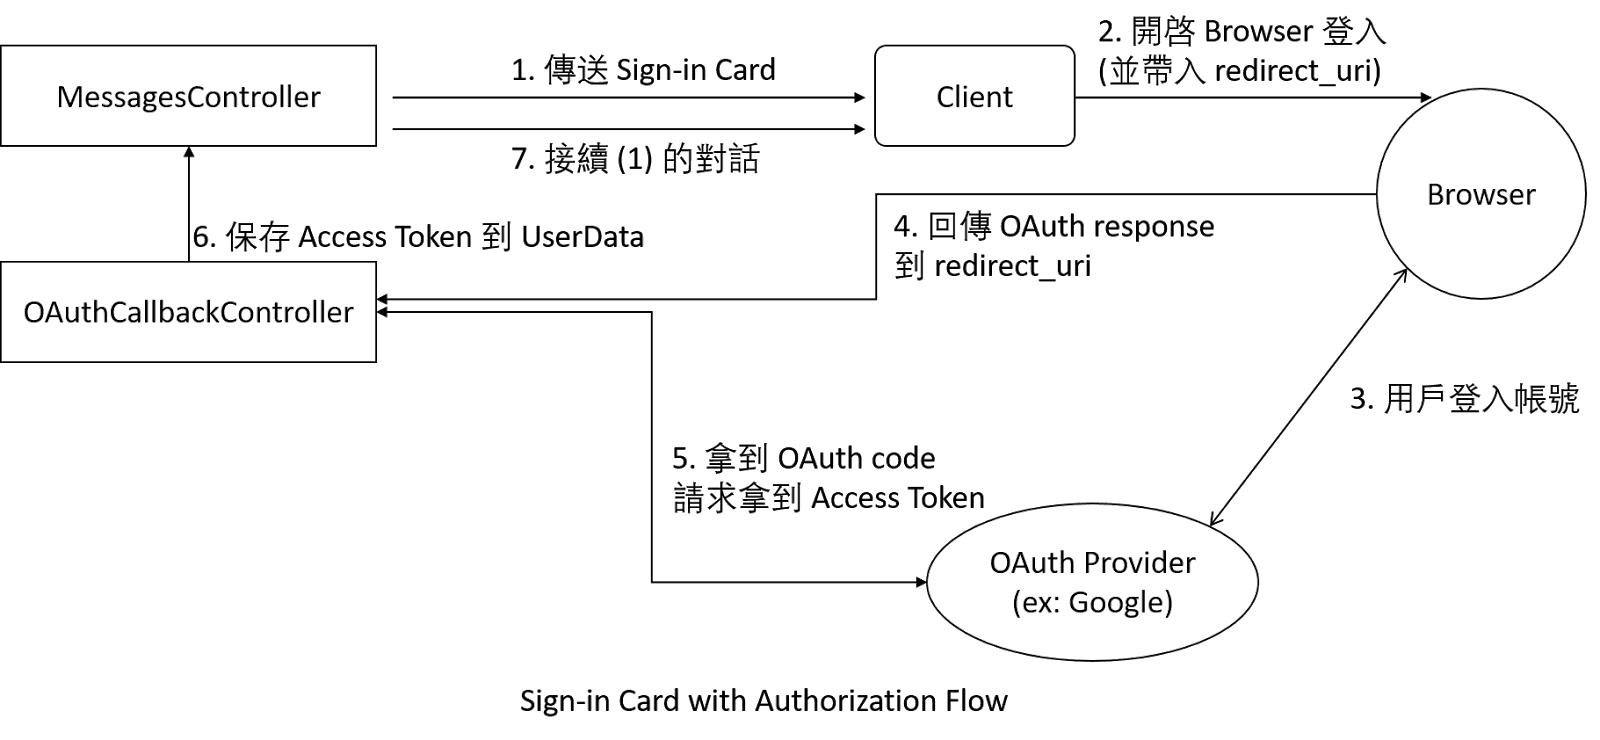
從上圖可以得知需要做的幾個地方:
1. MessagesController 需要檢查是否有 Access Token 以及處理來自 OAuthCallback API 回傳的内容
private async Task MessageReceivedAsync(IDialogContext context, IAwaitable<object> result)
{
    var activity = await result as Activity;

    if (activity.Text == "login")
    {
        // 直接利用特定關鍵字觸發, 真實案例不適合這樣用
        await CheckLogin(context, activity);
    }
    else
    {
        // 接受來自 OAuthCallback ResumeAsync 回傳的内容 (例如: 使用 token 關鍵字, 真實案例不適合這樣用)
        if (activity.Text.StartsWith("token"))
        {
            if (await HandleFromOAuthCallbackResponse(context, activity) == true)
            {
                return;
            }
        }

        // calculate something for us to return
        int length = (activity.Text ?? string.Empty).Length;

        // return our reply to the user
        await context.PostAsync($"You sent {activity.Text} which was {length} characters");

        context.Wait(MessageReceivedAsync);
    }
}
1-1. 發出 Sign-in Card 並且保存目前 ConversationReference (或是使用 ResumptionCookie) 到 Google OAuth API 的 state 參數:
private async Task CheckLogin(IDialogContext context, IMessageActivity msg)
{
    if (context.UserData.TryGetValue(BotUtility.AccessToken, out string token))
    {
        await context.PostAsync("you are already logined.");
    }
    else
    {
        // 保存這次對話的記錄,登入完畢後要 ResumeAsync 回到原本的對話
        var conversationReference = context.Activity.ToConversationReference();

        string authUrl = GoogleOAuthHelper.GetGoogleLoginURL(conversationReference, BotUtility.OAuthCallbackURL);

        var reply = context.MakeMessage();
        reply.Text = "Please login in using this card";
        reply.Attachments.Add(SigninCard.Create("You need to authorize me", "Login to Google!", authUrl).ToAttachment());
        await context.PostAsync(reply);
    }

    context.Wait(MessageReceivedAsync);
}

public static string GetGoogleLoginURL(ConversationReference conversationReference, string oauthCallback)
{
    // 把 conversationreference 的内容放到 state 的參數裏面
    string stateToken = UrlToken.Encode(conversationReference);

    var uri = BotUtility.GetUri("https://accounts.google.com/o/oauth2/v2/auth",
                                Tuple.Create("client_id", Google_clientId),
                                Tuple.Create("redirect_uri", oauthCallback),
                                Tuple.Create("response_type", "code"),
                                Tuple.Create("access_type", "online"),
                                Tuple.Create("scope", Uri.EscapeDataString("profile")),
                                Tuple.Create("state", stateToken));
    return uri.ToString();
}
1-2. 處理來自 OAuthCallBackController 處理完的結果,取得該 User 的 Profile 資料:
private async Task HandleFromOAuthCallbackResponse(IDialogContext context, IMessageActivity msg)
{
    // 拿出 user data 裏面的資料
    if (context.UserData.TryGetValue(BotUtility.AccessToken, out string token) == false)
    {
        return false;
    }
    var userProfile = await GoogleOAuthHelper.GetUserInfo(token);
    var reply = context.MakeMessage();
    reply.Speak = reply.Text = $"Login success. your name is: {userProfile.Name}";
    reply.Attachments = new List() {
                            new HeroCard("Login success", $"your name is: {userProfile.Name}", $"locale: {userProfile.Locale}",
                                         new List() {
                                            new CardImage() { Url = userProfile.Picture, Alt = "Hero Card Image Alt" }
      }).ToAttachment()};
    await context.PostAsync(reply);
    return true;
}
2. OAuthCallbackController 建立 RESTFul 接口收 OAuth 的結果,並請求拿到 Access Token,最後保存在 UserData,並且接續回到之前的對話内容
public async Task Get(string code, string state, CancellationToken cancellationToken)
{
    // 從 state 參數轉換為原本的 ConversationReference
    ConversationReference conversationReference = UrlToken.Decode(state);

    // 請求拿到 Google OAuth 的 Access Token
    var accessToken = await GoogleOAuthHelper.ExchangeCodeForGoogleAccessToken(code, BotUtility.OAuthCallbackURL);

    var msg = conversationReference.GetPostToBotMessage();

    // 取得目前談話對象的容器,並且把 UserData 加入 Access Token
    using (var scope = DialogModule.BeginLifetimeScope(Conversation.Container, msg))
    {
        IStateClient sc = scope.Resolve();
        BotData userData = sc.BotState.GetUserData(msg.ChannelId, msg.From.Id);
        userData.SetProperty(BotUtility.AccessToken, accessToken.AccessToken);
        sc.BotState.SetUserData(msg.ChannelId, msg.From.Id, userData);
    }

    // 設定 ResumeAsync 回到 MessagesController 的識別值 (例如: 使用 token 關鍵字, 真實案例不適合這樣用)
    msg.Text = "token:" + accessToken.AccessToken;

    // 要記得使用 RsumeAsync 才能夠接回原本的 converstaion
    await Conversation.ResumeAsync(conversationReference, msg);

    return Request.CreateResponse("ok");
}
3. 利用 Bot Framework emulator 測試結果如下圖: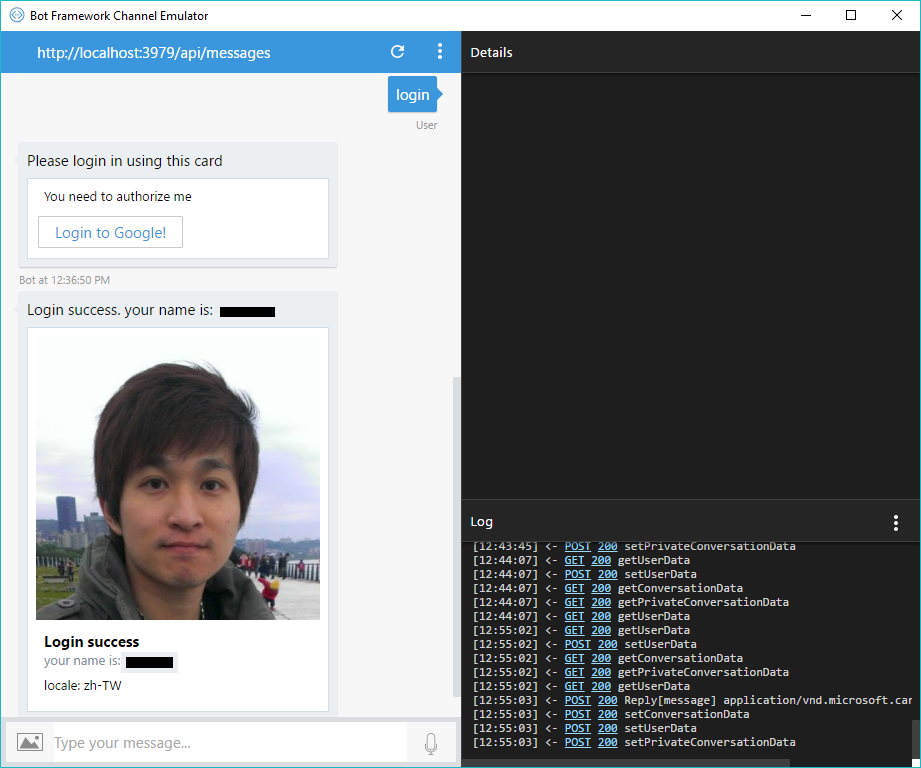
[注意]
目前 Cortana Skill 還不支援 Sign-in Card,預計之後會支援。可以參考 [Cortana] SignCard still doesn't work with Cortana #3230 我發的問題。 我玩過 Fitbit for Cortana Skill 的版本,它是使用 Hero Card 的方式來實現。
======
以上分享如何使用自定義的 OAuth 驗證,很多小細節都是在測試的時候遇到的,希望對大家有所幫助。謝謝。
如果閲讀起來有點吃力,建議先看 About the Bot Framework 的介紹再回來看就容易上手。
References:
- Secure your Skill with Authentication
- Cortana's got skills
- Cortana Device SDK lets OEMs integrate Cortana
- MicrosoftDX/AuthBot (重要範例)
- Simple Facebook Auth Sample (重要範例)
- Build BOT with Authentication (Microsoft Bot Framework)
- tsmatsuz/AuthDemoBot
- Azure AD : OAuth flow when you cannot show the login UI
- Add rich card attachments to messages
- Speech Synthesis Markup Language (SSML) Version 1.0
- Bot Authentication in the Bot Framework
- Troubleshooting Bot Framework authentication
- Manage state data (重要觀念)
- Authentication (重要觀念)
- Cortana Skill integrated OAuth, But WebAuthorizationBroker be not closed.