Hangfire 是開源的 .NET 非同步任務調度框架,當你需要定期執行、延遲執行、執行失敗重試,他就是你的選項之一。它脫離 Windows 工作排程,在 Web 檢視、重送任務,在 Hangfire 操作 UI 介面可以知道你指派給它的任務狀態,何時成功?為什麼失敗?(例外捕捉)下一次任務觸發時間?訊息可說是相當的完整。
比如:一個工作(Method)需要花費大量時間,除了寫背景執行緒之外,現在又多了一個選擇1.6 以上的版本已支持 .NET Core,個人認為它最大的特點內建視覺化的報表,方便後台監試。
架構
Hangfire 的工作流程很簡單,Client 把工作放進 Storage,Server 去 Storage 拿工作出來執行,這是不是跟 Producer-Consumer Dataflow Pattern 很像呢
下圖出自:https://docs.hangfire.io/en/latest/
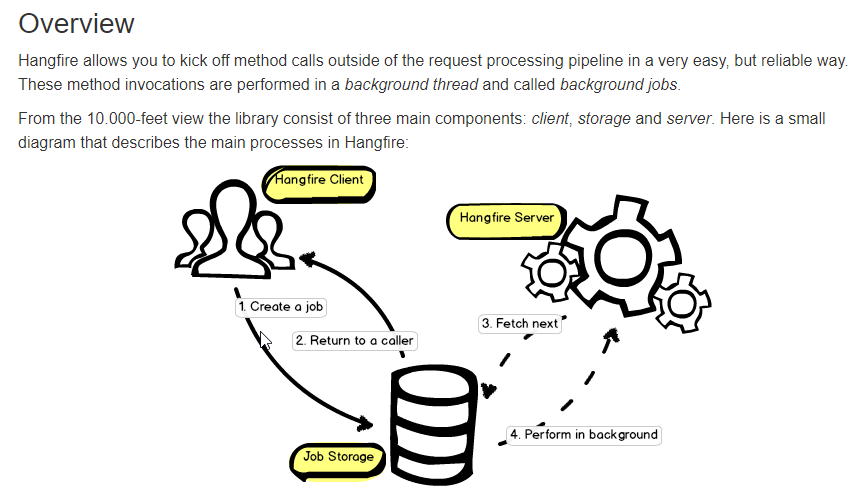
從上圖可以得知,這三個角色可以分離出來單獨部署
開發環境
VS 2019、.NET Framework 4.8
快速建立
Hangfire Dashboard 使用 OWIN 實作,所以能用在網頁專案和桌面應用程式專案,接下來我要用 Console App 專案演練
安裝套件
Install-Package Microsoft.AspNet.WebApi.OwinSelfHost
Install-Package Microsoft.Owin.Diagnostics
Install-Package Microsoft.Owin.Host.SystemWeb
Install-Package Hangfire
Install-Package Hangfire.Console
Install-Package Hangfire.MemoryStorage
新增 Startup.cs
public class Startup
{
    public void Configuration(IAppBuilder app)
    {
        // For more information on how to configure your application, visit https://go.microsoft.com/fwlink/?LinkID=316888
        var config = new HttpConfiguration();
        HangfireConfig.Register(app);
        config.Routes.MapHttpRoute("DefaultApi",
                                   "api/{controller}/{id}",
                                   new {id = RouteParameter.Optional}
                                  );

        app.UseWelcomePage("/");
        app.UseWebApi(config);
        app.UseErrorPage();
    }
}
Hangfire 主要配置順序,如下
1.選擇 Storage,除了 SQL Server 之外還有 MemoryStorage (Install-Package Hangfire.MemoryStorage) etc..
2.設定 Dashboard 路徑
3.使用 Hangfire Server,這是用來處理工作的服務
internal class HangfireConfig
{
    public static void Register(IAppBuilder app)
    {
        GlobalConfiguration.Configuration
                           .UseSqlServerStorage("Hangfire")
                           .UseConsole();

        app.UseHangfireDashboard("/hangfire");
        app.UseHangfireServer();
    }
}
WebApp.Start
在 Program.cs 用 WebApp.Start 把服務掛載起來
class Program
{
    private static IDisposable s_webApp;
    private const string HOST_ADDRESS = "http://localhost:8001";
    static void Main(string[] args)
    {
        s_webApp = WebApp.Start<Startup>(HOST_ADDRESS);
        Console.ReadLine();
    }
}
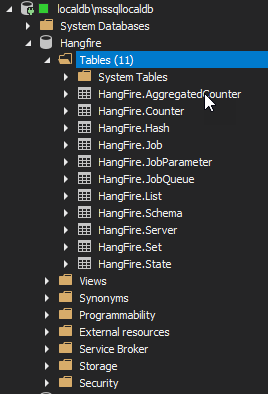
建立資料庫
要先手動建立資料庫,Hangfire 啟動的時候會幫我們建立資料表,當然你的帳號要有權限
調試
必須簡單的幾個配置就完成了設定,使用上還算蠻簡單的
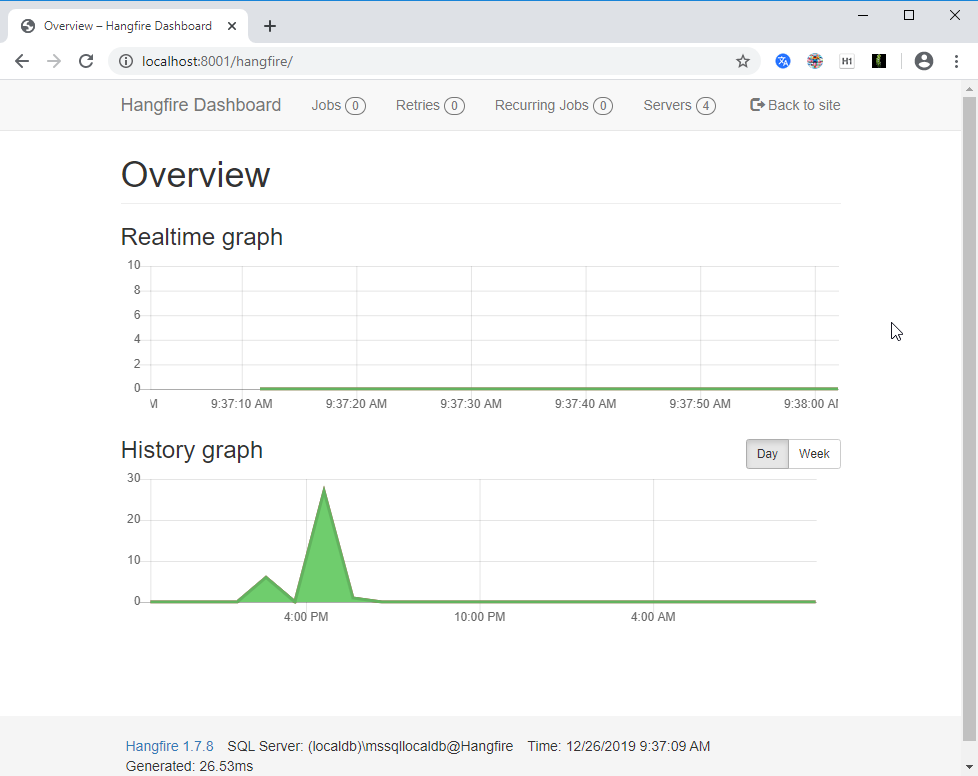
訪問 Hangfire
Ctrl+F5 啟動 Console App
通過瀏覽器,訪問 http://localhost:8001/hangfire
資料庫也有以下資料表
如果無法建立服務可能是 URL 保留區的問題,參考以下連結解決
https://dotblogs.com.tw/yc421206/2020/01/30/via_nancy_create_rest_api#%E7%B6%81%E5%AE%9A%20URL
Hangfire Server
建立 Hangfire 建立有兩種方式,一種是 OWIN 的使用方法,一開始的範例就是用這種寫法
app.UseHangfireServer();
或是使用 BackgroundJobServer class
var server = new BackgroundJobServer();
server.Dispose();
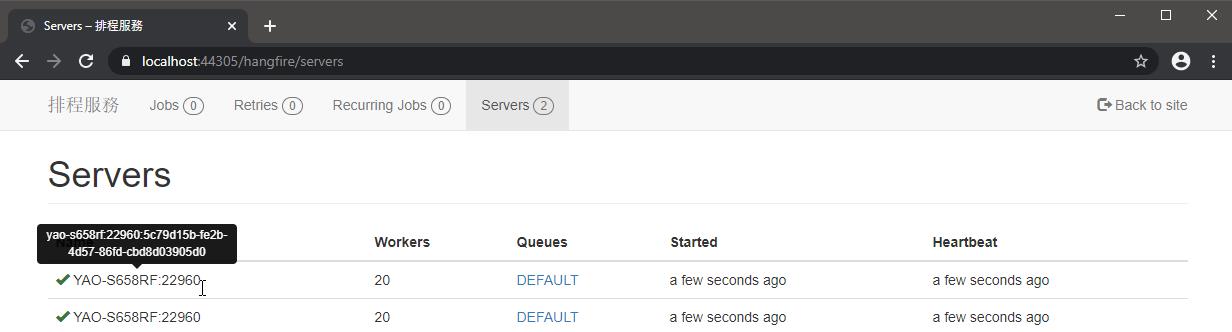
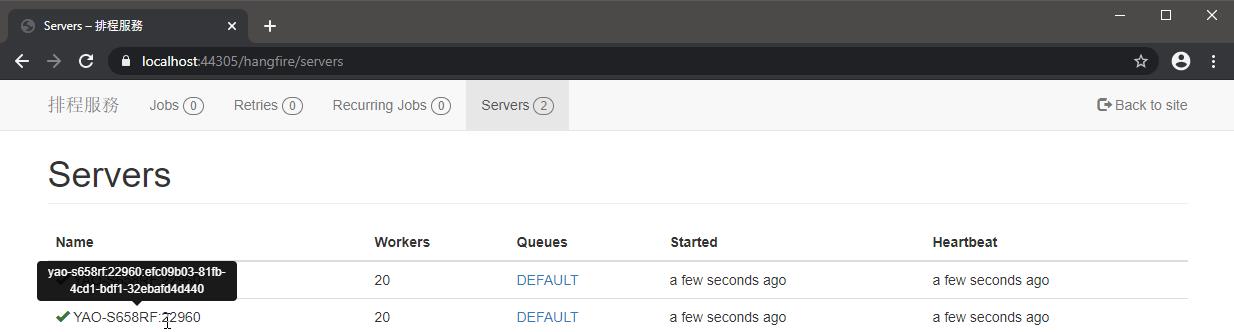
多個服務實例
呼叫幾個 UseHangfireServer 就會有幾個服務實例,Hangfire 1.5 之後,務器標識符現在使用 GUID ,因此所有實例名稱都是唯一的。
app.UseHangfireServer();
app.UseHangfireServer();
如下圖
BackgroundJobServerOptions
這用來配置 Hangfire 服務的設定
- ServerName:預設使用電腦名稱:ProcessID,例如:server1:9853,server1:4531,server2:6742。
https://docs.hangfire.io/en/latest/background-processing/running-multiple-server-instances.html - WorkerCount:執行緒使用數量,預設 Environment.ProcessorCount * 5 跟 20 取最小值
https://docs.hangfire.io/en/latest/background-processing/configuring-degree-of-parallelism.html - Queues:佇列名稱,可以多筆,預設 default,如果你的任務想要用別的名稱,一開始就要宣告
https://docs.hangfire.io/en/latest/background-processing/configuring-queues.html - StopTimeout:停止逾時,預設 00:00:00
- ShutdownTimeout:關閉逾時,預設 00:00:15 (15秒)
- SchedulePollingInterval:執行排程任務的輪詢週期,預設 00:00:15 (15秒),每 15 秒執行一次任務。
- HeartbeatInterval:心跳,預設 00:00:30 (30秒)
- ServerCheckInterval:服務檢查週期,預設 00:05:00 (5 分鐘)
- ServerTimeout:服務逾時,預設 00:05:00 (5 分鐘)
- CancellationCheckInterval:任務取消檢查週期,預設 00:00:05 (5秒)
使用方式如下:
var jobServerOptions = new BackgroundJobServerOptions()
{
	SchedulePollingInterval = new TimeSpan(0,0,2),
};
app.UseHangfireServer(jobServerOptions);
Hangfire Dashboard
授權
在本機不加授權可以訪問,一旦部署到遠端伺服器,就需要授權才能訪問了
DashboardAuthorizationFilter
在開發、測試環境,我想要略過授權直接訪問 /hangfire
Hangfile Dashboard 有提供 IDashboardAuthorizationFilter 讓我們可以實作授權
var dashboardOptions = new DashboardOptions
{
    Authorization = new[]
    {
        new DashboardAuthorizationFilter()
    }
};
app.UseHangfireDashboard("/hangfire", dashboardOptions);
在 Authorize 方法加上要處理的流程即可,回傳 true 同等不授權
public class DashboardAuthorizationFilter : IDashboardAuthorizationFilter
{
    public bool Authorize(DashboardContext context)
    {
        return true;
    }
}
DashboardBasicAuthorizationFilter
上線後,我想要套用真正的授權,這裡我用 Basic Authorization
開始之前先安裝 Install-Package Microsoft.Owin.Security.Cookies
DashboardBasicAuthorizationFilter 實作如下
- AuthenticationHeaderValue 把 WWW-Authenticate 出來,判斷是不是用 Basic Type,再把帳號密碼拿出來。
- 比對帳密
- 使用 Microsoft.Owin.Security.IAuthenticationManager.SignIn 方法登入
- user.Identity.IsAuthenticated == true 登入成功就離開驗證流程
public class DashboardBasicAuthorizationFilter : IDashboardAuthorizationFilter
{
    public bool Authorize(DashboardContext context)
    {
        // In case you need an OWIN context, use the next line, `OwinContext` class
        // is the part of the `Microsoft.Owin` package.

        var owinContext = new OwinContext(context.GetOwinEnvironment());
        if (owinContext.Request.Scheme != "https")
        {
            string redirectUri = new UriBuilder("https", owinContext.Request.Host.ToString(), 443, context.Request.Path).ToString();

            owinContext.Response.StatusCode = 301;
            owinContext.Response.Redirect(redirectUri);
            return false;
        }
        if (owinContext.Request.IsSecure == false)
        {
            owinContext.Response.Write("Secure connection is required to access Hangfire Dashboard.");
            return false;
        }
        var user        = owinContext.Authentication.User;
        if (user != null)
        {
            if (user.Identity.IsAuthenticated)
            {
                return true;
            }
        }

        // Allow all authenticated users to see the Dashboard (potentially dangerous).
        string header = owinContext.Request.Headers["Authorization"];
        if (!string.IsNullOrWhiteSpace(header))
        {
            var auHeader = AuthenticationHeaderValue.Parse(header);
            if ("Basic".Equals(auHeader.Scheme, StringComparison.InvariantCultureIgnoreCase))
            {
                var split = Encoding.UTF8
                                    .GetString(Convert.FromBase64String(auHeader.Parameter))
                                    .Split(':');
                if (split.Length == 2)
                {
                    string userId   = split[0];
                    string password = split[1];
                    if (string.Compare(userId,   "yao",         true) == 0 &&
                        string.Compare(password, "pass@w0rd1~", true) == 0)
                    {
                        var claims = new List<Claim>();
                        claims.Add(new Claim(ClaimTypes.Name, "yao"));
                        claims.Add(new Claim(ClaimTypes.Role, "admin"));
                        var identity = new ClaimsIdentity(claims, "HangfireLogin");
                        owinContext.Authentication.SignIn(identity);
                        return true;
                    }
                }
            }
        }

        return this.Challenge(owinContext);
    }
}
只要在 Reponse.Header 加上 WWW-Authenticate,瀏覽器就會跳出帳密讓我們填寫囉
private bool Challenge(OwinContext context)
{
    context.Response.StatusCode = 401;
    context.Response.Headers.Append("WWW-Authenticate", "Basic realm=\"Hangfire Dashboard\"");
    context.Response.Write("Authenticatoin is required.");
    return false;
}
使用 app.UseCookieAuthentication,這樣 Microsoft.Owin.Security.IAuthenticationManager.SignIn 就會把登入資訊寫進 Cookie 囉。
#if DEV 切換授權
    internal class HangfireConfig
    {
        public static void Register(IAppBuilder app)
        {
            app.UseCookieAuthentication(new CookieAuthenticationOptions
            {
                AuthenticationType = "HangfireLogin"
            });

            GlobalConfiguration.Configuration
                               .UseSqlServerStorage("Hangfire")
                               .UseConsole();

            IDashboardAuthorizationFilter dashboardAuthorization = null;
#if DEV
            dashboardAuthorization = new DashboardAuthorizationFilter();

#else
            dashboardAuthorization = new DashboardBasicAuthorizationFilter();
#endif
            var dashboardOptions = new DashboardOptions
            {
                Authorization = new[]
                {
                    dashboardAuthorization
                }
            };

            app.UseHangfireDashboard("/hangfire", dashboardOptions);
            app.UseHangfireServer();
        }
    }
建立 DEV symbol,如下圖

官方提供的 Filter,也用 Basic Authentication,不過已經過時
https://github.com/HangfireIO/Hangfire.Dashboard.Authorization
這裡有人實作 IDashboardAuthorizationFilter,可以從 Nuget 上找到
https://github.com/yuzd/Hangfire.Dashboard.BasicAuthorization
也可以自訂驗證畫面
Hangfire Dashboard of Authorization
Job Storage
Hangfire 提供了很多 Storage 讓我們使用,除了 SQL Server 之外,還有許多的持久化儲存方案讓我們選擇,不需要持久化則選 MemoryStorage
更多的 Storage,請參考
https://www.hangfire.io/extensions.html
使用方式如下:
GlobalConfiguration.Configuration
                   .UseMemoryStorage()
    ;
Hangfire Log
Hangfire 後台記錄是使用 LibLog 來封裝的,支援市面上熱門的 Log Provider,我們只需要配置好 Log Provider,就能記錄 Hangfire 後台的活動
使用代碼如下
GlobalConfiguration.Configuration
				   .UseSerilogLogProvider()
				   .UseNLogLogProvider()
				   .UseLog4NetLogProvider()
				   .UseEntLibLogProvider()
				   .UseLoupeLogProvider()
				   .UseElmahLogProvider();
也可以在 Job 裡面使用 LogProvider
internal class Job
{
	private static ILog s_logger;

	static Job()
	{
		s_logger = LogProvider.GetCurrentClassLogger();
	}

	public static void Send(string message, IJobCancellationToken cancelToken)
	{
		s_logger.Info($"Message:{message}, Now:{DateTime.Now}");
		//Thread.Sleep(10000);
		Trace.WriteLine($"Message:{message}, Now:{DateTime.Now}");
	}
}
以下使用 NLog 演練,先安裝套件 Install-Package NLog.Config
NLog.config 的配置如下
<?xml version="1.0" encoding="utf-8" ?>
<nlog xmlns="http://www.nlog-project.org/schemas/NLog.xsd"
      xmlns:xsi="http://www.w3.org/2001/XMLSchema-instance"
      xsi:schemaLocation="http://www.nlog-project.org/schemas/NLog.xsd NLog.xsd"
      autoReload="true"
      throwExceptions="false"
      internalLogLevel="Off" internalLogFile="c:\temp\nlog-internal.log">

  <!-- optional, add some variables
  https://github.com/nlog/NLog/wiki/Configuration-file#variables
  -->
  <variable name="myvar" value="myvalue"/>

  <!--
  See https://github.com/nlog/nlog/wiki/Configuration-file
  for information on customizing logging rules and outputs.
   -->
  <targets>

    <!--
    add your targets here
    See https://github.com/nlog/NLog/wiki/Targets for possible targets.
    See https://github.com/nlog/NLog/wiki/Layout-Renderers for the possible layout renderers.
    -->

    <!--
    Write events to a file with the date in the filename.
    <target xsi:type="File" name="f" fileName="${basedir}/logs/${shortdate}.log"
            layout="${longdate} ${uppercase:${level}} ${message}" />
    -->
    <target xsi:type="File" name="Generic" fileName="${basedir}/logs/${shortdate}.log"
            layout="${longdate} ${uppercase:${level}} ${message}" />
    <target xsi:type="File" name="Hangfire" fileName="${basedir}/logs/${shortdate}.hangfire.log"
            layout="${longdate} ${uppercase:${level}} ${message}" />

  </targets>

  <rules>
    <!-- add your logging rules here -->

    <!--
    Write all events with minimal level of Debug (So Debug, Info, Warn, Error and Fatal, but not Trace)  to "f"
    <logger name="*" minlevel="Debug" writeTo="f" />
    -->
    <logger name="Lab.HangfireApp*" minlevel="Debug" writeTo="Generic" />
    <logger name="Hangfire*" minlevel="Debug" writeTo="Hangfire" />
  </rules>
</nlog>
為了區分 Hangfire 後台的 Log,我設定了兩個 rule、target。
Jobs
完成了 Hangfire 服務的建立,接下來就要跟服務講,有哪些 Job 以及 Job 的工作方式,一旦建立了 Job ,就會被放到 Queue 裡面,再根據你建立的工作方式來決定何時運行,預設 Job 有以下工作方式,你得根據需求來決定要使用哪一種方式。
Fire-and-forgot jobs:立即執行一次
Delayed jobs:延遲執行一次
Recurring jobs:根據 Cron 描述,定期執行多次
Continuations:在某個 Job 執行完後接續執行
下圖出自:https://www.hangfire.io/overview.html

Job Method
Hangfire 所提供的 Job 工作方式,只能用單行撰寫 Job,應把 Job 變成一個 Method,才好使
範例如下
//立即執行一次
BackgroundJob.Enqueue(() => Job.Send(content));
internal class Job
{
    public static void Send(string message)
    {
        //Thread.Sleep(10000);
        Trace.WriteLine($"Message:{message}, Now:{DateTime.Now}");
    }
}
Job Attribute
QueueAttribute
指定該項任務要被放置到哪一個佇列
[Queue("alpha")]
public void SomeMethod() { }
佇列格式
佇列名稱參數必須僅包含小寫字母,數字,下劃線和破折號(自1.7.6起)
https://docs.hangfire.io/en/latest/background-processing/configuring-queues.html
服務配置佇列
服務要配置有哪些佇列名抽,任務才能指定要用哪一個佇列
var options = new BackgroundJobServerOptions
{
    Queues = new[] { "alpha", "beta", "default" }
};

app.UseHangfireServer(options);
佇列的運行順序
這取決於存儲體實現。例如,當我們使用Hangfire.SqlServer時,順序是由"字母數字"順序定義的,而陣列索引將被忽略。
使用 Hangfire.Pro.Redis 時,陣列"索引"很重要,索引較低的佇列將首先處理。
AutomaticRetryAttribute
https://docs.hangfire.io/en/latest/background-processing/dealing-with-exceptions.html
當任務發生失敗重試,有以下幾個要點
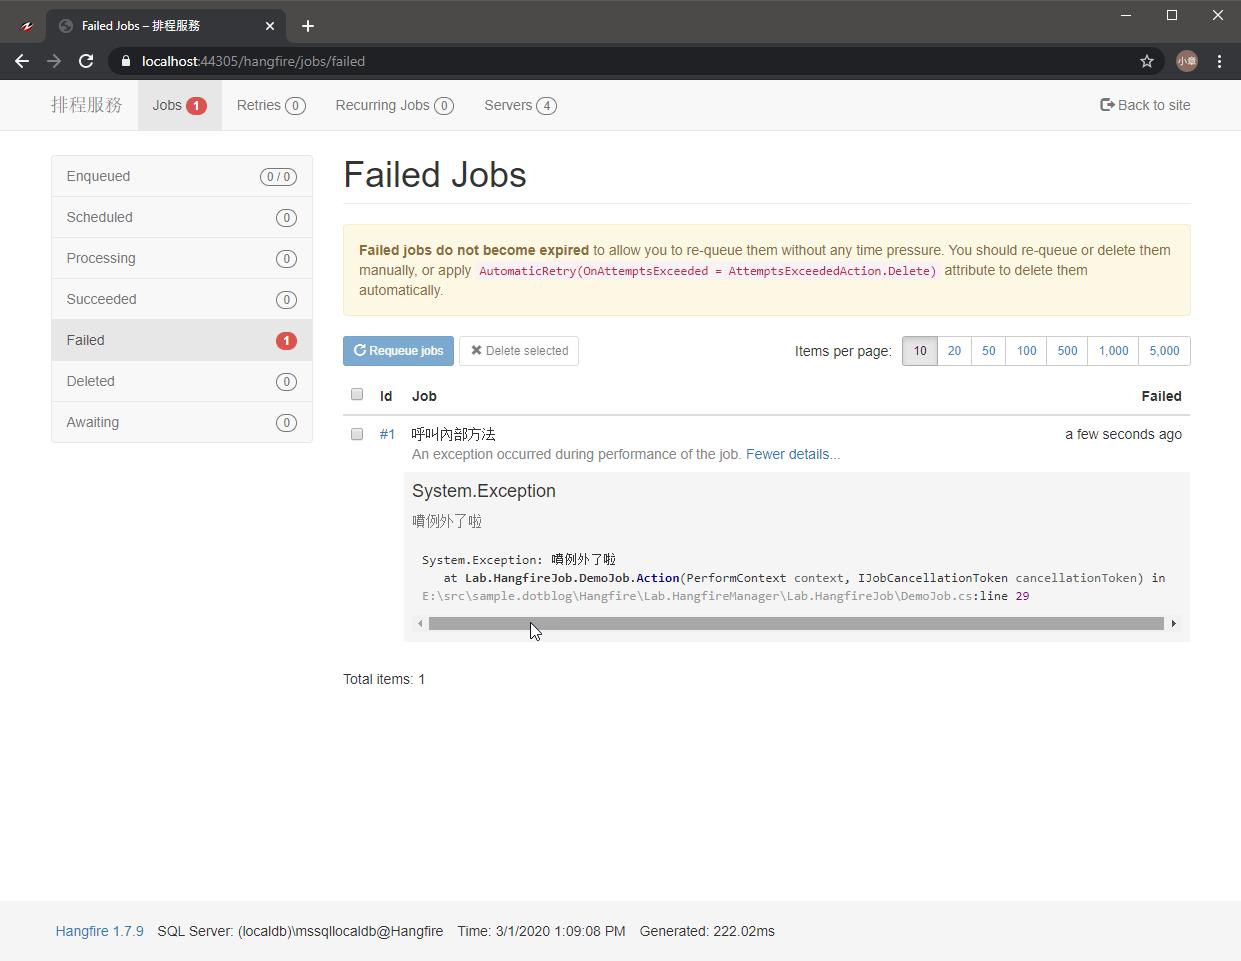
Attempts 重試次數預設為 10
超過重試次數任務的狀態就會被標記為 Failed,可以在 Hangfire UI 看到完整的錯誤訊息,他會一直在這裡存留著,除非你把他刪除
不想要重試 Attempts 設為 0
[AutomaticRetry(Attempts = 0)]
public void BackgroundMethod()
{
}
若想要使用全域設定,可加入 AutomaticRetryAttribute
GlobalJobFilters.Filters.Add(new AutomaticRetryAttribute { Attempts = 5 });
ASP.NET Core 使用 IServiceCollection.AddHangfire .AddHangfire 擴充方法,由於要使用 GlobalJobFilter 實例,因此應該依賴 Transient 或 Singleton
services.AddHangfire((provider, configuration) =>
{
    configuration.UseFilter(provider.GetRequiredService<AutomaticRetryAttribute>());
}
任務發生例外效果如下:
重試工作
當工作發生錯誤會觸發重試流程,它會暫止並重新排隊,超過重試次數,把工作移到 Failded、Delete 區。請參考:重試時重新排隊
[AutomaticRetry(Attempts = 3, DelaysInSeconds = new[] {10, 20, 30},OnAttemptsExceeded = AttemptsExceededAction.Delete)]
public void Retry(string msg, PerformContext context, IJobCancellationToken cancelToken)
{
    //TODO....
}
詳請請參考 [Hangfire] 任務佇列重試策
取消工作
當 Job 取消的時候,Job Method 可透過 IJobCancellationToken 來停止工作,它大大縮短了應用程序關閉時間,並降低了 ThreadAbortException 出現的風險,官方也建議應該要使用它
BackgroundJob.Enqueue(() => Job.LongRunning(JobCancellationToken.Null));
當需要長時間的工作時,以下兩種方式判斷取消旗標,擇一即可
cancellationToken.ShutdownToken.IsCancellationRequested
cancellationToken.ThrowIfCancellationRequested()
範例如下:
public static void LongRunning(IJobCancellationToken cancellationToken)
{
    for (var i = 0; i < Int32.MaxValue; i++)
    {
        if (cancellationToken.ShutdownToken.IsCancellationRequested)
        {
            Trace.WriteLine($"Task Cancel");
            return;
        }

        //cancellationToken.ThrowIfCancellationRequested();

        Thread.Sleep(TimeSpan.FromSeconds(1));
    }
}
當我按下 Delete 刪除工作,觸發 JobCancellationToken.ShutdownToken
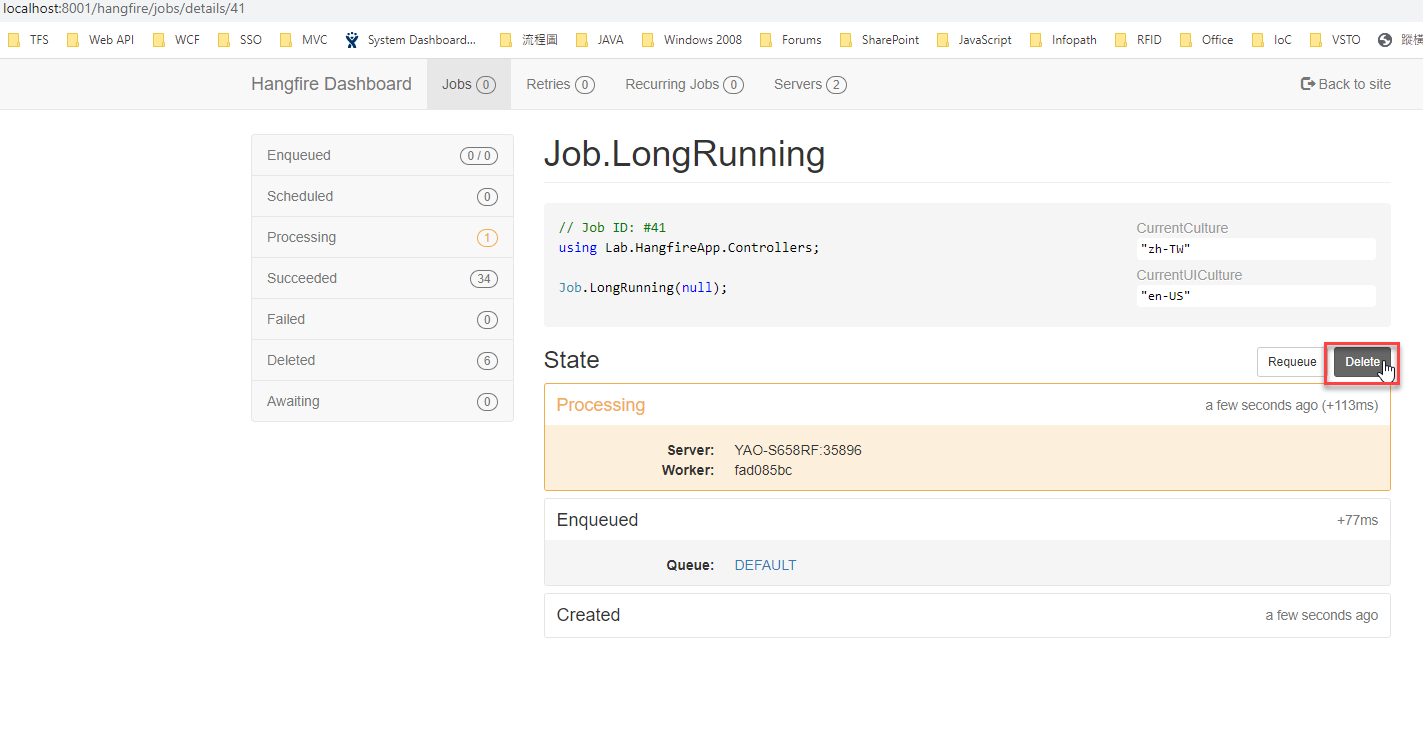
ShutdownToken 是 CancellationToken 型別,這是用來取消執行緒工作
public interface IJobCancellationToken
{
  CancellationToken ShutdownToken { get; }

  void ThrowIfCancellationRequested();
}
這裡有以前我寫過有關執行緒取消的文章,需要的可以參考
[ASP.NET Web API] 通過 CancellationToken 取消非同步請求
提供 REST API 給用戶端調用
提供 REST API 給用戶使用,這樣就可以把 Job 開放給其他人調用
public class JobApiController : ApiController
{
    public async Task<IHttpActionResult> Post(string content)
    {
        BackgroundJob.Enqueue(() => Job.LongRunning(JobCancellationToken.Null));

        return this.Ok();
    }
}
通過 PostMan 調試 REST API
Ctrl+F5 啟動 Console App
通過瀏覽器,訪問 http://localhost:8001/hangfire
通過 PostMan,POST http://localhost:8001/api/JobApi?content=TEST
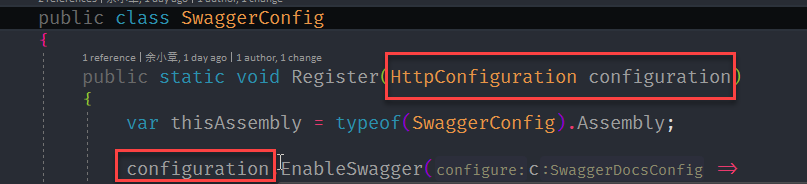
通過 Swagger 調試 REST API
Install-Package Swagger-Net
SwaggerConfig.cs 的 GlobalConfiguration 要換成 HttpConfiguration
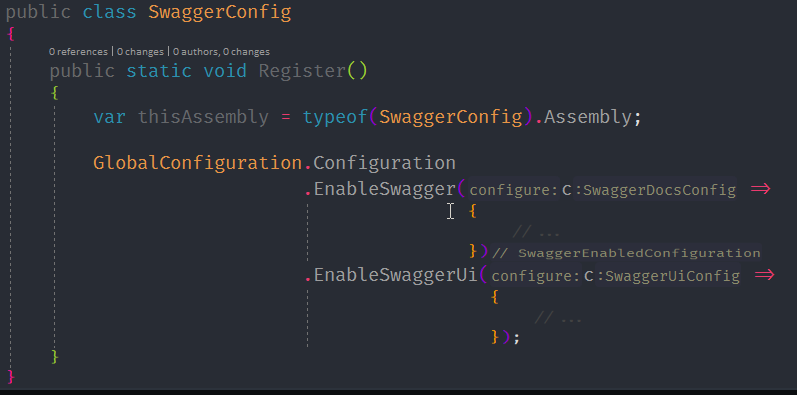
在桌面應用程式也能使用 Swagger
別忘了註冊 Swagger 的配置
public class Startup
{
    public void Configuration(IAppBuilder app)
    {
        // For more information on how to configure your application, visit https://go.microsoft.com/fwlink/?LinkID=316888
        var config = new HttpConfiguration();
        SwaggerConfig.Register(config);
        HangfireConfig.Register(app);
        config.Routes.MapHttpRoute("DefaultApi",
                                   "api/{controller}/{id}",
                                   new {id = RouteParameter.Optional}
                                  );

        app.UseWelcomePage("/");
        app.UseWebApi(config);
        app.UseErrorPage();
    }
}
工作管理介面
當你想要在管理加入非同步的工作,預設,只有工作的檢視以及重試,沒有提供新增任務的管理介面,本篇演示透過 Swagger UI 完成新增工作的需求
Hangfire.Dashboard.Management 套件直接整合到 Dashboard 讓你輕易的讓你實現這個需求,而且更強大,詳情請參考以下連結
[Hangfire] ASP.NET Core Hangfire 排程管理 - Hangfire.Dashboard.Management
參考
更多的 Hangfire 擴充套件
https://www.hangfire.io/extensions.html
官方文件
https://docs.hangfire.io/en/latest/
範例位置
https://github.com/yaochangyu/sample.dotblog/tree/master/Hangfire/Lab.HangfireApp
若有謬誤,煩請告知,新手發帖請多包涵

Microsoft MVP Award 2010~2017 C# 第四季
Microsoft MVP Award 2018~2025 .NET
