Nginx (讀作 engine x),是一個免費的開源軟體,具有非同步框架的 Web Server,更多的用途是作為反向代理、Http Cache、負載平衡器。久仰它許久,但對它的配置一無所知,趁假日的時候練習一波。
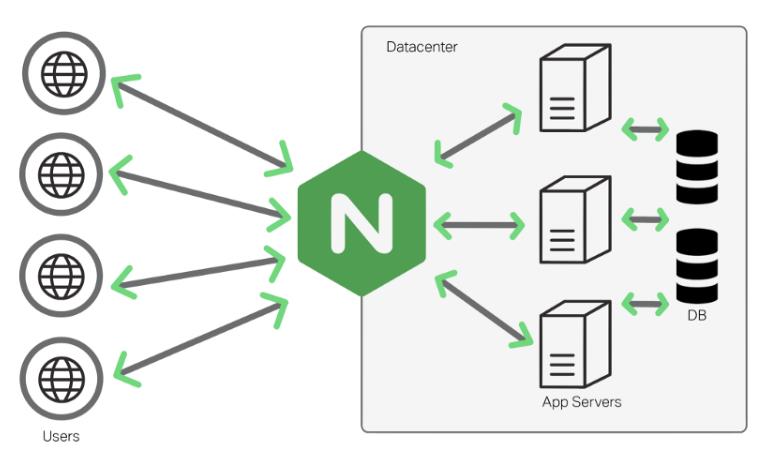
下圖出自網路

開發環境
- Windows 11 Home
- Docker 27.2.0
準備環境
docker-compose.yml
內容如下:
version: '3.8'
services:
  app1:
    build:
      context: ./app1
#    ports:
#      - "8081:80" # 將容器的 80 端口映射到主機的 8081 端口
    networks:
      - myapp

  webapi:
    image: webapi
    build:
      context: ./WebApi
      dockerfile: ./WebApi/Dockerfile
    ports:
      - "8080:8080" # 將主機的 9527 端口映射到 Nginx 容器的 80 端口
    networks:
      - myapp

  app2:
    build:
      context: ./app2
#    ports:
#      - "8082:80" # 將容器的 80 端口映射到主機的 8082 端口
    networks:
      - myapp

  nginx:
    image: nginx:latest
    ports:
      - "9527:80" # 將主機的 9527 端口映射到 Nginx 容器的 80 端口
    volumes:
      - ./nginx/nginx.conf:/etc/nginx/nginx.conf:ro # 挂载自定义的 Nginx 配置文件
      - ./nginx:/etc/nginx
    networks:
      - myapp

networks:
  myapp:
    driver: bridge
nginx.conf
內容如下:
events {}

http {
    # 定義上游服務池
    upstream backend {
        server app1:80 weight=1 fail_timeout=60s max_fails=1;       # app1 容器
        server app2:80 weight=1 fail_timeout=60s max_fails=1;       # app2 容器
        server webapi:8080 weight=1 fail_timeout=60s max_fails=1;   # webapi 容器
    }

    server {
        listen 80; # Nginx 容器內部仍需監聽 80 端口

        # 根路徑導向上游服務池
        location / {
            proxy_pass http://backend; # 將請求代理到上游服務池
            proxy_send_timeout 5s;
            proxy_set_header Host $host;
            proxy_set_header X-Real-IP $remote_addr;
            proxy_set_header X-Forwarded-For $proxy_add_x_forwarded_for;
        }
    }
}
upstream
在這裡,backend 是一個上游服務池的名稱,定義在 upstream 區塊中,包含了多個後端服務(例如 app1 和 app2)。Nginx 會根據上游服務池的配置,將請求分配到對應的服務中。達到 load balancer 負載平衡的功能。
server
proxy server 的相關設定,包括要監聽的 port (http 為 80 ,https 為 443),規定哪些 domain 或 ip 的 request 會被 nginx server 處理(例如:server_name)。
location
設定不同的 path 要對應到怎麼樣的設定。
proxy_pass http://backend; 是 Nginx 中用來將客戶端的請求代理到另一個服務(或服務池)的。它的功能是將請求轉發到上游服務(由 upstream backend 定義的服務池)。
在這裡,backend 是一個上游服務池的名稱,定義在 upstream 區塊中,包含了多個後端服務(例如 app1 和 app2)。Nginx 會根據上游服務池的配置,將請求分配到對應的服務中。
容器
app1 和 app2 用一個簡單的 nginx server 裡面放一個 html
Nginx/app1/Dockerfile
FROM nginx:alpine
COPY index.html /usr/share/nginx/html/index.htmlNginx/app1/index.html
<!DOCTYPE html>
<html>
<head>
   <title>App 1</title>
</head>
<body>
   <h1>Welcome to App 1</h1>
</body>
</html>
webapi 用 dotnet 8 專案,裡面放一個 html
Nginx/WebApi/WebApi/Dockerfile
FROM mcr.microsoft.com/dotnet/aspnet:8.0 AS base
USER $APP_UID
WORKDIR /app
EXPOSE 8080
EXPOSE 8081
FROM mcr.microsoft.com/dotnet/sdk:8.0 AS build
ARG BUILD_CONFIGURATION=Release
WORKDIR /src
COPY ["WebApi/WebApi.csproj", "WebApi/"]
RUN dotnet restore "WebApi/WebApi.csproj"
COPY . .
WORKDIR "/src/WebApi"
RUN dotnet build "WebApi.csproj" -c $BUILD_CONFIGURATION -o /app/build
FROM build AS publish
ARG BUILD_CONFIGURATION=Release
RUN dotnet publish "WebApi.csproj" -c $BUILD_CONFIGURATION -o /app/publish /p:UseAppHost=false
FROM base AS final
WORKDIR /app
COPY --from=publish /app/publish .
ENTRYPOINT ["dotnet", "WebApi.dll"]
Nginx/WebApi/WebApi/wwwroot
<!DOCTYPE html>
<html>
<head>
   <title>Web API</title>
</head>
<body>
   <h1>Welcome to Web API</h1>
</body>
</html>
演示
當啟動
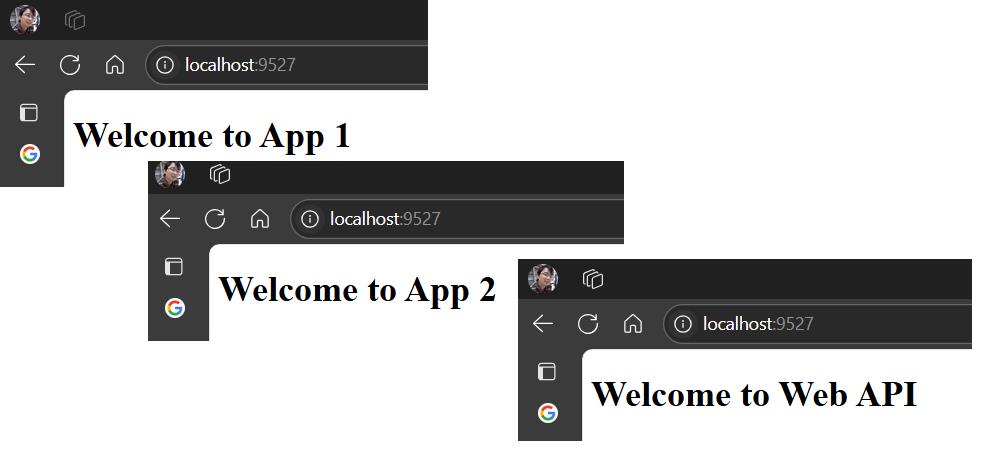
訪問 http://localhost:9527/
重新刷新可以看到 nginx 分別把它們導向不同的頁面

範例位置
sample.dotblog/Nginx at master · yaochangyu/sample.dotblog
若有謬誤,煩請告知,新手發帖請多包涵
Microsoft MVP Award 2010~2017 C# 第四季
Microsoft MVP Award 2018~2022 .NET