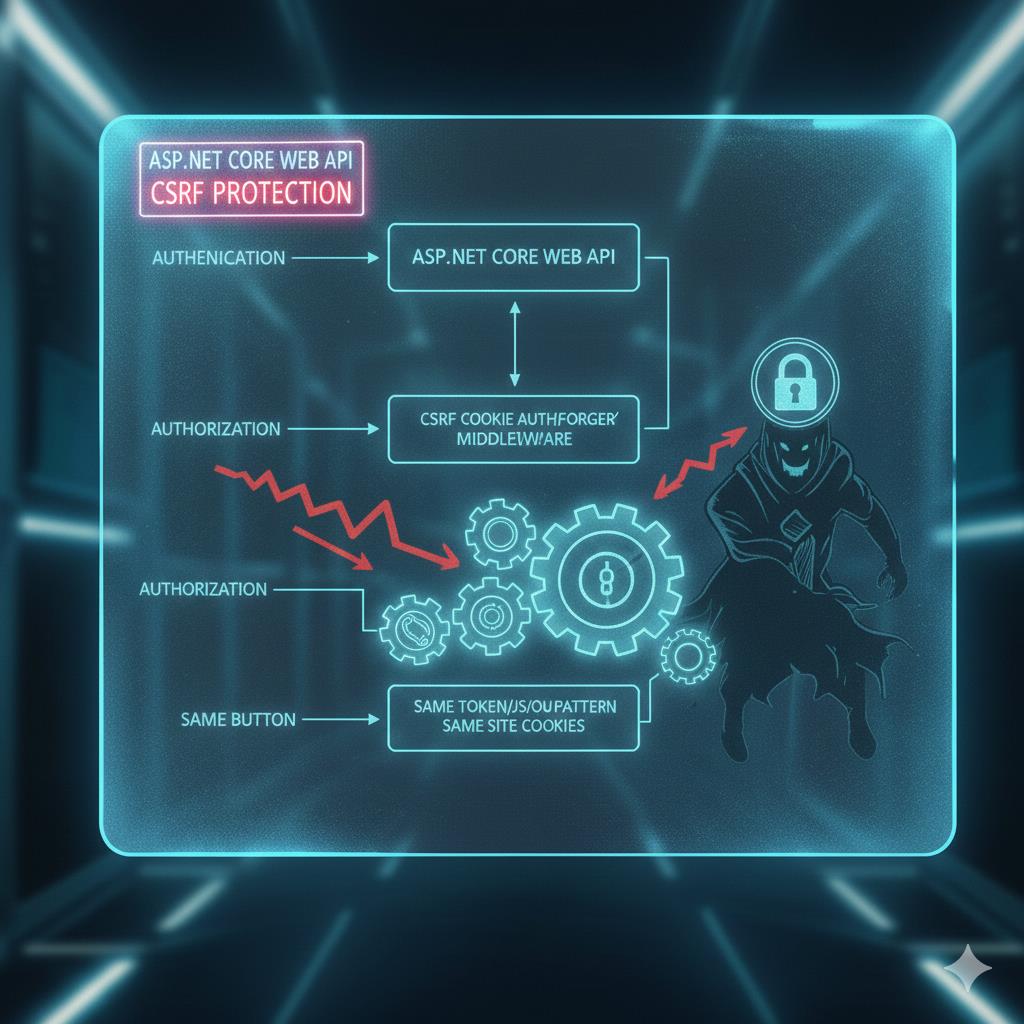
開發公開 API 時,防範惡意濫用是不可或缺的一環。本文將探討如何運用 ASP.NET Core 建構安全防護機制,為允許匿名存取的 Web API 提供堅實保障。
開發環境
- Windows 11 Pro
- .NET 10.0
- ASP.NET Core Web API
- Playwright (瀏覽器測試)
- PowerShell / Bash (測試腳本)
防護機制有哪些?
本系統實作了 8 層防護機制:
第 1 層: 速率限制
   ↓
第 2 層: User-Agent 黑名單驗證
   ↓
第 3 層: Referer/Origin 白名單驗證
   ↓
第 4 層: Token 存在性驗證
   ↓
第 5 層: Token 有效性驗證
   ↓
第 6 層: Token 過期驗證
   ↓
第 7 層: Token 使用次數驗證
   ↓
第 8 層: User-Agent 一致性驗證
   ↓
✅ 請求通過,執行業務邏輯
| 攻擊類型 | 防護機制 | HTTP 狀態碼 |
|---|---|---|
| 無 Token 直接攻擊 | Token 必須驗證 | 401 |
| 無效/偽造 Token | Token 伺服器端驗證 | 401 |
| Token 過期 | 時間限制驗證 | 401 |
| Token 重放攻擊 | 使用次數限制 | 401 |
| Token 盜用 | User-Agent 綁定 | 401 |
| 跨域攻擊 | Origin/Referer 驗證 | 403 |
| 爬蟲/Bot 攻擊 | User-Agent 黑名單 | 403 |
| 暴力破解 | 速率限制 | 429 |
怎麼做防護?
Server Side 配置
1. 速率限制
使用 ASP.NET Core 內建的 Rate Limiting 中介軟體,限制 API 呼叫頻率。
builder.Services.AddRateLimiter(options =>
{
    // API 端點速率限制: 10 秒內最多 10 次請求
    options.AddFixedWindowLimiter("api", limiterOptions =>
    {
        limiterOptions.Window = TimeSpan.FromSeconds(10);
        limiterOptions.PermitLimit = 10;
        limiterOptions.QueueLimit = 0;
    });

    // Token 生成速率限制: 1 分鐘內最多 5 個 Token
    options.AddFixedWindowLimiter("token", limiterOptions =>
    {
        limiterOptions.Window = TimeSpan.FromMinutes(1);
        limiterOptions.PermitLimit = 5;
        limiterOptions.QueueLimit = 0;
    });

    options.RejectionStatusCode = 429;
});
2. CORS 白名單
限制允許存取的來源,防止跨域攻擊。
builder.Services.AddCors(options =>
{
    options.AddDefaultPolicy(policy =>
    {
        policy.WithOrigins(
                "http://localhost:5073",
                "https://localhost:7026"
              )
              .AllowAnyMethod()
              .AllowAnyHeader()
              .WithExposedHeaders("X-CSRF-Token")
              .AllowCredentials();
    });
});
3. Token 提供者
使用 IMemoryCache 儲存 Token 資訊,綁定 User-Agent 和 IP 地址。
public class TokenProvider : ITokenProvider
{
    private readonly IMemoryCache _cache;

    public string GenerateToken(int maxUsageCount, int expirationMinutes,
                                string userAgent, string ipAddress)
    {
        var token = Guid.NewGuid().ToString();
        var tokenData = new TokenData
        {
            CreatedAt = DateTime.UtcNow,
            ExpiresAt = DateTime.UtcNow.AddMinutes(expirationMinutes),
            MaxUsageCount = maxUsageCount,
            UsageCount = 0,
            UserAgent = userAgent,
            IpAddress = ipAddress
        };

        var cacheOptions = new MemoryCacheEntryOptions
        {
            AbsoluteExpiration = tokenData.ExpiresAt
        };

        _cache.Set(token, tokenData, cacheOptions);
        return token;
    }
}
4. Token 發放端點
前端不是自己產生 Token,而是先呼叫 /api/token 向後端申請。後端收到請求後,會根據目前的 User-Agent 與 IP 位址建立 Token,並把 Token 放在 Response Header 的 X-CSRF-Token 回傳給前端。
[ApiController]
[Route("api/[controller]")]
public class TokenController : ControllerBase
{
    private readonly ITokenProvider _tokenProvider;

    public TokenController(ITokenProvider tokenProvider)
    {
        _tokenProvider = tokenProvider;
    }

    [HttpGet]
    [EnableRateLimiting("token")]
    public IActionResult GetToken([FromQuery] int maxUsage = 1, [FromQuery] int expirationMinutes = 5)
    {
        var userAgent = Request.Headers["User-Agent"].ToString();

        if (string.IsNullOrWhiteSpace(userAgent))
        {
            return BadRequest(new { error = "User-Agent header is required" });
        }

        var ipAddress = HttpContext.Connection.RemoteIpAddress?.ToString() ?? "unknown";

        var token = _tokenProvider.GenerateToken(
            maxUsage,
            expirationMinutes,
            userAgent,
            ipAddress);

        Response.Headers["X-CSRF-Token"] = token;

        return Ok(new
        {
            message = "Token generated successfully",
            token
        });
    }
}
這裡的重點有兩個:
- Token 必須由後端產生,前端只能申請,不能自己計算或偽造。
- Token 放在
Response Header: X-CSRF-Token,前端拿到後再放到下一次 Request Header 使用。
5. Token 驗證過濾器
使用 ActionFilter 實作多層次驗證邏輯。
public class ValidateTokenAttribute : ActionFilterAttribute
{
    // 爬蟲 User-Agent 黑名單
    private static readonly string[] BotUserAgents = new[]
    {
        "curl/", "wget/", "scrapy", "python-requests",
        "java/", "go-http-client", "axios/", "node-fetch"
    };

    public override void OnActionExecuting(ActionExecutingContext context)
    {
        var request = context.HttpContext.Request;
        var userAgent = request.Headers["User-Agent"].ToString();

        // 1. User-Agent 黑名單驗證
        if (!ValidateUserAgent(userAgent))
        {
            context.Result = new ObjectResult(new { error = "Forbidden User-Agent" })
            {
                StatusCode = 403
            };
            return;
        }

        // 2. Referer 驗證
        if (!ValidateReferer(request))
        {
            context.Result = new ObjectResult(new { error = "Invalid Referer" })
            {
                StatusCode = 403
            };
            return;
        }

        // 3. Token 驗證
        if (!request.Headers.TryGetValue("X-CSRF-Token", out var tokenValues))
        {
            context.Result = new UnauthorizedObjectResult(new { error = "Missing Token" });
            return;
        }

        var token = tokenValues.FirstOrDefault();
        var tokenService = context.HttpContext.RequestServices
            .GetRequiredService<ITokenProvider>();

        if (!tokenService.ValidateToken(token, userAgent, ipAddress))
        {
            context.Result = new UnauthorizedObjectResult(new { error = "Invalid token" });
            return;
        }

        base.OnActionExecuting(context);
    }
}
Client Side 配置
瀏覽器端使用方式
前端透過兩個步驟來存取受保護的 API:
- 取得 Token:呼叫
/api/token取得 Token,Token 會放在 Response Header 的X-CSRF-Token欄位。 - 使用 Token:將 Token 放在 Request Header 的
X-CSRF-Token欄位,呼叫受保護的 API。
// 步驟 1: 取得 Token
async function getToken() {
    const response = await fetch('/api/token?maxUsage=1&expirationMinutes=5');
    const token = response.headers.get('X-CSRF-Token');
    return token;
}

// 步驟 2: 呼叫受保護的 API
async function callProtectedApi(token, data) {
    const response = await fetch('/api/protected', {
        method: 'POST',
        headers: {
            'Content-Type': 'application/json',
            'X-CSRF-Token': token
        },
        body: JSON.stringify({ data: data })
    });
    return await response.json();
}
前端到後端互動流程
前端到後端的互動流程如下:
- 瀏覽器先呼叫
GET /api/token申請 Token。 - 後端建立 Token,並把 Token 與
User-Agent、有效時間、可使用次數等資訊一起存到快取。 - 後端透過 Response Header
X-CSRF-Token把 Token 回傳給前端。 - 前端呼叫受保護的 API 時,將 Token 放在 Request Header
X-CSRF-Token。 - 後端在
ValidateTokenAttribute中驗證:- User-Agent 是否合法
- Referer/Origin 是否可信
- Token 是否存在
- Token 是否有效
- Token 是否過期
- Token 使用次數是否超過限制
- User-Agent 是否與申請 Token 時一致
- 驗證通過後,才執行真正的業務邏輯。
sequenceDiagram
    participant Browser as 瀏覽器
    participant API as Web API
    participant Cache as Memory Cache

    Browser->>API: GET /api/token
    API->>API: 檢查 token 端點速率限制
    API->>Cache: 產生並儲存 Token<br/>(綁定 User-Agent + IP + 到期時間)
    API->>Browser: Response Header: X-CSRF-Token

    Browser->>API: POST /api/protected<br/>Header: X-CSRF-Token
    API->>API: ValidateTokenAttribute 驗證 User-Agent
    API->>API: 驗證 Referer/Origin
    API->>Cache: 驗證 Token 存在、有效、未過期
    API->>Cache: 更新使用次數
    API->>Browser: 200 OK / 401 Unauthorized / 403 Forbidden
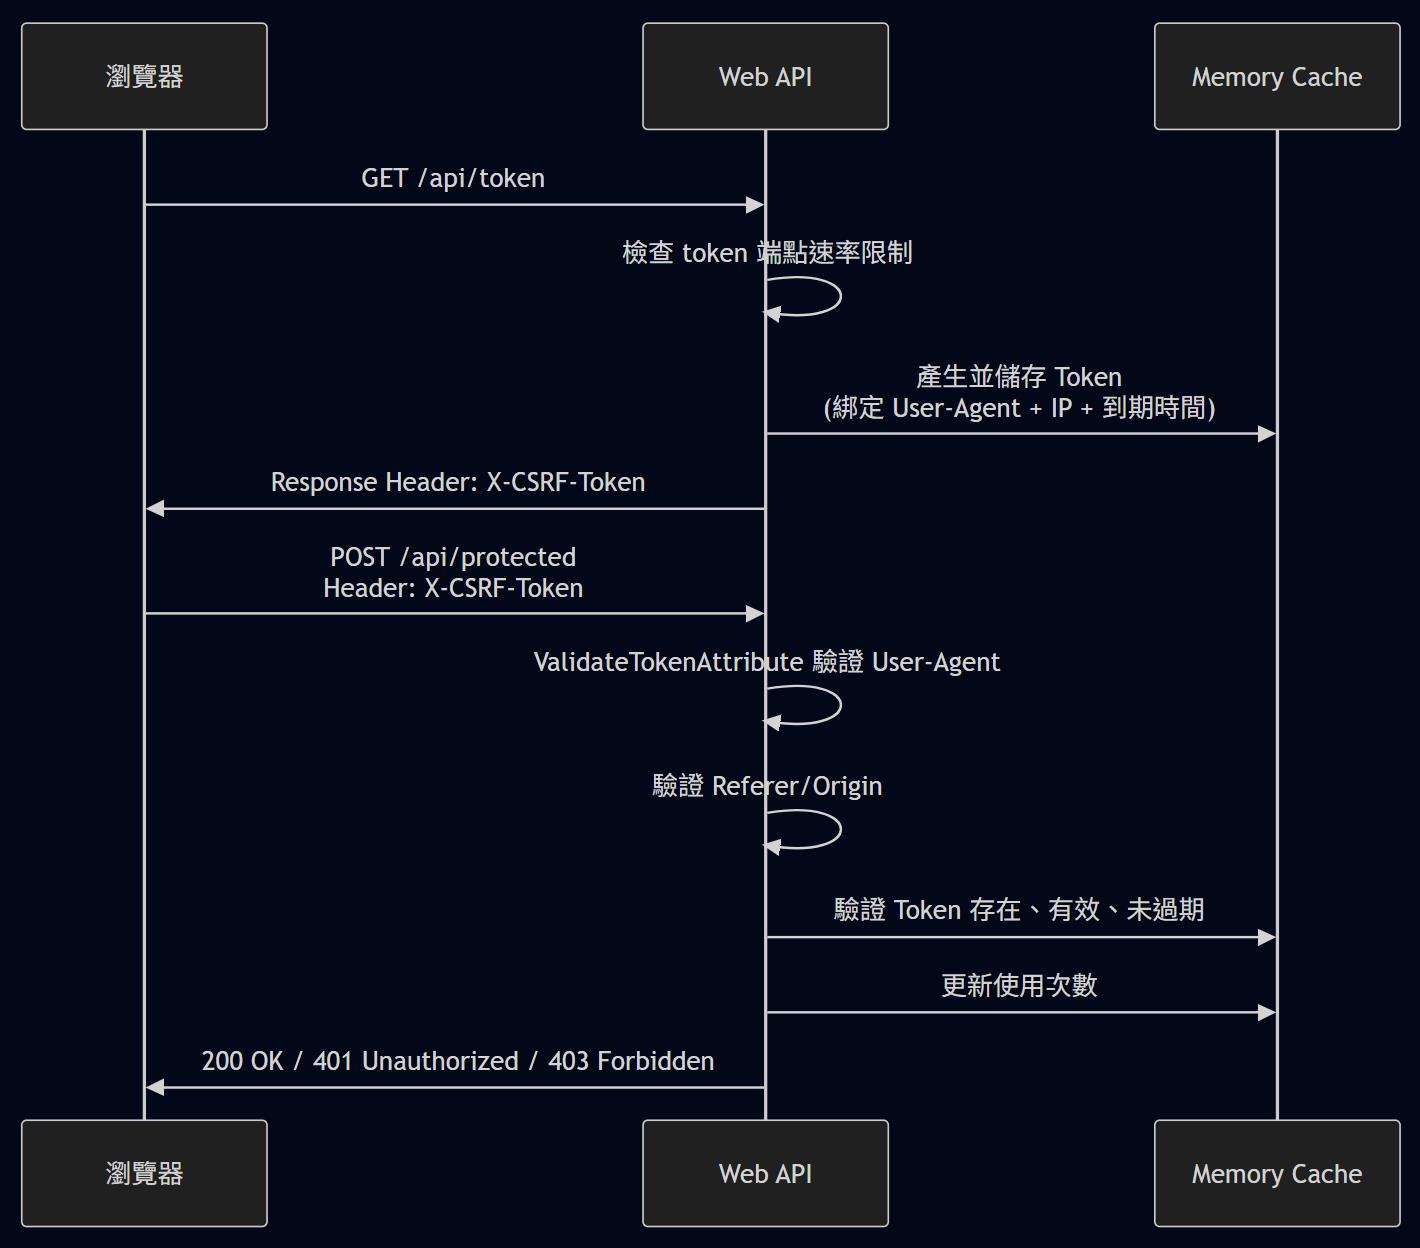
這樣的設計可以把 Token 的生命週期控制在伺服器端,避免前端自行產生或偽造 Token。
做了那些實驗
實驗一:正常流程測試
目的:驗證正常使用者可以正常存取 API。
# 1. 取得 Token
TOKEN=$(curl -s -X GET "http://localhost:5073/api/token" \
  -H "User-Agent: Mozilla/5.0" \
  -i | grep -i "x-csrf-token" | cut -d' ' -f2 | tr -d '\r')

# 2. 使用 Token 呼叫 API
curl -X POST "http://localhost:5073/api/protected" \
  -H "Content-Type: application/json" \
  -H "X-CSRF-Token: $TOKEN" \
  -H "User-Agent: Mozilla/5.0" \
  -d '{"Data":"test"}'
結果:HTTP 200,API 正常回應。
實驗二:重放攻擊測試
目的:驗證 Token 使用次數限制,防止 Token 被重複使用。
# 取得 Token (maxUsage=1)
TOKEN=$(curl -s -X GET "http://localhost:5073/api/token?maxUsage=1" \
  -H "User-Agent: Mozilla/5.0" \
  -i | grep -i "x-csrf-token" | cut -d' ' -f2 | tr -d '\r')

# 第一次使用
curl -X POST "http://localhost:5073/api/protected" \
  -H "X-CSRF-Token: $TOKEN" \
  -H "User-Agent: Mozilla/5.0" \
  -d '{"Data":"first"}'

# 第二次使用 (重放攻擊)
curl -X POST "http://localhost:5073/api/protected" \
  -H "X-CSRF-Token: $TOKEN" \
  -H "User-Agent: Mozilla/5.0" \
  -d '{"Data":"second"}'
結果:第一次 HTTP 200,第二次 HTTP 401 (Invalid or expired token)。
實驗三:User-Agent 綁定測試
目的:驗證 Token 綁定 User-Agent,防止 Token 被盜用到其他客戶端。
# 使用 User-Agent "BrowserA" 取得 Token
TOKEN=$(curl -s -X GET "http://localhost:5073/api/token" \
  -H "User-Agent: BrowserA" \
  -i | grep -i "x-csrf-token" | cut -d' ' -f2 | tr -d '\r')

# 使用 User-Agent "BrowserB" 呼叫 API
curl -X POST "http://localhost:5073/api/protected" \
  -H "X-CSRF-Token: $TOKEN" \
  -H "User-Agent: BrowserB" \
  -d '{"Data":"test"}'
結果:HTTP 401 (Invalid or expired token)。
實驗四:速率限制測試
目的:驗證速率限制機制,防止暴力破解。
# 快速請求 6 次 Token
for i in {1..6}; do
  curl -X GET "http://localhost:5073/api/token" \
    -H "User-Agent: Mozilla/5.0"
  echo ""
done
結果:前 5 次 HTTP 200,第 6 次 HTTP 429 (Too Many Requests)。
實驗五:爬蟲攻擊測試
目的:驗證 User-Agent 黑名單機制,拒絕爬蟲工具。
# 使用 curl 的預設 User-Agent 直接攻擊 Protected API
curl -X POST "http://localhost:5073/api/protected" \
  -H "Content-Type: application/json" \
  -d '{"Data":"attack"}'
結果:HTTP 403 (Forbidden User-Agent)。
實驗六:瀏覽器整合測試
目的:驗證瀏覽器環境下的完整流程。
使用 Playwright 模擬瀏覽器操作:
test('瀏覽器正常流程', async ({ page }) => {
  await page.goto('http://localhost:5073/test.html');

  // 設定 maxUsage=3
  await page.fill('#maxUsage', '3');
  await page.click('button:has-text("取得 Token")');

  // 呼叫 3 次 API
  for (let i = 0; i < 3; i++) {
    await page.click('button:has-text("呼叫 Protected API")');
    await expect(page.locator('#apiResult')).toContainText('success');
  }

  // 第 4 次應該失敗
  await page.click('button:has-text("呼叫 Protected API")');
  await expect(page.locator('#apiResult')).toContainText('Invalid or expired token');
});
結果:前 3 次成功,第 4 次失敗,符合預期。
測試結果
執行 13 個測試案例,涵蓋 Token 基本功能、安全防護與瀏覽器整合測試。
| 測試項目 | 測試數量 | 通過 |
|---|---|---|
| Token 基本功能 | 3 | 3 ✅ |
| 安全防護驗證 | 7 | 7 ✅ |
| 瀏覽器整合測試 | 3 | 3 ✅ |
| 總計 | 13 | 13 ✅ |
成功率:100%
生產環境建議
必須啟用的設定
HTTPS 強制
app.UseHttpsRedirection();
app.UseHsts();
IP 地址綁定
// 在 TokenProvider.ValidateToken 中取消註解
if (!string.IsNullOrEmpty(tokenData.IpAddress) &&
    tokenData.IpAddress != ipAddress)
{
    return false;
}
使用 Redis
// 替換 IMemoryCache 為 Redis
services.AddStackExchangeRedisCache(options =>
{
    options.Configuration = "localhost:6379";
});
日誌監控
logger.LogWarning("Security Event: TokenValidationFailed", new {
    UserAgent = userAgent,
    IpAddress = ipAddress,
    Timestamp = DateTime.UtcNow
});
範例位置
sample.dotblog/WebAPI/Lab.CSRF-2
參考資料
若有謬誤,煩請告知,新手發帖請多包涵

Microsoft MVP Award 2010~2017 C# 第四季
Microsoft MVP Award 2018~2025 .NET
