最近在玩 NousResearch 推出的 Hermes Agent,覺得 CLI 用起來還是不夠舒服,想把對話介面換成 OpenWebUI,又想在手機上也能用,所以順便串了 ngrok 把服務開到外網。
這一篇把安裝、Gateway 設定、OpenWebUI 串接、Hermes 舊對話匯入、ngrok 對外曝光一次整理起來,以後重灌也可以照著做一遍。
開發環境
- OS:Windows 11 Pro + WSL2 (Ubuntu 24.04)
- Docker Engine in WSL2
Hermes Agent v0.11.0 (2026.4.23)
官方文件:https://hermes-agent.nousresearch.com
GitHub 原始碼:https://github.com/NousResearch/hermes-agent- Open WebUI:
ghcr.io/open-webui/open-webui:main - ngrok v3.38.0
Hermes Agent 是什麼
官方一句話:
An autonomous agent that lives on your server, remembers what it learns, and gets more capable the longer it runs.
也就是一個跑在自己伺服器上的 AI Agent,會記得學過的東西,跑越久越聰明。官方特別強調它不是綁在 IDE 上的 coding copilot,也不是單純包一層 API 的 chatbot wrapper。
主要特性大致這幾個:
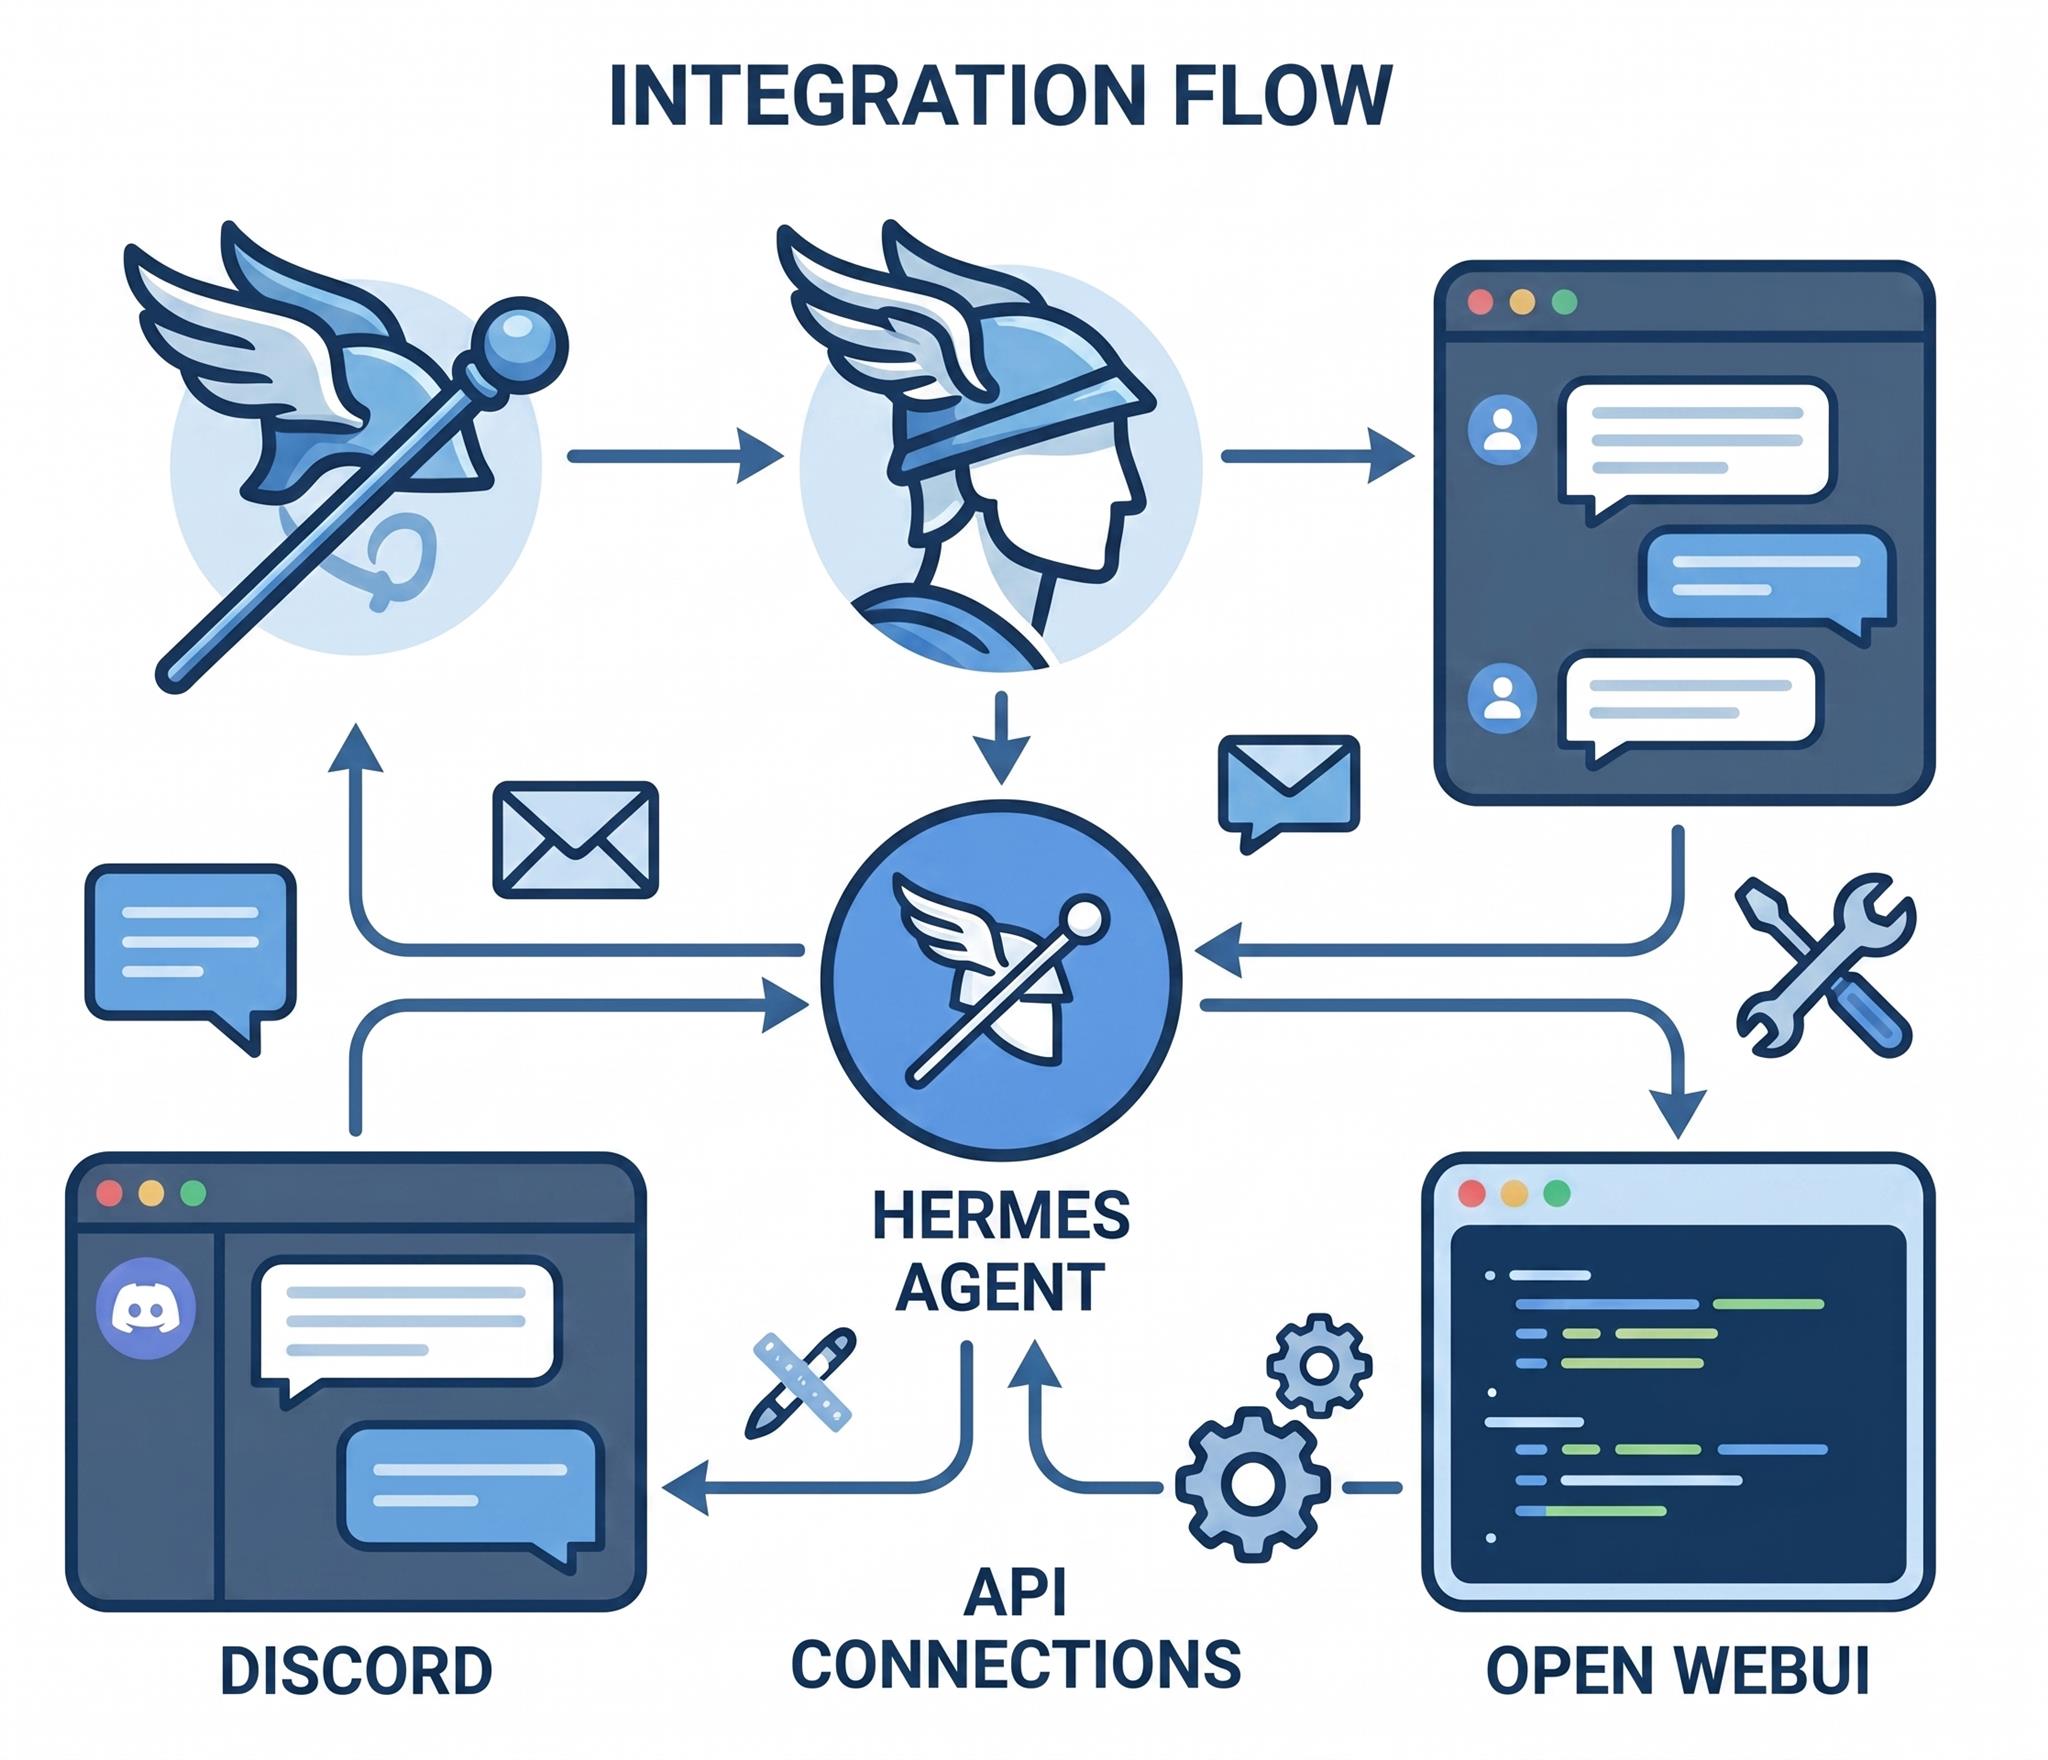
- 多平台部署 — CLI、Discord、Slack、Telegram、WhatsApp、Signal、Email 都能接,在某一個平台開的對話可以接到另一個平台繼續
- 持續記憶與自動技能 — Persistent memory,跑久了會自己累積出 skills
- 自然語言排程 — 用講話的方式設 cron,例如每天早上九點寄一份報告
- 並行子代理 — 子 agent 可以開自己的對話、terminal、Python RPC 平行做事
- 多種沙箱後端 — Local、Docker、SSH、Singularity、Modal 五種
- 完整 Web 與瀏覽器控制 — Web 搜尋、瀏覽器自動化、視覺辨識、圖像生成、TTS 一應俱全
引用內容出自:https://hermes-agent.nousresearch.com
快速啟動
從安裝到跑起來:
1. 安裝
官方提供一行式安裝(Linux / macOS / WSL2 / Termux):
curl -fsSL https://raw.githubusercontent.com/NousResearch/hermes-agent/main/scripts/install.sh | bash
NOTE:原生 Windows 不支援,請走 WSL2。安裝腳本會自動處理 Python 3.11、Node.js v22、ripgrep、ffmpeg,唯一需要的前置工具是 Git。
裝完重載 shell:
source ~/.bashrc # 或 source ~/.zshrc
2. 初始設定
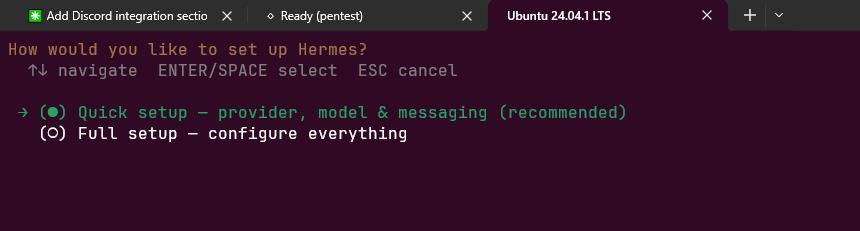
hermes setup
依提示選 provider、貼 API key、勾要啟用的工具,一路按下去。完整 wizard 說明見官方 quickstart:https://hermes-agent.nousresearch.com/docs/getting-started/quickstart
按照提示一步一步安裝就可以了
3. 驗證
hermes
看到下圖就代表通了,Ctrl-C 退出即可。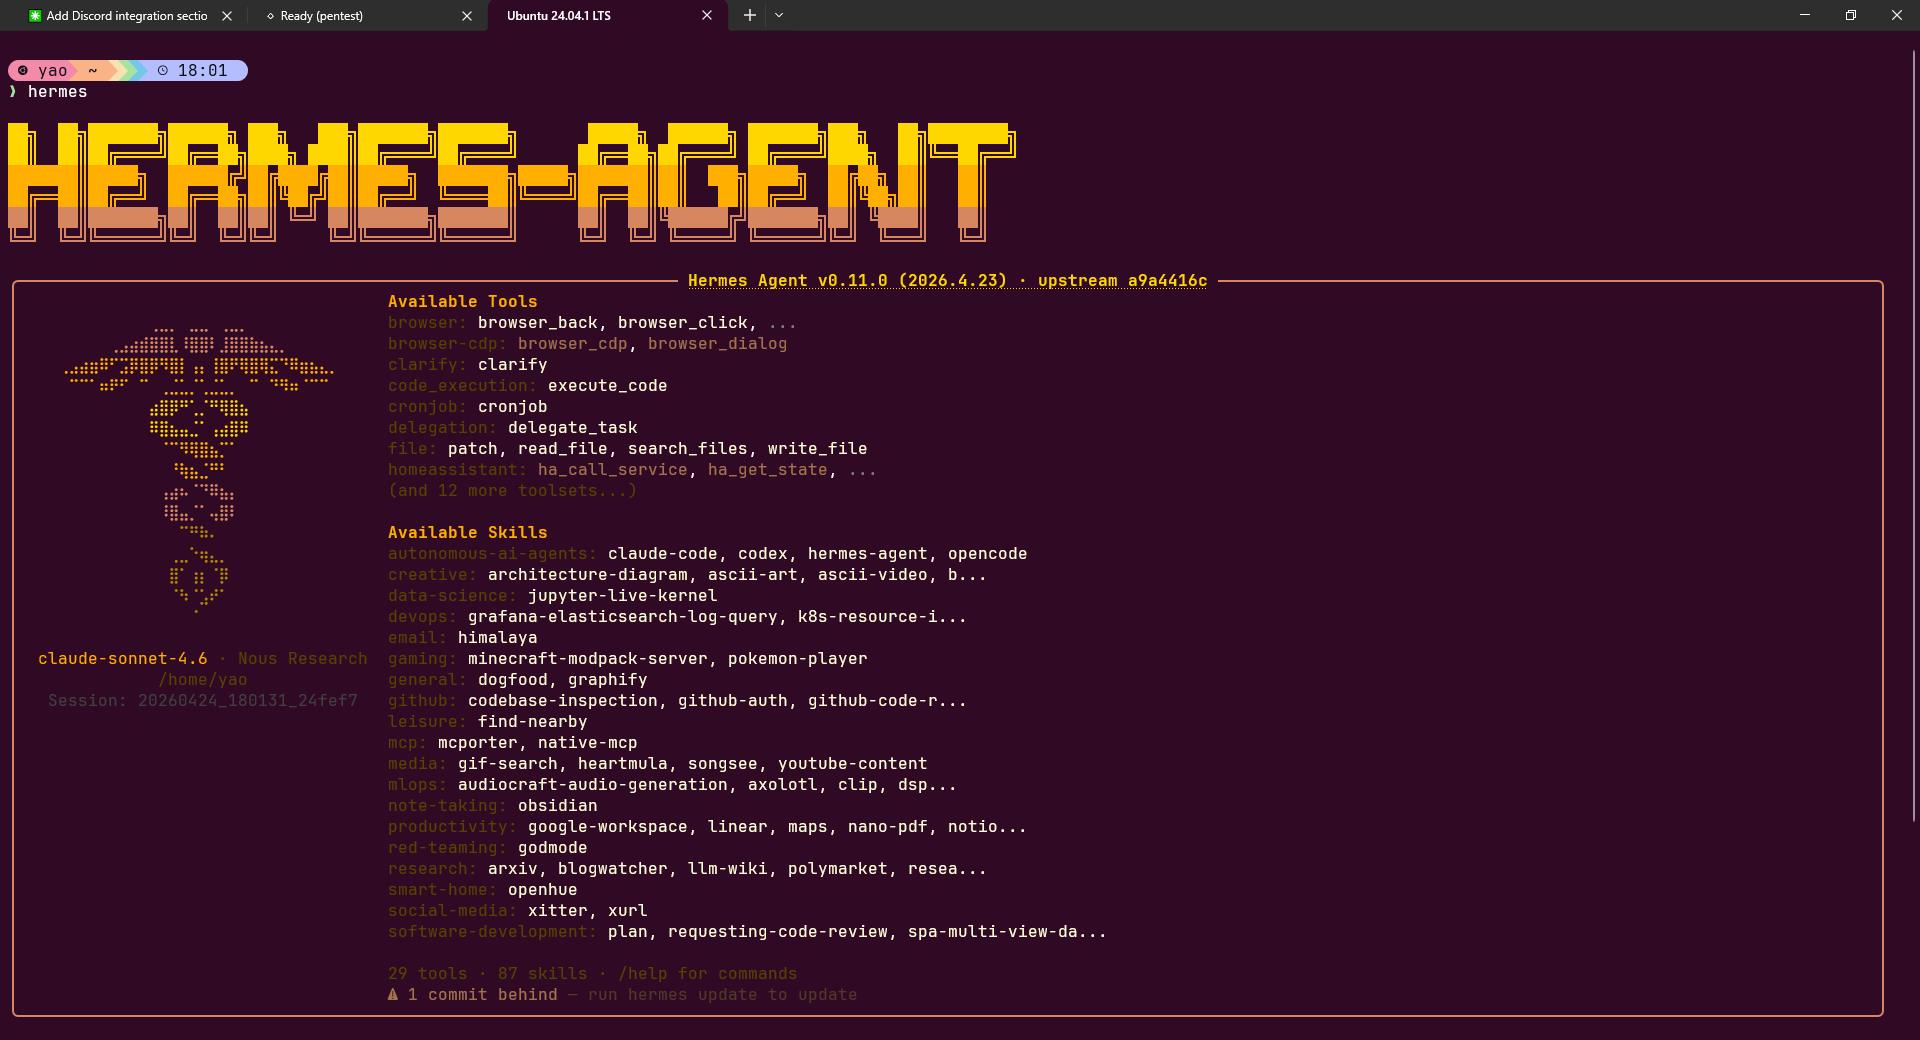
NOTE:~/.hermes 這個資料夾很重要,之後的 .env、config.yaml、session 檔案都放在這裡。
或者是用 AI Agent 安裝
https://github.com/nousresearch/hermes-agent
根據上述連結安裝 hermes agent
支援的 LLM Provider
Hermes Agent 本身不綁死特定 LLM,而是把一堆 provider 都串進來,要用哪一家就在設定檔切換。這也是它的賣點之一。
官方 AI Providers 頁完整列表非常長,我大致分成幾類:
- 主流 API:Anthropic、OpenAI Codex、Google/Gemini、xAI(Grok)、DeepSeek、Kimi/Moonshot、MiniMax、z.ai/GLM、Qwen Portal
- 聚合服務:OpenRouter、Nous Portal、AI Gateway
- 雲廠商:AWS Bedrock、NVIDIA NIM、Hugging Face、Ollama Cloud、Alibaba Cloud、Xiaomi MiMo
- IDE / Coding 工具整合:GitHub Copilot、GitHub Copilot ACP、Arcee AI、Kilo Code、OpenCode Zen、OpenCode Go
- 自託管 / 本地:Custom Endpoint、Ollama、vLLM、SGLang、llama.cpp、LM Studio、LiteLLM Proxy、ClawRouter
完整清單看官方文件:https://hermes-agent.nousresearch.com/docs/integrations/providers
NOTE:每一家 provider 的 API key / 帳號要自己去申請,Hermes 只負責把它們統一接進來。
模型設定
模型名稱格式是 <provider>/<model>,例如:
anthropic/claude-opus-4anthropic/claude-sonnet-4openai/gpt-4ogoogle/gemini-2.5-flash
切換方式有兩種:
# 寫進設定檔,永久套用
hermes config set model anthropic/claude-sonnet-4

# 單次 CLI 覆蓋
hermes chat --model anthropic/claude-sonnet-4
挑自己手上有 key 的那家就好,這一篇不限定哪一家。
NOTE:API key 寫進 ~/.hermes/.env,絕對不要 commit 進 Git。
我個人習慣用 GitHub Copilot 訂閱(Provider 名稱 copilot),因為本來就有月費了,等於不另外多花錢就能餵給 Hermes 用,CP 值最高,GitHub Copilot 真的棒。
串接 Discord
若想要跟其他人或是其他 AI Agent 互動,那麼 IM 的群聊就是你的選擇,我用 Hermes 串接 TG 跟 Discord,設定的步驟不難,按照手冊裝或是叫 AI Agent 協助,問題並不大,這裡我用 Discord 演練。
官方指南:https://hermes-agent.nousresearch.com/docs/user-guide/messaging/discord
建立 Discord Application 與 Bot
- 開啟 https://discord.com/developers/applications,點 New Application,命名隨意(例如
Hermes Agent),記下 Application ID。 - 左側點 Bot,確認已自動產生 Bot user。
取得 Bot Token
Bot 頁面點 Reset Token → 通過 2FA → 立即複製保存。Token 只會顯示一次,不要 commit 進 Git。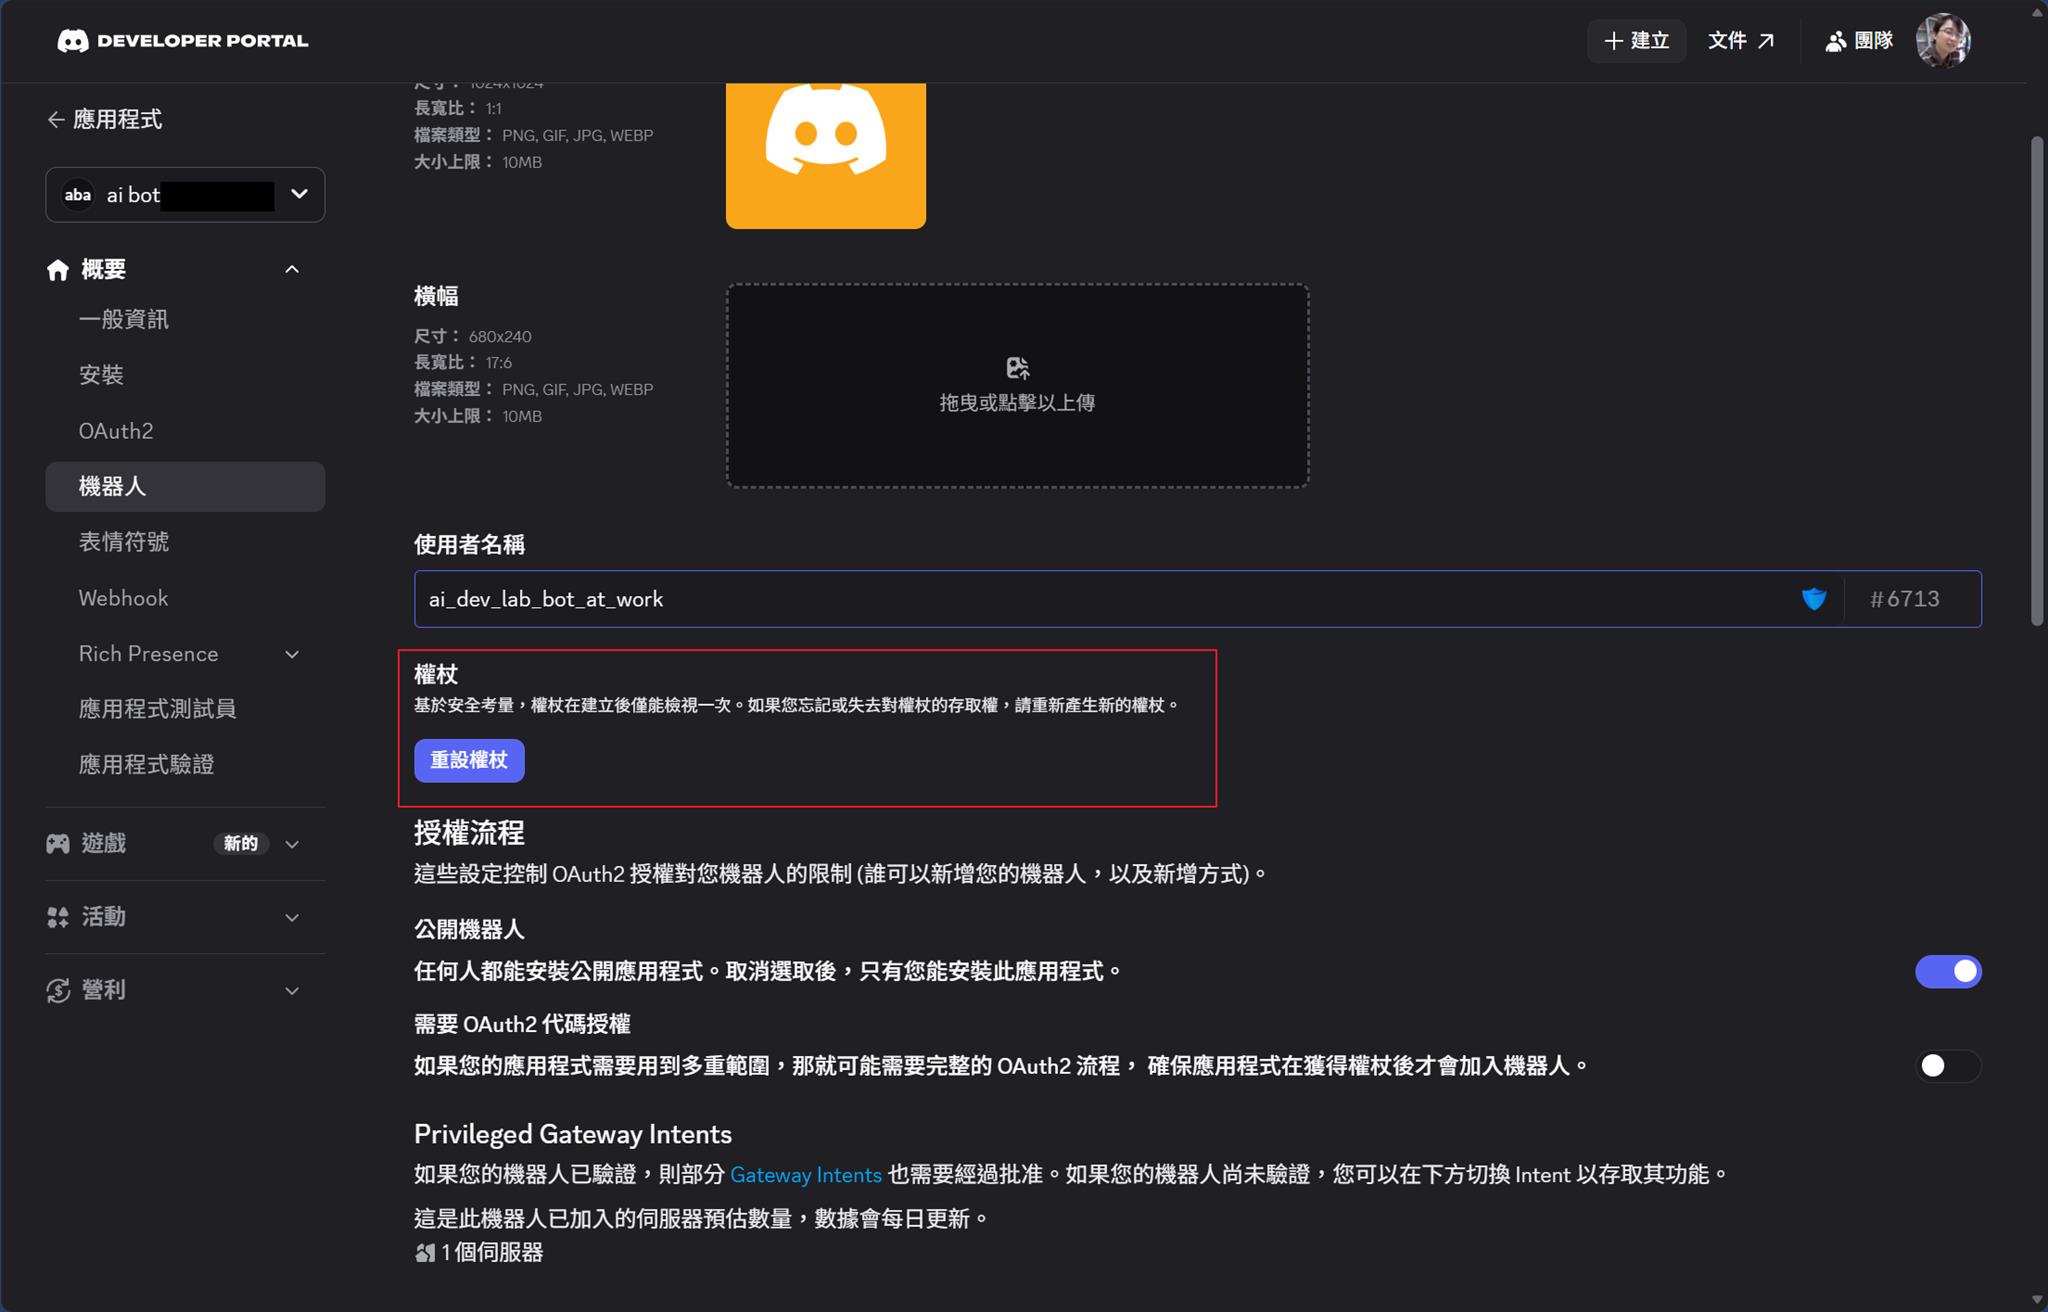
開啟 Privileged Gateway Intents(關鍵)
在 Bot 頁面打開以下開關並 Save Changes:
Server Members Intent— 必要Message Content Intent— 必要,沒開 Bot 收不到訊息內容Presence Intent— 可選
NOTE:Message Content Intent 沒開是最常見的安裝失敗原因,設定完一定要記得存。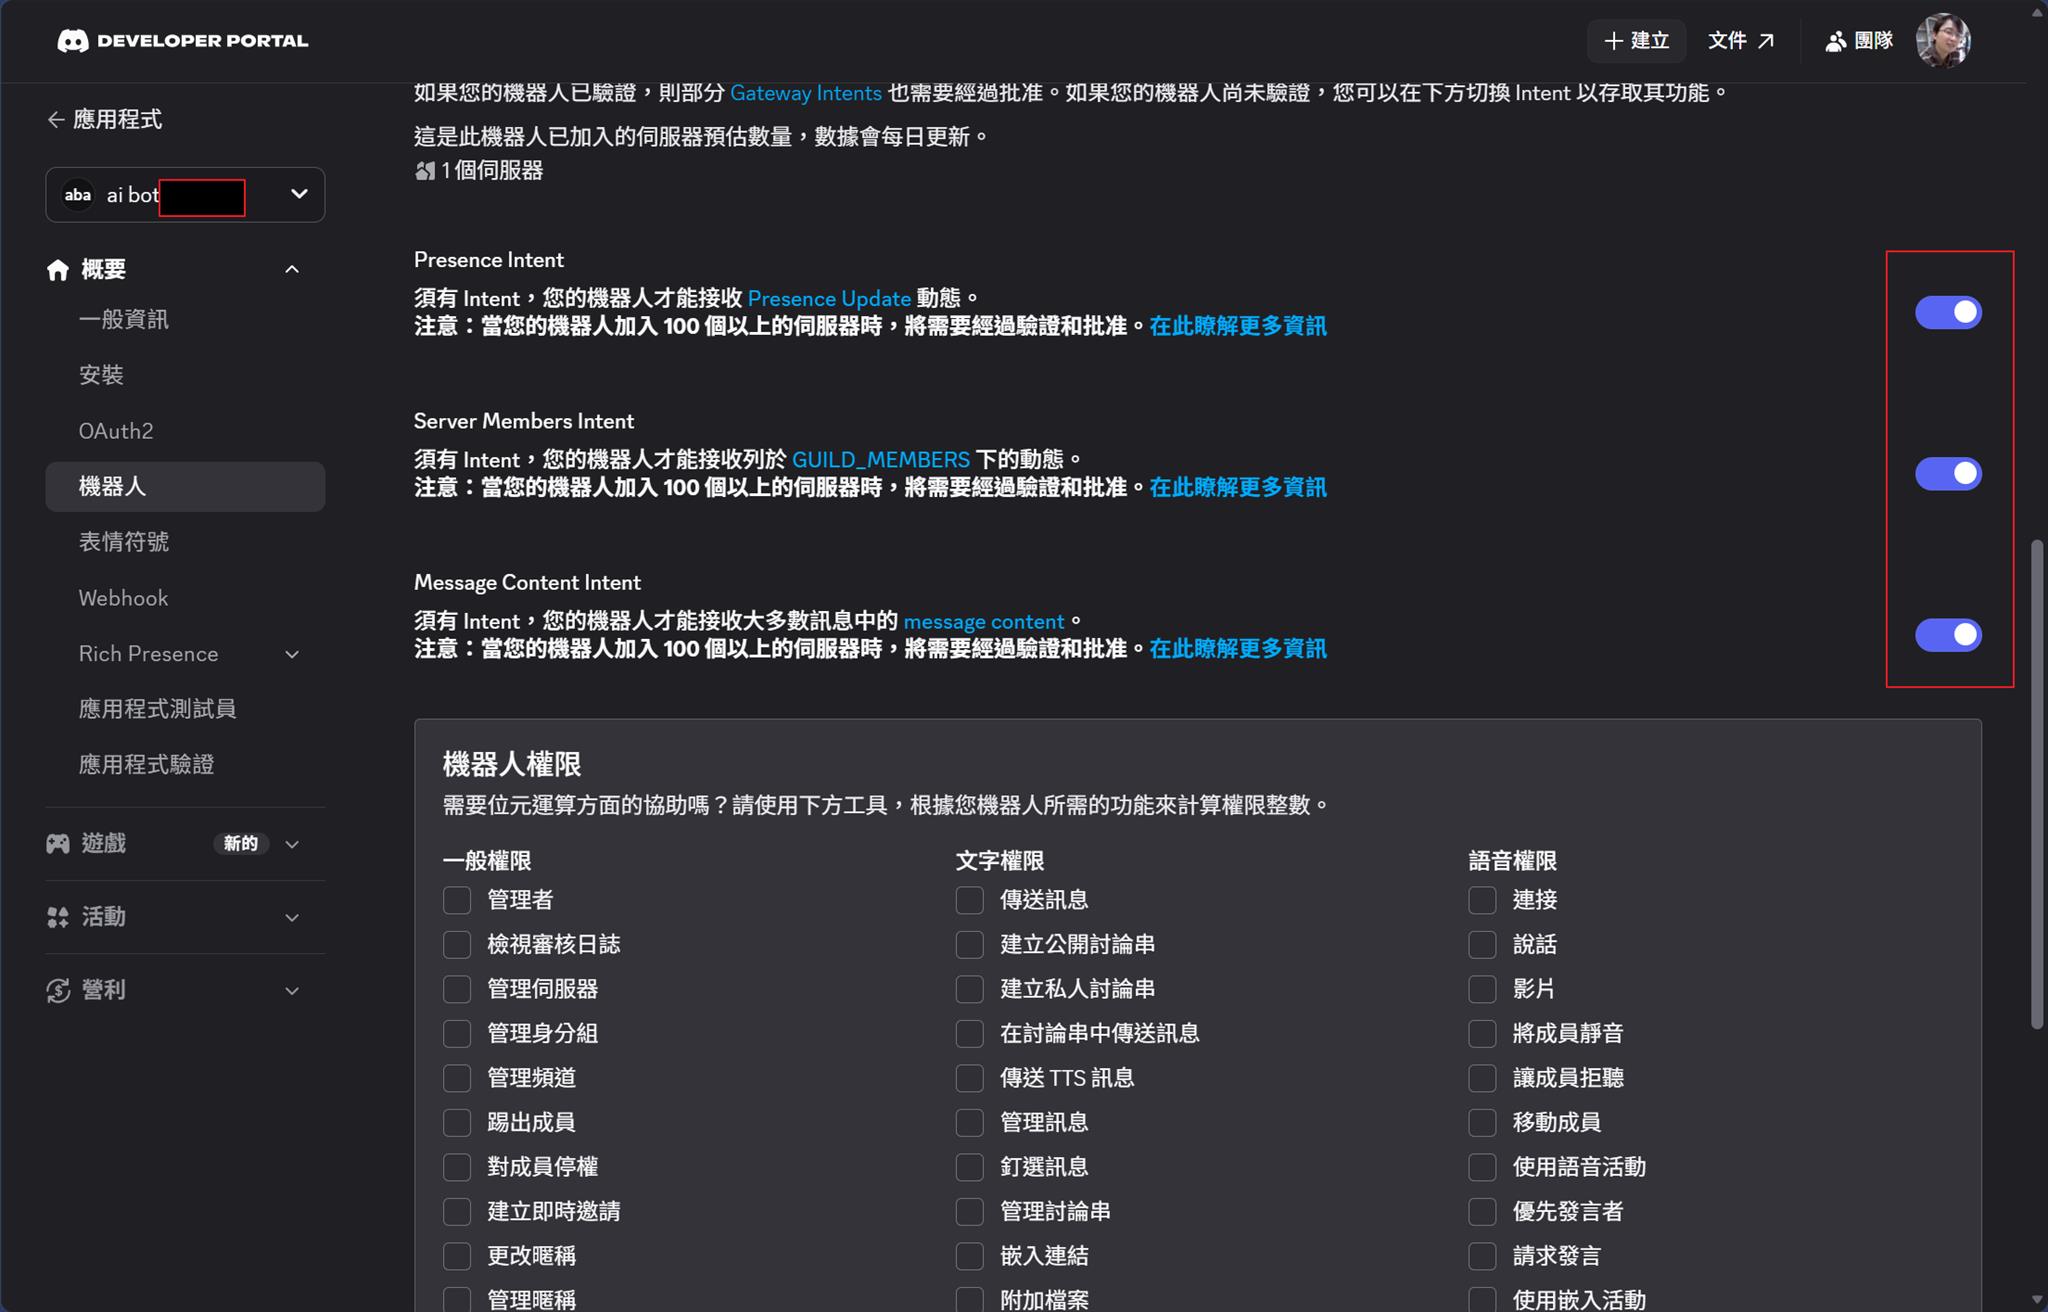
邀請 Bot 進伺服器
組合 OAuth2 邀請 URL(把 YOUR_APP_ID 換成剛才記下的 Application ID):
https://discord.com/oauth2/authorize?client_id=YOUR_APP_ID&scope=bot+applications.commands&permissions=274878286912
權限整數 274878286912 包含:View Channels / Send Messages / Embed Links / Attach Files / Read Message History / Send Messages in Threads / Add Reactions,是 Hermes 官方建議的最小授權組合。
開啟連結 → 選伺服器 → Authorize → 過 CAPTCHA。Bot 在 gateway 啟動前會顯示離線,這是正常的。
取得自己的 Discord User ID
Discord Settings → Advanced → 開啟 Developer Mode → 在自己名字上右鍵 Copy User ID。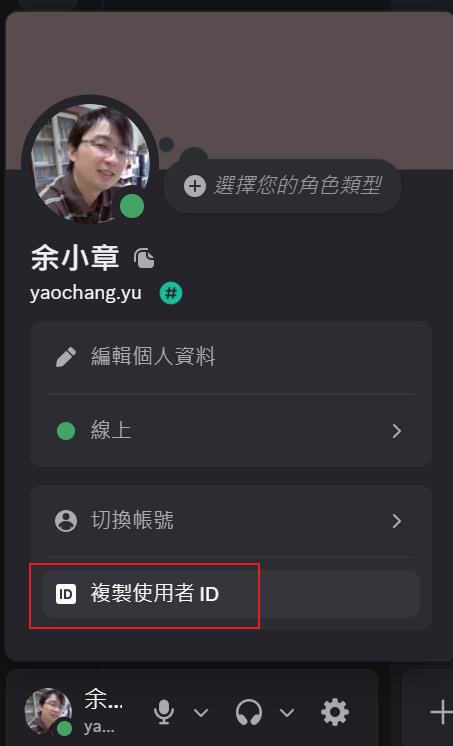
NOTE:Hermes 預設封鎖所有人,必須把自己的 User ID 加進白名單才能跟 Bot 對話。
設定 Hermes
方式 A(建議):互動式設定
hermes gateway setup
選 Discord,依提示貼上 Bot Token 與 User ID。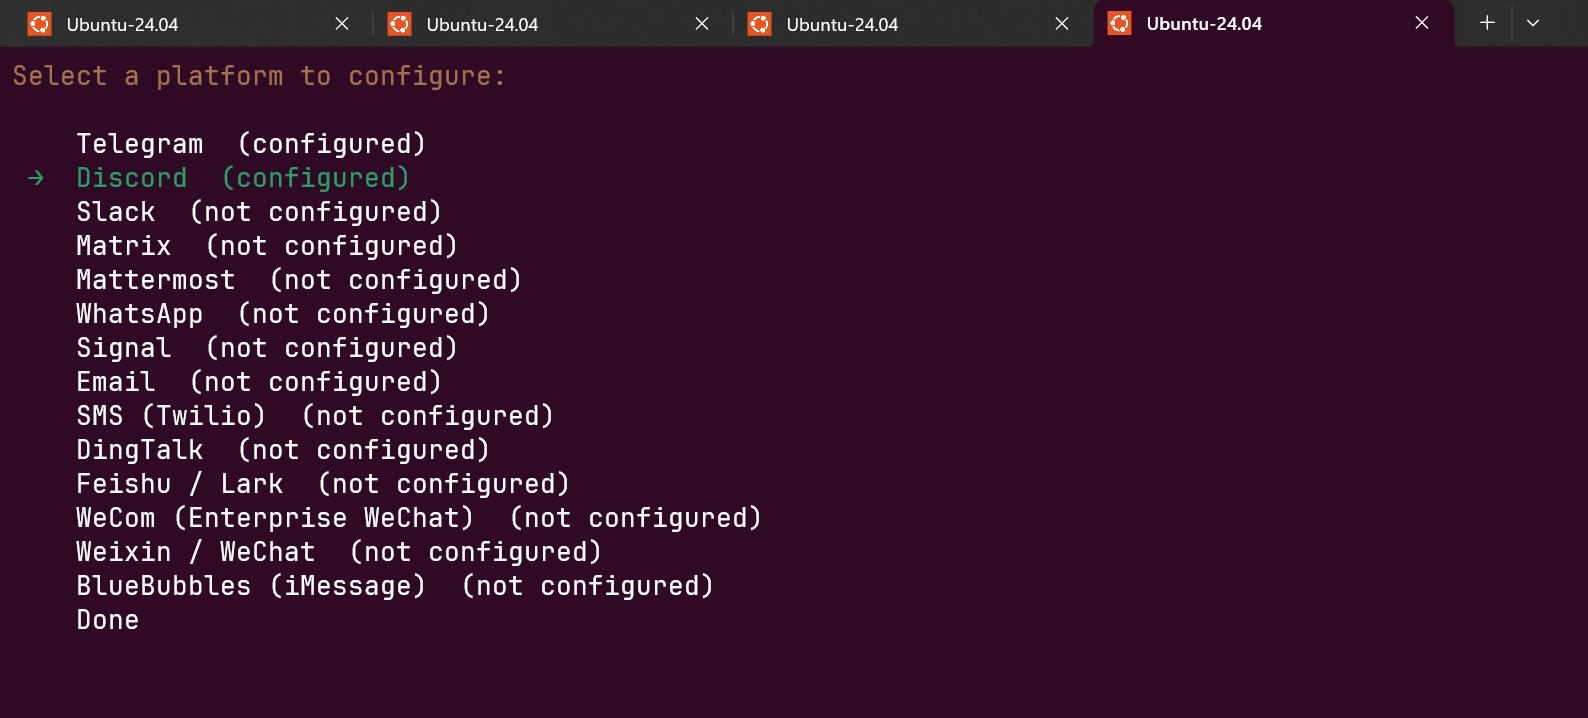
方式 B:手動編輯 ~/.hermes/.env
DISCORD_BOT_TOKEN=<Bot Token>
DISCORD_ALLOWED_USERS=<你的 User ID>
# 多人以逗號分隔:DISCORD_ALLOWED_USERS=id1,id2
NOTE:DISCORD_ALLOWED_USERS 或 DISCORD_ALLOWED_ROLES 至少要填一個,否則 gateway 會拒絕所有請求(預設安全策略)。
(選配)進階行為設定
編輯 ~/.hermes/config.yaml:
discord:
  require_mention: true          # 伺服器頻道要 @mention 才回應
  free_response_channels: ""     # 填入頻道 ID,這些頻道不用 mention
  auto_thread: true              # 被 mention 時自動開討論串
  reactions: true
  allow_mentions:
    everyone: false
    roles: false
    users: true
    replied_user: true
group_sessions_per_user: true    # 每個使用者獨立 session,避免 context 混用
require_mention: true 可以防止 Bot 在伺服器頻道被誤觸;私訊則不受此限制,直接傳就會回。
啟動 / 重啟 Gateway
# 第一次啟動
hermes gateway

# 已在跑的話改用 restart(會重讀 .env 與 config.yaml)
hermes gateway restart
# 查看狀態
hermes gateway status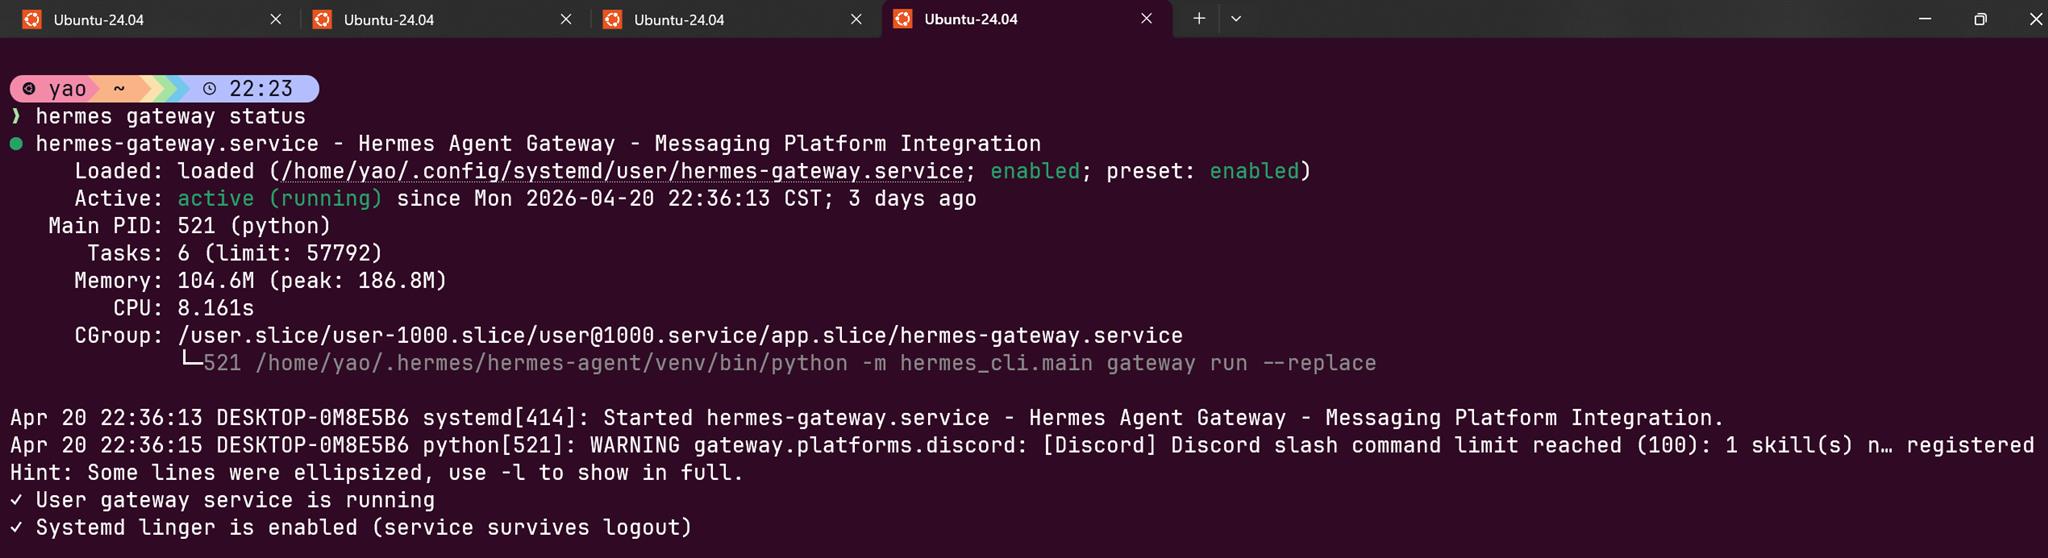
驗證
我先建立自己的伺服器頻道,把機器人加到頻道,再輸入 @Hermes Agent 你好,Bot 有回應就完成了。
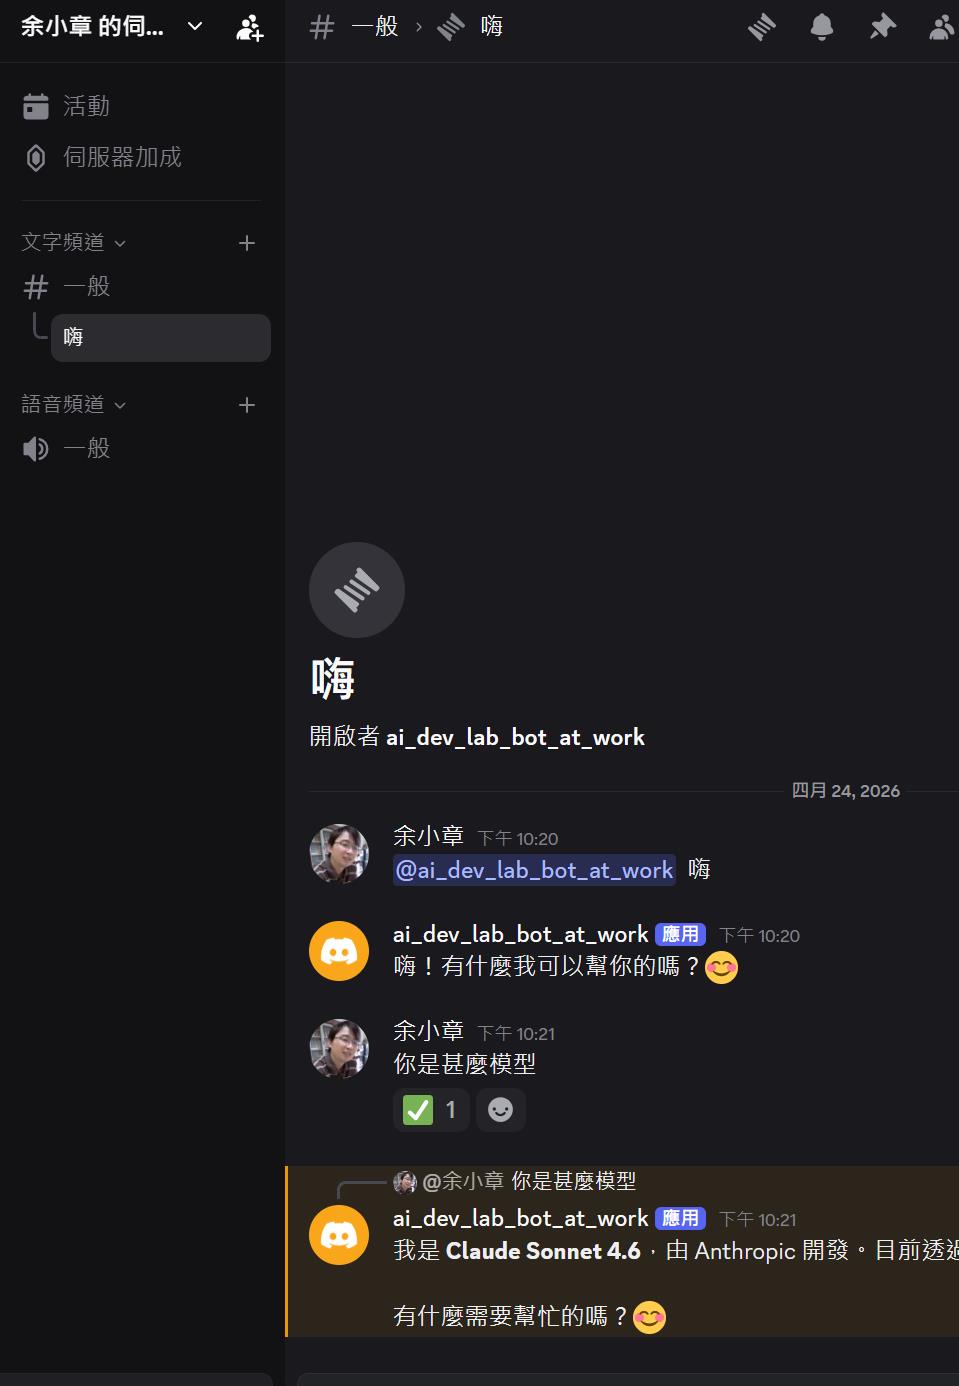
NOTE:這裡我記得我卡了一下,才順利的跟機器人對話,但我現在想不起來了 QQ
安裝並配置 Open WebUI
上一個章節,我使用了 Discord 跟 Hermes Agent 進行對話,但是對話的體驗不是很好
- 沒有過往的對話紀錄。
- 沒有支援 markdown table,這對查看報告是一個硬傷。
Open WebUI 可以很好的解決排版的問題。
Open WebUI 是什麼
官方一句話:
An extensible, feature-rich, and user-friendly self-hosted AI platform designed to operate entirely offline.
引用內容出自:https://github.com/open-webui/open-webui
也就是一個可以自己架在家裡的 AI 聊天介面,設計上完全離線也能跑,不依賴任何外部雲端服務。它支援 Ollama、OpenAI-compatible API 等多種後端,換句話說,只要後端吐出來的 API 格式相容 OpenAI,都可以接進來,Hermes Agent 的 API Server 就是走這條路。
主要特性大致這幾個:
- 完整 Markdown / LaTeX 支援 — 報告、表格、數學公式都能正確渲染,這是從 Discord 換過來的最直接原因
- 跨裝置 PWA — 桌機、手機都能用,甚至可以離線存取
- 對話紀錄保存 — 有左側歷史清單,不像 CLI / Discord 用完就消失
- 多模型並行 — 可以同時掛多個後端,切換模型不用重開視窗
- RAG 整合 — 內建向量資料庫支援,有需要可以餵文件進去
這一篇只用到它的聊天介面 + OpenAI-compatible API 串接,RAG、語音、圖像生成這些進階功能就不展開了。
NOTE:Open WebUI 本身不含 LLM,它只是一個前端。LLM 的算力這一篇走 Hermes Agent 的 API Server。
啟用 API Server
OpenWebUI 要吃 Hermes,就是靠 Hermes 的 API Server,需要先打開它。
編輯 ~/.hermes/.env,加入:
API_SERVER_ENABLED=true
API_SERVER_KEY=<自行設定一組金鑰>
API_SERVER_HOST=0.0.0.0
說明:
API_SERVER_ENABLED=true:啟用 OpenAI-compatible APIAPI_SERVER_KEY:給 Open WebUI 驗證用API_SERVER_HOST=0.0.0.0:讓 Docker 容器內的 Open WebUI 可以連到主機上的 Hermes API
改完重啟 gateway:
hermes gateway restart
驗證 Hermes API 是否正常:
curl http://127.0.0.1:8642/health
預期回應:
{"status":"ok","platform":"hermes-agent"}
如果這一步回應 OK,就代表 Hermes 這邊準備好了。
NOTE:0.0.0.0 是為了讓 Docker 容器可以連進來,不是為了對外網開放。對外請走 ngrok 那一段。
下載映像
docker pull ghcr.io/open-webui/open-webui:main
啟動容器
完整指令如下:
docker run -d -p 3000:8080 \
  -e OPENAI_API_BASE_URL=http://host.docker.internal:8642/v1 \
  -e OPENAI_API_KEY=<與 API_SERVER_KEY 相同的金鑰> \
  --add-host=host.docker.internal:host-gateway \
  -v open-webui:/app/backend/data \
  --name open-webui \
  --restart always \
  ghcr.io/open-webui/open-webui:main
幾個重點:
OPENAI_API_BASE_URL指向host.docker.internal:8642/v1,讓容器內的 Open WebUI 透過 docker 主機路由回到 HermesOPENAI_API_KEY要與「啟用 API Server」章節設的API_SERVER_KEY相同--add-host=host.docker.internal:host-gateway是 Linux/WSL 上必加,不然容器找不到主機- volume 掛
open-webui:/app/backend/data,資料留存在 docker volume
確認啟動
docker ps --filter name=^open-webui$ --format 'table {{.Names}}\t{{.Status}}\t{{.Ports}}'
curl http://127.0.0.1:3000/
建立 admin 帳號
第一次開啟 http://127.0.0.1:3000,Open WebUI 會要求建立第一個帳號,第一個建立的使用者會自動成為 admin。
也可以用 API 建立:
POST /api/v1/auths/signup
Content-Type: application/json

{
  "name": "顯示名稱",
  "email": "your@email.com",
  "password": "your-password"
}
驗證 OpenWebUI 能串到 Hermes
先從主機測:
curl http://127.0.0.1:8642/v1/models \
  -H "Authorization: Bearer <API_SERVER_KEY>"
再從容器內測:
docker exec open-webui /bin/sh -lc 'python - <<"PY"
import json, os, urllib.request
base = os.environ["OPENAI_API_BASE_URL"]
key = os.environ["OPENAI_API_KEY"]
req = urllib.request.Request(
    base + "/models",
    headers={"Authorization": f"Bearer {key}"}
)
with urllib.request.urlopen(req, timeout=20) as r:
    print(json.dumps(json.load(r), ensure_ascii=False))
PY'
兩邊都能列出模型,就代表 Open WebUI 這一端通了。
完成畫面如下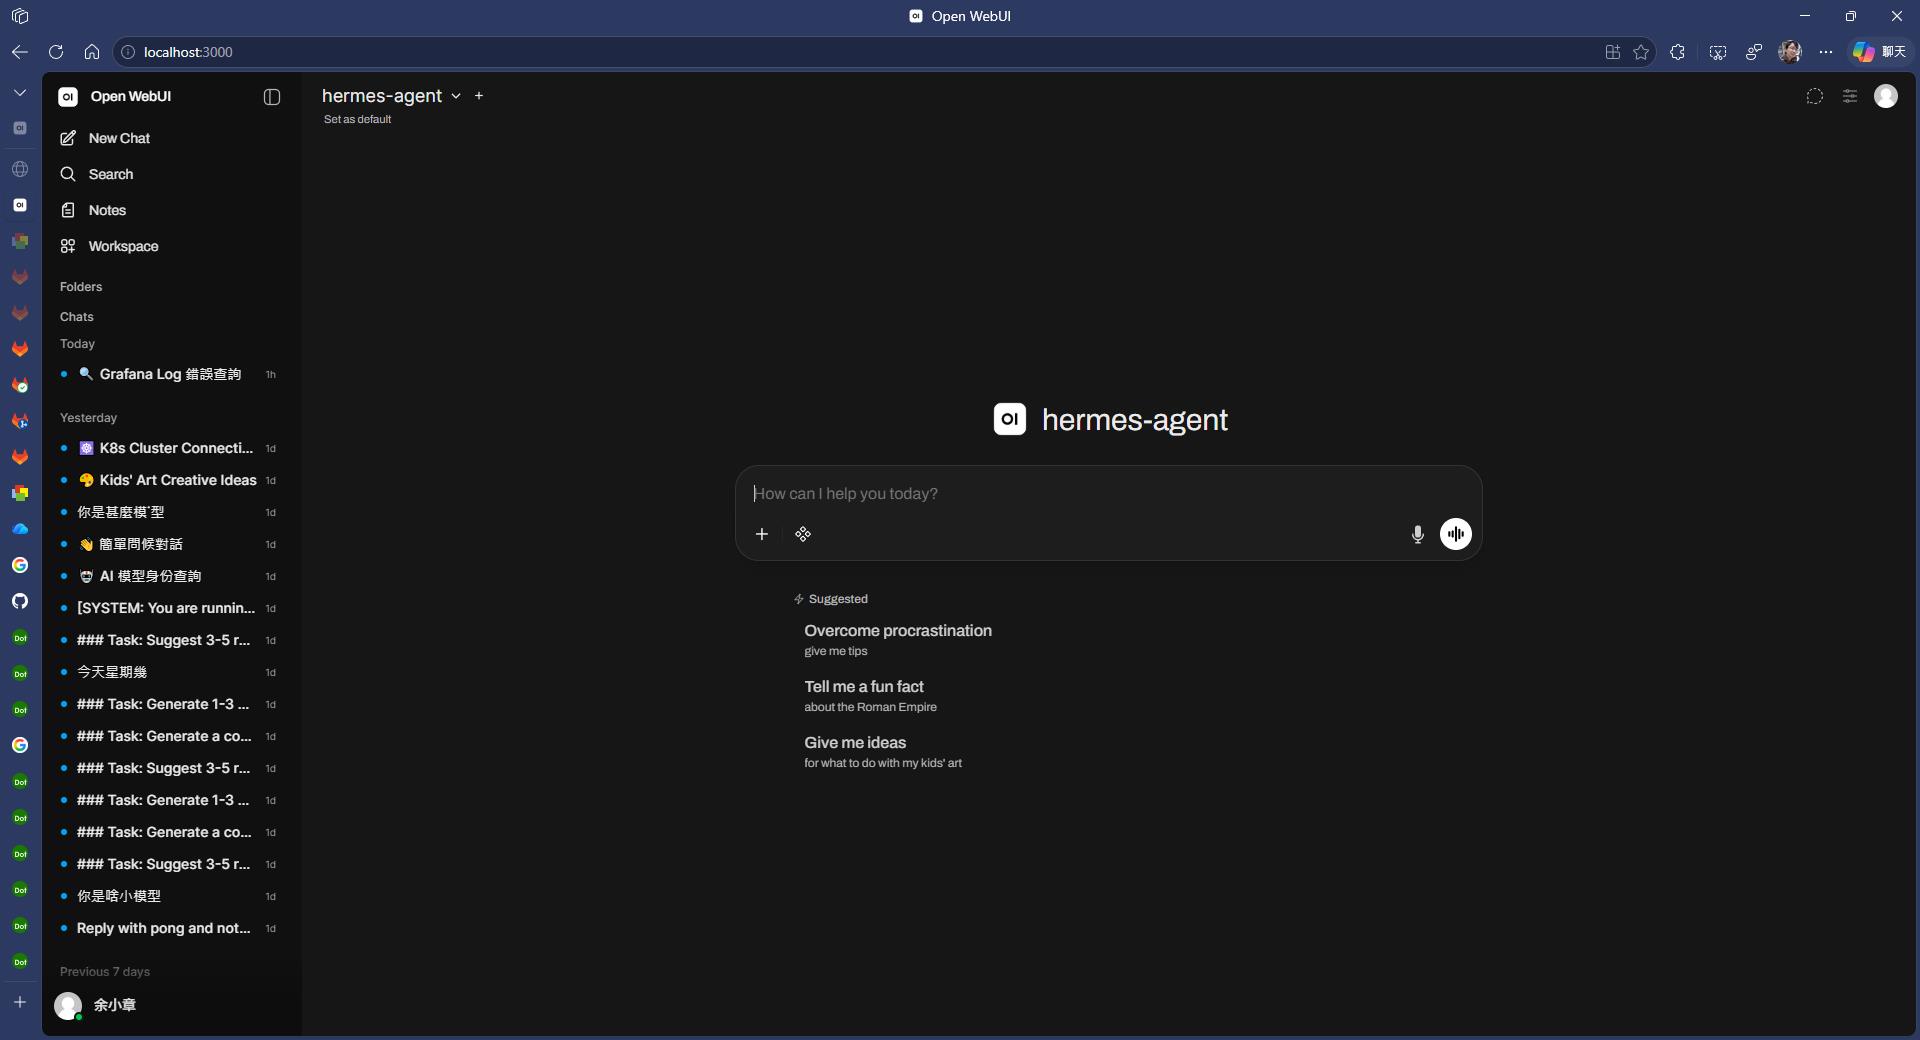
匯入 Hermes 對話紀錄到 Open WebUI
問題背景
Open WebUI 顯示的是 Open WebUI 自己的聊天紀錄,Hermes 既有的 CLI/gateway 對話,不會自動出現在 Open WebUI 左側歷史清單。
也就是說,舊的對話如果想統一在 Open WebUI 管理,得自己做一次轉檔。
資料對應規則
我在演練的時候是這樣對應的:
- Hermes 沒有 title → 從首則 user 訊息取前 80 字當 title
toolrole 訊息跳過- content 為空的 assistant 訊息跳過
session_id用 UUID5 deterministic 轉成 Open WebUI chat id(重複匯入會跳過)- Open WebUI DB 路徑:
/var/lib/docker/volumes/open-webui/_data/webui.db(需 sudo)
匯入工具
完整的匯入腳本放在 GitHub:hermes_into_openwebui.py,核心流程就是:
- 解析 Hermes session JSON
- 過濾掉 tool role 與空 assistant 訊息
- 建立 Open WebUI 的 history linked list(parentId / childrenIds)
- INSERT 進
webui.db的chat表
CLI 介面:
# 單一檔案
python hermes_into_openwebui.py <session.json>

# 批次匯入資料夾
python hermes_into_openwebui.py <資料夾>

# 預覽(不寫入 DB)
python hermes_into_openwebui.py <路徑> --dry-run

# 指定匯入到哪個使用者
python hermes_into_openwebui.py <路徑> --user your@email.com
重複匯入保護
這部分我特別在意,因為一不小心就會把同一堆 session 灌進去兩次。
作法:
def msg_to_uuid(session_id: str, index: int) -> str:
    return str(uuid.uuid5(uuid.NAMESPACE_DNS, f"{session_id}:{index}"))
也就是用 UUID5 + session_id + 訊息 index 做 deterministic id,重複匯入時直接比 chat id 就知道跳過:
def already_imported(conn, chat_id: str) -> bool:
    row = conn.execute("SELECT 1 FROM chat WHERE id = ?", (chat_id,)).fetchone()
    return row is not None
執行結果我這邊是:原本 2 筆 + 匯入 85 筆 = 87 筆,全數成功、0 失敗。
匯入結果驗證
匯入完打開 Open WebUI,左側歷史清單應該看得到舊對話,而且點進去內容也要能讀。如果點進去空白,通常是 history linked list 斷掉,回去檢查 parentId / childrenIds 是否正確。
NOTE:這次只做一次性匯入工具,不做 Hermes 與 Open WebUI 的即時雙向同步,有需要再另外寫。
配置 ngrok 對外曝光
目前 Open WebUI 只能在 http://localhost:3000 存取,想在手機或外網用,就得把它暴露出去。
安裝 ngrok
curl -sSL https://ngrok-agent.s3.amazonaws.com/ngrok.asc | sudo tee /etc/apt/trusted.gpg.d/ngrok.asc >/dev/null
echo "deb https://ngrok-agent.s3.amazonaws.com buster main" | sudo tee /etc/apt/sources.list.d/ngrok.list
sudo apt update && sudo apt install -y ngrok
設定 authtoken
到 https://dashboard.ngrok.com/get-started/your-authtoken 取得 token,然後:
ngrok config add-authtoken <YOUR_TOKEN>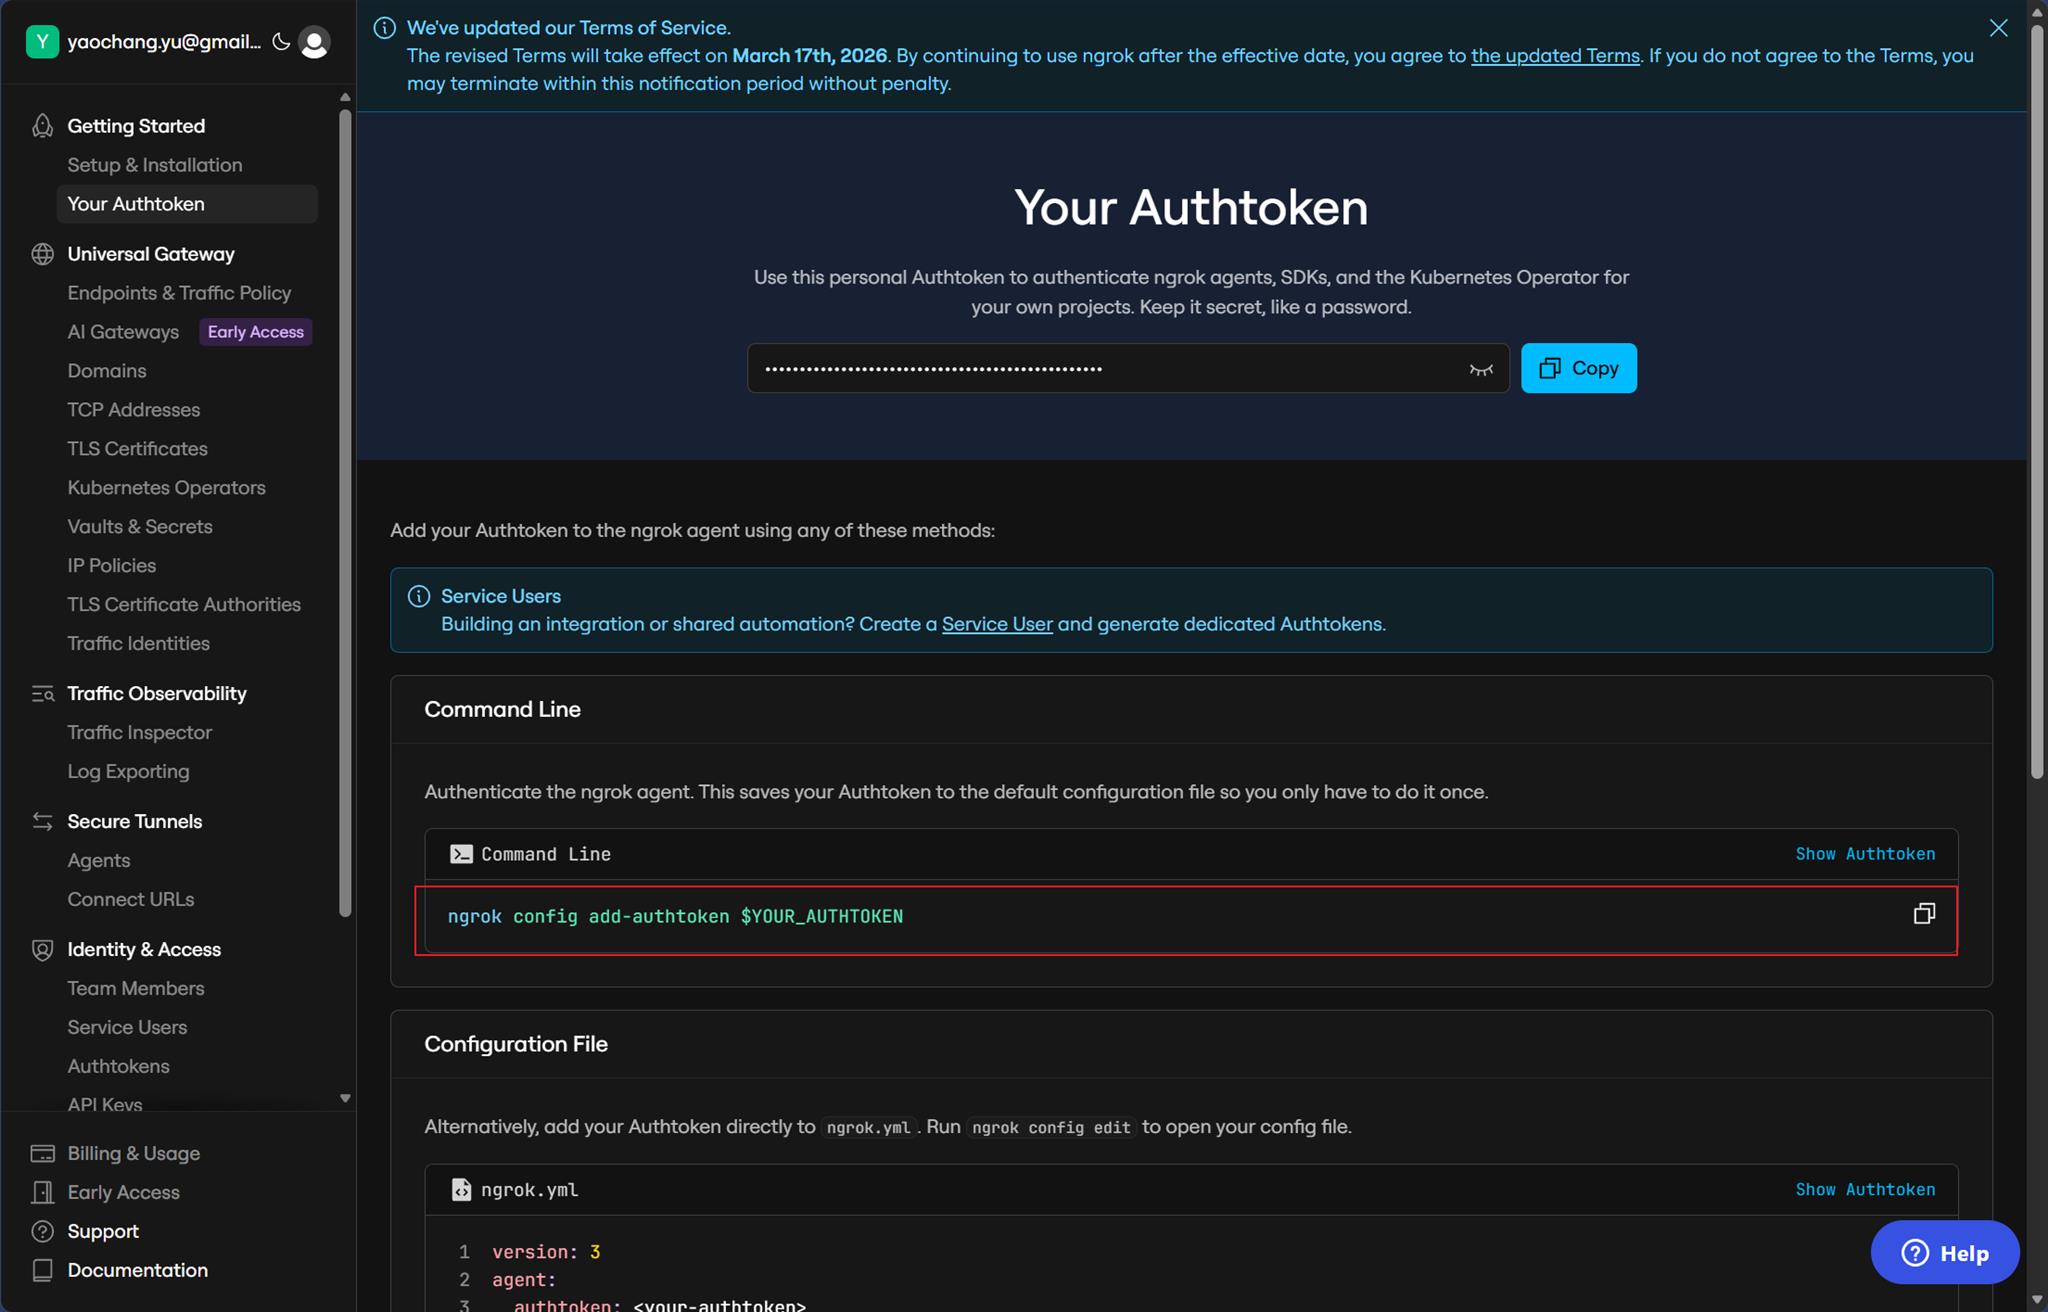
ngrok 設定檔
路徑:~/.config/ngrok/ngrok.yml
version: "3"
agent:
    authtoken: <YOUR_TOKEN>

tunnels:
    openwebui:
        proto: http
        addr: 3000
啟動 tunnel
ngrok start openwebui
啟動後從 stdout 或 http://localhost:4040 可以拿到公開網址,長得像 https://xxxx.ngrok-free.app 這種。
Open WebUI 安全設定(很重要)
對外開放之後,Open WebUI 的登入頁就等於暴露在網路上,絕對要先把幾件事做完再開:
- 關閉開放註冊:Admin Panel → Settings → General → 關閉 Enable New Sign Ups(DB 會看到
enable_signup: false) - Admin 密碼強度:12 字元以上,含大小寫、數字、符號
- 設定 basic auth(Open WebUI 登入本身已足夠,如果要雙層防護可再加)
NOTE:
- 免費方案每次重啟 URL 會變;固定域名需付費,或是用 ngrok 免費靜態域名(每帳號一個)。
- authtoken 屬於憑證,不要 commit 進 Git。
心得
跑完整套流程之後,幾個心得:
- Hermes 把 API Server 做成 OpenAI-compatible 是最大的賣點,因為只要相容 OpenAI,前端就可以任意換(Open WebUI、LibreChat、LobeChat 都行),不綁死在某一套 UI。
- 舊對話匯入這件事官方沒做,但因為 Open WebUI 的 chat 資料是放在 SQLite,欄位也不複雜,自己寫一支匯入腳本不會太痛。
- ngrok 很方便但要小心,對外曝光前一定要先關掉 Open WebUI 開放註冊,不然隨便人都可以註冊進去用你的 Hermes quota。
- 殘留 PID 檔是最容易踩到的雷,Hermes gateway 如果非正常結束,下次啟動會失敗,把
~/.hermes/gateway.pid砍掉重啟就好。 - 串 IM 要有耐心,這裡好容易卡住。
若有謬誤,煩請告知,新手發帖請多包涵

Microsoft MVP Award 2010~2017 C# 第四季
Microsoft MVP Award 2018~2025 .NET
