[C#.NET][Winform][User Control] 自訂控制項的智能標籤-ComponentDesigner / User Control of Smart Tag-ComponentDesigner
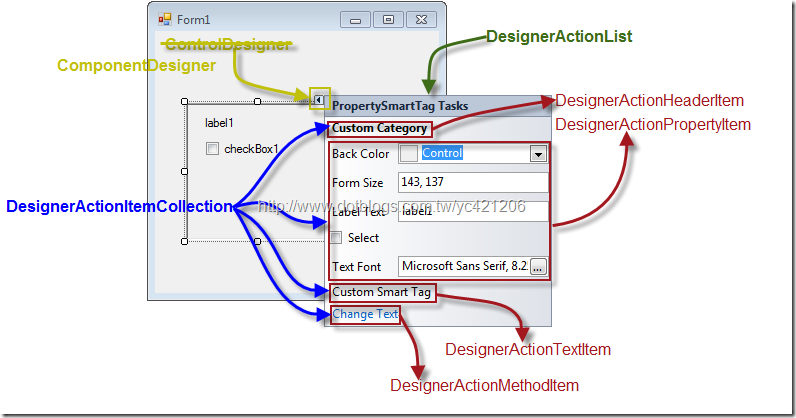
在上篇介紹過 [C#.NET][VB.NET] 自訂控制項的智能標籤-ControlDesigner / User Control of Smart Tag-ControlDesigner,這有 UI 畫面,但萬一你設計的控制項不需要有UI畫面,你可以選擇此方案。
這篇我們需要用 System.ComponentModel.Design命名空間 的 ComponentDesigner 類別。
所以我們要將上篇的ControlDesigner改成ComponetDesigner,且 PropertySmartTag 類別要繼承 Component類別 而不是UserControl類別。
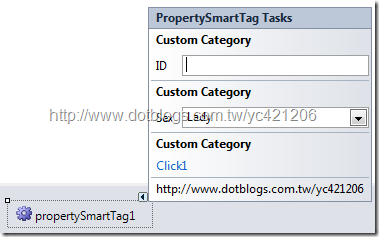
當然,繼承Component類別後,就不會有UI畫面出現,它會類似像下圖那樣。
1.建立組件控制項專案,PropertySmartTag類別繼承 Component,並為類別加入屬性
public partial class PropertySmartTag : Component
{
    public PropertySmartTag()
    {
        InitializeComponent();
    }

    public PropertySmartTag(IContainer container)
    {
        container.Add(this);
        InitializeComponent();
    }
    public enum Sexs
    {
        GentleMan = 0,
        Lady = 1,
        Child = 2
    }

    private string _ID;
    public string ID
    {
        get { return _ID; }
        set { _ID = value; }
    }

    private Sexs _Sex;
    public Sexs Sex
    {
        get { return _Sex; }
        set { _Sex = value; }
    }
}
2.建立CreateComponentDesigner類別,繼承System.ComponentModel.Design.ComponentDesigner。
//建立控制項設計類別
public class CreateComponentDesigner : System.ComponentModel.Design.ComponentDesigner
{
    private DesignerActionListCollection _ActionLists;
    public override DesignerActionListCollection ActionLists
    {
        get
        {
            if (null == _ActionLists)
            {
                _ActionLists = new DesignerActionListCollection();
                _ActionLists.Add(new CustomerActionList(this.Component));
            }
            return _ActionLists;
        }
    }
    //若不想讓方法在智能面版上出現,可利用DesignerVerb定義
    private void OnClick2(object sender, EventArgs e)
    {
        MessageBox.Show("按下 Click2");
    }
    //覆寫建構子
    public CreateComponentDesigner()
    {
        DesignerVerb verb = new DesignerVerb("Click2", new EventHandler(OnClick2));
        this.Verbs.Add(verb);
    }
}
3.建立CustomControlActionList類別,繼承 System.ComponentModel.Design.DesignerActionList。
//定義智能面版樣式類別
[System.Security.Permissions.PermissionSet(System.Security.Permissions.SecurityAction.Demand, Name = "FullTrust")]
public class CustomControlActionList : System.ComponentModel.Design.DesignerActionList
{
    private PropertySmartTag _PropertySmartTag;
    public CustomControlActionList(IComponent component)
        : base(component)
    {
        _PropertySmartTag = component as PropertySmartTag;
    }

    //更新自訂控制項的屬性
    private PropertyDescriptor GetPropertyByName(String PropertyName)
    {
        PropertyDescriptor prop;
        prop = TypeDescriptor.GetProperties(_PropertySmartTag)[PropertyName];
        if (null == prop)
            throw new ArgumentException("找不到此屬性名稱!", PropertyName);
        else
            return prop;
    }
    //定義智能面版的屬性,面版屬性會與綁定的"PropertySmartTag使用者控制項"屬性同步
    public string ID
    {
        get { return _PropertySmartTag.ID; }
        set { GetPropertyByName("ID").SetValue(_PropertySmartTag, value); }
    }

    public PropertySmartTag.Sexs Sex
    {
        get { return _PropertySmartTag.Sex; }
        set { GetPropertyByName("Sex").SetValue(_PropertySmartTag, value); }
    }
    //方法
    public void OnClick1()
    {
        MessageBox.Show("按下 Click1");
    }
    //設計智能面版項目
    public override DesignerActionItemCollection GetSortedActionItems()
    {
        DesignerActionItemCollection items = new DesignerActionItemCollection();
        //建立智能面板上項的分類。
        items.Add(new DesignerActionHeaderItem("分類1", "Category1"));
        items.Add(new DesignerActionHeaderItem("分類2", "Category2"));
        items.Add(new DesignerActionHeaderItem("分類2", "Category3"));
        //建立智能面板上項的項目。
        items.Add(new DesignerActionPropertyItem("ID", "ID", "Category1", "選擇ID"));
        items.Add(new DesignerActionPropertyItem("Sex", "Sex", "Category2", "選擇性別"));
        items.Add(new DesignerActionMethodItem(this, "OnClick1", "Click1", "Category3","自訂方法", true));
        //items.Add(new DesignerActionMethodItem(this, "OnClick2", "Click2", "Category3","自訂方法", true));

        items.Add(new DesignerActionTextItem("http://www.dotblogs.com.tw/yc421206", "Category3"));

        return items;
    }
}
4.在PropertySmartTag類別定義Designer attribute
[Designer(typeof(CreateComponentDesigner), typeof(IDesigner))]
public partial class PropertySmartTag : Component
{

}
5.加入WinForm專案,用來測試PropertySmartTag控制項

這篇範例其實並沒有寫的很完整,這當中比較重要的是當UI更新後,UI的屬性有沒有寫到控制項的屬性,有興趣的人可以練習一下怎麼傳遞變數。
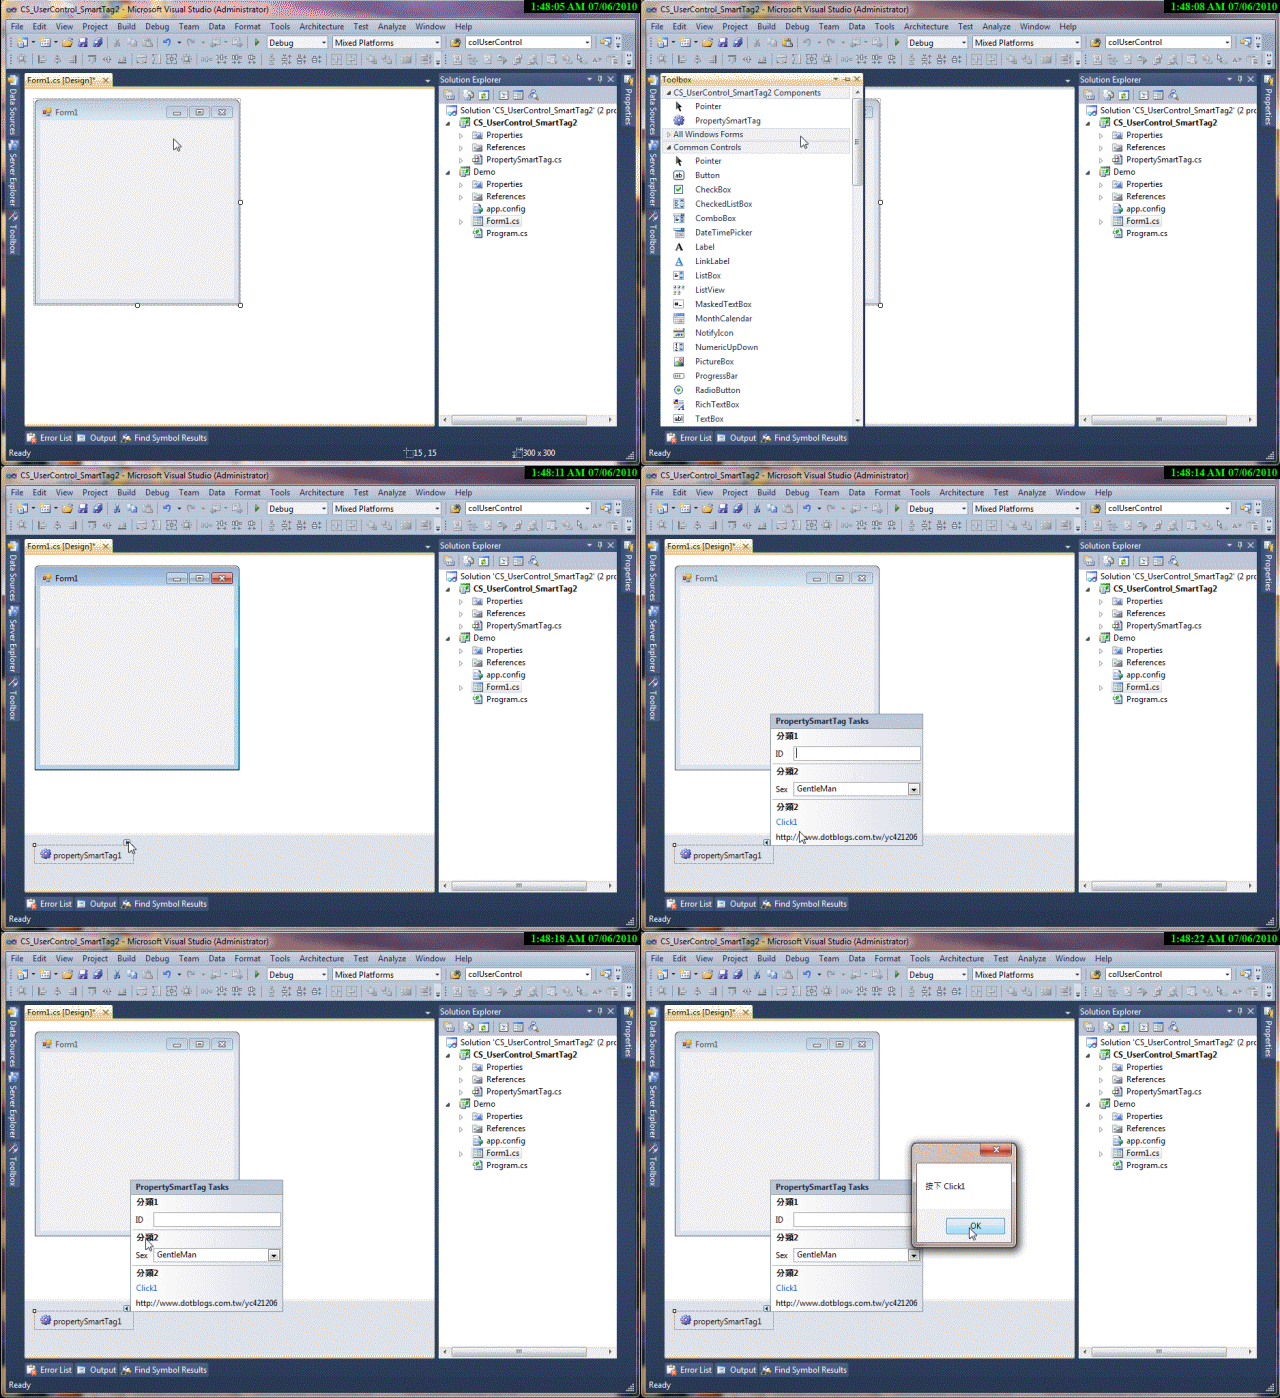
下圖為專案建立步驟
範例下載
若有謬誤,煩請告知,新手發帖請多包涵
Microsoft MVP Award 2010~2017 C# 第四季
Microsoft MVP Award 2018~2022 .NET


