上篇 提到使用 Prism 來建立 Mock Server,經同事反饋,他期望能使用類似像 Wiremock 有 API 可以在測試步驟根據場景快速的定義 Mock Server 的回傳值,而我期望除了用 API 動態的決定 Mock Server 的回傳值之外,還能匯入 Open API/Swagger,於是我把我手上收集的 Mock Server 清單玩了一遍,發現這一套 Mock Server 可以滿足我需要的
開發環境
- Windows 11
- .NET 8
- Rider 2023.3.3
安裝
官方提供了很多種執行方式,Getting Started Mocking (mock-server.com),我選用 Docker Container,未來可以使用 TestContainers 整合到測試步驟裡面
docker-compose 定義如下
services:
 mockServer:
   image: mockserver/mockserver:latest
   container_name: mockServer
   ports:
     - 1080:1080
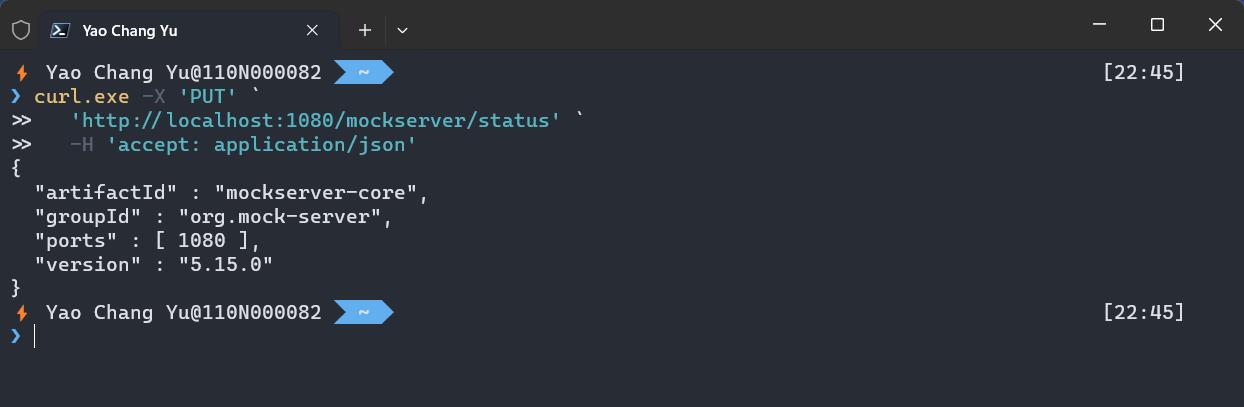
確定一下 Mock Server 是不是真的起來了
curl.exe -X 'PUT' `
 'http://localhost:1080/mockserver/status' `
 -H 'accept: application/json'
執行結果如下:
或者訪問 UI
http://localhost:1080/mockserver/dashboard
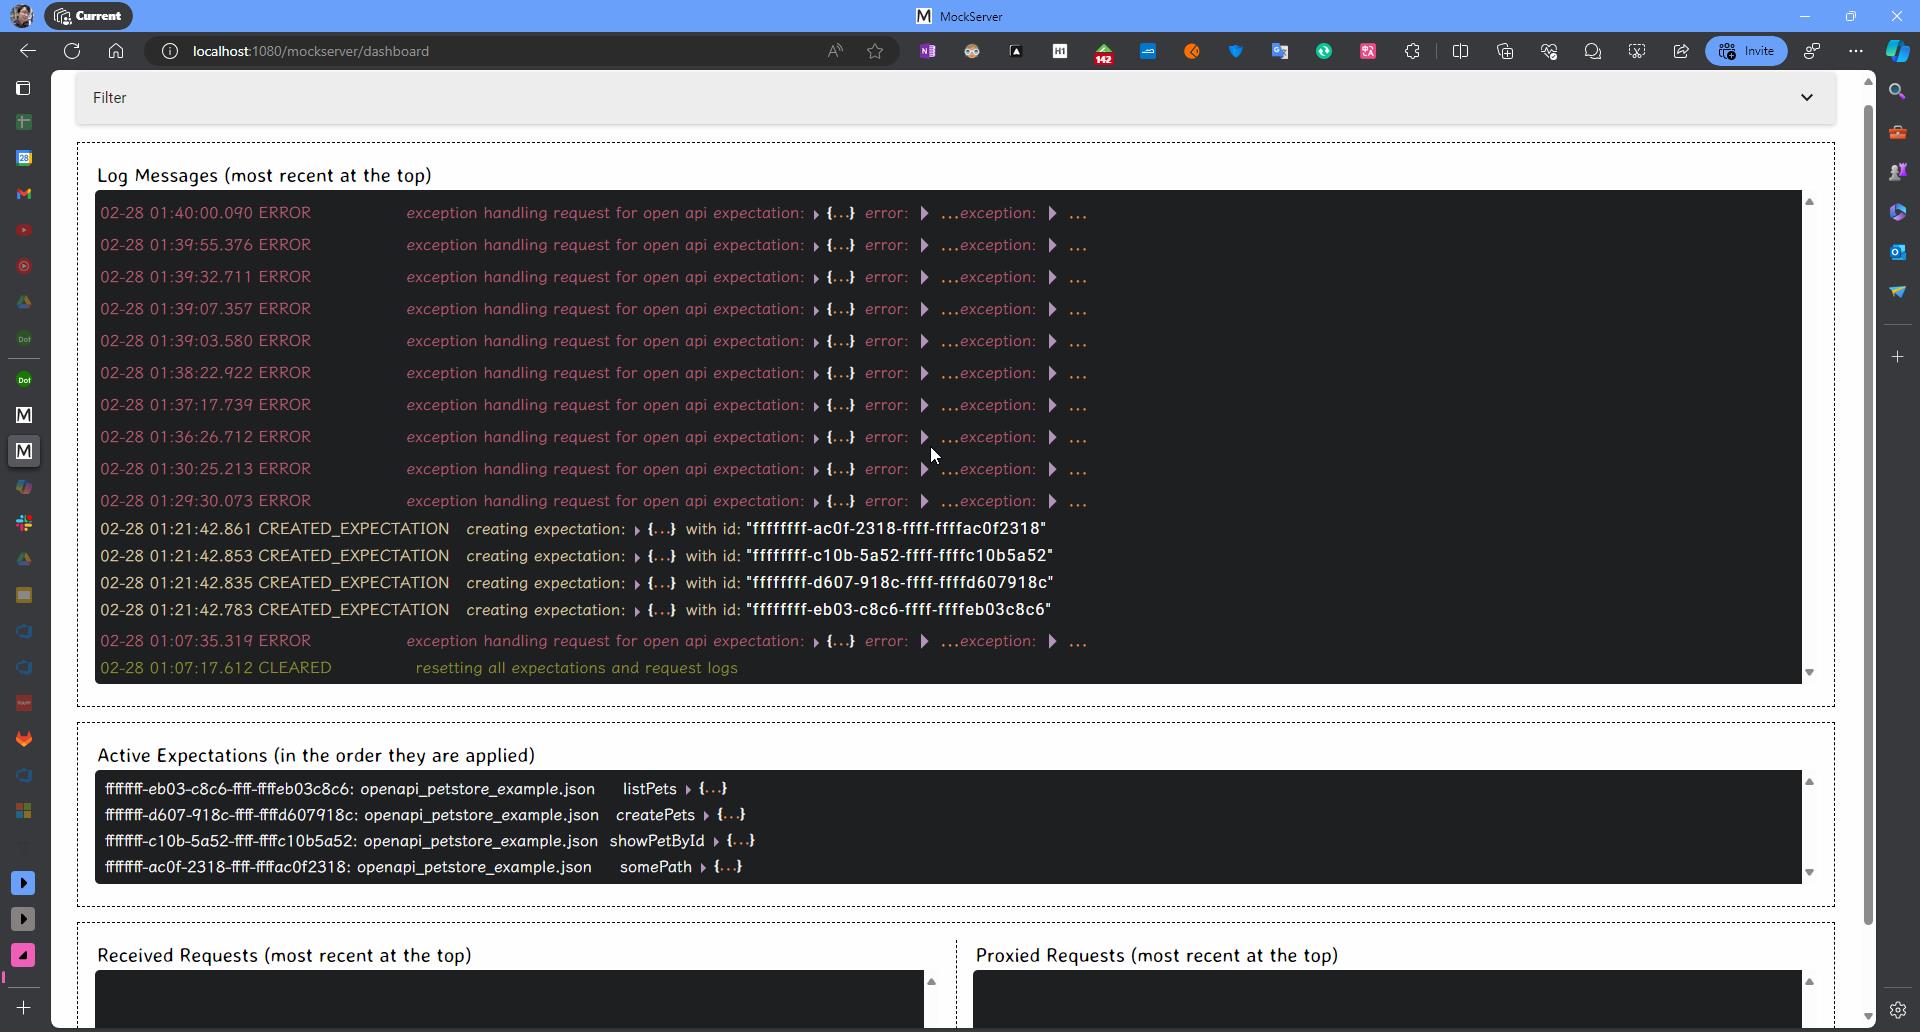
可以在這裡看到你建立了那些假端點、建立假端點時發生了甚麼錯誤,更多的細節請參考 MockServer UI (mock-server.com)
建立假端點
Mock Server 提供一系列的 API 讓我們控制
mock-server-openapi | 5.15.x | jamesdbloom | SwaggerHub
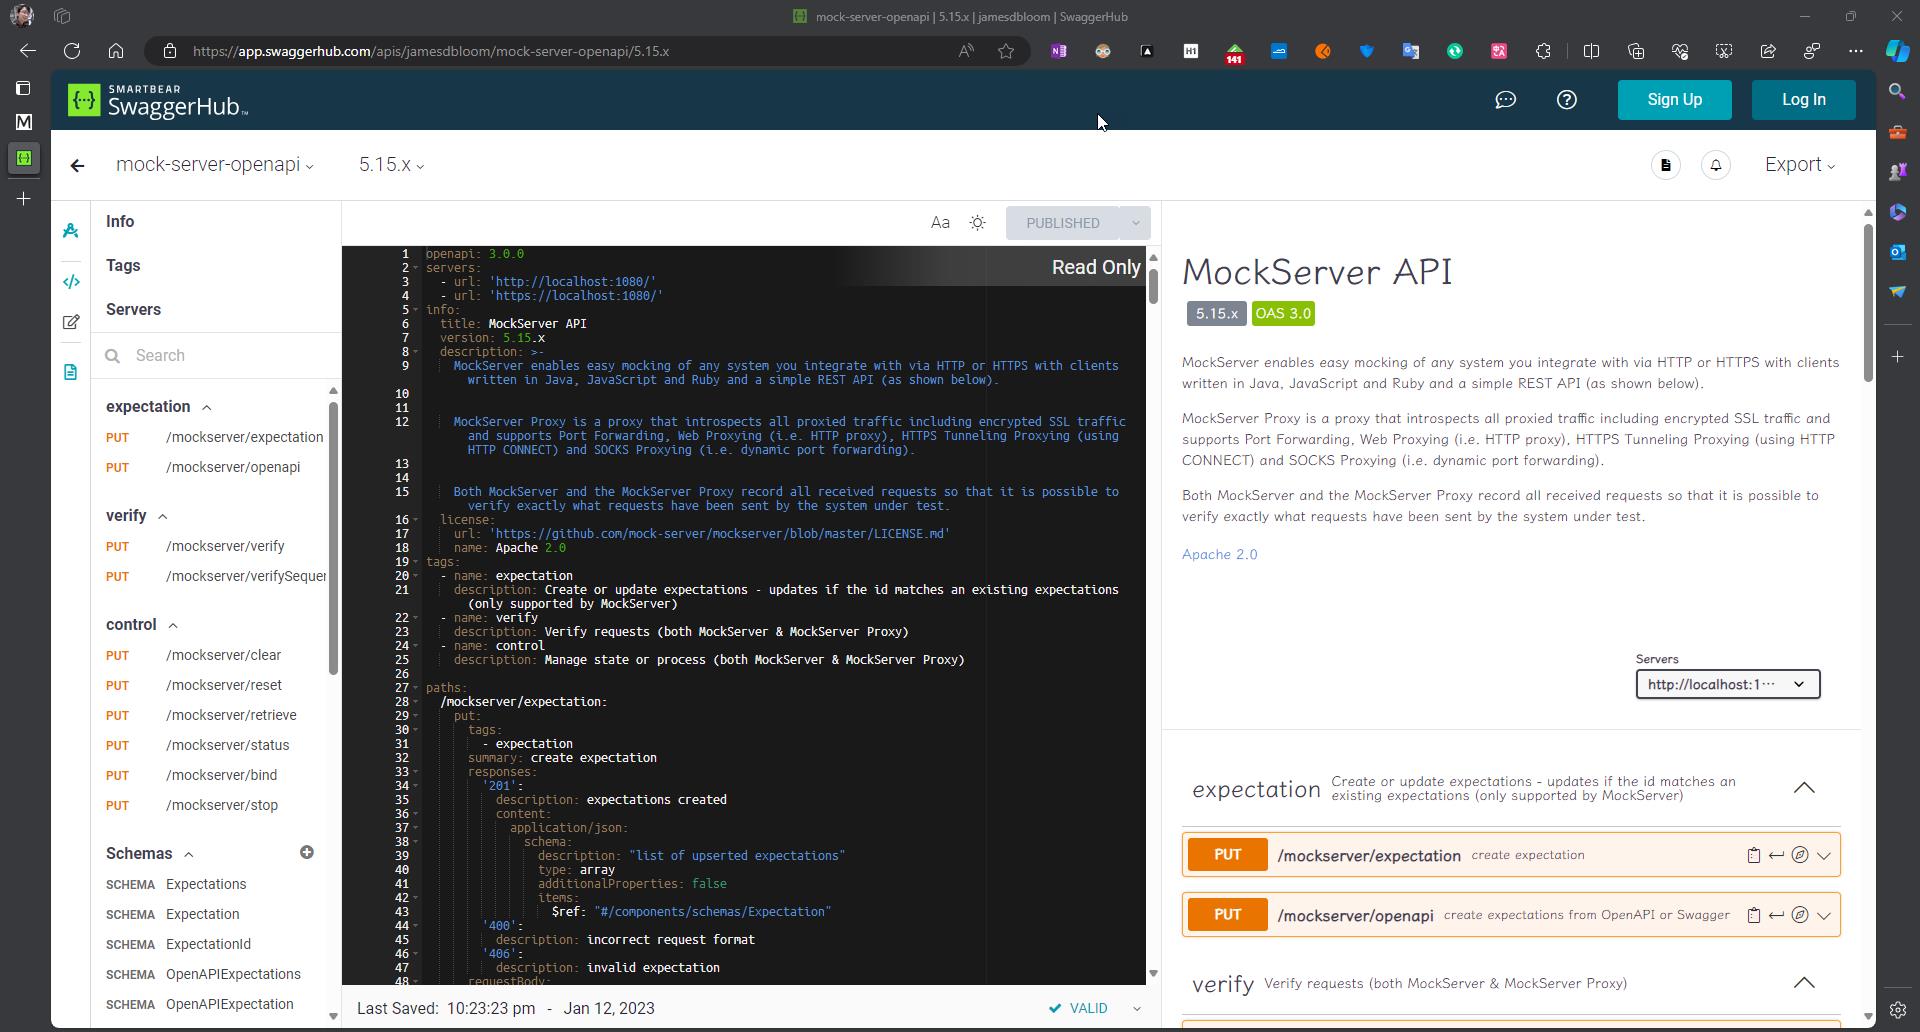
其中需要關注的應該是以下兩個功能
建立期望的假端點:/mockserver/expectation
匯入Open API:/mockserver/openapi
建立期望的假端點:/mockserver/expectation
由下面的例子就可以輕易地建立起一個 /view/cart 的端點,回傳值是 some_response_body
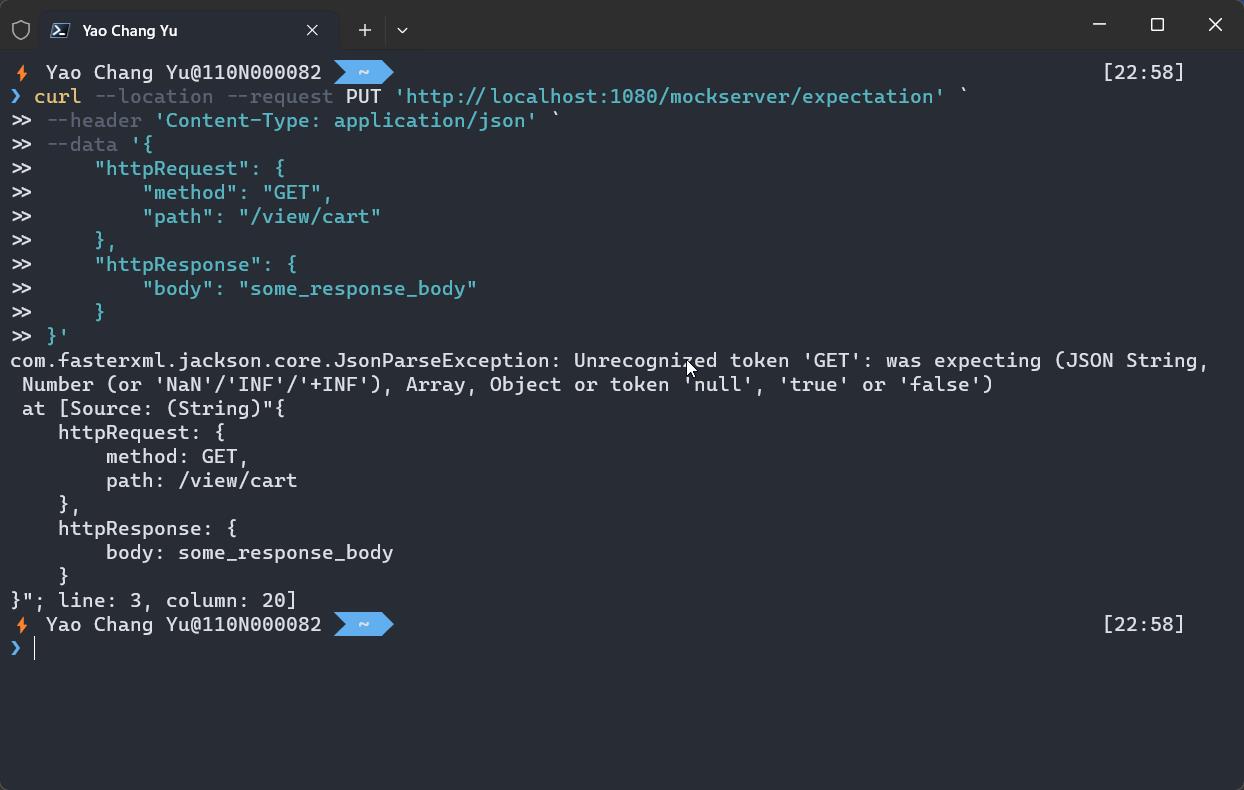
curl --location --request PUT 'http://localhost:1080/mockserver/expectation' `
--header 'Content-Type: application/json' `
--data '{
   "httpRequest": {
       "method": "GET",
       "path": "/view/cart"
   },
   "httpResponse": {
       "body": "some_response_body"
   }
}'
執行結果如下:
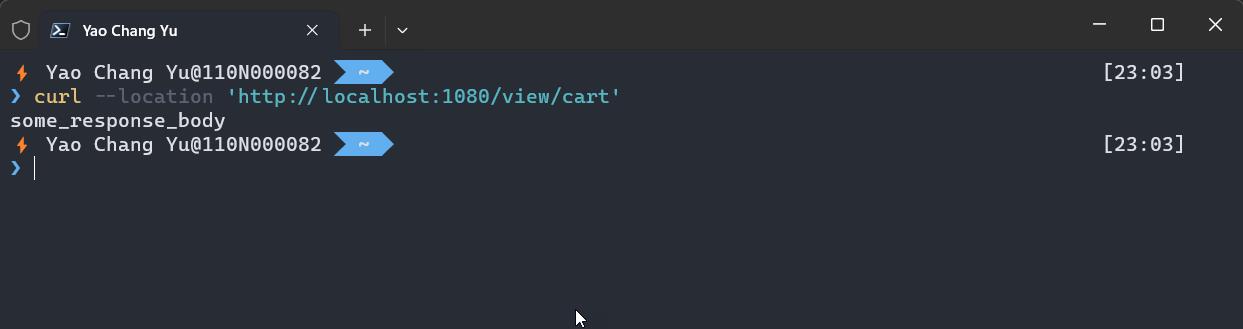
打打看
curl --location 'http://localhost:1080/view/cart'執行結果如下:
運作方式
Mock Server 的 Request Matchers (請求匹配器) 會根據你所定義的假端點配置來決定要執行甚麼工作 (Actions)
- Request Matchers:請求匹配器(request matcher)是用來判斷一個請求是否符合期望的條件。請求匹配器可以是基於請求屬性(如方法、路徑、參數等)的匹配器,也可以是基於 OpenAPI 定義的匹配器。可以使用完整比對、regex、json schema
- Actions:是指 MockServer 在匹配到一個請求後要執行的操作。可以是返回一個模擬的響應(response)、轉發請求到另一個服務器(forward)、調用一個回調函數(callback)或返回一個錯誤(error)。
更多的細節可以參考 Creating Expectations (mock-server.com)
每一個段落都有一個範例,範例預設是縮起來的,要看時要展開,在這裡 Creating Expectations (mock-server.com)
匯入Open API:/mockserver/openapi
MockServer 可以根據 OpenAPI 規範來設置期望假端端,並根據請求匹配器和動作來模擬 HTTP 或 HTTPS 的互動
OpenAPI 期望假端點設置有兩個參數:
- specUrlOrPayload:必填值,包含 OpenAPI v3 規範,可以是 JSON 或 YAML 格式,可以是以下幾種形式:
- HTTP/HTTPS URL
- 文件 URL
- classpath 位置(不包含 classpath: 方案)
- 內嵌的 JSON 物件
- 內嵌的轉義 YAML 字串
- operationsAndResponses:可選值,用於指定包含哪些操作,如果未指定,則包含所有操作。此外,可以指定多個 Response 時(例如,不同的狀態碼),使用哪個 Response。
- operationId 欄位,表示 OpenAPI 規範中的 operationId。
- statusCode 欄位,例如 "200:"、"400" 或 "default"。
範例
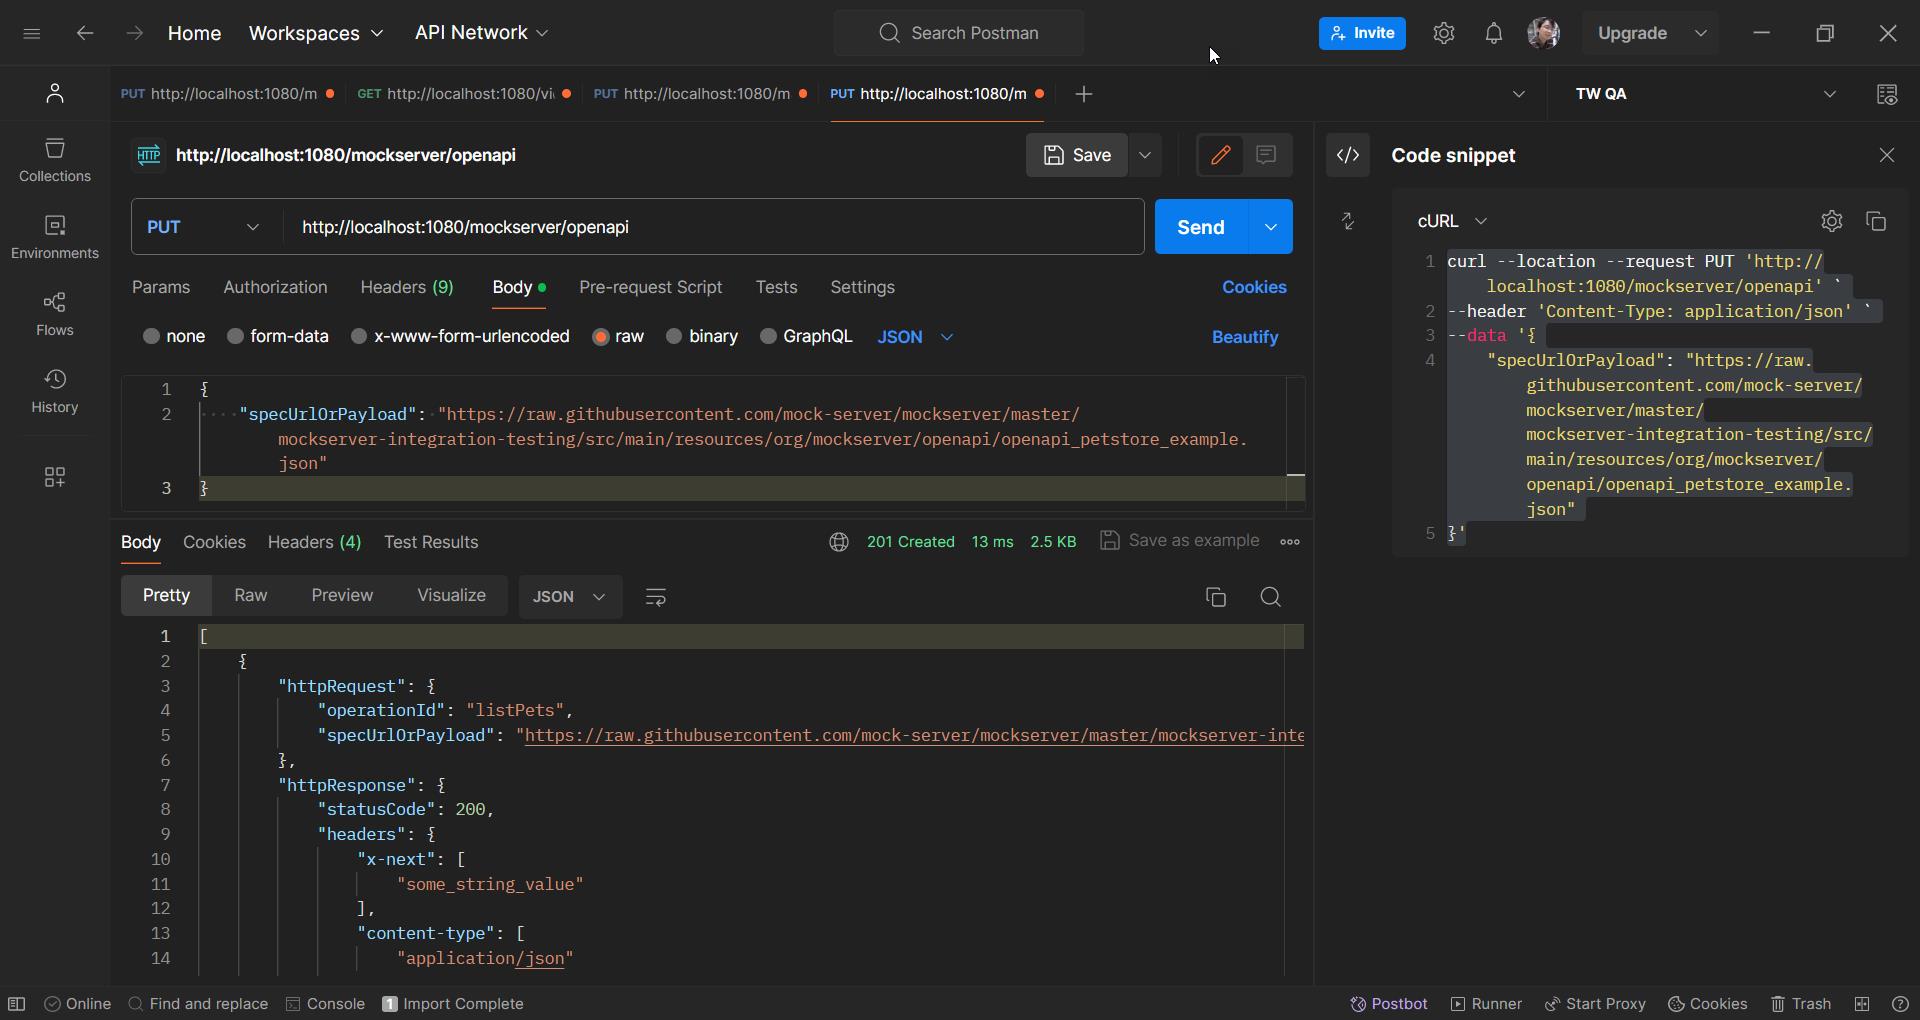
不知道為啥,我的 curl 無法正常的運行,用 postman 卻可以
curl --location --request PUT 'http://localhost:1080/mockserver/openapi' `
--header 'Content-Type: application/json' `
--data '{
    "specUrlOrPayload": "https://raw.githubusercontent.com/mock-server/mockserver/master/mockserver-integration-testing/src/main/resources/org/mockserver/openapi/openapi_petstore_example.json"
}'
執行結果如下
整合到測試步驟
知道怎麼建立假端點之後,就可以整合到測試步驟裡面了,使用方式跟剛剛的 curl 差不多,只是我換成了 HttpClient
[Fact]
public void 動態建立假端點()
{
    //建立假的端點
    var url = "mockserver/expectation";
    var body = """
               {
                 "httpRequest": {
                   "method": "GET",
                   "path": "/view/cart"
                 },
                 "httpResponse": {
                   "body": "some_response_body"
                 }
               }
               """;
    var request = new HttpRequestMessage(HttpMethod.Put, url);
    request.Content = new StringContent(body, Encoding.UTF8, "application/json");
    var response = Client.SendAsync(request).Result;
    response.StatusCode.Should().Be(HttpStatusCode.Created);

    //呼叫假的端點
    var getCartResult = Client.GetStringAsync("view/cart?cartId=055CA455-1DF7-45BB-8535-4F83E7266092").Result;
    getCartResult.Should().Be("some_response_body");
}
匯入OpenAPI/Swagger,這裡我用匯入文本的寫法
    [Fact]
    public void 匯入OpenApi()
    {
        //建立假的端點
        var url = "mockserver/openapi";

        var yaml = @"
openapi: '3.0.0'
info:
  version: 1.0.0
  title: Swagger Petstore
  license:
    name: MIT
servers:
  - url: http://petstore.swagger.io/v1
paths:
  /pets:
    get:
      summary: List all pets
      operationId: listPets
      tags:
        - pets
      parameters:
        - name: limit
          in: query
          description: How many items to return at one time (max 100)
          required: false
          schema:
            type: integer
            maximum: 100
            format: int32
      responses:
        '200':
          description: A paged array of pets
          headers:
            x-next:
              description: A link to the next page of responses
              schema:
                type: string
          content:
            application/json:
              schema:
                $ref: '#/components/schemas/Pets'
        default:
          description: unexpected error
          content:
            application/json:
              schema:
                $ref: '#/components/schemas/Error'
    post:
      summary: Create a pet
      operationId: createPets
      tags:
        - pets
      requestBody:
        content:
          application/json:
            schema:
              $ref: '#/components/schemas/Pet'
        required: true
      responses:
        '201':
          description: Null response
        default:
          description: unexpected error
          content:
            application/json:
              schema:
                $ref: '#/components/schemas/Error'
  /pets/{petId}:
    get:
      summary: Info for a specific pet
      operationId: showPetById
      tags:
        - pets
      parameters:
        - name: petId
          in: path
          required: true
          description: The id of the pet to retrieve
          schema:
            type: string
      responses:
        '200':
          description: Expected response to a valid request
          content:
            application/json:
              schema:
                $ref: '#/components/schemas/Pet'
        default:
          description: unexpected error
          content:
            application/json:
              schema:
                $ref: '#/components/schemas/Error'
components:
  schemas:
    Pet:
      type: object
      required:
        - id
        - name
      properties:
        id:
          type: integer
          format: int64
        name:
          type: string
        tag:
          type: string
    Pets:
      type: array
      maxItems: 100
      items:
        $ref: '#/components/schemas/Pet'
    Error:
      type: object
      required:
        - code
        - message
      properties:
        code:
          type: integer
          format: int32
        message:
          type: string";

        var httpFile = "https://raw.githubusercontent.com/OAI/OpenAPI-Specification/main/examples/v3.0/petstore.yaml";
        var jsonPayload = new
        {
            specUrlOrPayload = httpFile
        };

        var body = System.Text.Json.JsonSerializer.Serialize(jsonPayload);
        var request = new HttpRequestMessage(HttpMethod.Put, url);
        request.Content = new StringContent(body, Encoding.UTF8, "application/json");
        var response = Client.SendAsync(request).Result;
        response.StatusCode.Should().Be(HttpStatusCode.Created);

        //呼叫假的端點
        var getCartResult = Client.GetStringAsync("/v1/pets").Result;

        var expected = """
                       [
                         {
                           "id": 0,
                           "name": "some_string_value",
                           "tag": "some_string_value"
                         }
                       ]
                       """;
        var diff = JsonDiffPatcher.Diff(expected, getCartResult);
        Assert.Null(diff);
    }
上述的例子是用 docker-compose 建立 Mock Server,接下來改用 TestContainers,不知道怎麼用它的可以看下這篇
[Fact]
public async Task 動態建立假端點_TestContainers()
{
    //建立假的端點
    var url = "mockserver/expectation";
    var body = """
               {
                 "httpRequest": {
                   "method": "GET",
                   "path": "/view/cart"
                 },
                 "httpResponse": {
                   "body": "some_response_body"
                 }
               }
               """;

    var container = new ContainerBuilder()
        .WithImage("mockserver/mockserver")
        .WithPortBinding(1080, assignRandomHostPort: true)
        .Build();
    await container.StartAsync();
    var hostname = container.Hostname;
    var port = container.GetMappedPublicPort(1080);
    var httpClient = new HttpClient
    {
        BaseAddress = new Uri($"http://{hostname}:{port}/")
    };
    var request = new HttpRequestMessage(HttpMethod.Put, url);
    request.Content = new StringContent(body, Encoding.UTF8, "application/json");
    var response = httpClient.SendAsync(request).Result;
    response.StatusCode.Should().Be(HttpStatusCode.Created);

    //呼叫假的端點
    var getCartResult = httpClient.GetStringAsync("view/cart?cartId=055CA455-1DF7-45BB-8535-4F83E7266092").Result;
    getCartResult.Should().Be("some_response_body");
}
結論
Mock Server 除了可以很方便的整合到測試步驟之外,開發體驗、效能、穩定性我覺得都蠻好的(測試報告),所以給 QA 作為生產環境使用應該也不錯的選擇之一。
範例位置
若有謬誤,煩請告知,新手發帖請多包涵

Microsoft MVP Award 2010~2017 C# 第四季
Microsoft MVP Award 2018~2025 .NET
