Windows Phone - 實作自動上傳照片的App
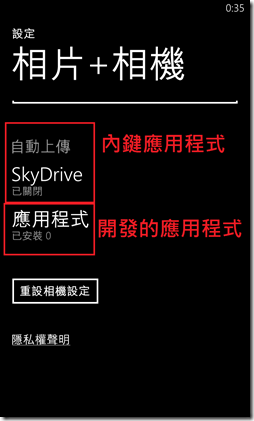
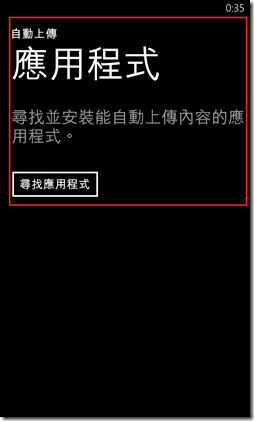
有一天我在操作WP中的「相片+相機」功能時,突然發現了以下兩張圖的功能:
才明白原來也可以自行建立可自動上傳照片的App,然後用戶就可以加以設定,將拍好的圖像自動上傳至指定空間。
關於這樣方便的功能,讓我非常想了解怎麼實作它,因此,該篇介紹如何實作一個自動上傳的App。
[注意]
1. Apps要提供自動上傳功能,需要先註冊「auto-upload extension」與提供一個「auto-upload settings page」。
‧auto-upload extension:提供App可以註冊於應用程式中;(如上圖1)
‧auto-upload settings page:提供從Settings程式進去入,可以加以管理Apps的上傳機制;(如上圖2)
2. 自動上傳機制,依賴「background agent」機制。
‧透過resource-intensive background agent,搭配ResourceIntensiveTask來指定上傳的任務;
‧Resource-Intensive(資源密集) Task是針對需要相對較長的處理時間,或是遇到需使用大量手機電源、網路等資源時較為適用的類型。
=>使用該Task將會需要相關的資訊配合,可參考<Windows Phone 7 – Background Schedule Tasks>的介紹。
3. 自動上傳機制使用的resource-intensive agents ,不受像其他background agent會過期的限制,但相對需要比較大的資源條件;
4. 需注意使用resource-intensive background agent有可能某些設備永遠不會被執行;
‧如果用戶沒有連接Wi-Fi或PC,或是無3G上網能力,那該agent將永遠不會執行;
‧resource-intensive background agent在同一時間僅能執行一個,如果太多App使用resource-intensive background agent,
那將有可能永遠不會執行到自己的Apps;
以上是說明了在實作自動上傳需要注意的幾點,這些是非常重要的考量。
了解了App需要實作的項目與觀念之後,接下來往下介紹如何實作一個自動上傳的App與準備一個提供自動上傳的網站:
〉準備具有接收App自動上傳的網站:
準備一個這樣的環境其實可以考慮與Facebook、Dropbox、Skydrive、Box等免費空間進行整合,此部分的說明則是採用自行實作一個網站,
接收來自App的自動上傳圖像。
程式碼如下:
a. 實作一個IHttpHandler,加上特定的POST參數「wpautoupload」與「filename」來取得接收到上傳的圖像與寫入實體檔案:
public class AutoUpAPI : IHttpHandler
{
#region IHttpHandler 成員
public bool IsReusable
{
get { return true; }
}
public void ProcessRequest(HttpContext context)
{
//識別有無必要的參數:wpautoupload與filename
if (context.Request.Params.AllKeys.Contains("wpautoupload") == false)
context.Response.Write("no data");
else
{
//取出檔名,建立實際要存儲存的目錄
string tFileName = System.IO.Path.GetFileName(context.Request.Params["filename"]);
string tResult = string.Empty;
try
{
//轉換成實際檔案路徑
string tSaveLocation = HttpContext.Current.Server.MapPath("Images\\box\\WP") + "\\" + tFileName;
string tData = context.Request.Params["wpautoupload"];
//寫入檔案
System.IO.File.WriteAllBytes(tSaveLocation, Convert.FromBase64String(tData));
tResult = "ok";
}
catch (Exception ex)
{
context.Response.StatusCode = 500;
tResult = ex.Message;
}
finally
{
context.Response.Write(string.Format("filename: {0}, result: {1}", tFileName, tResult));
}
}
//回傳處理結果
context.Response.Flush();
context.Response.Close();
}
#endregion
}
b. 由於是實作IHtpHandler,記得要在web.config的<httpHandlers />加上特定的處理常式「*.aup」:
<httpHandlers>
<remove verb="*" path="*.asmx"/>
<add verb="*" path="*.asmx" validate="false" type="System.Web.Script.Services.ScriptHandlerFactory, System.Web.Extensions, Version=3.5.0.0, Culture=neutral, PublicKeyToken=31BF3856AD364E35"/>
<add verb="*" path="*_AppService.axd" validate="false" type="System.Web.Script.Services.ScriptHandlerFactory, System.Web.Extensions, Version=3.5.0.0, Culture=neutral, PublicKeyToken=31BF3856AD364E35"/>
<add verb="GET,HEAD" path="ScriptResource.axd" type="System.Web.Handlers.ScriptResourceHandler, System.Web.Extensions, Version=3.5.0.0, Culture=neutral, PublicKeyToken=31BF3856AD364E35" validate="false"/>
<!-- 加上要處理AUTO UPLOAD 的處理常式 -->
<add verb="*" path="*.aup" type="YSPService.AutoUpAPI" validate="false" />
</httpHandlers>
以上準備好的Server端要處理的任務後,往下必開始App要處理的事情;
〉實作自動上傳的App步驟:
(A) 在AppManifest.xml中加上宣告註冊auto-upload extension;
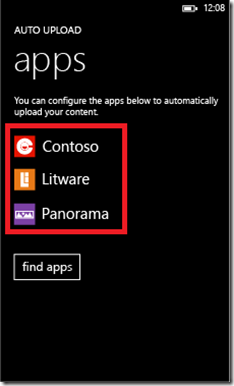
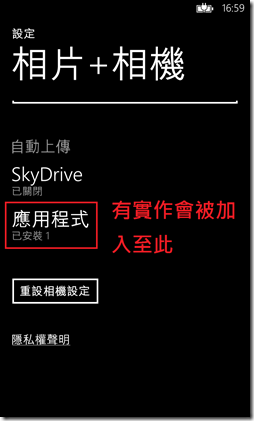
製作自動上傳的App需要先宣告,才能讓App被註冊於「設定->應用程式->相片+相機->自動上傳」的應用程式群組,如下圖:
開啟WMAppManifest.xml增加宣告於<Extension />的類型:「Photos_Auto_Upload」,撰寫於<Token />之後,如下:
<Tokens>
<PrimaryToken TokenID="AutoUPAppToken" TaskName="_default">
<TemplateFlip>
<SmallImageURI IsRelative="true" IsResource="false">Assets\Tiles\FlipCycleTileSmall.png</SmallImageURI>
<Count>0</Count>
<BackgroundImageURI IsRelative="true" IsResource="false">Assets\Tiles\FlipCycleTileMedium.png</BackgroundImageURI>
<Title>AutoUPApp</Title>
<BackContent></BackContent>
<BackBackgroundImageURI></BackBackgroundImageURI>
<BackTitle></BackTitle>
<DeviceLockImageURI></DeviceLockImageURI>
<HasLarge></HasLarge>
</TemplateFlip>
</PrimaryToken>
</Tokens>
<!-- 宣告註冊為自動上傳App的延伸應用 -->
<Extensions>
<!-- 指定延伸應用類型為 Photos_Auto_Upload -->
<Extension ExtensionName="Photos_Auto_Upload"
ConsumerID = "{5B04B775-356B-4AA0-AAF8-6491FFEA5632}"
TaskID="_default"/>
</Extensions>
ExtensionName為「Photo_Auto_Upload」,指定ComsumerID為固定的「{5B04B775-356B-4AA0-AAF8-6491FFEA5632}」。
加上宣告後,該App即可以被註冊於如上圖的自動上傳群組中。
(B) 開發支持auto-upload settings page;
auto-upload settings page是必要實作的項目,因為用戶可透過「設定->應用程式->相片+相機->自動上傳->應用程式」群組
開啟有註冊於該功能的應用程式。系統透過「deep link URI 」串聯夾帶特定的參數來開啟應用程式。
「deep link URI」可參考<Windows Phone 8 - App2App Communication - File associations>的說明;
因此,需要在應用程式裡實作一個畫面來負責承接開啟後的畫面與任務。
在deep link URI裡,固定會夾帶一個參數「ConfigurePhotosUploadSettings」,因此,實作一個UriMapperBase類別來加以識別,
從中切換至對應的設定畫面。程式碼如下:
public class CustomUriMapper : UriMapperBase
{
public override Uri MapUri(Uri uri)
{
// 取得進入該App的incoming URI
string tempUri = uri.ToString();
// 搜尋進入的URI是否具有關鍵字:ConfigurePhotosUploadSettings
// 代表是由「設定->應用程式->相片+相機->自動上傳->應用程式」進入
if (tempUri.Contains("ConfigurePhotosUploadSettings"))
{
// 執行auto-upload settings page.
return new Uri("/AutoUploadSettingsPage.xaml", UriKind.Relative);
}
// 非指定的URI則直接回傳URI物件即可
return uri;
}
}
實作識別URI類別,如果有ConfigurePhotosUploadSettings關鍵字則修改URI往AutoUploadSettingsPage.xaml。
接下來需要修改App.xaml.cs.InitializePhoneApplication()中處理root frame要載入那一個Page的邏輯,讓它可以搭配定義好的UriMapperBase
加入我們的邏輯,如下:
// Do not add any additional code to this method
private void InitializePhoneApplication()
{
if (phoneApplicationInitialized)
return;
// Create the frame but don't set it as RootVisual yet; this allows the splash
// screen to remain active until the application is ready to render.
RootFrame = new PhoneApplicationFrame();
RootFrame.Navigated += CompleteInitializePhoneApplication;
// Handle navigation failures
RootFrame.NavigationFailed += RootFrame_NavigationFailed;
// Handle reset requests for clearing the backstack
RootFrame.Navigated += CheckForResetNavigation;
// 加上自定義的UriMapper處理機制
RootFrame.UriMapper = new CustomUriMapper();
// Ensure we don't initialize again
phoneApplicationInitialized = true;
}
做好了必要的設定與註冊後,我們針對要導向設定的畫面加入一個ToggleSwitch來開啟與關閉ResourceIntensiveTask,如下:
<Grid x:Name="LayoutRoot" Background="Transparent">
<Grid.RowDefinitions>
<RowDefinition Height="Auto"/>
<RowDefinition Height="*"/>
</Grid.RowDefinitions>
<!--TitlePanel contains the name of the application and page title-->
<StackPanel Grid.Row="0" Margin="12,17,0,28">
<TextBlock Text="AutoUPApp" Style="{StaticResource PhoneTextNormalStyle}"/>
<TextBlock Text="自動上傳設定" Margin="9,-7,0,0" Style="{StaticResource PhoneTextTitle1Style}"/>
</StackPanel>
<!--ContentPanel - place additional content here-->
<Grid x:Name="ContentPanel" Grid.Row="1" Margin="12,0,12,0">
<Grid.RowDefinitions>
<RowDefinition Height="Auto" />
</Grid.RowDefinitions>
<StackPanel Grid.Row="0">
<TextBlock Text="開啟背景服務" FontSize="24" />
<toolkit:ToggleSwitch Name="tgsBgEnable"
IsChecked="false"
/>
</StackPanel>
</Grid>
</Grid>
加上開啟背景服務的處理邏輯:
IsolatedStorageSettings gSetting = IsolatedStorageSettings.ApplicationSettings;
const string RIntensive = "Resource-Intensive";
protected override void OnNavigatedFrom(NavigationEventArgs e)
{
base.OnNavigatedFrom(e);
//離開前先儲存設定好的參數
if (gSetting.Contains("isBgEnable") == true)
gSetting["isBgEnable"] = tgsBgEnable.IsChecked;
else
gSetting.Add("isBgEnable", tgsBgEnable.IsChecked);
//註冊是否需要建立
//移掉ResourceIntensiveTask
ScheduledAction tAction = ScheduledActionService.Find(RIntensive);
if (tAction != null)
ScheduledActionService.Remove(RIntensive);
if (tgsBgEnable.IsChecked == true)
{
//加入ResourceIntensiveTask
ResourceIntensiveTask tTask = new ResourceIntensiveTask(RIntensive);
tTask.Description = "BgScheduledAction for auto upload image to server";
ScheduledActionService.Add(tTask);
ScheduledActionService.LaunchForTest(RIntensive, TimeSpan.FromSeconds(10));
}
}
藉由在離開畫面的事件NavigatedFrom加上控制ResourceIntensiveTask的開啟/關閉。
(C) 建立resource-intensive background agent:
實作一個App支援自動上傳的應用,需要二大元素:
(1) 前景App來呈現設定畫面與其他畫面(如上(B)步驟);
(2) Background Agent來負責完成上傳的任務;
而這個Background Agent需要為resource-intensive agent,代表需要註冊Microsoft.Phone.Scheduler.ResourceIntensiveTask來使用。
一個resource-intensive agent如果被執行可以維持10分鐘。它需的資源條件如下:
需注意建立一個resource-intensive agent來負責自動上傳時,不需要去指定該Task的過期時間,這可以確保該Task不受14天過期的限制。
了解ResourceIntensiveTask之後,我們建立一個Background Agent的專案,並且為App加上註冊Background Agent的宣告如下:
<Tasks>
<DefaultTask Name="_default" NavigationPage="MainPage.xaml" />
<!-- 加上註冊 background agent -->
<ExtendedTask Name="BackgroundTask">
<BackgroundServiceAgent
Specifier="ScheduledTaskAgent"
Name="APUPScheduledTaskAgent"
Source="APUPScheduledTaskAgent"
Type="APUPScheduledTaskAgent.ScheduledAgent" />
</ExtendedTask>
</Tasks>
實作自動上傳圖像的邏輯,以下的程式碼是以擷取與今天差距三天的圖像自動上傳至Server端,如下:
c-1. 宣告必要的參數來保存上傳檔案的邏輯:
#region 必要參數
//伺服器位置
private string gUri = "http://192.168.1.185/YSPService/autolopad.aup";
//等待要上傳的圖像
private List<Picture> gWaitUpImgs = null;
//識別目前是否正在處理上傳
private bool gIsUploading = false;
//識別目前上傳至第幾個檔案
private int gCountIdx = 0;
//儲存目前每一個檔案的上傳結果
private List<string> gProcessResult = null;
#endregion
c-2. 實作必要的擷取前三天的圖像,並且啟動上傳的任務:
protected override void OnInvoke(ScheduledTask task)
{
try
{
MediaLibrary tLibrary = new MediaLibrary();
//掃瞄需要上傳的圖像:擷取三天內的圖像
var tImgs = from Images in tLibrary.Pictures
where DateTime.Now.Subtract(Images.Date).Days < 3
select Images;
//保存至公用變數加以處理
gWaitUpImgs = tImgs.ToList();
//開始上傳檔案
ProcessAutoUpload();
}
catch (Exception)
{
throw;
}
}
c-3. 寫成一個while的迴圈搭配檢查目前是否正在上傳而等待,以免上傳元件衝突;
/// <summary>
/// 建立HttpWebRequest來處理每一個檔案的上傳。
/// </summary>
private void ProcessAutoUpload()
{
//取得要上傳的數量
gCountIdx = gWaitUpImgs.Count();
//透過while的loop來控件一次只有一個檔案上傳
while (gCountIdx > 0)
{
//識別目前是否正在上傳檔案中...
if (gIsUploading == false)
{
//由於每次均是一個新的上傳,所以重新建立
HttpWebRequest tRequest = HttpWebRequest.CreateHttp(gUri);
tRequest.ContentType = "application/x-www-form-urlencoded; charset=utf-8";
tRequest.Method = "POST";
tRequest.BeginGetRequestStream(new AsyncCallback(RequestStreamCallback), tRequest);
//上傳啟動時要先扣一個並標記為正在上傳中
gCountIdx -= 1;
gIsUploading = true;
}
}
//將結果寫入成檔案
using (IsolatedStorageFile tStorage = IsolatedStorageFile.GetUserStoreForApplication())
{
string tResult = "Result.txt";
using (IsolatedStorageFileStream tStream =
new IsolatedStorageFileStream(tResult, System.IO.FileMode.Create, tStorage))
{
string tData = string.Join("\r\n", gProcessResult.ToArray());
byte[] tByte = Encoding.UTF8.GetBytes(tData);
tStream.Write(tByte, 0, tByte.Length);
}
}
NotifyComplete();
}
c-4. 實作POST的邏輯,將要上傳的檔案與名稱組合成一個POST DATA進行上傳;
/// <summary>
/// 處理RequestStream的事件
/// </summary>
/// <param name="asynchronousResult"></param>
protected virtual void RequestStreamCallback(IAsyncResult asynchronousResult)
{
try
{
HttpWebRequest request = (HttpWebRequest)asynchronousResult.AsyncState;
Stream postStream = request.EndGetRequestStream(asynchronousResult);
Picture tPicture = gWaitUpImgs[gCountIdx];
//轉換成Base64字串與準備要上傳的的項目
byte[] tBytes = new byte[tPicture.GetImage().Length];
tPicture.GetImage().Read(tBytes, 0, (int)tPicture.GetImage().Length);
string tBase64 = Convert.ToBase64String(tBytes);
string tFileName = tPicture.Name;
//準備要Post的資料
string tParams = string.Format("wpautoupload={0}&filename={1}",
HttpUtility.UrlEncode(tBase64),
tFileName);
byte[] tPost = Encoding.UTF8.GetBytes(tParams);
postStream.Write(tPost, 0, tPost.Length);
postStream.Close();
request.BeginGetResponse(new AsyncCallback(ResponseCallback), request);
}
catch (Exception ex)
{
gIsUploading = false;
throw;
}
}
/// <summary>
/// 處理Response的事件
/// </summary>
/// <param name="asynchronousResult"></param>
protected virtual void ResponseCallback(IAsyncResult asynchronousResult)
{
string srcString = string.Empty;
try
{
HttpWebRequest tRequest = (HttpWebRequest)asynchronousResult.AsyncState;
HttpWebResponse tResponse = (HttpWebResponse)tRequest.EndGetResponse(asynchronousResult);
if (tResponse.StatusCode == HttpStatusCode.OK)
{
using (StreamReader tResponseStream = new StreamReader(tResponse.GetResponseStream()))
{
//將處理結果儲存起來
srcString = tResponseStream.ReadToEnd();
if (gProcessResult == null)
gProcessResult = new List<string>();
gProcessResult.Add(srcString);
}
}
}
catch (Exception ex)
{
throw;
}
finally
{
gIsUploading = false;
}
}
(D) 為auto-upload apps加上加密的功能。
這是部分為補充的內容,主要是介紹如何操作「ProtectedData」類別來保護用戶所輸入的機密資料。
詳細可參考<How to encrypt data in a Windows Phone app>。本篇使用的是自行建立的Server端所以就暫時先不討論。
[範例畫面]
[範例程式]
======
以上是介紹如何實作自動上傳照片的App,對於這樣的App應用不知道大家是否會有些邪惡的念頭呢!?
因為透過自動上傳即可以上傳至App指定的地區,如果在設計App時提供讓它可以與Facebook或其他社群
軟體作整合時,那在上傳時我一樣可以備份一張張圖片在我的電腦,然後再轉到社群網站就好啦!
所以了解一下這樣的運作功能,其實還是可以做很多事情了,希望對大家有所幫助,謝謝。
References:
‧Auto-upload apps for Windows Phone 8
‧Advanced photo capture for Windows Phone 8
‧Camera and photos for Windows Phone
‧How to encrypt data in a Windows Phone app
‧Background agents for Windows Phone
‧How to modify the app manifest file for Windows Phone
‧How to create a settings page for Windows Phone
